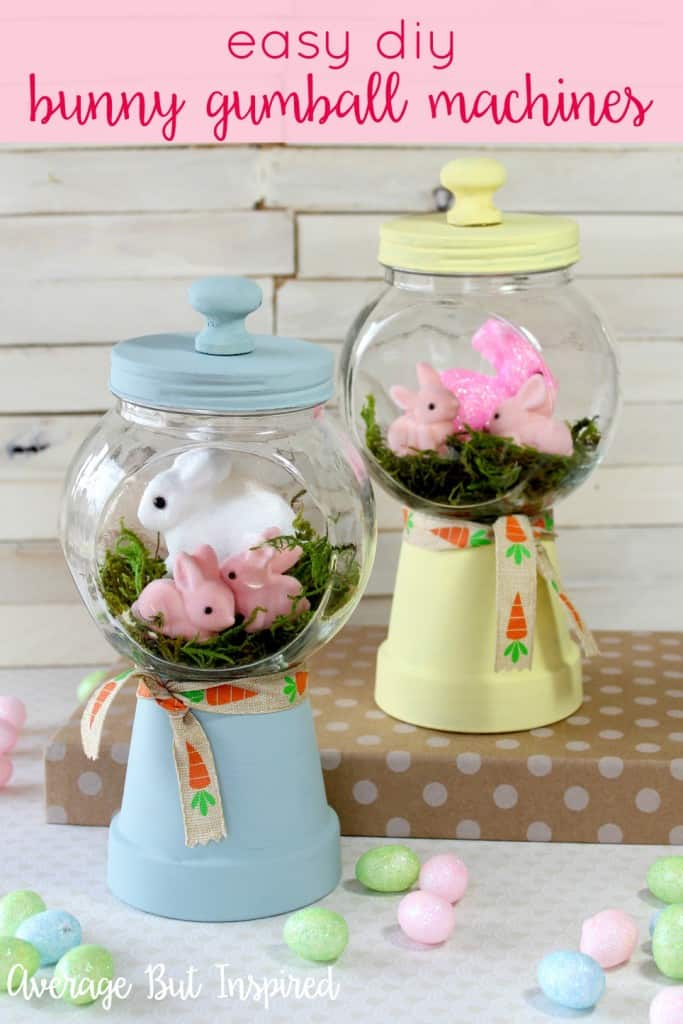
This DIY flower pot gumball machine craft is the perfect Easter decor or spring decoration to make!
Last Christmas I saw photos of tiny toy trucks and mini Christmas trees in old gumball machines. They were absolutely adorable and it was an idea that I loved! I have been hunting for the perfect gumball machine since then, but haven’t stumbled upon the right one just yet.
But that’s okay because for my Easter decor I made my own flower pot gumball machines with the cutest little bunnies! They’re so fun to make and just as cute as real gumball machines!
I mean, come on! These are cute, right?
Supplies for Spring Bunny Gumball Machine
Some of these links are affiliate links. Please read my disclosure policy for more information.
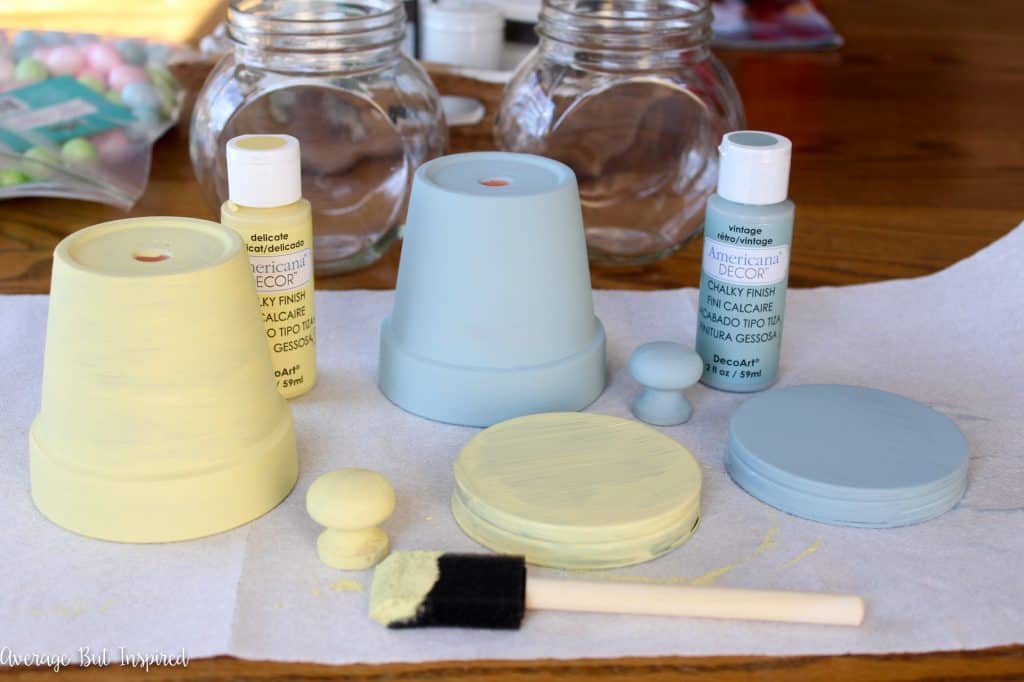
- Small terracotta pots
- Small candy jars with lids
- Small wood finials or drawer knobs
- Strong, multi-purpose glue
- Craft paint (the type of paint I used is no longer available. Substitute with a matte finish acrylic paint for the same look – this yellow craft paint and this light blue craft paint will be great)
- Foam brush
- Foam bunnies (I bought mine at Michaels but they don’t have them online. Linked bunnies are similar. Pull them off the floral pick stick for this project.)
- Floral moss
- Hot glue and glue gun
- Decorative spring ribbon
Instructions for Making a Flower Pot Gumball Machine
Begin by painting the flower pot, candy jar lid, and wooden knob with craft paint of your choice. A multi-surface craft paint will work best since you’re covering different types of surfaces.
Next, place floral moss into the bottom of the candy jar.
Here’s another adorable DIY spring flower pot craft you can make!

Put hot glue onto the bottom of the foam bunnies and press them into the floral moss that’s in the bottom of the candy jar.
Screw the lid on the candy jar, and glue the finial or knob to the top.
Flip the dry, painted flower pot over and cover the bottom with glue. I used a strong multi-surface glue, which is my favorite for adhering all kinds of things – even glass and terra cotta!
Press the candy jar onto the glue and let it sit, untouched, for the time indicated on the glue packaging. This will make sure that the glass and terra cotta properly bond to one another.
Add some decorative ribbon where the two meet for a cute, final touch!
I just love this little DIY spring decor project!
I kept one for myself and am bringing the other to my elderly neighbor this week. She will probably be like “what is this?!?” but hopefully it will bring her some Easter cheer, nonetheless!
What do you think about my spin on the gumball machine decor idea?
Will you be making a flower pot gumball machine for yourself this spring or Easter?
Maisie says
I am looking to do a workshop with youth for these. How long do you think I should set the workshop for?
Josie says
Love this Thank you for sharing instructions.
Bre says
Josie, thanks for stopping by!! 🙂
Dearlives says
Such a sweet diy project. Love the bunnies. Can’t wait to try this one.
Bre says
Thanks!!
Jane says
This such a darling little project. I’m out in the forest a ways from town so I’m going to improvise a little. I save everything lol. so I will use left over pastel spray paint ( I like shiny) and things I already have. At almost 70 yrs old I have tons of stuff. Can’t wait to get on this one! Thanks for a new Idea for an old lady!
Bre says
Jane you made my day with your sweet note! I hope your project turned out great (if you made it already). I love “making it your own” with what you have!!! Happy Easter!
Zen says
PS May i feature it on my round-up post of best Easter DIYs please? 🙂
Bre says
Yes! Of course you may. Thank you for asking!
Zen|| Fashion & Interiors DIY blogger says
This is so cute! 🙂 Iw ish it could dispense the bunnies though, hahah 🙂
Bre says
Hahahaha now THAT would be a project! 🙂 have a great day!
Lori says
For those who cant find the cute jars that she used. I used the glass bubble bowls from the dollar store. And for the Top I used the tray from the terra cotta pot and a. Wooden drawer handle. Still very cute! Have fun
Bre says
YES! That is a great solution! That was my original plan for this project until I found those candy jars. Thanks for sharing your solution!
Janice sneddon says
I am sort of confused I love the colors you used one place looks like you used jars of paint then in a pic see what looks like those small. Titles of craft paint can you clarify and give colors usef
Bre says
Hello – I used the colors that I link to in the supply list. I had smaller 2 oz. containers on hand, which you see in the photos, and which I purchased through a sample pack that is no longer available. That’s why I linked to the larger sizes of the paint. Thanks!
Sarah says
Oh, never mind! Disregard my first comment, I looked at your photos again and realized there is no access through the side of the jar. They’re so clean and from the angle of photos you took, it looked open to me! Lol
Bre says
Hi, Sarah! Aah sorry! I wish I knew of a place that sold jars like that! Anyway, because these jars have a wider brim than most, hopefully that will help the seniors a bit. Otherwise maybe some long tweezers that they could use to gently put the items in the jar? Well good luck! I hope they enjoy the project! Have a great day!
Linda Griffin says
Amazon sells the jars. Craft and party mini Favor jars with lids. 12 pm for $10.99
Bre says
Whoa – that’s a bargain! Thanks, Linda!
Sarah says
This is a super cute craft!
But I wonder where you got the jars..? The link you provided for it on the supply list shows an item that does not have the cut-out on the side of the jar, like the ones you worked with. I’m planning a craft for seniors at a retirement home and it would be much easier for them with access through the side of the jar, like what you have made. Can you please tell me where you got your jars?
Diane Schiffer says
Love this cute idea! I will be making this for sure! Thanks so much for this sweet idea. Diane, Nana to 3 beautiful grandchildren.
Bre says
Hi, Diane! I’m so glad you like it! Have fun making one of your own! 🙂
Kim~madeinaday says
This is such a sweet idea, love the adorable bunnies inside. Stopping by to let you know you are being featured on Friday’s P3 Party post! Have a great week! Thanks for pinning!
Best,
Kim
marissa | rae gun ramblings says
Oh this is so darling. My decorations kind of fall off at Valentines day I should really force myself to make these to start an Easter collection!