Six short weeks ago I set out to give my boring beige and neglected master bathroom a makeover as part of the One Room Challenge hosted by Calling It Home. It’s hard to believe that the day is finally here where I get to show you how all of my hard work came together! ![]()
Before we jump into all of the “good stuff,” let’s take a quick stroll down memory lane and rehash how we got from a master bathroom that was practically falling apart to a light and bright space that my husband and I actually enjoy using now!
Week One: I shared the ugly truth about the most forgotten room in my house and showed you my plans for making it better.
Week Two: I scraped the peeling ceiling and gave it a fresh coat of paint.
Week Three: I took my dark and fussy vanity to bright and beautiful with special vanity paint and installed new light fixtures.
Week Four: I primed and painted the beige walls and dark trim and instantly updated the room.
Week Five: I hung new wall art, bought too many rugs, and filled you in on some shortcuts I was taking in the room.
No wonder I have dark circles under my eyes; that was a lot to cram into six weeks!
OK, I know you’re thinking “enough with the chit chat – show me the pictures.” So here we go!
The BEFORE Photos (Proceed with Caution)
Of course, no good makeover post would be complete without some BEFORE photos, so I have to show you those first . . . just in case you forgot how truly awful my master bathroom was at the beginning of this challenge. Dark trim, ugly vanity, dated light fixtures, too much beige . . . the list goes on and on.
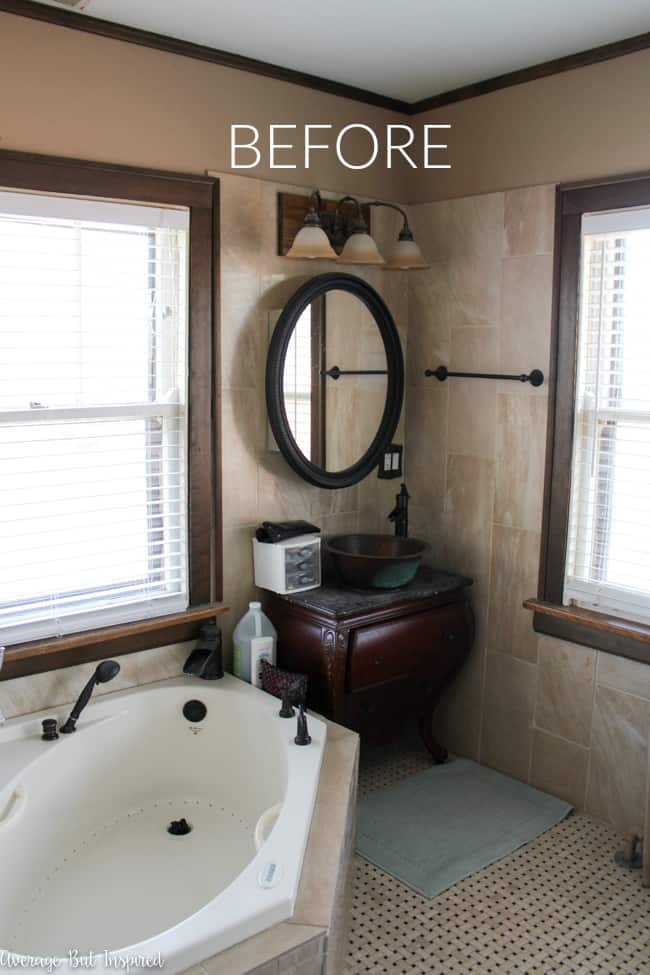

If you enjoy being tortured, you can see more of this train wreck in Week One’s post.
The AFTER Photos (Hooray!)
This post contains affiliate links. To read my full disclosure policy, please click here. Also, thank you to DecoArt and Sherwin-Williams for providing product used in this bathroom makeover.
Oh my gosh! I can’t wait to hear what you think about this! I really worked so hard on this bathroom and I feel like the changes I made with paint, fabric, and textiles have made such a shocking difference.
Painting the vanity made a huge impact and is one of my favorite parts of this bathroom.
I really dislike this vanity and sink area (it’s too ornate for my style, it’s too small, and the huge vessel sink leaves us with no counter space whatsoever), but the gorgeous new color and hardware makes it much more tolerable!
A new vanity light fixture, new hand towels with pretty tassels and detailing, DIY cornice boards over the windows, and the bright white window trim and wall paint (that resists mildew, I might add!), also made this vanity area look so much nicer.
Rug | Vanity Paint | Hand Towels | Cornice Board Fabric | Wall Color | Trim Color
I’m proud to say that I made the cornice boards that are hanging here all by myself! Cut the wood, drilled the holes, screwed them together, and attached all the fabric all by my little old self! I followed this awesome tutorial for the construction of these guys and that part could not have gone easier. The hanging, however, was a huge pain in the you-know-what because we had to drill through tile and it took forever to get through it. My poor husband stood up there drilling for what seemed like an eternity! I promptly went and bought him three six-packs of beer to thank him for his help. 🙂
I even shined up the copper sink with a homemade mix of lemon juice and salt. It was crazy to watch it shine in no time!
This blue and gold rug is one of my favorite purchases for the bathroom. It is super soft (perfect for stepping out of the shower!), and I love that it’s not a traditional bath mat. After bringing home seven rugs to try in the space, I am happy I found the perfect one for in here!
The opposite side of the bathroom got a bold new look, too!
Ceiling Fixture | Main Ceiling Fixture (pictured below) | Hanging Baskets | Wall Art | Shower Curtain
At the very last minute (less than 12 hours before I planned to photograph this space and call it quits), I decided to build some over the toilet storage. With some 1×2 lumber, stain, and pretty hanging baskets, I put this ladder storage unit together in less than an hour. I’m glad I did it – my toilet is a top flush so you can’t really put things on top of it. Problem solved!
I share this bathroom with a man, so some nicely fragranced spray is a must. 🙂
And can I just tell you how much I love having this giant painting covering the illegal utility panel now? With flecks of metallic gold in it, it’s absolutely beautiful!
The tub area got some attention, too. With fresh new towels and some pretty accessories, it actually seems like a nice spot to soak and relax. (Too bad I’m not a bath girl.)
Faux Fern | White Gardenia Soap | Soap Dish
Obviously my master bathroom is far from perfect. All of its flaws – like the terrible tile work, giant windows in a space where you’d like some privacy, and lack of counter space – remain. BUT it makes me so happy that it is now clean and bright and prettier than it ever has been!
This One Room Challenge was definitely a challenge, but it was so worth it to me! I couldn’t be happier to have an updated master bathroom that doesn’t make me cringe when I walk into it anymore. I also couldn’t be happier to be done with it. It’s time for a break! I’m going to put up my feet, watch some Real Housewives, and visit lots of the other One Room Challenge participants’ posts to see their final reveals, too!
Thank you so much for taking time out of your day to see how this project turned out. I hope you feel inspired to freshen up a space in your own home! Isn’t it amazing how much impact paint, fabric, and some new accessories can have? If you enjoyed seeing my work, would you be so kind as to pin this post to share the love?
Shop the Room
Click any of these images to learn more about the products I used in my master bathroom makeover!
Thank you to these sponsors for providing product for my Master Bathroom Makeover!

YOU MIGHT ALSO LIKE TO SEE THESE ONE ROOM CHALLENGE POSTS
Emily says
I know this is a dated post, but I was wondering what color stain you used on the storage ladder. Thank you.
Bre says
Hello! It’s called Briarsmoke, and it’s made by Varathane!
Saif Syman says
That was a fantastic idea to use the copper sink with a homemade lemon mix and salt. Awesome, the panels were looking really smart!!!
Bre says
Thanks so much!
Dina says
Beautiful job! Can I ask what kind of dog that is??? I want one!
Bre says
Thank you, Dina!! My dog is a labradoodle and he’s fantastic!! That breed doesn’t shed and they’re such great family dogs. I already want another! LOL!
Jan says
Love all three of the dogs pictured, especially the brown one. Had to chuckle. What a change in your master bathroom. Great job.
Bre says
Ha! Thanks, Jan!! The bathroom is far from perfect, but it’s a definite improvement. Thanks so much for taking the time to stop by and check it out!
Carol says
Where did you find the baskets for over the toilet?
Bre says
Hi, Carol – the exact baskets I used are linked in the post where I talk about the over the toilet storage. Thanks!
Tiffany W says
Can you give dimensions and stain colour for the over the toilet storage? Looks awesome!
Jenny says
It looks amazing, Bre! What a difference! The paint on the vanity and trim really brightened up the room, and I just love the rug you chose. Beautiful job!
Bre says
Thank you so much, Jenny!!
Dev says
You’ve done a really good job. I especially like the painting; not many people would think of adding a painting to a bathroom.
Bre says
Thank you so much, Dev! 🙂
Nicole Q-Schmitz says
It actually does look so much lighter and brighter, and that last minute toilet ladder was such a smart addition (I hate how dual flush buttons are on the top too!). I just realized that we got almost the same vanity light, I must have copied you haha 🙂
Bre says
Thank you, Nicole! And hey no great minds think alike on the lights! 🙂
Nicole @ The Inspired Hive says
It looks so good!! I’m always amazed by what a difference just painting trim makes! And I love your last minute toilet storage! Good work!
Bre says
Thank you, Nicole! I am so happy to have it finished!!
Shonee says
Bre I love the fresh look. I love that you took the time to find the perfect rug. That makes all the difference. Cute doggy too!
-Shonee
Bre says
THANK you, Shonee!! xo
Amy | Canary Street says
It looks amazing, Bre! It’s really inspiring to see how much you were able to improve the space without doing a total gut job.
Bre says
Thanks, Amy!! I am SO happy it’s finished!
Julie says
It turned out great, Bre! I really do love that blue vanity now, and the hardware is so pretty. Your sink looks fabulous! Great job on this room!
Bre says
Thank you, Julie! The vanity is much better with its new color! So happy to have a fresh space and to be finished working in there! 🙂
Angela @ Angela Marie Made says
Just beautiful! I love the blue painted painted vanity, it looks amazing!
Bre says
Thanks so much, Angela! I appreciate it!
Becky @ Daly Digs says
Fantastic job, Bre! You really brightened up the space for sure! It looks so welcoming. Love the doggie too 🙂 Congrats on the ORC!
Bre says
Thanks so much, Becky! It is so nice to have a cleaner and brighter bathroom, that’s for sure! And Jasper (my puppy) says thanks. 😉
Roxanne Kwiecinski says
Beautiful job Bre! I LOVE that vanity and you know I love that farmhouse ladder!
Bre says
Thanks, Roxanne! I am also loving the ladder! So glad the last minute decision worked out on that one! 🙂
Erin says
Bre! I love the window cornice with the fabric. Such a glam touch! The blue on the vanity is just perfect (you know I love blue hehe) … and those towels are deluxe! Perfect for a spa bath with some vino!!
Bre says
Thanks so much, Erin! Yeah I am loving the cornice boards! Such a sleek way to add some color where you can’t use drapes! Still dreaming about having a master bedroom that looks as good as yours, girl!
CoCo says
Oh my gosh, Bre, all of your hard work paid off – it looks so good! I love all of the special touches you added like the rug, art work, towels, vanity, the window treatments even the fern and the candle are perfection. Great job! I know you are so proud of this transformation! Hugs, CoCo
Bre says
Thank you, sweet CoCo! 🙂
Kristi Mercer says
It’s perfect Bre! It looks SO much lighter and that vanity was made to be blue! LOVE it!!!
Bre says
Thank you, Kristi! That means a lot to me! I’m glad you like it. 🙂
Bre says
Such a huge difference! I love that you were able to make such a big impact while having to keep some of the main elements. You totally worked with what you had and made it such a pretty space!!
Bre says
Thank you, Bre! Yes – having to keep so many things in there that we dislike was definitely tough, but for an interim makeover, I could not be happier! I am so glad I don’t hate going in there anymore – hahaha!
Katie @ Little House of Four says
It looks so great, Bre! The paint alone made such a huge impact and made the space feel so much brighter and larger. I’m loving the blue touches too. And those hand towels are so pretty. Great job!
Bre says
Thanks, Katie! Yeah the paint really made the biggest difference of all. I am SO happy to have it looking much better now. I cannot believe we lived with it in such a state of disrepair for so long!