Average But Inspired

Inspiring creativity with crafts, DIY, and home decor projects.

  • About Bre
  • Contact Me
  • Disclosures
  • Policies
  • Home
  • Shop
  • DIY
  • Crafts
    • Dollar Store Crafts
  • Seasonal
    • Patriotic & Summer
    • Valentine’s Day
    • Easter & Spring
    • Fall & Halloween
    • Christmas & Winter
  • Home Decor
  • Furniture
  • Organization

October 25, 2017 by Bre

Easy DIY Canvas Art

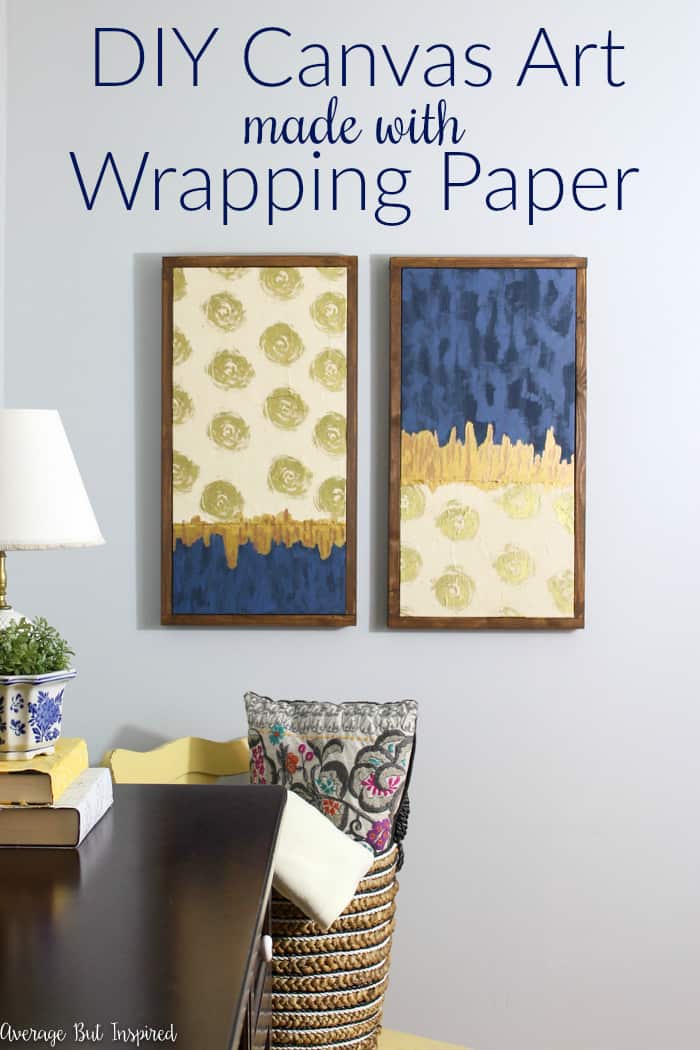
Raise your hand if you’re guilty of hanging art on your walls that is too small.  Or not hanging any art at all.  (Hand raised.  Head hung in shame.)  Until recently, I had two prints hanging in my master bedroom that I knew were totally the WRONG size for the wall, but I was too lazy to do anything about it.  That all changed when I got a dash of inspiration and created this easy DIY canvas art with my secret decorating and DIY weapon – luxe wrapping paper!  

Upgrade bare walls with DIY Canvas Art that you can make with wrapping paper and paint! Learn how to make gorgeous DIY wall art with this tutorial. No artistic talent needed! #canvas #wallart #diydecor

I’ve used wrapping paper on other projects (like these Upgraded IKEA Bookshelves and this Trash to Treasure Table), and its versatility never ceases to amaze me! 

This time I turned it into pretty canvas wall art, and I’m convinced that anyone (yes, anyone!) can make DIY wall art for their homes with this trick!

Supplies Needed to Make Easy DIY Canvas Art

This post contains affiliate links.  To read my full disclosure policy, please click here.

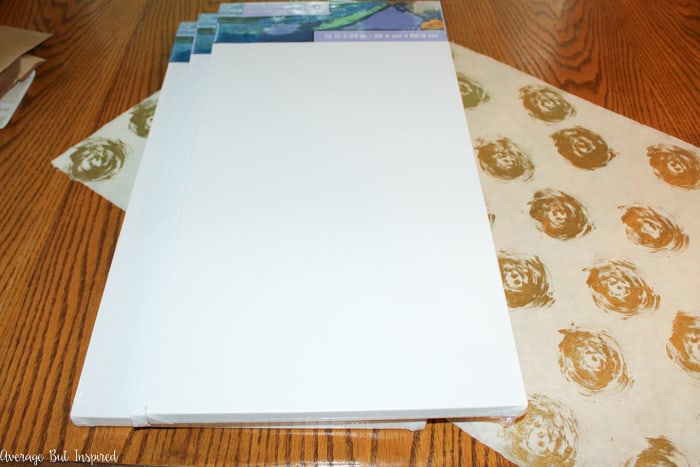
  • Canvas panels (I used 12″ x 24″ panels)
  • Luxe wrapping paper (this is the print I used.  Make sure to use a heavyweight wrapping paper for less chance of wrinkling and tearing)
  • Mod Podge in finish of your choice (I used matte)
  • Foam brushes
  • Optional: brayer
  • Scissors
  • Acrylic paints in colors of your choice (I used this color, this color, and this color)
  • Liquid gold leaf
  • Artist’s paint brushes
  • Double-sided permanent tape
  • Optional – For Wooden Frames (follow this tutorial, which requires 1″x2″ pieces of lumber, hand saw, brad nailer, 3/4″ corner braces, and wood stain)Upgrade bare walls with DIY Canvas Art that you can make with wrapping paper and paint! Learn how to make gorgeous DIY wall art with this tutorial. No artistic talent needed! #canvas #wallart #diydecor

How to Make Easy DIY Canvas Art

Aaaah I’m so excited to show you how to make your own large-scale canvas art!  You’ll feel like an artist when all is said and done – I just know it!

Step One: Cover the Canvas with Wrapping Paper

I began by cutting my wrapping paper slightly larger than the portion of the canvas that I was covering. 

Then I applied a thin layer of Mod Podge to the canvas, and pressed the wrapping paper onto the canvas – removing air bubbles as I went.  I used a brayer to help with this part, but if you don’t have one, it’s not totally necessary (just helpful!).  

Upgrade bare walls with DIY Canvas Art that you can make with wrapping paper and paint! Learn how to make gorgeous DIY wall art with this tutorial. No artistic talent needed! #canvas #wallart #diydecor

Step Two: Paint the Canvas

While the Mod Podge was drying, I painted the empty part of the canvas in this color, which is a pretty navy blue.  I left a little gap between the wrapping paper portion of the canvas and the blue paint because I knew I’d be painting that part of the canvas gold.Upgrade bare walls with DIY Canvas Art that you can make with wrapping paper and paint! Learn how to make gorgeous DIY wall art with this tutorial. No artistic talent needed! #canvas #wallart #diydecor

Once the paint dried, I used gold acrylic paint to add a border between the navy paint and the wrapping paper.  

Upgrade bare walls with DIY Canvas Art that you can make with wrapping paper and paint! Learn how to make gorgeous DIY wall art with this tutorial. No artistic talent needed! #canvas #wallart #diydecor

Step Three: Fasten the Wrapping Paper to the Back of the Canvas

Once the paint was dry, I flipped the canvas over and attached the wrapping paper to the sides and back with double-sided permanent tape. 

Upgrade bare walls with DIY Canvas Art that you can make with wrapping paper and paint! Learn how to make gorgeous DIY wall art with this tutorial. No artistic talent needed! #canvas #wallart #diydecor

Step Four: Topcoat with Mod Podge

Then I flipped the canvas over and put a thin layer of Mod Podge on top of the wrapping paper for extra adhesion and protection.  You probably don’t have to do this – especially if you like the texture of the wrapping paper as-is – but I wanted to make sure these pieces of art are durable! 

Upgrade bare walls with DIY Canvas Art that you can make with wrapping paper and paint! Learn how to make gorgeous DIY wall art with this tutorial. No artistic talent needed! #canvas #wallart #diydecor

Step Five: Get Artsy with the Paint and Gold Leaf

After about 20 minutes when the Mod Podge was dry, I added random brushstrokes of a different shade of navy blue paint to the top of the canvas. 

Then I added gold leaf streaks to the gold painted portion of the canvas.  These little touches added some dimension and made things look less flat!  

Upgrade bare walls with DIY Canvas Art that you can make with wrapping paper and paint! Learn how to make gorgeous DIY wall art with this tutorial. No artistic talent needed! #canvas #wallart #diydecor

Upgrade bare walls with DIY Canvas Art that you can make with wrapping paper and paint! Learn how to make gorgeous DIY wall art with this tutorial. No artistic talent needed! #canvas #wallart #diydecor

Upgrade bare walls with DIY Canvas Art that you can make with wrapping paper and paint! Learn how to make gorgeous DIY wall art with this tutorial. No artistic talent needed! #canvas #wallart #diydecor

Step Six: Build a Canvas Frame

Once everything dried, I built canvas frames by following this tutorial.  These frames went together really easily and gave my easy DIY canvas art a finished look! 

Upgrade bare walls with DIY Canvas Art that you can make with wrapping paper and paint! Learn how to make gorgeous DIY wall art with this tutorial. No artistic talent needed! #canvas #wallart #diydecor

Upgrade bare walls with DIY Canvas Art that you can make with wrapping paper and paint! Learn how to make gorgeous DIY wall art with this tutorial. No artistic talent needed! #canvas #wallart #diydecor

Can you believe how easy it is to make your own art with wrapping paper?  

Upgrade bare walls with DIY Canvas Art that you can make with wrapping paper and paint! Learn how to make gorgeous DIY wall art with this tutorial. No artistic talent needed! #canvas #wallart #diydecor

There’s really no reason NOT to have pretty walls with art this easy and inexpensive!  (I’m typing that so I remember it – trust me, I have some walls that need help!)  

Upgrade bare walls with DIY Canvas Art that you can make with wrapping paper and paint! Learn how to make gorgeous DIY wall art with this tutorial. No artistic talent needed! #canvas #wallart #diydecor

If you agree and like this idea, I’d appreciate it if you’d pin this post to help others find it!  

Upgrade bare walls with DIY Canvas Art that you can make with wrapping paper and paint! Learn how to make gorgeous DIY wall art with this tutorial. No artistic talent needed! #canvas #wallart #diydecor

So what do you think?  Will you try making art for your home with wrapping paper?

-Bre

❮❮ Previous Post
Next Post ❯ ❯

Comments

  1. Norma Rolader says

    October 25, 2017 at 9:47 am

    What a neat idea!!! I bet you could do this with Christmas paper and put it up for the holidays Thank you for sharing with us

    Reply
    • Bre says

      October 30, 2017 at 9:31 pm

      Hi, Norma! YES!! That is brilliant! It would make such easy but festive decor for Christmas. Another good idea for Christmas is framing pretty gift bags – even easier than this project! Thanks for sharing. 🙂

  2. Laura Harrie says

    October 25, 2017 at 7:35 pm

    This wrapping paper art is a terrific idea. I have something I can use right now to make a unique art piece. Thank you for inspiring me!

    Reply
    • Bre says

      October 30, 2017 at 9:32 pm

      Hi, Laura! That is awesome!! Thanks so much for taking the time to let me know that. I really appreciate it. Good luck with your project!

Leave a Reply Cancel reply

Your email address will not be published. Required fields are marked *

Let’s Connect!

  • Facebook
  • Instagram
  • Pinterest
  • Twitter
  • YouTube
blank

Hi, I'm Bre! I believe in working with what you've got to create a home you love. I hope to inspire you to do the same!

Love DIY & Decor? Join the Fun!

    How Can I Help You?

    blank

    How to Create a Faux Antique Brass Finish with Paint

    blank

    How to Organize Digital Photos Using Amazon Photos

    blank

    How to Build a Backyard Fire Pit

    blank

    7 Tips for Hosting a Party on a Budget

    Looking for Something?

    blank

    How to Fix Paint Bleed Through When Painting Cabinets

    When painting cabinets or furniture, nothing causes a queasy feeling faster than seeing stains or discolorations bleeding through the primer or paint.  But never fear – I’m here to show you how to fix paint bleed through when painting cabinets or furniture.  Best part?  It’s easy! This post contains affiliate links.  To read my full […]

    blank

    Dollar Tree House Valentine’s Day DIY

    If you follow any Dollar Tree crafters on Instagram or YouTube, you know that the Dollar Tree house is one of the most popular crafting items around! Only available in-store and online once in awhile, these cute wooden houses are the perfect craft blanks to update for any style of decor or season!  I gave […]

    blank

    Dated Oak China Cabinet Makeover

    Our new house came with some nice architectural features, but they were all pretty dated.  I already tackled a makeover of our 1970s stone fireplace, and most recently finished the built-in dated oak china cabinet makeover, which has made a HUGE difference in my dining room already!   Here’s the built-in oak china cabinet a little […]

    blank

    Modern Vintage Dining Room Makeover

    It took me almost three months, but I’ve finally finished putting together the dining room in our new house!  It is no longer being used as our virtual learning classroom (thank goodness!), but instead is a beautiful modern vintage dining room that we love! This post contains affiliate links.  To read my full disclosure policy, […]

    Copyright © 2013-2021, Bre Eggert (Average But Inspired). All rights reserved.

    Pretty Chic Theme By: Pretty Darn Cute Design