The spookiest time of year is almost here again! Get ready to pull out those Halloween decorations and deck the halls for trick-or-treaters. And of course, don’t forget to make time for some Halloween crafting! This year, Halloween skull decorations are all the rage, and I’m going to show you how to make a mini Halloween cloche with Dollar Tree plastic skulls. It’s a piece of Halloween decor that’s cute and creepy all at the same time!
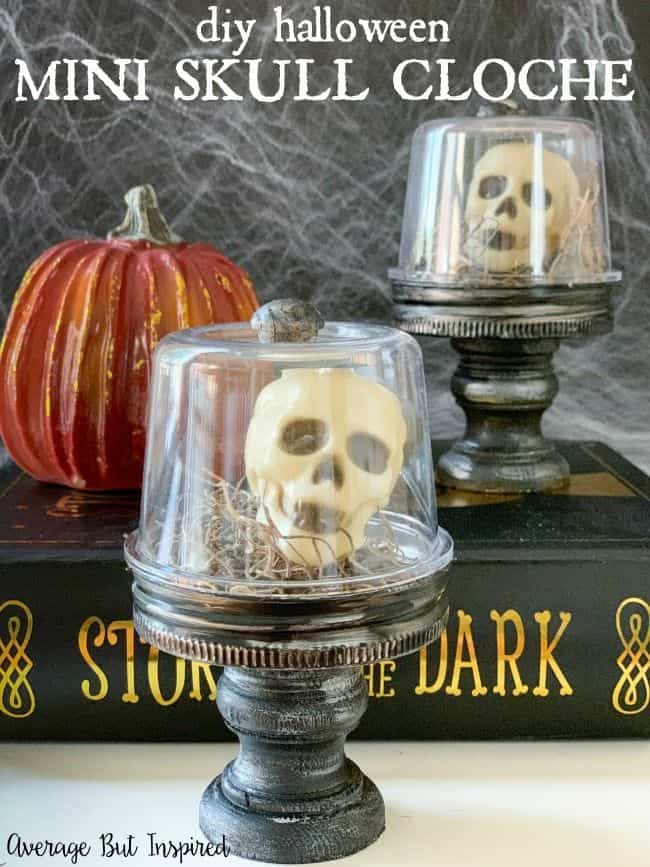
This Halloween skull decoration is pint sized, which makes it totally perfect for any little spot in your home or office that needs a tiny dash of Halloween. Think shelves, entryway tables, window sills, and more!
I need small and discreet Halloween decorations this year so I can easily stash them away for house showings. (We’re moving! Read up on our unexpected life change here.) This is just right!
Also, because this Halloween cloche is miniature (well, mini as compared to a regular-sized cloche, but not fairy garden mini!), you can make the whole thing in about 20 minutes. Not bad! 
Supplies Needed to Make a Mini Skull Halloween Cloche
This post contains affiliate links. To read my full disclosure policy, please click here.
- Unfinished wood candle holder
- Empty baby food jar or 4 oz. small mason jar
- Acrylic craft paint in black and silver
- Paint brush
- Spanish moss (from Dollar Tree)
- Mini skulls (from Dollar Tree)
- High-temperature hot glue gun OR E6000 glue
- Optional: small unfinished wood furniture buttons
How to Make a Mini Skull Cloche For Halloween Decor
Begin by getting your paints and paint brush ready! Paint the unfinished wood candle holder, the mason jar rim (or baby food jar lid), and the unfinished wood furniture button with the black acrylic paint.

Chances are that the black paint won’t cover the rim of the mason jar very well (even with multiple coats), but that is OK! Let some of that silver color underneath show through – it adds to the look!
Once the black paint dries on all of those pieces, lightly dab some silver metallic craft paint or acrylic paint onto the wooden pieces. You can also add some silver paint to the mason jar lid if it needs it. Mine did not.
Let the silver paint dry and then use hot glue (only with a high temperature hot glue gun) or use a glue made for plastic and wood (like E6000), to attach the mason jar lid to the wood candle holder.
Place a little Spanish moss inside the lid, and be careful not to put too much in. You can hot glue the moss to the lid if you like, or leave it loose. (You might like to see how I used this same Spanish moss to make my fake fiddle leaf fig tree look real!)
Then pop a miniature skull on top of the moss. You can also hot glue the skull onto the moss if you want a more stable skull. 🙂 (That sounds so funny.)
Now, screw the mason jar onto the lid and trim off any Spanish moss that sticks out the sides. If you choose to add the little wooden button to the top, go ahead and glue that on now.
Once that glue is hardened or set, your adorable mini Halloween cloche is complete!
This is one Halloween skull decoration that you definitely want to add to your haunted house this year!
-Bre
Seana Turner says
Definitely creepier inside the cloche than it would be sitting alone on a shelf. I’m glad I ran across this post, as now I’m clicking around looking at some of your other great ideas. Have a happy day Bre!
Bre says
Thank you, Seana!! Glad it was creepy – that was the goal! Ha!! Hope you have a great day!