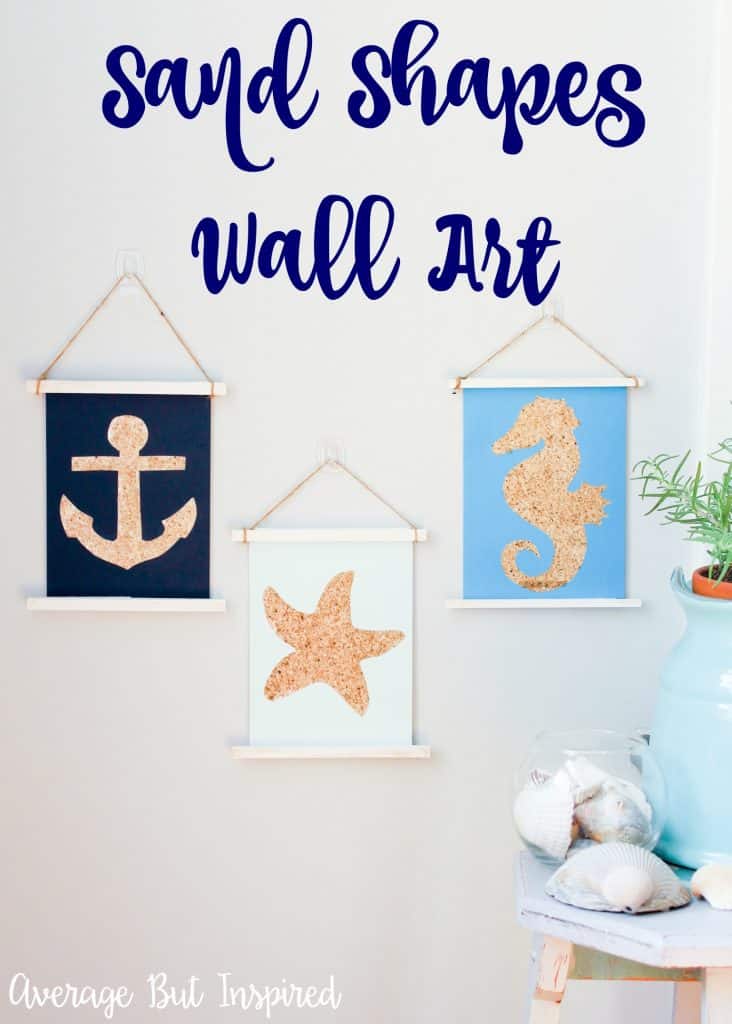
Average But Inspired

Inspiring creativity with crafts, DIY, and home decor projects.

  • About Bre
  • Contact Me
  • Disclosures
  • Policies
  • Home
  • Shop
  • DIY
  • Crafts
    • Dollar Store Crafts
  • Seasonal
    • Patriotic & Summer
    • Valentine’s Day
    • Easter & Spring
    • Fall & Halloween
    • Christmas & Winter
  • Home Decor
  • Furniture
  • Organization

June 16, 2016 by Bre

DIY Sandy Shapes Wall Art

This shop has been compensated by Collective Bias, Inc. and its advertiser.  All opinions are mine alone.  #SpringCreations #Collective Bias

Now that the weather is finally nice and people are feeling more social, it’s time to get the ladies together for a girls’ night crafting session, don’t you think?  In my opinion, the keys to a successful craft night party are good food and drinks, great tunes, and a simple project that your friends can make and take in one evening, like this DIY Sandy Shapes Wall Art!  Use sand to create adorable sandy shapes wall art with this fun tutorial! It's a surprisingly low-mess project and it's really easy to make. Get the full tutorial and FREE shape templates in this post.

Keep the project simple and as mess-free as possible, and you’ll be able to relax and enjoy the evening with your friends!  (I know you’re probably thinking that with sand there’s no way this project won’t make a mess, but I promise it’s true!)Use sand to create adorable sandy shapes wall art with this fun tutorial! It's a surprisingly low-mess project and it's really easy to make. Get the full tutorial and FREE shape templates in this post.

Supplies Needed for DIY Sandy Shapes Wall Art

Make sure to have these supplies on hand for your girls’ night craft project:

  • Scotch® Brand Permanent Mounting Tape
  • Scotch® Brand Double Sided Tape
  • Command™ Mini Hooks
  • Cardstock in colors of your choice
  • Shape templates (available to download here)
  • Flat canvases (5″x7″)
  • White acrylic paint
  • Square dowels
  • Small saw
  • Sand
  • Twine
  • Aerosol hairspray
  • Small paintbrush
  • Scissors or utility knife
  • Pencil
  • Optional: paper cutter (for cutting cardstock to size), plastic cup (for pouring sand), cookie sheet (for containing sand)

Use sand to create adorable sandy shapes wall art with this fun tutorial! It's a surprisingly low-mess project and it's really easy to make. Get the full tutorial and FREE shape templates in this post.The great thing about this project is that you can buy almost all of your supplies, including the Scotch® Brand and Command™ products, in the crafting aisle at any Walmart.  From masking tape to spray adhesives and everything in between – no matter the task, there’s a Scotch® Brand to match.  It’s so convenient to be able to get everything you need in one spot.  (You’ll probably need to check the health and beauty aisle for the hairspray though.  Wink wink.)  Find all of the craft supplies you need for this sandy shapes wall art project in the crafting aisle at Walmart.

How to Make DIY Sandy Shapes Wall Art

Now, once you have all of your supplies, begin by printing the shape templates, cutting them out, and tracing them onto cardstock that has been cut to 5″ x 7″.  Use sand to create adorable sandy shapes wall art with this fun tutorial! It's a surprisingly low-mess project and it's really easy to make. Get the full tutorial and FREE shape templates in this post.

Carefully cut out the designs from the center of the cardstock using scissors or a utility knife.  If you use a utility knife, make sure to protect the surface underneath the cardstock.  (I would hate for you to end up with nautical-themed shapes permanently engraved into your dining room table!)Use sand to create adorable sandy shapes wall art with this fun tutorial! It's a surprisingly low-mess project and it's really easy to make. Get the full tutorial and FREE shape templates in this post.

Next, line the outer edges of each canvas with Scotch® Brand Double Sided Tape.  Also fill the center of each canvas with Scotch® Brand Double Sided Tape.  You will want the entirety of each shape that you have cut out to be filled with the double sided tape, so it may end up that most of each canvas is covered in double sided tape.  This tape is extra strong and sticky, so it’s perfect for keeping grainy sand in place!Use sand to create adorable sandy shapes wall art with this fun tutorial! It's a surprisingly low-mess project and it's really easy to make. Get the full tutorial and FREE shape templates in this post.

Carefully press the cardstock onto the canvas, making sure to align the edges.  Also be sure to press down around all of the edges of the shape in the middle.Use sand to create adorable sandy shapes wall art with this fun tutorial! It's a surprisingly low-mess project and it's really easy to make. Get the full tutorial and FREE shape templates in this post.

Next, gently pour sand over the entire shape.  Once the shape has been covered, gently press the sand down onto the Scotch® Brand Double Sided Tape, and then shake off the excess sand.Use sand to create adorable sandy shapes wall art with this fun tutorial! It's a surprisingly low-mess project and it's really easy to make. Get the full tutorial and FREE shape templates in this post.

Spray the entire shape and surrounding cardstock with aerosol hairspray.  This will help the sand stick together and keep any stray grains from brushing off of the canvas too easily.  Use sand to create adorable sandy shapes wall art with this fun tutorial! It's a surprisingly low-mess project and it's really easy to make. Get the full tutorial and FREE shape templates in this post.

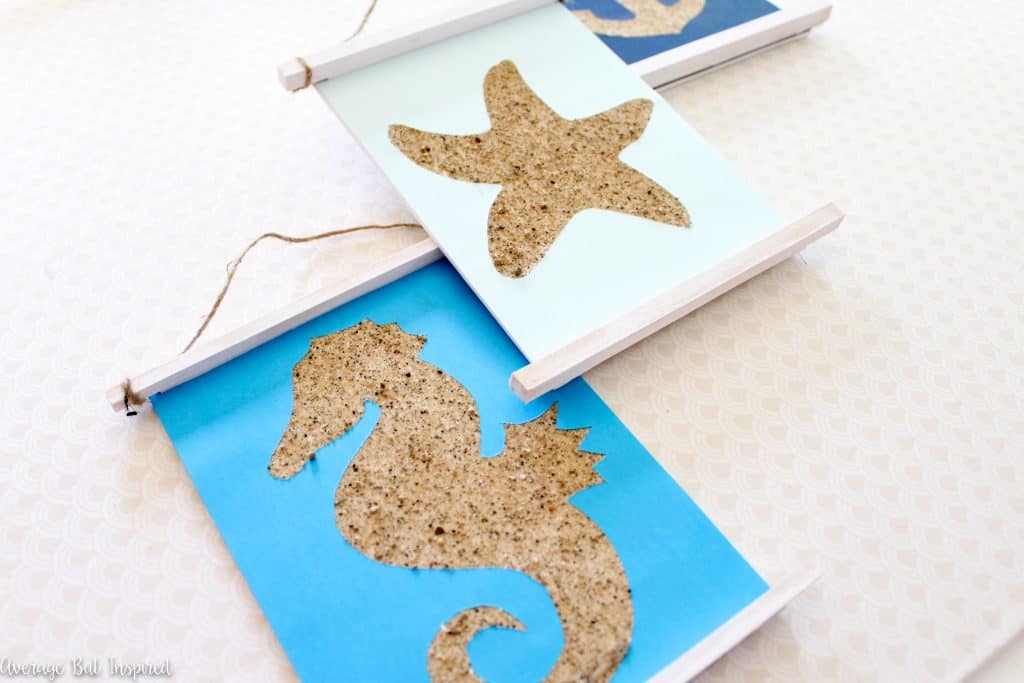
Next, cut the dowels to approximately 6″ long and paint them with the acrylic paint.  If you’re doing this project as part of a girls’ night, you might want to prepare this step in advance.Use sand to create adorable sandy shapes wall art with this fun tutorial! It's a surprisingly low-mess project and it's really easy to make. Get the full tutorial and FREE shape templates in this post.

Cut a length of Scotch® Brand Permanent Mounting Tape and press it onto the back of each dowel.Use sand to create adorable sandy shapes wall art with this fun tutorial! It's a surprisingly low-mess project and it's really easy to make. Get the full tutorial and FREE shape templates in this post.

The Scotch® Brand Permanent Mounting Tape will likely be wider than your dowel, so trim the excess from the edge of each dowel.  Use sand to create adorable sandy shapes wall art with this fun tutorial! It's a surprisingly low-mess project and it's really easy to make. Get the full tutorial and FREE shape templates in this post.

Press one dowel onto the top face of the cardstock, and one dowel onto the bottom face of the cardstock.  The Scotch® Brand Permanent Mounting Tape will hold these dowels in place strongly and securely, and you won’t have to worry about your sandy shape art falling apart.  I have used this product on similar projects in the past, and they’re still proudly displayed in my home!Use sand to create adorable sandy shapes wall art with this fun tutorial! It's a surprisingly low-mess project and it's really easy to make. Get the full tutorial and FREE shape templates in this post.

Tie twine or ribbon to the top dowel for an easy way to hang the sand shape art.  Use sand to create adorable sandy shapes wall art with this fun tutorial! It's a surprisingly low-mess project and it's really easy to make. Get the full tutorial and FREE shape templates in this post.

Press some Command™ Mini Hooks to the wall, hang your sandy shapes wall art, and enjoy!  If you’re hosting a craft night party, make sure to send your guests home with some Command™ Mini Hooks so they can hang their art, too!  Use sand to create adorable sandy shapes wall art with this fun tutorial! It's a surprisingly low-mess project and it's really easy to make. Get the full tutorial and FREE shape templates in this post.

I use Command™ products to hang almost everything in my house!  They provide damage-free hanging, hold on strongly, and come off cleanly every single time.  My husband rolls his eyes every time he sees me hanging something else with my trusty Command™ Mini Hooks or Command™ Picture Hanging Strips.  Use sand to create adorable sandy shapes wall art with this fun tutorial! It's a surprisingly low-mess project and it's really easy to make. Get the full tutorial and FREE shape templates in this post.

See how easy and mess-free this project is?  I told you!  No measurable drying time means less mess and instant gratification – totally perfect for a girls’ night.Use sand to create adorable sandy shapes wall art with this fun tutorial! It's a surprisingly low-mess project and it's really easy to make. Get the full tutorial and FREE shape templates in this post.

So what are you waiting for?  Pin this project, head to Walmart to pick up your supplies, and invite your girlfriends over for a fun night!Use sand to create adorable sandy shapes wall art with this fun tutorial! It's a surprisingly low-mess project and it's really easy to make. Get the full tutorial and FREE shape templates in this post.

And for more project inspiration, check out the Scotch® Brand and Command™ Social Hub and be sure to connect with 3M on Pinterest.

Now that you’ve seen this fun sandy shapes wall art project idea and all of the other project ideas using Scotch® Brand and Command™ products, what will you be making at your next girls’ night crafting party?

Bre

❮❮ Previous Post
Next Post ❯ ❯

Comments

  1. Courtney Buteau says

    June 16, 2016 at 7:57 am

    I LOVE this idea! What a fun seasonal DIY home decor craft. I’m trying to weave in some coastal items into my decor and these would be perfect for the summer. #client

    Reply
    • Bre says

      June 21, 2016 at 7:48 pm

      Thank you so much, Courtney! This really is a fun project, and the best part is that you can make them into any shape! Thanks again. 🙂

  2. Kristi says

    June 16, 2016 at 8:09 am

    Ahhhhh, these are just the cutest thing Bre! SO creative and fun!

    Reply
    • Bre says

      June 21, 2016 at 7:49 pm

      Thanks, Kristi! They really are a fun project to make!

  3. Emily @ Table & Hearth says

    June 16, 2016 at 8:21 am

    These are so stinkin’ cute for summer! Kids would love to help make some I’m sure 🙂

    Reply
    • Bre says

      June 21, 2016 at 7:49 pm

      Thank you, Emily!

  4. Breanna says

    June 16, 2016 at 1:08 pm

    this is such a cute idea, Bre!

    Reply
    • Bre says

      June 21, 2016 at 7:49 pm

      Thanks, Bre! 🙂

  5. Kim~madeinaday says

    June 29, 2016 at 6:57 pm

    Bre I love these sweet sand shapes! So beachy! Thanks so much for sharing this pin on the P3 party Board! I love it and it will be featured on the blog and my social media tomorrow! So look for a little traffic from me!
    Best,
    Kim

    Reply
    • Bre says

      June 29, 2016 at 8:14 pm

      YAY! Thank you, Kim!! Many thanks!

  6. suki says

    April 22, 2018 at 6:30 am

    I have attempted to make this project. It does not work smoothly. The tape bubbles and it shows. The tape attachment to the ends does not adhere. Mine fell off the wall and only liquid glue helped. If I were to
    redo this cute project I would use spray glue instead. The idea of this art is very cute and I wanted it for
    my powder room nautical theme.

    Reply
    • Bre says

      April 30, 2018 at 11:45 am

      Hi, Suki – oh no! I’m sorry you had so many problems with this. Yikes! I wonder if the tape wasn’t adhering to the canvas properly. Canvases can have different coatings, so it’s possible I used a different type than you did. Anyway, I think your idea of spray adhesive is a great one! Good luck!

Leave a Reply Cancel reply

Your email address will not be published. Required fields are marked *

Let’s Connect!

  • Facebook
  • Instagram
  • Pinterest
  • Twitter
  • YouTube
Bre of Average But Inspired

Hi, I'm Bre! Thanks for visiting my blog. I hope you'll find ideas to inspire your creativity and beautify your home here.

Love DIY & Decor? Join the Fun!

    How Can I Help You?

    blank

    How to Organize Digital Photos Using Amazon Photos

    blank

    10 Craft Supplies You Should Buy at Dollar Tree

    blank

    7 Tips for Hosting a Party on a Budget

    blank

    How to Build a Backyard Fire Pit

    Looking for Something?

    blank

    The Easiest DIY Under Cabinet Lighting

    As I’ve been talking about non-stop, I painted my oak kitchen cabinets and freshened up the space! Part of the kitchen makeover was enhancing the lighting, and I’m pumped to show you the EASIEST DIY under cabinet lighting that absolutely anybody can add to his or her kitchen for a little mood lighting and general […]

    blank

    Dollar Tree House Valentine’s Day DIY

    If you follow any Dollar Tree crafters on Instagram or YouTube, you know that the Dollar Tree house is one of the most popular crafting items around! Only available in-store and online once in awhile, these cute wooden houses are the perfect craft blanks to update for any style of decor or season!  I gave […]

    blank

    A Dated Powder Room Gets a Bold Makeover!

    I absolutely love doing room makeovers.  And you know what I’ve discovered?  It’s even better when I’m spending someone else’s money to do them!  HA!  I had the opportunity to do just that over Mother’s Day weekend when I helped my mom give her dated powder room a bold makeover with a vanity paint job […]

    blank

    Modern Vintage Dining Room Makeover

    It took me almost three months, but I’ve finally finished putting together the dining room in our new house!  It is no longer being used as our virtual learning classroom (thank goodness!), but instead is a beautiful modern vintage dining room that we love! This post contains affiliate links.  To read my full disclosure policy, […]

    Copyright © 2013-2021, Bre Eggert (Average But Inspired). All rights reserved.

    Pretty Chic Theme By: Pretty Darn Cute Design