Learn how to paint a countertop with a finish that lasts!
I LOVE a good home transformation experiment, and today’s post showcases an amazing one! I’m going to show you how to paint a countertop to look like marble.
I painted my granite countertop in my powder room and I achieved a convincing marble finish! And guess what? You can, too – on any type of countertop (laminate, formica, granite, cultured marble, and more)!
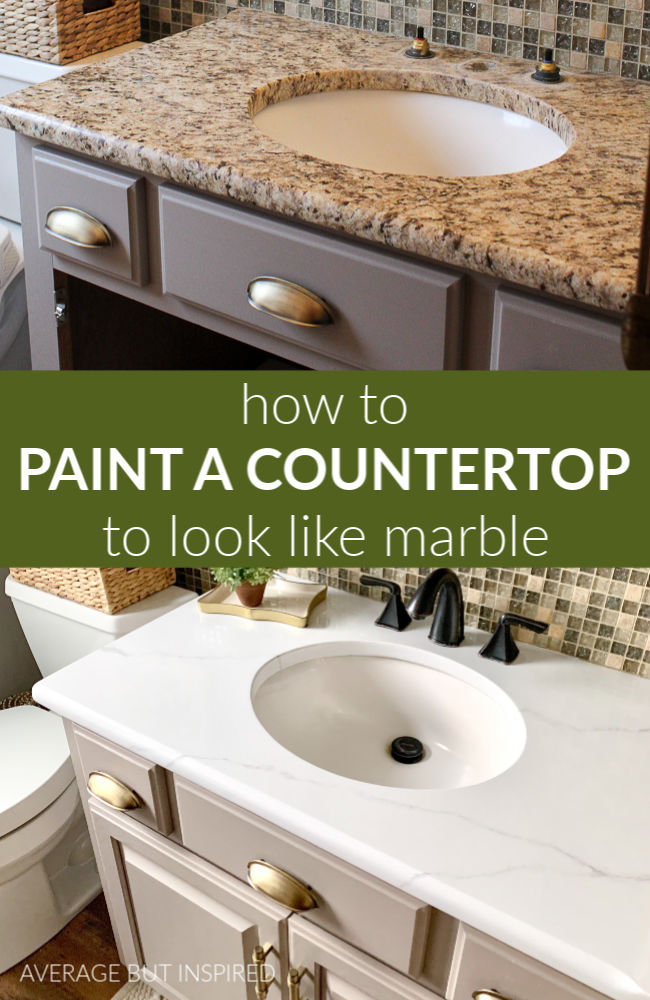
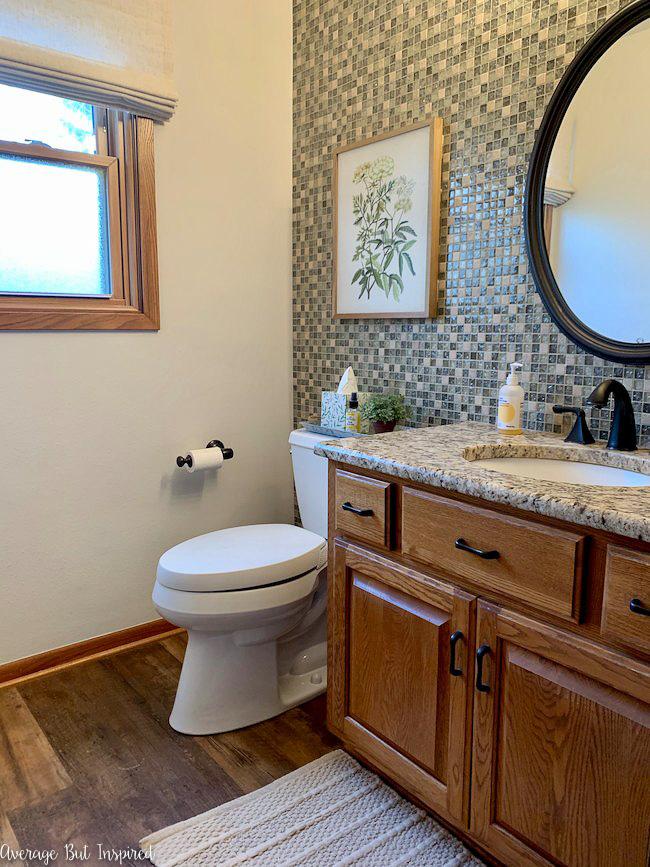
Before we dive in, let me show you what I was working with in my powder room. Dated oak vanity, busy tile wall backsplash, and a dark and dated granite countertop that was REALLY busy with that crazy tile wall.
(UPDATE: I painted the tile wall! Visit that link to see the newest updates to this bathroom! Also, here’s my two-year update on how this painted countertop is holding up!)
On a whim one day, I decided to paint the vanity with paint I purchased as a possibility for my painted marble fireplace hearth. I didn’t end up using that color for the hearth, but I’m glad I saved the paint because it worked great in this bathroom.
New paint and new hardware on the vanity (as well as on the baseboards and mirror), helped spiff up this bathroom, but the countertop still really bugged me.

We will be replacing our kitchen countertops in the near future, and I planned to replace this bathroom countertop at that time as well. Since I had that already in mind, I decided to try painting my granite countertop first, just to see if and how it would work. I figured that if it looked good, I’d save myself some money, and if it looked bad, I will have only wasted around $80.
Although the painted countertop is not perfect, it turned out MUCH BETTER than I expected!
Supplies Used to Paint a Countertop to Look Like Marble
This post contains affiliate links. To read my full disclosure policy, click here.
Because I painted a granite countertop, some of my prep work may have been different than will be required for those painting countertops made of different materials.
In my experience, the key to painting a granite countertop is in the prep work and in the sealer. Because of that, it’s important to pay special attention to these steps!
I began by researching the Giani Marble Countertop Finish Kit, which includes everything you need to paint your countertops to look like marble. Giani, the manufacturer of this kit, has an awesome video about the painting process, and this video really got me intrigued.
I quickly realized that the Marble Countertop Painting Kit contained enough product to paint a kitchen’s worth of countertops, and that I didn’t need nearly that amount of paint or product. So, I figured out what I wanted and purchased the following items separately:
- Xylene (this is a MUST HAVE when painting granite. TIP: buy this at a local store. Amazon charges exorbitant amounts for it.)
- Rubbing alcohol (also a MUST HAVE when painting granite)
- Step 1 white primer paint
- Step 2 gray paint for veining
- Step 3 epoxy sealer
- 2″ foam brush
- 1/4″ nap roller (TIP: See my note below about possibly using a foam roller instead)
- Small artist’s brush
- 2″ brush
- Roller tray
- Painter’s tape
- Painter’s tarp
- Clear acrylic caulk
- Rubber gloves
I got all of my supplies for under $100, which was less than the price of the kit. (Note that the kit does not include Xylene.)
How to Paint a Countertop to Look Like Marble
If you follow the instructions and are patient, I believe you can also paint your countertop for a lasting finish!
Step 1 for painting a granite countertop: PREP and CLEAN
I started by cleaning the countertop and then wiping it down with Xylene, which smells AWFUL. Make sure to open a window while using this solution. After the Xylene dried, I wiped it down with rubbing alcohol, per the instructions online.
Then I placed painter’s tape around the edge of the countertop and covered the vanity with a tarp.
Step 2 for painting a countertop to look like marble: PRIME
Next, I primed the entire countertop with the white countertop paint. After one coat it looked pretty streaky, but the video warned that this would be the case so I wasn’t worried.
After four hours, I applied the second coat of primer. It definitely looked better, but there were still spots where dark granite was shadowing through, or divots in the granite didn’t get filled.
Because of that, I applied a third coat of white primer the next morning. The instructions say you only need two coats, but I definitely needed three coats of primer for my dark granite. After three coats of white primer, all of the dark granite was covered.
Step 3 for painting a granite countertop: VEINING
After third coat of primer dried for four hours, I decided to try some veining to give my painted countertop a true marble look!
I watched the Giani video again and used the techniques shared there to create what I think are very authentic-looking marble veins with one of their second-step gray countertop paints!
I made sure not to add too many painted marble veins, as I did not want to have the countertop be too busy.
Step 4 for painting a granite countertop: SEAL WITH EPOXY
This final step was the scariest in the entire countertop painting process: sealing the painted countertop with epoxy freaked me out! I had never worked with epoxy, so I wasn’t totally sure what to expect. But, I put on my game face and got to work.
I mixed up the epoxy (with the activator) per the instructions and poured it onto the countertop. I used the roller with 1/4″ nap as recommended, but if I were you, I would use a foam roller instead. The 1/4″ nap roller left lint everywhere!
I had to get as much out of the epoxy as I could with tweezers, but there was too much to remove before the epoxy set up (in about 30 minutes). You would not have a lint problem of this magnitude if you use a foam roller!
As a result of my roller problems, there are visible lint bubbles in my finish. I may be sensitive to them and others may not really notice them, but they are definitely there and mar the finish, in my opinion.
Aside from this, the epoxy is what transforms the painted countertop from looking, well, painted, to looking like a shiny, marble finish. Painted countertops with epoxy sealers are durable and the best looking painted countertops out there. I’m not saying it looks identical to marble, I am just saying that the epoxy elevates the finish in a way that paint alone cannot.
Step Five for Countertop Painting: CAULK
Prior to using the countertops, I added a line of clear acrylic caulk around the countertop and the backsplash to help seal the edges. After two days we were able to use our bathroom again.
Again, I painted a granite countertop to look like marble. It’s not perfect, but it’s a definite improvement. The Giani Marble Countertop Paint Kit or paint products enclosed in the kit, along with the company’s awesome video tutorial, make the marble countertop look accessible to all.
If you’re on a budget or don’t want to deal with getting countertops replaced, I recommend using the Giani paints and epoxy to paint a countertop to look like marble.
Make sure your expectations are realistic, watch their video, and read others’ reviews of the products on Amazon, as all of these things will help you get the best finish possible!
I, for one, am very happy with the look of my painted countertop, and I’m glad I took a chance in painting it instead of replacing it! Make sure to see how these countertops have held up over the past two years!
Jen says
Gianni epoxy sealer comes with a separate can of activator! I don’t see it sold individually. Did u use this also?
Bre says
Hi! I JUST updated the product links and the new link comes with the activator. Here you go: https://amzn.to/3LexRCN. (Sorry about that before. Giani changes their links ALL THE TIME – so annoying!)
Lynn Tymczyszyn says
I love it all. The marble looks very real in the photo , but I really love the cabinet! I’m going to try! Thank you!
Lynn
Bre says
Hi, Lynn! YAY FOR YOU!!! You’ve got this! 🙂
Blaire says
This might be an odd question but when did you take the tape off? After applying by the epoxy or after it dries? My guess is after applying before it dries but I want to be sure before tape gets stuck in my epoxy. It just dries so fast!
Bre says
Hi! This is actually a brilliant question! I wish I could remember – I am so sorry but I don’t recall! I hope that the manufacturer can answer that question for you though. Good luck!!
Val says
How had this held up over the years?
Bre says
Hi, Val – its amazing!! I’ve got a two year update post here: https://averageinspired.com/2022/04/painted-granite-countertops-durability.html
Donna says
Can this be done over Formica?
Bre says
Yes it can! 🙂
Kelley says
This is beautiful. Well done. How has the bathroom vanity held up? I want to do this in my kitchen but am concerned about how well the faux finish will hold up to daily cleaning. Thoughts?
Bre says
Hi, Kelley! Thank you! It has held up great in this bathroom, but I don’t clean it every day the way I clean my kitchen countertops. I am so happy with this in the bathroom, but being totally honest – I would be scared to do it in the kitchen! If you’re looking for a temporary fix that’s one thing, but I’d be worried about long-term.
Emily says
Thank you for these instructions!! I plan to do two vanities similar to your size (in the same bathroom so I’ll be doing them at the same time). My question is – did you need the entire epoxy kit for your one vanity? Should I buy double the amount of epoxy or was the full can more than you needed?
Bre says
Hi, Emily! Oh man…I am so sorry but I am not totally certain if you’ll only need one or two epoxy kits. I know I had some leftover in the can, but I don’t remember if it was half a can (like so enough to do another vanity). The worst thing would be to run out of epoxy midway through a vanity, so I would order two epoxies to be safe!! Good luck with your project!!!
Mona says
So inspiring! Love the results 👍🏻
Bre says
Thanks, Mona! I appreciate it!
Ghazala says
Do you think this could be done with the walls of a shower too?
Bre says
Hi, Ghazala! No, actually this is not good for showers. The manufacturer says on their website not to use it in shower walls or shower floors. Sorry!
Shannon says
Will you please tell me what paint brand and color you used on the cabinet. I love it. I have similar backsplash in my kitchen and I’m going to try the countertop makeover and would love to paint my cabinets that color. Thank you.
Bre says
Hi, Shannon! Such an exciting project!!! The paint I used on this vanity is Americana Decor Satin Enamels in Gray Taupe. I love this paint for SMALL projects – small being the key. It only comes in 8 ounce jars, which does not go far at all in a kitchen and you’d need so many jars. I prefer actual gallons of enamel paint for a large-scale job. Benjamin Moore Advance is outstanding. If you’re at all interested or need help with painting cabinets, I have an entire cabinet painting downloadable guide in the “Shop” section on my website, or here is a link to it: https://averageinspired.com/shop/diy-cabinet-painting-pro . GOOD LUCK with your kitchen makeover!
Laura Harrie says
Sure looks like the real deal, excellent instructions!
Bre says
Thank you, Laura!
priscilla says
Yes thank for the detailed instructions andI inspiration!
Bre says
Thanks, Priscilla!
Molly says
WoW!!! Beautiful! You did an amazing job!
Bre says
Thank you so much, Molly!!