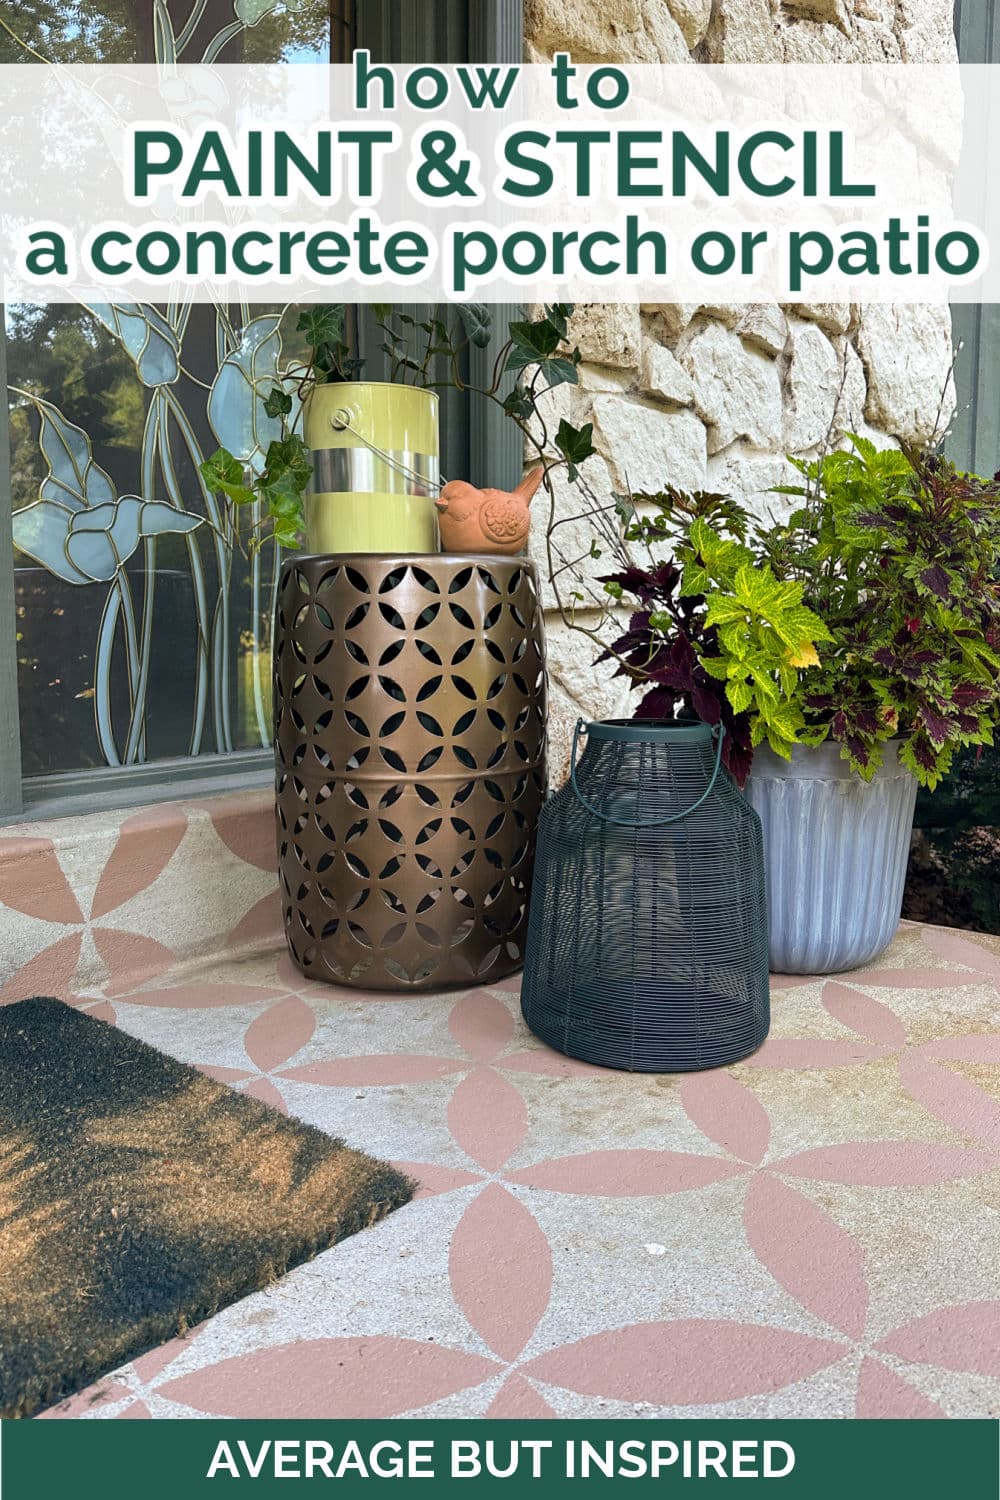
Looking for a relatively easy way to spruce up a concrete porch or patio? Let me show you how to paint and stencil concrete! You’ll instantly infuse your outdoor space with personality and charm.
I’ve always wanted to stencil my concrete porch floor, but that project kept getting pushed to the bottom of the project list. (I know you know how that goes!)
If you’re in the same boat, I want to encourage you to JUST DO IT (yeah, Nike style)! I finally stenciled my porch (or more accurately, my stoop) this summer, and I absolutely love it! It makes me so happy when I pull up to the house and see it.
So let’s dive in – I’m going to give you all the info you need!
Concrete Stain vs. Concrete Paint: What is the Difference?
When I shopped for materials for this project, I was surprised to find out that there are actually two product types used to stencil concrete: concrete stain and concrete paint.
I wasn’t sure which to use, so I did a little research (that I’m more than happy to share with you!).
What I found out is that concrete stain and paint are much like “regular” stain and paint. Namely, concrete stain actually permeates the concrete, which means that it seeps right in there. Conversely, concrete paint sits on top of the concrete.
As I’m sure you can guess, the stain is much more durable and withstands foot traffic better because of the way it bonds with the concrete. Concrete paint will stick well to the surface, but because it’s on the surface, it’s much more prone to peeling, chipping, and fading.
Because of this, I chose to use concrete stain for my stencil project.
How Long Does Concrete Stain Last Outside?
Of course you don’t want your hard work of stenciling your porch or patio to wash away in the elements, but it’s really hard to give a definite timeframe of how long concrete stain lasts outside.
The reason for this is that it’s very dependent upon your prep work, the sealer used, the conditions to which the concrete is subjected (weather, amount of foot traffic or car traffic), and more!
Generally, with proper sealing and reapplication of sealer every year, you should be able to maintain the look of your stencil pattern for years to come. Your porch or patio won’t be as low maintenance as it was before, but it will be worth it for the charm and character you add!
What Supplies Do You Need to Stencil and Paint a Concrete Patio or Porch?
Now that you know a bit more about this project, here’s the supply list. These are the materials I used to transform my concrete stoop over the course of three days. They are what is shown in this post.
This post contains affiliate links. Please read my disclosure policy for more information.
- Power washer or pressure washer
- Broom
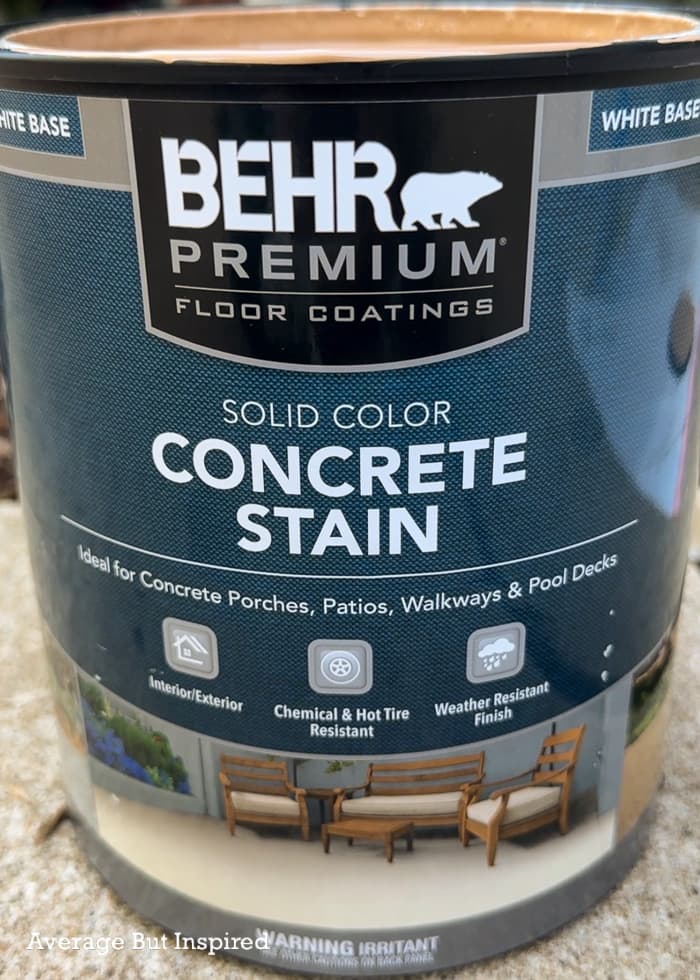
- Behr Premium Solid-Color Concrete Stain: pick two colors if you’re painting a base coat before stenciling. I used the color Pyramid for my porch.
- Stirring Stick
- Stencil brush
- Stencil for concrete patio (stencil used is out of stock; linked stencil is similar. And, see other suggested stencils at the bottom of this post)
- Mini paint roller
- Painters tape
- Paper plates
- Paper towel roll
- Garbage bag
- Behr Premium Concrete, Brick & Tile Low-Lustre Sealer
Optional, but recommended depending on your plans, supplies:
- Muriatic acid or concrete etch and cleaner
- Behr Premium Concrete & Masonry Bonding Primer
How to Stain and Stencil a Concrete Porch or Patio Floor
Get ready to make a huge difference in the look and feel of your porch or patio! (And P.S., once you tackle this job, why not stencil a wall in your home? That linked post will tell you everything you need!)
Step One: Prepare the Surface
First things first: you gotta do the prep work. I know, I know. It’s not fun or glamorous, but it’s essential!
Must-Do Prep Work
Start by pressure washing or power washing the concrete. (Confession time: I don’t know the difference between these two things, or if there even is a difference.) I’m lucky that my mom owns one of these devices, so I borrowed hers and got to work. Then I let the concrete dry overnight.

The discoloration along the front and right-hand side of the porch did not go away with the pressure wash, but a lot of dirt blew off!
Maybe Necessary Prep Work
Power washing is where my prep work stopped, but there might be more required for some.
For example, if you have cracks in the concrete that you wish to fill, this is the time to do it.
In addition, IF YOU PLAN TO PAINT OR STAIN A BASE LAYER of color before stenciling, you should consider etching the concrete with muriatic acid next. I did not do this because I wasn’t putting down a base color (and because I like to live on the edge).
Also, if you are putting down a base color, you should DEFINITELY apply concrete primer. I’ve painted and stained enough tricky surfaces in my day to know that primer is super duper important. I did not prime my porch because the stencil would not cover all of the primer, so it would have looked weird.
Step Two: Paint or Stain the Base Layer
If you want a solid color underneath the stencil color, you need to apply a coat or two of stain with a roller. How many coats of stain depend on the look you’re going for. This is totally your preference!
If you want a more subtle look like I have, you can skip this step. I didn’t want the porch or stoop to stick out like a sore thumb from the sidewalk leading up to it, so I chose not to paint or stain a base layer.
Check out all of our 1970s home exterior updates!
Step Three: Stencil the Concrete
This step is where the magic starts to happen! Stenciling fun begins!
I suggest starting in the center of the most visible part of your patio or porch, so that your pattern will be full/complete where people are most likely to look. For my stoop, I started at the very front, right in the middle.
Tape the stencil down at the corners with painter’s tape. Then, load a stencil brush with stain and dab off excess paint or excess stain onto a paper plate. You don’t want too much paint on the brush, or it will bleed under the stencil!
Dab that stencil brush all over the stencil to apply the paint or stain. When finished, lift the stencil, check for paint on the opposite side, and wipe any off with a paper towel.
Then, place the stencil back down and repeat this process for the whole porch or patio!
For tricky spots that my stencil could not fit on (like in corners, on edges, or on the front of the stoop where the stencil was too large), I waited until the end. Then I cut apart the stencil to fit these spots, and this worked wonderfully!
I only applied one coat of stain, but the coverage was beautiful.
Step Four: Seal the Concrete
Alright, this last step is so important! As mentioned above, you really need to seal the stenciled concrete in order to protect your hard work.
Sealer can be applied with a brush, roller, or sprayer, and the Behr Low-Lustre Sealer dries to the touch in one hour. When applied and before it dries, it makes the stain look darker, but when it dries, it will be exactly the same color as before.
Taking this final step will not add a lot of time to your project, but it will add a lot of life to your stenciled floor!
Outdoor Concrete Stencils
If you’re thinking of stenciling your patio or porch but not quite sure what type of stencil to use, I have some suggestions!
Pick a simple pattern in a large-scale format. This will be easier to apply and take less time because you won’t have to move the stencil as frequently as you would a small stencil.
Here are some patio stencils and porch stencils that may be perfect for your project:
- Moroccan Tile Stencil (similar to on my porch)
- Starburst Floor Stencil
- Modern Tile Stencil
- Geometric Tile Stencil
****
I hope you found this project inspiring and helpful! Don’t be like me and wait so long to revamp your patio floors or concrete porch floor.
It will give you such a boost every time you see that cute stencil pattern bringing color and dimension to your space!
Ree says
I’m about to stencil my back patio using the same stencil pattern that you used on yours. Other tutorials I’ve watched suggest spraying adhesive to the back of the stencil. Is this something you would suggest or just tape the stencil down. I worry about getting the tape on the wet freshly stencilled paint.
Bre says
Hi! I only use spray adhesive for stenciling when I am doing it on a wall (or other vertical surface). Here I found the stencil was able to lay flat against the concrete, and because of that, bleedthrough wasn’t an issue like it can be on a wall. Hope that helps!
Roseville Handyman says
I’ve always wanted to try this out and you make it look so easy. I work as a handyman in Roseville, CA and sometimes I get asked to do something like this. Thank you for the instructions, I’m going to try this out!
Bre says
Hi, there! YAY! I’m so glad it’s helpful! Also, I need to update the post to tell you that I did, in fact, seal the concrete after the fact. I used the Behr Low Lustre Sealer and it looks beautiful. So far with our snow and salt the stencil is looking great!
Bre says
test