If you’re looking for a way to hide the side of a refrigerator that doesn’t involve building cabinetry around it, you might like this creative idea for disguising a fridge! It uses paint and magnetic panels you can make yourself!
Since we moved into this house, the oversized refrigerator has really bothered me. It is enormous and sticks out like a sore thumb against the rest of the kitchen.
Back in 2020 and 2021, when I painted the kitchen cabinets, replaced the countertop and backsplash, and made some other cosmetic modifications like disguising the soffits and converting the kitchen desk to pull out trash, I should have tackled the refrigerator.
But . . . I am a lifetime member of the 95% complete club, so I left it as-is. LOL.
Fast forward to January 2025, and I finally decided to do something about this behemoth of a refrigerator. Something that did not require me to rip out the cabinets above the fridge and build an enclosure.
I can’t wait to show you my solution!
Supplies Used to Hide Refrigerator
This post contains affiliate links. Please read my disclosure policy for more information.
Refrigerator Painting Supplies
- Krud Kutter
- Orbital sander with 120 grit sandpaper
- Stix Adhesion Primer
- Benjamin Moore Advance Paint (satin)
- Paint roller
- Paint tray
- Paint brush
- Dropcloth
- Paper towels
Magnetic Refrigerator Panels Supplies
- Oak toe kick panels
- Circular saw
- Magnets (9x3mm neodymium)
- High-temp hot glue
- Tape measure
- Pencil
If this project inspires you to paint your cabinets too, my DIY Cabinet Painting Pro guide walks you through the entire process step-by-step. Save $3 with code 1E98HJA0IC.
Part 1: How to Paint Refrigerator Sides
The first part of this refrigerator makeover involves my favorite type of DIY project: paint!
Step One: Clean the Refrigerator
I started by thoroughly cleaning the sides of the refrigerator with Krud Kutter, which is my favorite pre-paint cleaner.
All I can say is “dang!” The sides of my fridge were dirty.
Step Two: Sand the Sides of the Refrigerator
The sides of my refrigerator were pretty glossy, so I used 120-grit sandpaper and my orbital sander to gently scuff sand the sides.

Once I finished sanding, I wiped down the sides to remove the dust.
Step 3: Prime the Fridge Sides
I’m no stranger to painting tricky surfaces that typically aren’t painted (like when I painted tile walls and painted a fireplace hearth), so I know that high-quality adhesion primer is essential for projects like this!
I used Stix Adhesion Primer all over the fridge sides. This primer has not failed me in the past – it really works well!
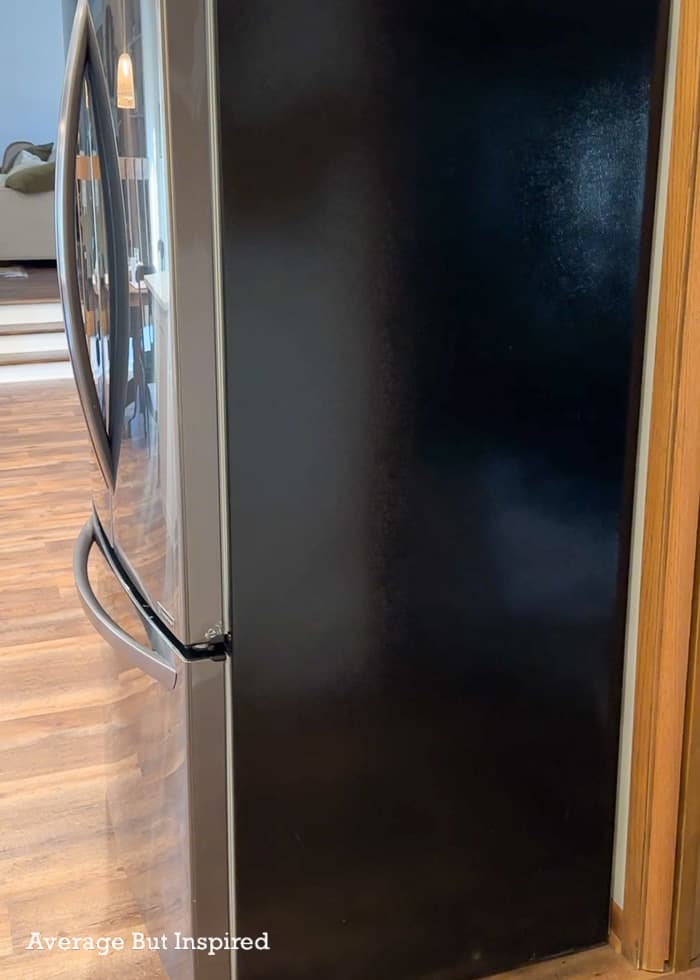
Step Four: Paint the Refrigerator Sides
The last part of this phase of the project was painting the sides of the refrigerator.
Because there is some texture there, I did the first coat of paint in a matte finish (tinted to the same color as the cabinets) to minimize the look of that texture. BUT THAT WAS A MISTAKE.
The matte paint color was slightly different than the cabinet enamel color, and it was making me crazy.
So, I went over that paint with the exact same paint I used to paint the cabinets: Benjamin Moore Advance in Hampshire Taupe (satin finish). It was perfect! And thankfully, the texture really did not show up any more than it did with the matte paint.
Once the paint dried, I pushed the fridge back into place. On this side, it looked just fine!
And on the opposite side, I thought, “well this looks dumb.”
I didn’t like the gap between the bottom of the upper cabinets and the top of the fridge. Instead of the refrigerator blending in with the cabinets, it looked like the same fridge with a painted side.
I mean, I guess it was better than before, but it still wasn’t doing it for me.
Part Two: How to Make Magnetic Fridge Panels
Because this beast of a fridge butts up to the door leading into the dining room, I didn’t have room to build a wall or put in a real panel to hide the fridge.
I also really didn’t feel like doing anything like that, to be honest.
So I decided to try making magnetic trim pieces to frame out the refrigerator and make it look more like part of the cabinetry than before.
Step One: Cut Toe Kick Pieces
I purchased three 4.5″ wide (1/4″ thick) oak cabinet toe kick pieces and got to work! If you have better tools than me, you could cut down plywood to size instead.
I measured the top of the refrigerator from side to side and cut that panel with my circular saw. Don’t be jealous of my sophisticated “buckets as sawhorses” setup.
I then used super-hot glue to attach strong magnets to the back of that section of the toe kick. I put it in place, and it held great!
I then repeated this process for the bottom piece and then each side. I worked one piece at a time to make sure the measurements were as close as I could get them. I knew I could not caulk any gaps, so I needed these to be as close as possible.
(NOTE: At the request of my husband, I also tried thin magnetic tape. It was not as strong as the magnets I used, and it (surprisingly) did not bring the panel pieces any closer to the refrigerator than the magnetic discs did. I do not recommend using magnetic tape.)
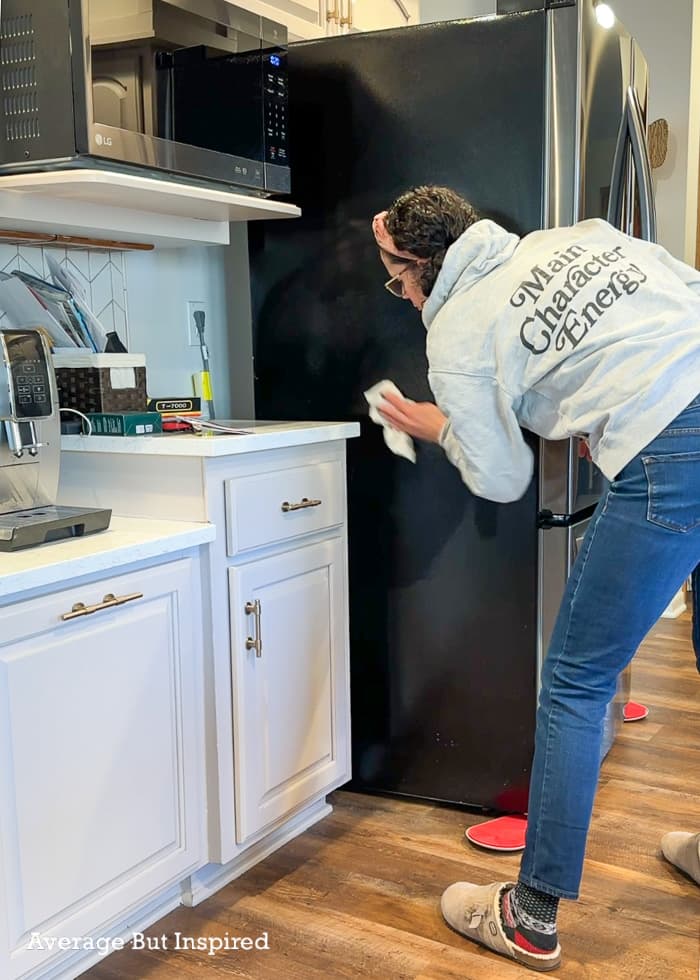
Step Two: Prime and Paint the Trim Pieces
I took down each piece of magnetic trim and wrote the placement of each on the backs.
I then primed and painted the trim with the same primer and paint I used on the sides of the refrigerator.
Step Three: Place the Trim
Once dry, I popped the magnetic trim pieces back into place on the side of the refrigerator.
And then, to be extra fancy, I put magnets on the back of a piece of framed art and popped that onto the side of the fridge. I also put magnetic hooks there and hung some decorative serving boards.
The Completed Faux Fridge Panel
The magnetic trim pieces did the trick! They really helped bridge the gap between the upper cabinets and the refrigerator.
The gigantic fridge is no longer the first thing I see when I walk into the house, and that makes me so happy!
It also blends much better now with the kitchen as a whole.
I think if you wanted to take it a step further, you could cut a piece of plywood to the same size as the side of the fridge, attach trim pieces to that (which you could caulk to remove any gaps), and then attach that to the refrigerator with magnets or mounting strips.
Since I like to drag projects out as long as possible, maybe I’ll try that in five years. Wink.
Brandy says
How have the magnets held up? I’m looking to do something similar, but wondering if you are constantly having to straighten the toe kicks.
Bre says
Hi! These magnets are SO STRONG! Nothing moves – I promise. Even when my kids slam the refrigerator door!
Brandy says
How have the magnets held up? I’m looking to do something similar, but wondering if you are constantly having to straighten the toe kicks.
O. McKee says
I too have a big fridge, in a small kitchen where it sticks out like the sore thumb. I have gotten used to seeing it. However; I would like to try something different. However, for as much as we paid for the fridge I would be frightened to do something like you did! Bravo to you on a job well job and getting me thinking outside of the box on possibly fixing the sore thumb!
Laurie says
Impressive and love the step-by-step instructions. I wish you could come to my house and offer suggestions as I just moved into the saddest new house with such total lack of personality possible! And absolutely nothing in the backyard. My previous home was on a lake that had been updated thoughtfully by previous owners. It had been the bar in the beach for the community for years so it had all types of character.
Alex says
This turned out so good! I never would have thought to do something like this! I recently refinished my kitchen cabinets, but I’m having a similar issue where I feel like the fridge sticks out like a sore thumb now. I am definitely going to need to consider something like this after seeing yours. Thanks so much for sharing!
DIANE RAINTREE says
GREAT job!! Hubby and I recently purchased another rental (a real fixer-upper!), and you always show such great advice. (Yes, that is exactly what I meant and not an AI translation). We might use some of your projects for inspiration. Thank you for showing us how!
Bre says
Hi, Diane – thank you so much!!! And oh gosh that sounds so exciting that you have a new property to work on! Congratulations!!! Have fun with it!
Nancy says
The fridge makeover is terrific!
Bre says
Nancy, thank you! It really made a huge difference in here. Thanks so much!