Looking for a way to repurpose kitchen desk space? Here’s how we converted a kitchen desk area into pull out trash!
Back in the day (like 20 or 30 years ago), the hot trend in design was to plop a desk in the middle of every home’s most valuable area: the kitchen. Nowadays, most people don’t use the kitchen desk space, and it’s just a dumping ground for junk and clutter.
Of course, my new house had a kitchen desk. We put my dog’s food and water bowl where the chair should be, and created a pseudo coffee bar area on the countertop.
But when it was time for me to revamp the kitchen and paint the oak cabinets, we decided to convert the kitchen desk area into pull-out trash, and it was the BEST thing we did in here!
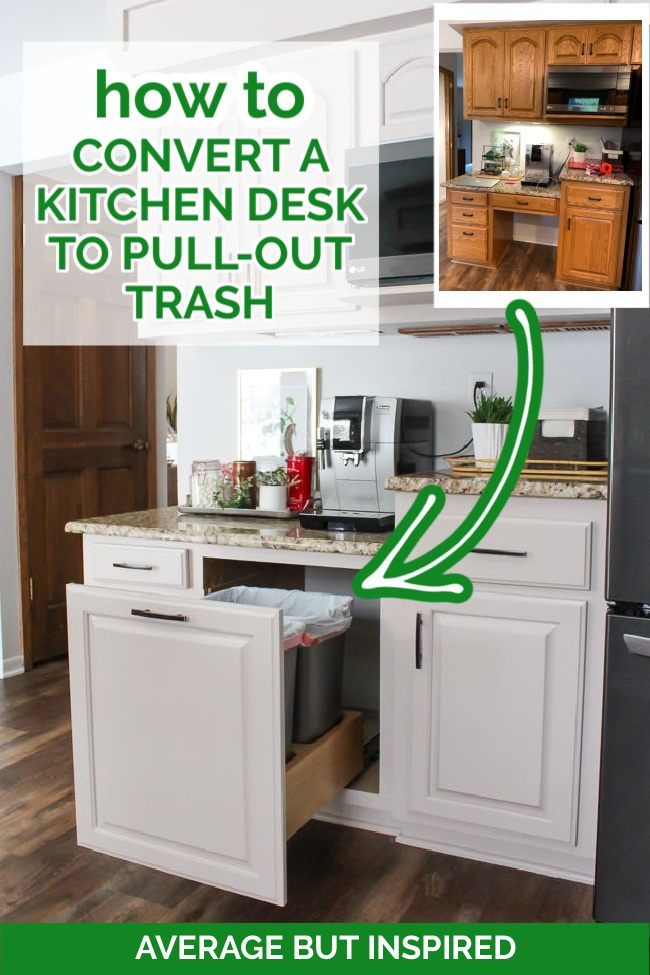
This kitchen desk repurposing idea is a total win because it lets you hide your trash cans, and it ends up looking like it was meant to be this way all along!
Supplies Needed to Convert a Kitchen Desk to Pull-Out Trash
This post contains affiliate links. To read my full disclosure policy, please click here.
- Rev-a-Shelf pull out trash can system
- Custom-size cabinet door (we ordered from Fast Cabinet Doors)
- Level
- Drill
- Circular Saw
- Miter Saw or hand saw with miter box
- Brad nailer
- Lumber (2×4 lumber; 1×4 lumber; shoe trim; veneer pieces; MDF sheet). *NOTE: if you’re painting the cabinets once finished, the type of lumber does not really matter. We used what we could get. At the time we did this, there was a bit of a lumber shortage, so we had to buy some nicer wood than necessary.
How to Convert a Kitchen Desk to Hidden Trash
To start, you have to understand that all kitchen desks are not created equal – they all have different measurements and shapes! Because of that, I will not share any measurements here, but instead, will give you a basic overview of what needs to happen to convert your desk to pull out trash cans.
Also, if you have inset cabinet doors (fancy!), the building steps listed here won’t work quite right for you. And unless you’re an experienced carpenter, you would probably want to hire out this job.
Step One: Build the New Cabinet Box
The photo collage below shows the basic process of building the new cabinet box to fill in the desk part of the cabinets. Again, depending on your set up, the process might be slightly different. This should give you an idea of how to get started at least!
We started by cutting 2×4 lumber to fit in the front and back of the desk chair gap. We used the brad nailer to attach that to the sides of the cabinet (attach through the pre-existing cabinets into the new wood). This is the first photo in the collage (top left).
Then we added two more 2×4 lumber pieces vertically in that space, and shimmed them up to get them level. We attached them to the horizontal 2×4 pieces with the brad nailer. This is the second photo in the collage (top right).
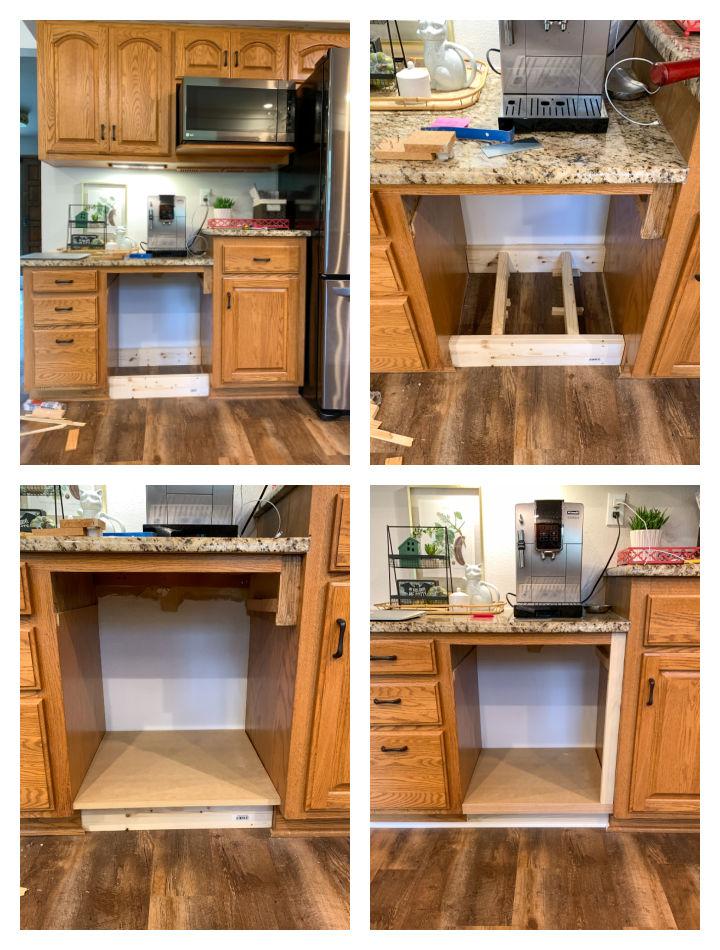
Then, we cut a sheet of MDF to fit in that opening and used the brad nailer to attach it to the 2×4 base. This is photo 3 in the collage (bottom left).
Because we removed a desk drawer from this space, we also had to fill in the gap on the side of the cabinet box, from underneath the old drawer to the new cabinet box base. To do that, we cut a 1×4 to size and used the brad nailer to attach it to the existing cabinet box.
Then, we covered that piece with a piece of veneer, and we also added a piece of veneer to the front of the MDF panel to make that flush with the existing cabinet box base. This is photo 4 in the collage (bottom right).
We finished this off with paint-grade shoe trim molding at the base.
Step Two: Measure and Order The Trash System and a Custom Cabinet Door
Once we had the new cabinet box built to fill in the gap meant for the desk chair, it was time to order both the pull-out trash mechanism and a new cabinet door.
With our dimensions, we were able to use this Rev-A-Shelf double trash can system, which is great because we can put both trash and recycling in the same space.
If you do this project, you’ll most likely need a custom size cabinet door, because the space meant for the desk chair is likely wider than a standard door. We ordered a door from Fast Cabinet Doors because they could make a door in the same style as the existing cabinet doors, and it wasn’t that expensive.

Note that because I was going to paint everything, I did not order an oak door (like the rest of the cabinets), but instead maple. My husband wanted a wood door, but I like the smooth grain of maple better – it looks better painted than oak does. Also, maple was cheaper.
Check Out All of the Posts in This DIY Kitchen Makeover Series
Step Three: Install the Pull-Out Trash Mechanism
For this step, we followed the instructions that came with the pull-out trash system. Since you may order a different one than I did, I won’t go through step-by-step of how to install the in-cabinet trash can system.
Step Four: Install the New Cabinet Door
Again, the specifics of this step depend on what type of trash system you chose.
The system and door we ordered had us screw the door to the front of the trash can system. In this photo you can see that we didn’t get the placement exactly right . . . a couple of times. Ha!
Since these holes are only visible on the inside of the door, I didn’t bother filling them prior to painting.
Step Five: Paint or Stain Everything
And the last step in your kitchen desk repurposing journey is painting or staining the new door to match the surrounding cabinetry.
Because I did this project as part of my larger oak kitchen cabinet painting project, I painted the new door along with everything else. You can get more details on the kitchen cabinet painting process at that link.
My Repurposed Kitchen Desk Idea Come to Life: Transforming the Desk to Pull-Out Trash
I have to say that I am beyond thrilled with this new use for an old space! We LOVE our pull-out trash can (how funny is it to love a trash can?!), and you cannot tell from looking at the space that it was not always here!
This is one of those projects that exceeded my expectations. It has improved the space dramatically for us, and I am so thankful to have my trash and recycling out of sight now.
Other Kitchen Desk Repurposing Ideas
If you want to convert a kitchen desk but hidden trash isn’t going to work for you, there are lots of other ways to change up the desk area!
If you’re a wine connoisseur, consider installing a wine fridge. You could turn the entire area into a functional beverage bar with minimal effort! Shelves over the countertop are a perfect spot to store wine glasses, wine bottles, and more.
Or maybe you prefer to use the area as a coffee bar. The lower countertop is a perfect spot to set the coffee maker and a cute tray holding things like coasters, mugs, and a sugar bowl. Shirred fabric hanging from a tension rod could conceal the opening for the chair and create a design moment in your kitchen.
Another idea is to install shelves in the gap and fill them with cookbooks, baskets, easy-to-reach snacks for the kids, small appliances (like a stand mixer, Instant Pot, or crock pot), and more! The desk area could easily gain new storage space and function with a decorative twist.
If you prefer to close off the area with doors but can’t find replacement doors to match those already on your cabinets, consider using glass doors.
***
Whatever you decide to do, I hope you find a way to repurpose that kitchen desk into a space you love!
Vivian Hudson says
I am getting ready to do this exact same thing, but have room for two cabinets. I think I have the exact same cabinets that you have. When you ordered from Fast Cabinet Doors, did you custom design the door or did you choose one they have (like the Diaz or Heritage)? Such a great idea and looks great too!
Bre says
Hi, Vivian! Apologies for my extremely delayed response! I’m sure you’ve ordered by now. In case you haven’t, I purchased one of their designs and did not do a custom design. Unfortunately I can’t find my order email anymore so I don’t have the exact name. If you need me to, I can look at the site and try to figure out which one it was! Thank you!!
Kristen Burnup says
What a great idea! My sister has a “desk” in her kitchen as well. I’m going to show her this! 🙂
Bre says
Aw, awesome!!
Kristine C. says
What a brilliant idea and so well done! You could also use this idea in a bathroom that has a vanity cut-out, if you don’t use it. Thanks for sharing. I love seeing your projects. They are so creative and well done!
Bre says
Kristine – thank you!!! This is so nice of you to say! That’s a great idea to also do it in a bathroom. I have to admit though, I think I’d love to have a vanity where I could primp all day – ha!
Seana Turner says
This came out so well! I have a kitchen desk, and while I use it for storage, I hardly ever sit there, meaning that there is wasted space. You’ve got me thinking that if/when I redo the cabinetry, maybe I will fill in that bottom section and add a bit more storage (which I could definitely use!) Thanks for sharing, Bre!
Bre says
Hi, Seana! YES!! Make it work for you, my friend! Thanks for your nice note!