
• Skip to primary navigation
  • Skip to main content
  • Skip to primary sidebar
Average But Inspired logo - DIY and craft

Average But Inspired

Craft a home you love. DIY and craft tutorials.

  • About
    • Contact Me
    • Disclosures
    • Privacy Policy and Copyright Policy
  • DIY
    • Furniture
  • Crafts
    • Dollar Store Crafts
    • Seasonal
      • Patriotic & Summer
      • Valentine’s Day
      • Easter & Spring
      • Fall & Halloween
      • Christmas & Winter
  • Home Decor
    • Organization
  • Shop
    • DIY Guides
  • Home

Bathroom

I Covered My Bathroom Floor with Tile Stickers. Here’s How It Went.

March 17, 2026 by Bre 1 Comment

The floor tile in my cottage’s loft bathroom and laundry room was in great shape, and it wasn’t ugly. But . . . it needed a little something.

The room was essentially a white box, and I wanted to give it personality without tearing anything out.
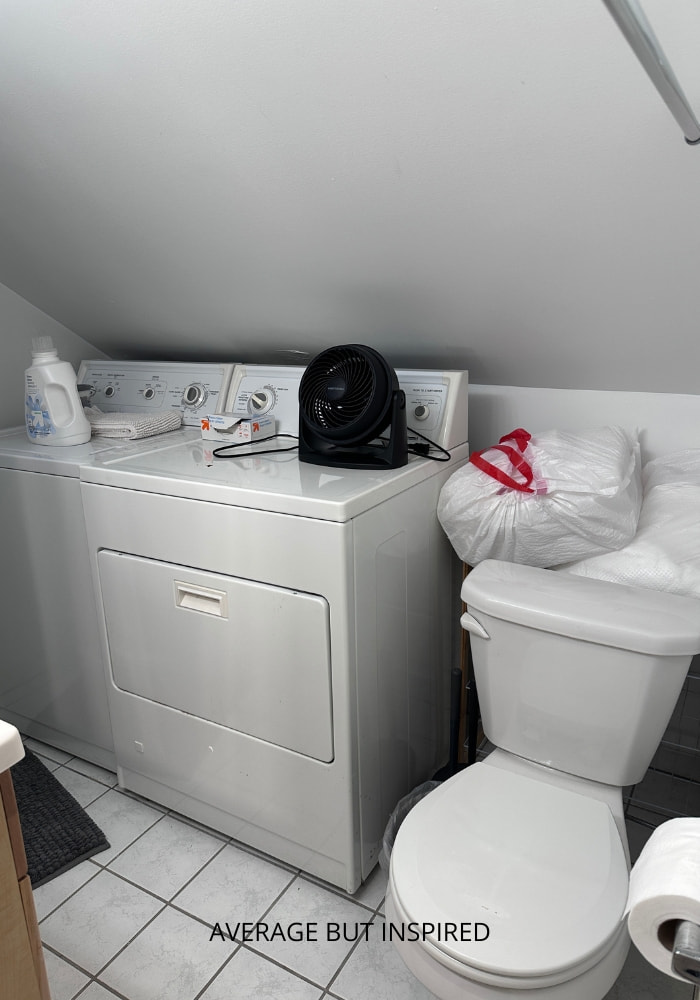
Before: an all white bathroom was boring and plain. Tile decal stickers gave it a whole new look.
BEFORE: The loft bathroom and laundry room was almost all white. I painted stripes on the walls and then got to work putting down peel and stick tile decals.

This post contains affiliate links and sponsored content as part of the Amazon Influencers program. Please read my disclosure policy for more information.

Having installed peel-and-stick floor tiles in my sister’s kitchen five years earlier, I wondered if that would be an option for this bathroom. But because those were more akin to real tiles with thickness to them, I knew they wouldn’t work on top of the tiles already in this space.

So I settled on waterproof tile stickers, or tile decals, which are very thin and can be placed right on top of the preexisting floor tiles.

Colorful tile sticker decals go right over floor tile to create a pretty bathroom floor.

Products Used in This Post

  • Tile sticker decals
  • Brayer
  • Krud Kutter

Prepare for tile sticker installation

To get the floor ready for installation, I first vacuumed and then cleaned the tiles and grout with Krud Kutter.

Krud Kutter is the cleaner I use before almost all of my painting projects. It does an amazing job and doesn’t leave any residue, so I was confident it would be a good choice before putting down tile stickers.

Mix up the tile stickers

Next, I opened all of the tile sticker packages and mixed up the decals from the various packages. I did this to be sure that if any of the colors varied from package to package, they’d blend in and not stand out in sections of the bathroom.

Start with full tiles

The next part was easy and went quickly. I started with the full tiles where no cutting is required, and placed the tile stickers.

The preexisting floor tiles in this room measured 8″ x 8″, so these tile decals, which were slightly smaller than that, were the perfect size for my tiles in that they didn’t require me to trim them to fit full tiles. It’s good for the decals to be slightly smaller than the preexisting tiles so that they don’t hang off the edges.

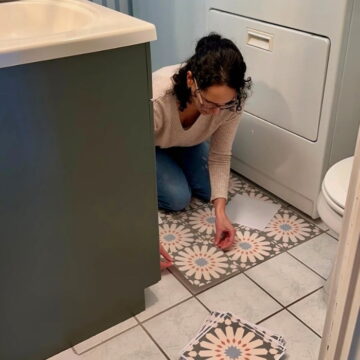
Installing tile sticker decals on a bathroom and laundry room floor.

I took care to ensure that each sticker made contact with the entire tile. (You don’t want any edges hanging off, or your socks or shoes will snag on the corners.)

My process was removing the paper backing from the tile, placing the sticker on top of the tile, and rolling over it with a brayer to make sure the decal’s adhesive made good contact with the tile.

Press tile decals onto the tile with a brayer.

Cut and place partial tile stickers

Then it came time to cut and place the partial tile decals. For this part, I used white copy paper, a ruler, a pencil, and scissors.

Essentially, I traced a full tile onto a piece of copy paper and cut it to size. Then I laid that paper on top of the partial tile on the floor, and traced along the edges that needed to be cut.

I then cut those parts of the copy paper and traced them onto the front of the tile decal. I cut out the tile decal to shape and placed it just as before.

Cut tile sticker decals with regular scissors.

The copy paper worked great, including around the base of the toilet. But a contour gauge would also be helpful for even more precise lines.

The finished bathroom floor

This took me about five hours from start to finish, and I absolutely adore the charming look these adhesive tile decals gave this space.

Peel and stick tile decal stickers gave this bathroom and laundry room a totally new look.

Of course, I don’t expect that these tile sticker decals will last forever, but they’re inexpensive and a relatively quick way to update a bathroom, so that’s fine with me.

Tile decal stickers on a bathroom floor.

Let me know if you have any questions in the comments below, and tell me what you think of this room’s new look! And don’t forget to share this image on Pinterest to share this post with others!

You can put adhesive peel and stick tile decal stickers right over existing floor tiles. This post shows you how I did it and updated a bathroom on a budget.

Filed Under: DIY Tagged With: Bathroom, Cottage

Mirrored Medicine Cabinet and Hollywood Vanity Light Makeover

February 18, 2026 by Bre Leave a Comment

A Hollywood vanity light and mirrored medicine cabinet get a makeover that's stylish and thrifty.

If you have a mirrored medicine cabinet and/or Hollywood vanity light in need of a new look, this easy DIY makeover might do the trick.

Our tiny lake cottage has a super small bathroom and laundry room cleverly packed into the loft. Complete with a very slanted ceiling and an extra small footprint, it is actually one of the main reasons we purchased this cottage.

Most of the properties we looked at only had one bathroom, and if they had laundry machines at all, they were in weird places, like the crawl space.

So, even though some might not view this particular bathroom or laundry room as ideal, I love it!

I recently set out to give it a makeover (more on that soon), and one of the projects was refreshing this existing mirrored medicine cabinet and Hollywood-style vanity light.

Before: a dated mirrored medicine cabinet and Hollywood vanity light .

This post contains affiliate links. Please read my disclosure policy for more information.

Why not replace them with a new mirror and new light?

Because I know you’re wondering why I didn’t just rip out this medicine cabinet and vanity light, I’ll tell you!

First, with such a small cottage, we need all the storage we can get. A medicine cabinet was a must-have in here.

Next, the slant of the ceiling makes it so that a regular-sized mirror and a separate vanity light would not fit. The mirror would be too short.

Finally, I like a challenge. I wanted to see what I could come up with.

So here we are.

Peel and stick mirror trim

The edges of this mirrored medicine cabinet were becoming discolored (getting those black or brown splotches along the bevel). That’s not a huge deal, as desilvering happens to mirrors all the time.

But I found this cool peel-and-stick trim for mirrors and decided to try it out here. It sort of reminded me of my mirror wall makeover, except there I used tape, which was totally flat. This mirror trim has more heft to it and looks more like trim.

Peel and stick gold trim is a perfect addition to a mirrored medicine cabinet in need of a makeover.

It was easy to cut with scissors and press onto the face of the mirror, and it gave it an updated look right off the bat. I chose the matte gold finish, but it comes in other colors, too.

This mirrored medicine cabinet is partially through its makeover, with peel and stick trim having been applied to the beveled edges.

Hollywood light fixture makeover

The next part of this project was giving the dated vanity light a makeover. I had several ideas rolling around my brain, but none was going to work quite right. It took a lot of trial and error, but I eventually came up with this solution, which took into account a couple of important factors:

  1. Any light embellishments did not interfere with the functionality of the medicine cabinet or hit the sloped ceiling, and
  2. The light bulbs could still be incandescent (this fixture would not accept LED lights. Trust me, I tried). Incandescent bulbs are hot, whereas LED are not, so I had to be cautious about heat and starting a fire.

I found glass candle wax catchers (the fancy name for them is “bobeche”) and decided they were exactly what I needed.

I applied Rub n Buff in the shade Gold Leaf around the edges and backs of the bobeches, and super-glued them to the part of the fixture where the light bulbs screw in (which I also applied Rub n Buff to on the outside only).

A Hollywood vanity light got a stylish DIY makeover with clever embellishments and clear globe light bulbs.

With new, clear incandescent bulbs, the Hollywood vanity light looked less 1980’s Glamour Shots chic and more, well, cute.

Shop My Mirror & Vanity Light Makeover Supplies

  • Peel-and-stick gold mirror trim
  • Glass candle wax rings or bobeches
  • Rub n Buff (Gold Leaf)
  • Gorilla Glue gel

In the end, would I rather have a new mirror and vanity light? Probably. But I’m glad to have come up with a creative solution to work with what I already have. I’d so much rather save the cash!

A dated mirror medicine cabinet and Hollywood vanity light got a makeover and update with peel and stick gold trim and a clever addition of glass flowers to the vanity light.

I’d love to hear what you think about this makeover, so please leave me a comment, share this on Pinterest, or find me on social media @averagebutinspired.

Filed Under: DIY Tagged With: Bathroom, Cottage

Cozy Cottage Bathroom with Vintage Charm

April 17, 2025 by Bre 2 Comments

blank

A dated lake cottage bathroom gets a cozy makeover with vintage charm.

Although our lake cottage is teeny tiny (around 700 square feet), one of the reasons we chose it is because it has two bathrooms.

Neither is luxurious, but the good thing is that neither was in bad shape or terribly ugly, either!

With some elbow grease, paint, and new accessories, I was able to infuse the main bathroom with some personality and a bit more functionality, too! And it was all on a pretty low budget, which makes it even more impressive (I think).

I’m excited to show it to you and hear what you think!

The Cottage Bathroom Before The Makeover

The main bathroom is right off the living area, and it’s visible from that room.

This is the main bathroom in the lake cottage. It was dated and needed a refresh to make it feel like a pretty but cozy cottage bath.

Its main features were an interesting tile pattern in the shower, a medicine cabinet that was held together with duct tape, and a laminate vanity and over-the-toilet cabinet.

This dated bathroom in a cozy lake cottage needed a makeover with vintage charm.

Painting the Builder-Grade Vanity

The vanity was in great shape, but it was not the nicest vanity in the world. The sides were like a sticker – they were not wood veneer like the cabinet fronts.

Painting the builder-grade vanity with Heirloom Traditions paint in the color Spruce.

This post contains affiliate links. For more information, please read my disclosure policy. In addition, some items were generously gifted to me by Lowe’s and Moen. Thank you to those companies for their support!

I cleaned the vanity with Krud Kutter (my favorite pre-paint cleaner), scuff sanded it, and then painted it with two coats of my favorite one-step paint.

(In between coats, I started to disassemble the medicine cabinet, too!)

I used Heirloom Traditions in Spruce for this vanity, and I LOVE it. It’s a deep blue green shade that looks really sophisticated.

This bathroom vanity was getting a fresh coat of paint in the color Spruce by Heirloom Traditions Paint.

Because the paint is fast-drying and doesn’t require a topcoat, I was able to finish the vanity in just a few hours.

Color Drenching the Walls, Ceiling, and Trim

Once my husband was able to come down here with me, he finished up the medicine cabinet and vanity light removal.

When he got that down, we found that the light wiring wasn’t actually centered over the vanity. Great. Another project. Womp womp.

Once the medicine cabinet was removed, it was revealed that the cottage light was not centered over the vanity.

I filled the holes left behind by the medicine cabinet, washed the walls, and got to painting.

Color drenching a small bathroom in Wedgewood Gray by Benjamin Moore.

I chose Wedgewood Gray by Benjamin Moore, but I had it mixed in Behr paint to save some cash.

I painted the walls, ceiling, trim, and over-the-toilet cabinet all the same color to make it feel extra cozy in here. The designer-types call this color drenching. And apparently it’s great in a small bathroom- from what they tell me.

At this point, I was sick of painting, and my neck hurt from painting the ceiling, so I decided to put up the new mirror to make me feel better about this bathroom.

Adding a wood mirror to a blue bathroom adds some warmth to the space.

Although we need all the storage we can get in here, I couldn’t find a medicine cabinet I love, so I chose a pretty wood mirror instead. I liked the soft wood tone and scalloped corners of this mirror, and when I hung it up, I felt so much better about this space!

Changing the Vanity Light and Adding Cottage-Style Details

We came back another day for my husband to move that light box. We also swapped the shower head and added a towel bar under the over-the-toilet cabinet so we’d have a place to hang hand towels.

We moved the light box so that the vanity light could be centered over the vanity.

Then I decided to add the CUTEST scalloped wood trim to the bottom of the cabinet over the toilet.

Adding scalloped wood trim to the face of a cabinet gives instant cottage-style charm to this bathroom.

I really prefer shelves over a toilet, but we had to keep this cabinet. We need the storage! So I figured I’d at least infuse a little of my love for scallops in here! (Check out the adorable DIY scallop shelf I built for our primary bedroom at the cottage!)

My husband walked me through how to hang the vanity light (spoiler alert: it was much easier than I thought it would be), and it only took me buying three lights to finally settle on this brass two-bulb vanity light.

I hung a brass light or gold light above the wood mirror to add even more warmth to the cottage bathroom.

I love how the brass/gold adds more warmth to contrast the cool paint colors and the chrome fixtures.

Then I did a bunch of little things like adding new mother-of-pearl cabinet knobs, hanging a pretty plaid shower curtain, displaying thrifted art that I’ve been stockpiling, and hanging up cute gingham hand towels (that will only be used for pictures and when we have guests – IYKYK!).

Changing the Faucet

Finally, I had the privilege of partnering with Moen for a video on Instagram, and I changed a faucet for the very first time!

I changed the sink faucet to add a more sophisticated look.

It wasn’t the easiest project, but it wasn’t too awful either. I needed some help from my husband to get the supply lines loosened and then also reconnected at the end. I made a lot of weird faces during the process.

But the swap from that builder-grade faucet to this high-arc chrome stunner actually made a huge difference in here!

A new chrome faucet from Moen made a huge style impact in this small cozy cottage bathroom.

The Cozy Cottage Bathroom is Complete

In the end, I’m super happy with how this budget bathroom refresh turned out!

A cottage bathroom got a facelift in shades of blue, and pops of warmth from a wood mirror and gold vanity light.

I think I succeeded in giving it some style without going overboard.

This cozy cottage bathroom makeover features Wedgewood Gray walls, a blue vanity, thrifted artwork, and pops of gold and rust for warmth.

Even though all of the “bones” in here are exactly the same, it feels totally different.

A plaid shower curtain adds a masculine touch to this cottage bathroom.

Thank you for checking it out and seeing how my hard work came together!

Scalloped trim added to an over-the-toilet cabinet was an adorable cottage-style detail.

Shop the Bathroom | Items I Used Here

In case it’s helpful, here’s a list of the products I used to bring together this cozy cottage bathroom style.

  • Vanity Paint
  • Wall, Ceiling, Trim paint color
  • Wood Vanity Mirror
  • Showerhead
  • Towel Bar
  • Scalloped Wood Trim
  • Sink Faucet
  • Brass Vanity Light
  • Gingham Hand Towels
  • Plaid Shower Curtain
  • Cabinet Knobs
  • Toilet Paper Basket

Thanks for visiting! Be sure to let me know what you think of this makeover or ask me any questions in the comments!

Filed Under: DIY, home decor Tagged With: Bathroom, Cottage

Primary Sidebar

Let’s Connect!

Hi, I’m Bre! Thanks for visiting Average But Inspired, where I show you how to work with what you’ve got to create a home you love.

Bre of Average But Inspired - a DIY and craft blog

Love DIY? Subscribe to Get Posts E-mailed!

How Can I Help You?

blank

Limewash Stone Fireplace Makeover: Bye Bye Orange Stone Fireplace, Hello Neutral Stone Beauty!

blank

How to Paint a Countertop to Look Like Marble!

blank

My DIY Kitchen Makeover Reveal!

blank

How to Paint a Door to Look Like Wood (It’s Easier Than You Think!)

Looking for Something?

Copyright © 2013-2022, Bre Eggert (Average But Inspired). All rights reserved.
  • Home
  • DIY
  • Crafts
  • Home Decor
  • Privacy Policy and Copyright Policy
  • Disclosures
  • Contact Me