
• Skip to primary navigation
  • Skip to main content
  • Skip to primary sidebar
Average But Inspired logo - DIY and craft

Average But Inspired

Craft a home you love. DIY and craft tutorials.

  • About
    • Contact Me
    • Disclosures
    • Privacy Policy and Copyright Policy
  • DIY
    • Furniture
  • Crafts
    • Dollar Store Crafts
    • Seasonal
      • Patriotic & Summer
      • Valentine’s Day
      • Easter & Spring
      • Fall & Halloween
      • Christmas & Winter
  • Home Decor
    • Organization
  • Shop
    • DIY Guides
  • Home

Crafts

Easy DIY Kids Playroom Art

February 17, 2014 by Bre 62 Comments

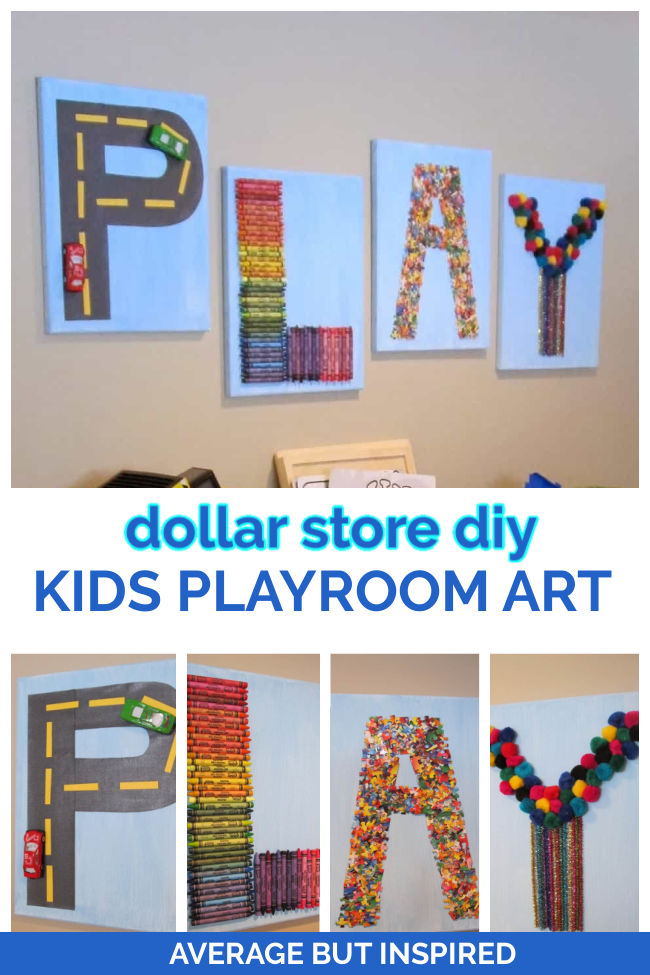
Make this easy Kids Playroom Art with inexpensive dollar store supplies.

After dealing with sick kids all last week, this week just has to be better!  Fingers crossed that my kids will spend less time in front of the TV and more time in their playroom having fun! 

Speaking of their playroom, I’m so excited to show you this DIY kids playroom art I recently made to help liven the place up a bit.  
Do you want to liven up the walls of your kids' playroom? Try this easy dollar store DIY Kids' Playroom Art! Get creative with the supplies you use, or follow this tutorial!

It uses leftover canvases, scrapbook paper I had on hand, and materials from Dollar Tree, and spells out the word “PLAY” in a very creative way!

It was easy and inexpensive, which are necessary attributes of any project of mine!

DIY Kids Playroom Art Supplies

This post contains affiliate links. Please read my disclosure policy for more information.

  • Artist Canvases (11×14)
  • Black cardstock, yellow cardstock
  • Toy cars
  • Crayons
  • Puzzle
  • Pipe cleaners
  • Pom Poms
  • Craft paint
  • Paint brush
  • Hot glue and glue gun
  • Mod Podge

How to Make PLAY Artwork

This DIY artwork is so easy to make!

Start by painting each of the four canvases with acrylic craft paint. Let them dry and gather your other supplies while you wait.

Make the Letter P

I made the letter “P” with black and yellow cardstock paper that I Mod Podged to the canvas.  

I then hot glued some toy cars to the “P” to make it look like a road.

Make cute and colorful kids playroom art with fun supplies from the dollar store.

I Think You’ll Like These Other Creative Ideas for Kids, Too!

DIY Art Creation Station

Art Supply Caddy

Make the Letter L

Next, I made the letter “L” by hot gluing crayons to the canvas.

I alternated the direction of each crayon and did not trim or cut any of them.  That probably would have led to a nicer looking letter, but I didn’t have the time or patience for that.

Make your own kids playroom art with fun supplies like crayons!

Make the Letter A

For the letter “A,” I purchased a 500 piece puzzle from Dollar Tree and whipped out the hot glue gun.  I drew an “A” on the canvas with pencil and glued all the pieces within the letter outline.

The pieces were really small so this was pretty tedious.  It also led to a lot of hot glued fingers.  I think it was worth it in the end, however.

Make your own kids playroom art with fun supplies like puzzle pieces!

Make the Letter Y

Finally, I made the “Y” by outlining the letter in pencil on my canvas, and then hot gluing metallic pipe cleaners and pom poms within the outline.  This is my least favorite of all the letters, but it will do.

Make your own DIY wall art for the playroom with fun supplies like pom poms and pipe cleaners!

My daughter was really excited to see this art go up in the playroom, so that made me happy.  

It's so easy to make DIY kids playroom art with supplies from the dollar store! Get the project tutorial in this post.

And my son has finally stopped trying to scale the toy shelves to get the cars off of the letter “P,” so that has also made me happy.

PLAY art is easy to make using toys and craft supplies from a dollar store!

I love that this was an inexpensive and easy way to fill a blank space in the playroom!

PLAY art is easy to make using toys and craft supplies from a dollar store!

Tell me what you think of it in the comments below!

Filed Under: Crafts, Dollar Tree

Easy DIY Ribbon Chandelier

July 22, 2013 by Bre 3 Comments

blank

This post was updated in January 2019.

My favorite kinds of crafts are those that I can complete during my kids’ afternoon naps.  Give me some quiet time and a glue gun and I’m a happy camper!  This Easy DIY Ribbon Chandelier turned out to be one of those projects.  It was quick and easy, and I love the way the finished product looks hanging in my daughter’s bedroom.

A DIY ribbon chandelier is an easy way to add a fun decorative touch to any room - especially a kids bedroom! This DIY decor project only requires four supplies to make! So easy. #diyhomedecor #homedecorcrafts #ribbonchandelier

Supplies Needed to Make a DIY Ribbon Chandelier

For this project, you’ll need the following supplies:

  • Hoop or wreath form (I used a 4″ grapevine wreath from Dollar Tree. You could also use an embroidery hoop or a styrofoam hoop);
  • Variety of Ribbon (I used five spools of ribbon of varying widths, patterns and shades of purple)
  • Glue Gun  (You could also tie the ribbon to the hoop, but I think gluing the ends gives it a cleaner look)
  • Fishing Line or Twine (for hanging once complete)

How to Make a DIY Ribbon Chandelier

Unfortunately I don’t have step by step photos of this project!  This was the second blog post I ever wrote, and I didn’t know what I was doing!  It’s so easy that I think you’ll be able to figure it out without photos though.  

  1. Hot glue the end of a very long ribbon to your hoop.
  2. Wrap the ribbon around the hoop to cover the form.
  3. Cut ribbons of varying length, which will serve as your chandelier pieces.
  4. Loop a ribbon around the top of your covered hoop and hot glue the back piece to the longer front part of your ribbon.
  5. Repeat all around the hoop.
  6. Hang and enjoy!

Learn how to make a DIY ribbon chandelier for DIY home decor or DIY party decor! This simple project adds a fun touch to any room or event! #kidsroomdecor #DIYhomedecor #homedecorcrafts #partydecor

These DIY Ribbon Chandeliers would also look cute grouped together in varying sizes and/or colors.  Another inexpensive variation for parties would be using streamers instead of ribbon.

Learn how to make a DIY ribbon chandelier for DIY home decor or DIY party decor! This simple project adds a fun touch to any room or event! #kidsroomdecor #DIYhomedecor #homedecorcrafts #partydecor

It’s such an incredibly simple way to add a fun element to any room or event!

Learn how to make a DIY ribbon chandelier for DIY home decor or DIY party decor! This simple project adds a fun touch to any room or event! #kidsroomdecor #DIYhomedecor #homedecorcrafts #partydecor

-Bre

Filed Under: Crafts

  • « Go to Previous Page
  • Page 1
  • Interim pages omitted …
  • Page 20
  • Page 21
  • Page 22

Primary Sidebar

Let’s Connect!

Hi, I’m Bre! Thanks for visiting Average But Inspired, where I show you how to work with what you’ve got to create a home you love.

Bre of Average But Inspired - a DIY and craft blog

Love DIY? Subscribe to Get Posts E-mailed!

How Can I Help You?

blank

My DIY Kitchen Makeover Reveal!

blank

How to Paint a Door to Look Like Wood (It’s Easier Than You Think!)

blank

How to Paint a Countertop to Look Like Marble!

blank

How to Paint Over Tile

Looking for Something?

Copyright © 2013-2022, Bre Eggert (Average But Inspired). All rights reserved.
  • Home
  • DIY
  • Crafts
  • Home Decor
  • Privacy Policy and Copyright Policy
  • Disclosures
  • Contact Me