• Skip to primary navigation
  • Skip to main content
  • Skip to primary sidebar
Average But Inspired logo - DIY and craft

Average But Inspired

Craft a home you love. DIY and craft tutorials.

  • About
    • Contact Me
    • Disclosures
    • Privacy Policy and Copyright Policy
  • DIY
    • Furniture
  • Crafts
    • Dollar Store Crafts
    • Seasonal
      • Patriotic & Summer
      • Valentine’s Day
      • Easter & Spring
      • Fall & Halloween
      • Christmas & Winter
  • Home Decor
    • Organization
  • Shop
    • DIY Guides
  • Home

Crafts

Twigs and Berries Fall Door Decor

September 8, 2014 by Bre 36 Comments

Like it or not, fall is in the air.

I like it.  A lot.

So it’s no surprise that I am thrilled to be getting my home ready for the new season.  Last year I barely plunked a pumpkin on my porch because all of my fall decor was in storage during our basement remodeling project.  This year will be totally different!  My home will look like a scarecrow vomited copious amounts of harvest-themed decor all over it.

One item that I already added to my backdoor was this cute little guy I made with some twigs I lifted from my neighbor’s yard.

Fall door decor made with branches and berries. Average But Inspired
OK, they weren’t actually twigs – it was actually more like a tree limb that I took from my neighbor’s yard.  (Trust me – I waited until I was sure nobody was around to see me dragging this thing into my house.  I looked like a lunatic.  Even my daughter asked what was wrong with me.  Look at her face – you can tell she thinks I’m crazy.)
blank
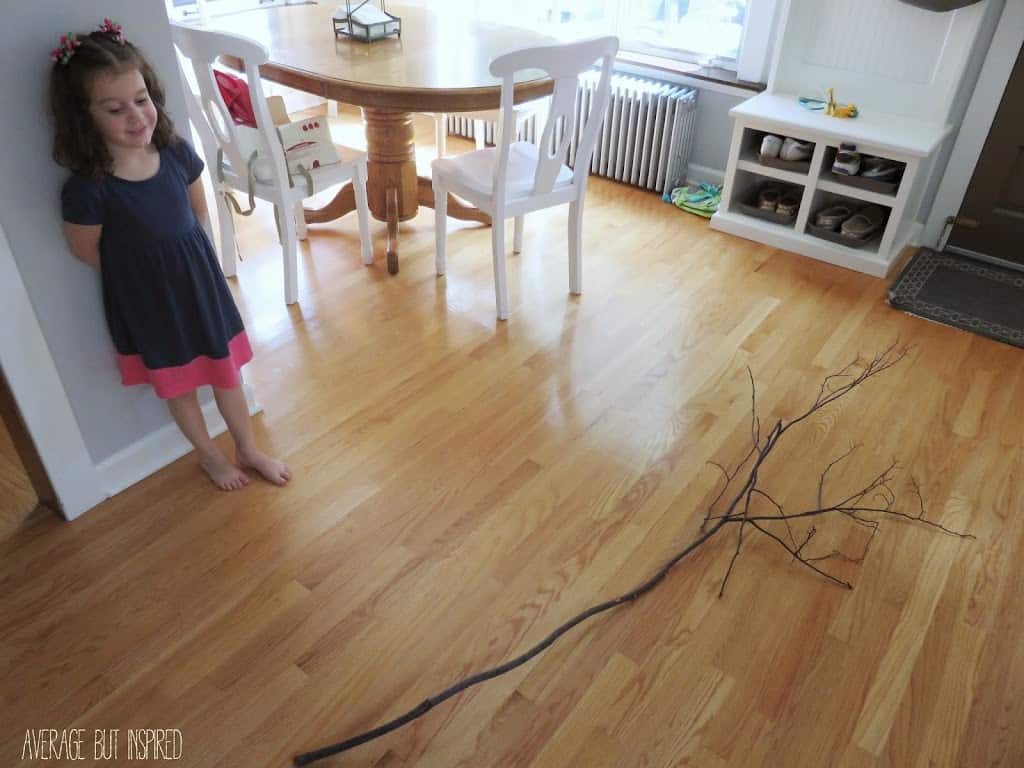
Once I sawed my tree limb into twigs of appropriate sizes, I got to work making my door decor.
I used the following supplies (please note that some of these are affiliate links.  You can read my full disclosure policy here.)
  • 9×12 flat burlap canvas
  • Gold acrylic paint
  • Foam brush
  • Hot glue gun & hot glue
  • Twigs/branches
  • Twine
  • Artificial berry stem
  • Fabric or ribbon

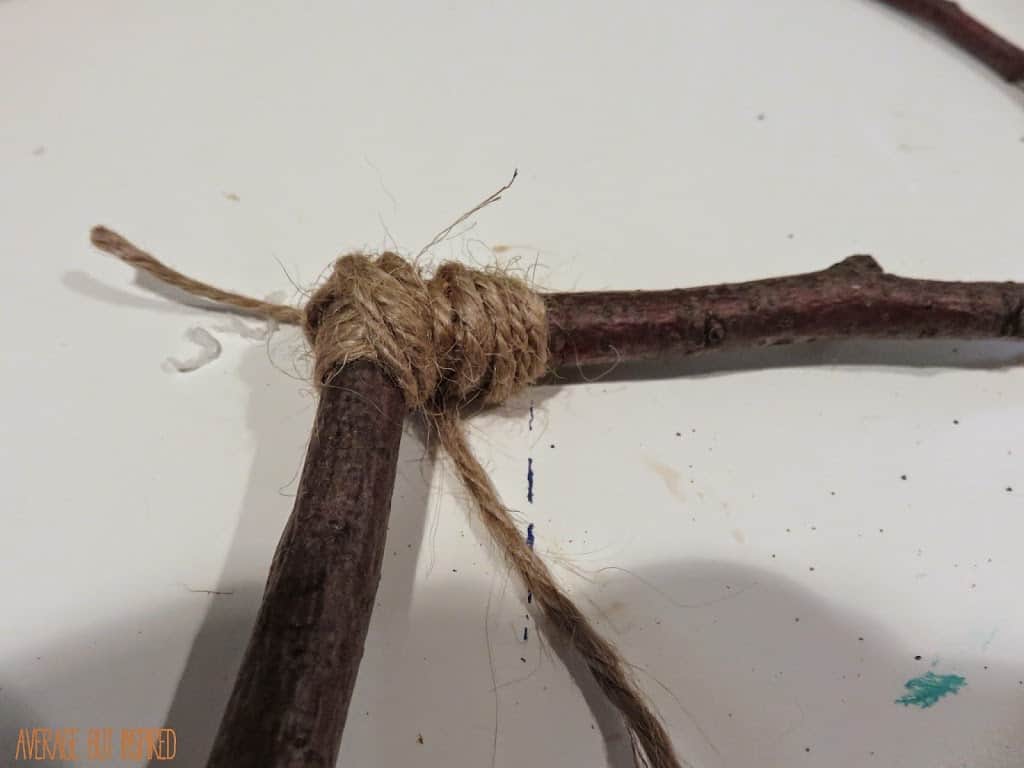
First I hot glued my twigs together to form the letter I wanted.  Then I wrapped the joints with twine to give some extra hold.

blank
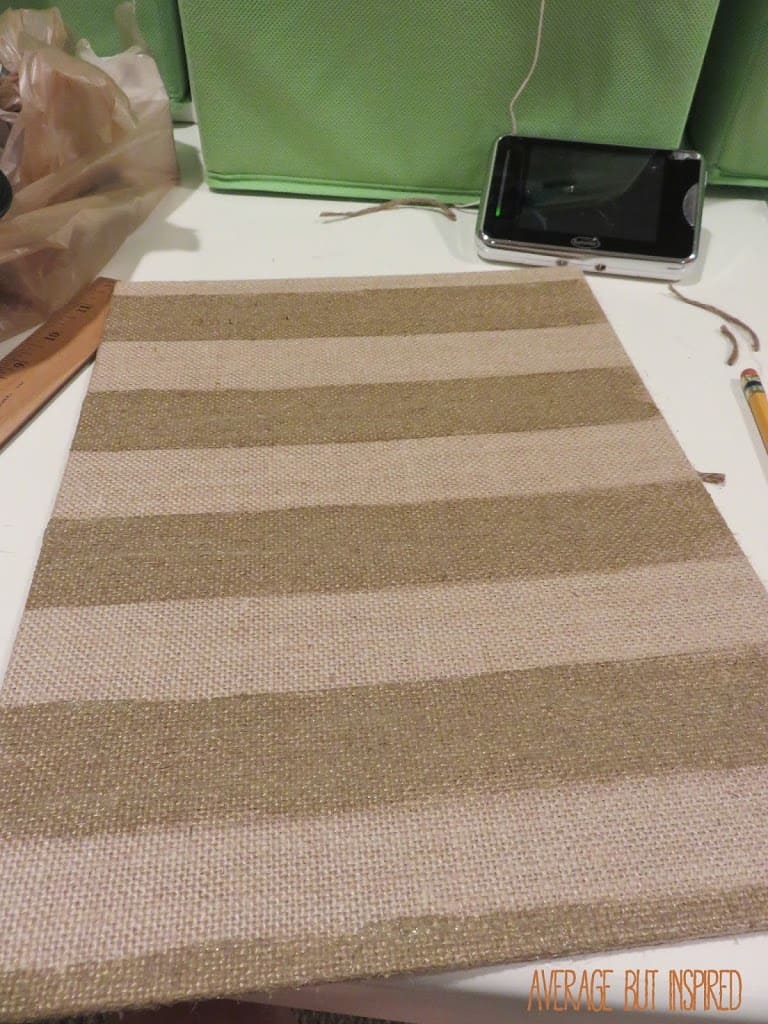
Next, I drew lines on my canvas so that I could paint stripes on it with my gold acrylic paint.  You could obviously paint your canvas however you like.
blank
When I filled in those lines, I loved how it looked!  The gold was subtle but added a little interest to the plain canvas.  Perfect.
blank
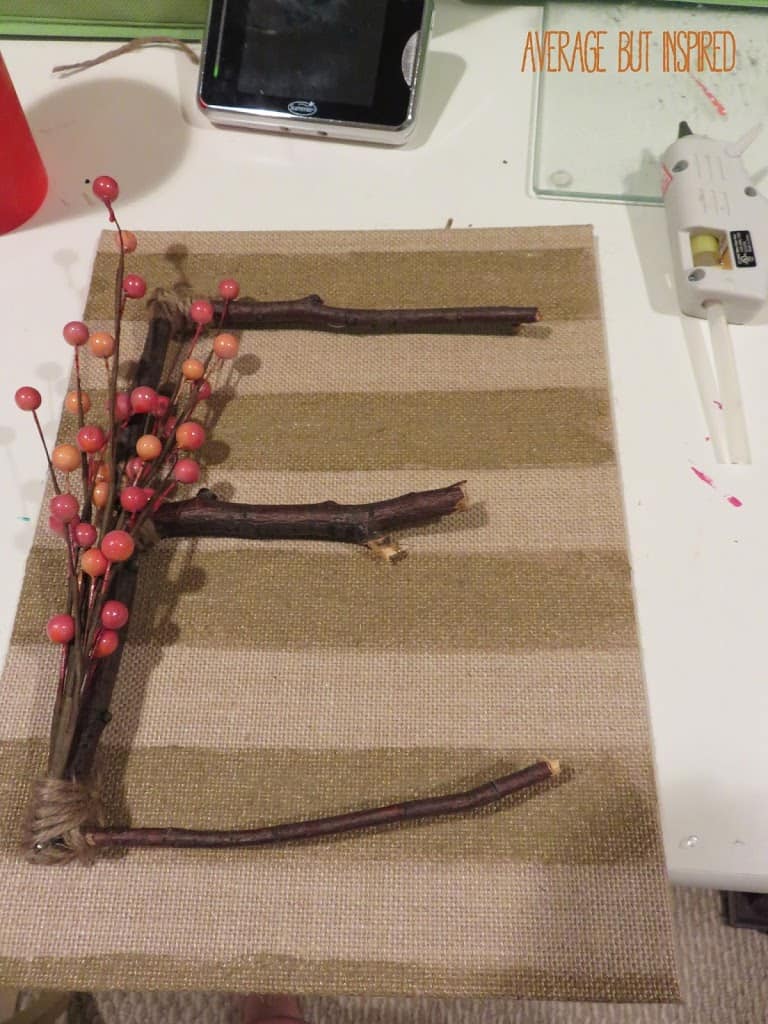
Next, I hot glued a small artificial berry sprig to my letter, and tied some twine around the base.  Then I hot glued the entire thing to the front of my canvas.
blank
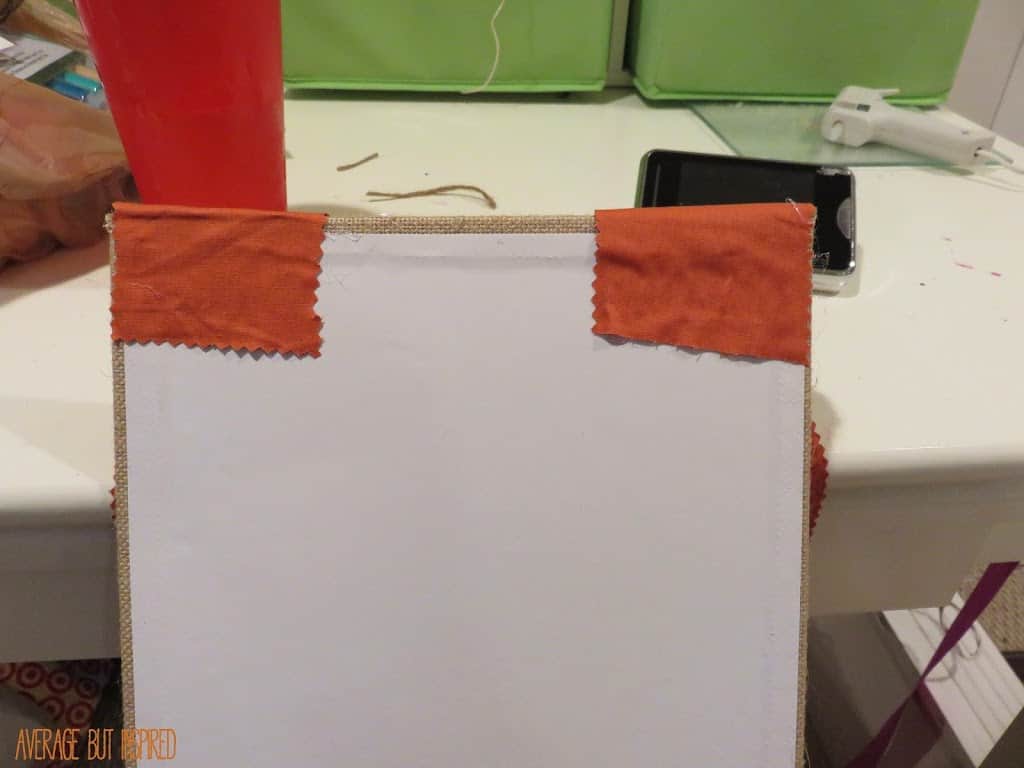
Finally, I cut two strips of fabric and hot glued them to the back of my canvas so that I would have a way to hang my letter decor.
blank
So simple and so fun.  I made this entire thing in just about an hour.
It is a perfect touch of fall for my back door.
blank
If you have an unfortunate last name that begins with a curvy letter, you may not be able to do this project, or you may have to get super lucky and find some bendy twigs in the yard.  I’ll cross my fingers for you.
– Bre

Filed Under: Crafts, Fall and Halloween

Easy DIY Ice Pop Hand Warmers for the Kiddos

September 2, 2014 by Bre 12 Comments

blank

With warm weather and kids there are always ice pops around.  They’re a summertime staple! I love them because they’re less messy than regular popsicles, but I don’t like how my kids always complain about how cold their hands are while eating them.  To solve that problem I made these DIY freeze pop holders!  

Keep your kids' hands warm while they enjoy their favorite frozen ice pop treats! These no-sew DIY Freeze Pop Holders are so easy to make! Get the full tutorial here.

 
These freeze pop holders are ridiculously simple, but seriously effective.  And so, I love them.

DIY Ice Pop Holder Supplies

This post contains affiliate links.  To read my full disclosure policy, please click here.

You need just three supplies for this project, or four if you decide to embellish your ice pop hand warmers as I did.
  • Acrylic craft felt
  • Scissors
  • Hot glue gun
  • Embellishments  (I used rainbow ric rac)
    Keep your kids' hands warm while they enjoy their favorite frozen ice pop treats! These no-sew ice pop hand warmers are so easy to make! Get the full tutorial here.

How to Make a No-Sew Freeze Pop Holder

STEP ONE
Cut felt into 2″ wide strips.  I used pinking shears to create the zig-zag edge that you’ll see at the top of the freeze pop holder.  Regular scissors will work just fine!  You may need to use fabric scissors to cut the felt, as they’re generally sharper than regular scissors.
 
Keep your kids' hands warm while they enjoy their favorite frozen ice pop treats! These no-sew ice pop hand warmers are so easy to make! Get the full tutorial here.
 
STEP TWO
Hot glue down the long sides of the felt strips.
 
Keep your kids' hands warm while they enjoy their favorite frozen ice pop treats! These no-sew ice pop handwarmers are so easy to make! Get the full tutorial here.
 
STEP THREE
Fold the felt strips in half, and press along the glued seams.
 
Keep your kids' hands warm while they enjoy their favorite frozen ice pop treats! These no-sew ice pop handwarmers are so easy to make! Get the full tutorial here.
 
STEP FOUR
Cut the ice pop holder pouch down so that it’s shorter.  Embellish however you like, or leave it plain!
 
Keep your kids' hands warm while they enjoy their favorite frozen ice pop treats! These no-sew ice pop hand warmers are so easy to make! Get the full tutorial here.
 
STEP FIVE
Watch your kids enjoy their icy treats without complaint! 🙂
 
Keep your kids' hands warm while they enjoy their favorite frozen ice pop treats! These no-sew ice pop hand warmers are so easy to make! Get the full tutorial here.
 
Tip:  For a healthier spin on ice pops, freeze yogurt pouches.  My kids think they’re getting a special treat when they’re really having a healthy snack.
 
Now I’m going to go use one of my Koozies for a special adult treat.  (Too bad they don’t have rainbow ric rac.)  🙂
 
blank
– Bre

Filed Under: Crafts

DIY Painted Beach Bags for Kids

June 3, 2014 by Bre 4 Comments

blank

Going to the beach is always an adventure with kids!  To help them take responsibility for their things, it’s great to give them their own beach bags.  These fun DIY Painted Beach Bags for kids are are great project, and even a good “rainy day at the beach” project.

My kids made these beach bags to bring on our trip to Seabrook Island, South Carolina.  They had a blast making them, and having individual beach bags made staying organized much easier!

This is so cute! DIY beach bags for kids are a fun project for the little ones. Learn how to make these DIY beach bags in this post.

Supplies Needed for DIY Kids Beach Bags

This post contains affiliate links.  To read my full disclosure policy, please click here.

We only needed a few supplies for this project, which is perfect when working with kids.  We used:
  • Canvas tote bags
  • Multi-surface acrylic paints
  • Foam paint brushes
  • Contact paper
  • Crayola fabric markers

How to Make Beach Bags for Kids

First, I drew sea creatures on the back of Contact Paper to serve as our stencils.  We chose fish, a seahorse, an octopus and an anchor.  

Your drawings do not have to be perfect because your kids will inevitably get paint underneath the contact paper, which will deform the shapes anyway.  But, if you want to be a perfectionist, you could find clip art online, print it, and trace it onto the Contact Paper.

kids can paint their own beach bags

Next we cut out the Contact Paper shapes, removed the backing paper and placed them sticky side down on our canvas tote bags, making sure to press them down the best that we could.  

In this picture you can see that we’d placed one of the fish and still had to do the other items.

kids can paint their own beach bags
Third, we got down to business!  My kids loaded up their paintbrushes and got to work covering their bags with their favorite sea-inspired colors. 
 
My daughter, who is a huge Octonauts fan, was insistent on having two different colors so that there would be a difference between the “midnight zone” and the upper part of the ocean on her beach bag.  Details details.
 
kids can paint their own beach bags
 
The little guy was pumped to be using such a large paintbrush filled with paint that leaves a permanent mark.  
 
kids can paint their own beach bags
 
I was having a minor heart attack at this point.
 
kids can paint their own beach bags
 
Next we let the paint dry, and then we removed our stencils.  The bags looked like this with the stencils removed.
 
kids can paint their own beach bags
 
They were a little plain, to say the least, so I got out the fabric markers and added a little extra detailing in the way of fish scales, tentacle suckers, eyeballs, etc.  The creatures looked a little happier (and a little more identifiable) that way.
 
kids can paint their own beach bags

I’m not joking that my kids were super pumped to carry these down to the beach.  They loved having their towels, sunglasses and sun hats in their own special place. (These beach bags are also perfect to carry back supplies for a DIY ‘Beach in a Bottle’ Vacation Souvenirs!)

kids can paint their own beach bags
 
Isn’t my model scrumptious?  (The other one refused to stand still or make a normal face, so I don’t have a modeling pic of her.)
 
If you don’t have time to make these before you leave on vacation, bring some supplies with you (assuming your bag isn’t packed to the brim).  Making DIY beach bags an awesome rainy day at the beach or quiet time activity for the kids.  Plus, it makes for some great memories.
 
Oh, and hey, mama – if you need a beach bag of your own, check out this post on how to paint a straw tote bag!

Filed Under: Crafts

Anthropologie Inspired Pom Pom Pushpins

May 16, 2014 by Bre 24 Comments

blank

Okay, I seriously love Anthropologie.  It’s definitely up there on my list of favorite stores, right there with Target and Nordstrom.

Most things Anthropologie sells are worth the higher price tag, in my opinion.  But once in awhile, something sneaks in there that makes me scratch my head and say “for real?”  Take pushpins with pom poms glued on them, for example.

$15 for a set of 12 pushpins?

No thank you.  I’ll spend my $15 on a crystallized bobby pin or metallic hair tie, thank you very much.  And I’ll make my own pom pom pushpins for a fraction of the price!

blank
Seriously, this is so ridiculously easy I’m kind of embarrassed to post it.  But these pushpins are cute, so I figured why not.

Literally all you need are some pre-made pom poms, wide-base pushpins and a hot glue gun.

blank
I got these homemade-looking pom poms at Michaels for $2.99.  They were in the summer kids crafting section, as opposed to the regular kids crafting section that has more traditional-looking pom poms (you know, not like actual yarn pom poms).  Michaels also has wide-base pushpins, or you can get them at Dollar Tree (for a dollar, duh!).
Now, all you do is open your packages and hot glue one pom pom per pushpin.
E-A-S-Y!  
blank
They look super cute on any bulletin board, too!
blank
Cheers to getting the look for less!
– Bre
Let’s Be Social!  Facebook // Pinterest // Twitter // Google+ // Bloglovin’
Linking Here:
Monday:  The DIY’ers  // Frugal Crafty Home //  Inspiration Monday  // Your Designs This Time
Tuesday:  Do Tell Tuesday  // Hit Me With Your Best Shot // Sugar Bee Crafts // Brag About It  // The Makers
Wednesday:  Creative Spark // Make Bake Create // Work It Wednesday // Wow Me Wednesday
Thursday:  Artsy Corner Thursday //  Create It Thursday//  Inspiration Gallery //  Link’n Blogs // Live Laugh Linky // Thursday S.T.Y.L.E.  
Friday:  Frugal Friday  //  Link Party Palooza // The Party Bunch 
Saturday:  Show Stopper Saturday  // Six Sisters’ Stuff  // Showlicious Craft & Recipe Party
Sunday:  DIY Sunday Showcase //  Link it or Lump it // That DIY Party  // Sunday Soiree

Filed Under: Crafts

How to Make Pretty Fabric Covered Clipboards

April 28, 2014 by Bre 47 Comments

blank

Did you know that Teacher Appreciation Week is around the corner?  I don’t know how teachers do it . . . putting up with all of the craziness children throw at them on a daily basis.  Some days I can barely even handle my own children, let alone other people’s kids.  Teachers truly are special people, worthy of a week devoted to making them feel appreciated!

I always like to give teachers little gifts throughout the year, and one of my favorite teacher gifts is these DIY Fabric Covered Clipboards.  Swap out teachers’ boring, plain and uninspired clipboards for these fabulous fabric covered clipboards! This is a great Teacher Appreciation Week gift, or a gift for anyone who likes to be organized!  It's so easy to make these cute fabric covered clipboards! No sewing involved! This is a fantastic teacher gift idea, or a project for anyone who likes to be organized! #teacherappreciation #teacherappreciationweek #teachergiftideas #teachergift #clipboardideas

Seriously, how cute are these?!?
 
This project was really fun to put together and I love the end result.  If you want to make your own, keep reading!

Supplies Needed for DIY Fabric Covered Clipboards

This post contains affiliate links. To read my full disclosure policy, please click here.

  • Clipboard
  • Fabric of your choice
  • Mod Podge (I used matte finish)
  • Foam brush
  • Hot glue gun & glue
  • Rotary cutter, Xacto knife, and/or sharp fabric scissors
  • Optional: fabric stabilizer (see step six below)

How to Make DIY Fabric Covered Clipboards

It’s so easy to make these clipboards!  

These fabric covered clipboards with bottom pockets are an easy DIY project and make a PERFECT gift for teachers or students!
STEP ONE
Cut your base fabric slightly larger than the size of your clipboard.
 
STEP TWO
Cut a space out of the top of the fabric to accommodate the clip portion of the clipboard.
 
STEP THREE
Apply a layer of Mod Podge all over the clipboard.
 
STEP FOUR
Place your fabric over the Mod Podged clipboard.  Smooth out any wrinkles.  Apply a layer of Mod Podge all over the top of the fabric.
 
STEP FIVE
Once the Mod Podge has completely dried, flip the clipboard over and cut the excess fabric from around the clipboard.  I used a rotary cutter and it worked very well.
 
STEP SIX
You could leave your clipboard as is, but if you want to add a pocket to the bottom of the clipboard, cut a rectangular piece of fabric 1″ taller and wider than the bottom portion of the clipboard.  Flip the fabric over and fold three sides in .5″ and iron for a crisp seam.  Hot glue those pressed in sides to the bottom of the clipboard to form a pocket.
 
Note that I applied an iron-on stabilizer to the fabric I used for my pocket, just to give it some extra strength.  I also trimmed the top portion of the pocket with pinking shears to ensure that the fabric won’t fray with time.
These fabric covered clipboards with bottom pockets are an easy DIY project and make a PERFECT gift for teachers or students!
I love how the pocket can be used to hold pens and other small accessories, and I like how the contrasting fabric gives an extra dose of personality!
These fabric covered clipboards with bottom pockets are an easy DIY project and make a PERFECT gift for teachers or students!
These fabric covered clipboards are sure to be a welcome addition to any classroom!  How will you be recognizing the teachers in your life this Teacher Appreciation Week?
 
– Bre

Filed Under: Crafts

Knockoff West Elm Brass Base Terrarium

April 2, 2014 by Bre 23 Comments

These DIY Brass Base Terrariums are an easy DIY!

Last weekend I got to go shopping by myself.

As a mother of small children, do you know how precious that time was?

I was actually able to browse around and go into stores with breakable merchandise.  It was so liberating and SO INSPIRING!!!

A direct result of that shopping trip was this project . . . my knockoff West Elm Brass Base Terrarium.

West Elm’s Brass Base Terrariums are beautiful.  They come in two sizes – small and large – and are priced at $29.50 (small) and $59 (large).  The interesting thing about the West Elm terrarium is that it looks like the bowl is almost tipped on its side, as opposed to being straight up (like mine).  West Elm also sells the succulents to go inside of the terrarium at $12.50 a pop.

I love the low-maintenance nature of succulents and I wanted one of these terrariums.  But I wasn’t about to lug one around the mall with me, nor was I about to pay $42 for a terrarium and one succulent.  So yeah, I decided to try making one myself.

West Elm’s terrarium definitely looks nicer.  But I think mine is okay, too.  And for just $7 all in (like, with the plants), I’ll take it.  And since my glass bowls aren’t tipped on their side, these can be used for taller plants as well.  Bonus!

Learn to make a DIY faux brass base terrarium. It's easy and makes for a chic and modern planter or terrarium.
 
The best part was that this really and truly was a snap to put together.

Faux Brass Base Terrarium Supplies

This post contains affiliate links.  To read my full disclosure policy, please click here.

Here are the materials I used to make these faux brass base terrariums:

  • Small glass bowl vase
  • 4×6 piece of wood, cut to size
  • Sandpaper
  • American Accents spray paint in Aged Bronze (you can find this cheaper in a store!)
  • Acrylic paint in bronze
  • Elmer’s ProBond Advanced glue

How to Make a DIY Brass Base Terrarium

Here’s how I put this together:

STEP ONE

Determine the desired size of your wood base by placing your glass bowl on top and deciding how large you want the bottom square to be.  Measure and cut.  (Ignore all the junk in my garage.  We just finished a renovation and had to store a bunch of stuff in there.  It’s normally not this messy!)

Cut wood pieces from a 4x6 to create the bottom of the DIY brass base terrarium.

STEP TWO

Sand your wood block all over and then spray paint it.
 
Spray paint the wooden base of the DIY brass base terrarium.
 

STEP THREE

Once the paint has dried, coat it with a layer of bronze acrylic paint.  This will make the color look richer and your base piece look less like a piece of wood and more like a bronze block.  (The block on the left has acrylic paint on top whereas the block on the right does not.)
 
Topcoat the spray painted wood with bronze craft paint.
 
Check out this other blog post of mine to learn how to create an even more authentic faux brass finish with paint!

STEP FOUR

Once the paint has dried, apply the glue to the bottom of your glass bowl.  Affix to the wood and follow the package’s instructions for proper adhesion.  (NOTE:  the glue does not dry clear so be sure not to apply too much or it will squeeze out the bottom of the bowl and leave a visible glue ring around your bowl and base.)

blank

STEP FIVE

Once the glue is dry, add your plants and enjoy!

blank
To get a look closer to West Elm’s terrarium, I should have cut my base pieces smaller.  I’m just going to say that this was my creative spin on the project – ha!
 
– Bre

Filed Under: Crafts

  • « Go to Previous Page
  • Page 1
  • Interim pages omitted …
  • Page 18
  • Page 19
  • Page 20
  • Page 21
  • Go to Next Page »

Primary Sidebar

Let’s Connect!

Hi, I’m Bre! Thanks for visiting Average But Inspired, where I show you how to work with what you’ve got to create a home you love.

Bre of Average But Inspired - a DIY and craft blog

Love DIY? Subscribe to Get Posts E-mailed!

How Can I Help You?

blank

Limewash Stone Fireplace Makeover: Bye Bye Orange Stone Fireplace, Hello Neutral Stone Beauty!

blank

How to Paint Over Tile

blank

How to Paint a Countertop to Look Like Marble!

blank

My DIY Kitchen Makeover Reveal!

Looking for Something?

Copyright © 2013-2022, Bre Eggert (Average But Inspired). All rights reserved.
  • Home
  • DIY
  • Crafts
  • Home Decor
  • Privacy Policy and Copyright Policy
  • Disclosures
  • Contact Me