Over the years I’ve made quite a few pieces of door decor or wreaths from Dollar Tree supplies. (Take my Fourth of July Tinsel Wreath or my Egg Tray Wreath for Easter, for example.) I just can’t help myself! Every time I go to Dollar Tree I find cute new supplies that call out to me, and I am forced to create. It’s a real problem, friends (the creating and the fact that products at Dollar Tree talk to me. HA!)! On a recent trip, I bought supplies to make an atypical fall wreath for my backdoor – and today I’m going to show you how to transform a Dollar Tree silver tray from the party supply section into a beautiful Silver Tray Wreath! 
Supplies Needed to Make a Silver Tray Wreath
Some of these links are affiliate links. Please read my full disclosure policy here.
- Silver tray (I purchased a nickel plated metal serving tray at Dollar Tree)
- Chalkboard paint
- Paintbrush
- Light gray and dark gray acrylic paint
- Sponge
- Chalk
- Faux fall leaves (I also purchased them at Dollar Tree, but here’s an alternative)
- Hot glue gun and hot glue
- Mini 3M Command Hooks
- Ribbon
How to Make a Silver Tray Wreath for Fall
I started with this plain silver tray from the party supply section at Dollar Tree. These are actually really sturdy and they come in three shapes/sizes. They’re great for crafting and entertaining! 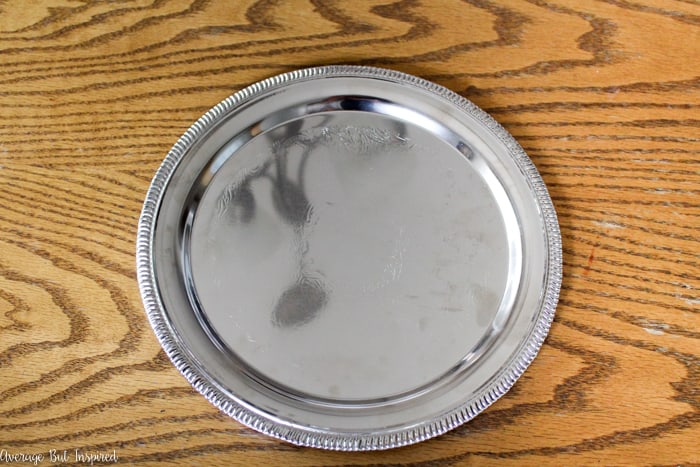
Next, I turned the center of the silver tray into a chalkboard with my favorite chalkboard paint. I used two coats of chalkboard paint to make sure there was good coverage! 
Once the chalkboard paint was dry, I worked to take the shine down on the silver tray, and to make it look like it is aged or antique. I began by lightly sponging on acrylic paint in a light gray color. I gently dabbed the light gray paint all around the edge of the tray.
When that light gray paint dried, I then used by sponge to rub dark gray acrylic paint along the raised portions of the silver tray. Unlike with the light gray paint where I dabbed the color on, this time I rubbed the color on in order to accent those raised portions of the tray.
This painting technique went a long way toward giving my Dollar Tree silver tray an aged look!
Once that paint dried, I cut leaves off of my Dollar Tree fall leaf garland and began to hot glue them around the bottom 1/3 to 1/2 of the silver tray. I layered them and angled them in different ways, rather than lying them flat and in a row.
Next, I flipped the tray over and attached two 3M Mini Command Hooks to the back, upside down. These things are my go-to for just about everything that needs a hook. I love them! I then ran a ribbon through the hooks and tied it at the top.
Then I flipped the tray over and gently ran a piece of chalk all over the chalkboard portion of the tray to season it. Next, I tried to write “Hello” in fancy script on the front. (Note: need to practice chalkboard lettering!)
Before I hung up my Silver tray wreath, I bent my ribbon streamers and hot glued them to the edges of the tray. Then my silver tray wreath was ready to be displayed on my backdoor!
I love the pretty touch it adds to the door, and it was such an affordable way to bring some charm to the back porch!
Can you see why I love to go to Dollar Tree so much? What’s your favorite thing to buy there? Also, if you enjoyed this project, I would appreciate it if you would PIN it to share the love!
-Bre
You Might Also Like This Dollar Tree Project!
DIY Fork, Spoon, and Knife Kitchen Plates Decor
Valerie says
I really love this project, especially the ‘aging’ technique you described for the tray! My decor leans heavily toward natural elements for the Christmas/holiday season (mostly so I can leave it up all winter…wink, wink) and I am thinking this would look quite pretty on our front door with greenery instead of leaves. Thank you for sharing!
Bre says
Hi, Valerie – thank you! YES – you can totally make this with greenery! I’d love to see a pic if you do it! 🙂
Norma Rolader says
This is such a great idea Thank you for sharing and the great info God bless
Bre says
Hi, Norma! I am SO glad you like it! 🙂 Gotta love the quick and easy projects. Thanks for reading and see you again soon!
Cait says
I love this DIY! Definitely inspires me to do some DIY fall decor. I have been wanting to create new things, but our budget is a bit smaller this year. You’ve got my creative juices going to try new, affordable ideas.
My favorite touch is the aging with acrylic paint. I already pinned this!
Bre says
Hi, Cait! Thank you so much!! You should DEFINITELY check out Dollar Tree – you can turn so many of their things into beautiful stuff! You might also like my friend Katie’s blog – Little House of Four – because she does a ton of budget-friendly decor and crafts! Thanks again for stopping by and I hope you have a great day.