• Skip to primary navigation
  • Skip to main content
  • Skip to primary sidebar
Average But Inspired logo - DIY and craft

Average But Inspired

Craft a home you love. DIY and craft tutorials.

  • About
    • Contact Me
    • Disclosures
    • Privacy Policy and Copyright Policy
  • DIY
    • Furniture
  • Crafts
    • Dollar Store Crafts
    • Seasonal
      • Patriotic & Summer
      • Valentine’s Day
      • Easter & Spring
      • Fall & Halloween
      • Christmas & Winter
  • Home Decor
    • Organization
  • Shop
    • DIY Swag
    • DIY Guides
  • Home

DIY

DIY IKEA Bar Cart from a Rast Dresser

October 26, 2015 by Bre 23 Comments

This IKEA bar cart hack will have you saying “sip sip hooray!”  OK sorry, I know that’s cheesy but I couldn’t help myself!  I’m so pumped to show you how to transform an IKEA Rast dresser into a portable bar cart for the home.
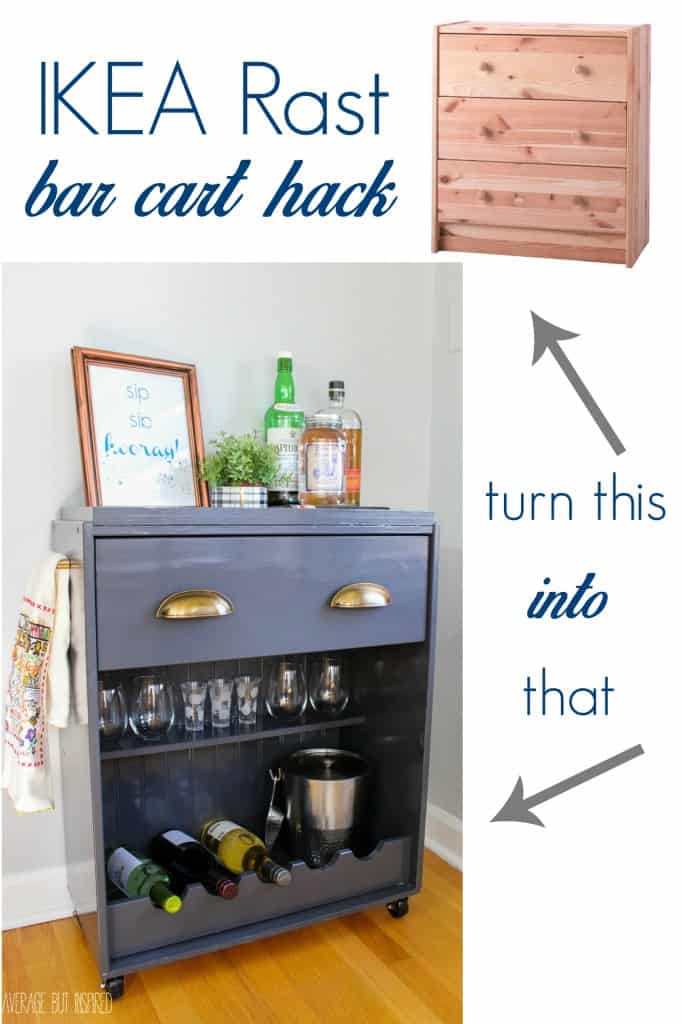
 

This IKEA bar cart hack is awesome! Turn a Rast dresser into a stylish and functional bar cart that's perfect for any space.

A big thanks to both Hickory Hardware and Pittsburgh Paints for providing some of the materials I used on this project!

Why turn the IKEA Rast into a bar cart?

When assembled, the IKEA Rast dresser is extraordinarily basic and very small in scale.  Honestly, it’s more like a nightstand than a dresser.Transform a plain IKEA Rast dresser into a fun bar cart with this tutorial!

Perhaps because of its small stature, it is priced at only $39.99! (That’s the current price at the time of updating this post in 2021.)

It’s SO plain that it’s the perfect piece to hack into a bar cart with ample storage for everything you need in a bar cart!  The drawer is especially handy for storing things, too.

Because of that, I knew I wanted to transform the Rast dresser into a bar cart.  Let me show you why and how!

Supplies Needed for This IKEA Bar Cart Hack

This post contains affiliate links.  To read my full disclosure policy, please click here.

With the basic shape of my bar cart in mind, I set aside some supplies I had on hand and also went shopping at my new Menards (which is amazing, by the way), to take my IKEA Rast from Plain Jane to amazing.  

Here’s what I used to transform my Rast dresser into a fabulous bar cart:

  • Wood filler (paintable and stainable)
  • Putty knife
  • Nails & screws
  • Hammer
  • Drill
  • Wood glue
  • Clamps
  • Miter box and saw
  • Circular saw
  • Jigsaw
  • Paint
  • Primer
  • Paint brushes
  • Beadboard
  • Three 1″ x 36″ square dowels
  • Precut section of 1/2″ thick birch plywood
  • Four casters
  • Two Hickory Hardware Williamsburg 3″ Narrow Cup Pulls
  • Two Hickory Hardware Williamsburg 3″ Drawer Pulls

How to Make This DIY IKEA Bar Cart Hack

Step One: Assemble the Majority of the Rast Dresser

So with the help of my three-year-old son and his plastic tools (yes, seriously), I assembled the majority of the dresser, but left off the back particle board, the bottom two drawers, and the bottom lip (that goes under the bottom drawer).  I assembled everything else according to IKEA’s directions.  

Transform a plain IKEA Rast dresser into a fun bar cart with this tutorial!

Step Two: Fill Holes

Next, I used wood filler to fill in the preexisting hardware holes in the drawer and along the inside of the dresser (where the bottom two drawers would have been).

Step Three: Create the Wine Bottle Holder

Next, using the jigsaw, my husband helped me cut semi-circles out of the bottom lip of the dresser to create the wine bottle holder!  You can see in the photo below that I traced semi-circles where I wanted him to cut.

Once it was all cut, I then put that piece onto the bottom of the dresser, right in its designated spot.

Transform a plain IKEA Rast dresser into a fun bar cart with this tutorial!

Step Four: Cut the Bar Cart Backboard and Bottom

Next up, my husband cut the beadboard (for the back of the bar cart), and birch plywood (for the bottom of the bar cart), to size for me.  (I wish I had the dimensions for you, but I’m sorry that I didn’t write that down!)

He was not thrilled about this and kept lecturing me about how I need to learn to use the power tools. I bought him some beer to calm him down.  (UPDATE: Now (2021) I could totally do this myself.)

Step Five: Sand and Prime

Next, I primed everything with a coat of oil-based primer.  (Remember, I was using the oil-based trim and door paint that is no longer available.  Depending on the paint you choose, you may not need oil-based primer!)

Transform a plain IKEA Rast dresser into a fun bar cart with this tutorial!
Step Six: Attach the Backboard and the Bar Cart Bottom

Once the primer dried, I nailed the beadboard into place for the back of the bar cart, and screwed the bottom onto the cart.

Step Seven: Create the Bar Cart Top Tray

Then came the worst part. I had to do a lot of measuring (I really do not like math), in order to make a tray-type trim around the top of the bar cart. My husband was cracking up at me trying to “measure twice, cut once” and took this lovely photo of me. (OK, he actually took like 50 because it took a super long time. You don’t need to see all of those.)  And even with all the time spent, I still messed up a couple of times.  Good thing I had an extra dowel.

Transform a plain IKEA Rast dresser into a fun bar cart with this tutorial!
And then, I think simply for his own amusement, he had me hand saw the square dowels in the miter box so that I’d get a perfect fit for the tray trim on top.  I seriously think I pulled a muscle from all that sawing.  But I have to admit that he was right – using the miter box was the way to go.  (Another 2021 update: now I would’ve used my Ryobi Miter Saw).

Transform a plain IKEA Rast dresser into a fun bar cart with this tutorial!
I glued the dowels to the top of the dresser/bar cart with a thin layer of wood glue and clamped (and weighted) them down to make sure they’d really stick.  (Can you see the bribery beer in the top right of this picture?)

Transform a plain IKEA Rast dresser into a fun bar cart with this tutorial!

Step Eight: Drill Holes

After I was convinced my dowels were not going anywhere, I drilled holes for my new hardware in the drawer and on the left and right side of the dresser/bar cart, drilled holes for my casters on the bottom, and got ready to add some color!

Transform a plain IKEA Rast dresser into a fun bar cart with this tutorial!

Step Nine: Paint the Bar Cart

I gave the dresser/bar cart two coats of Pittsburgh Paint Trim Door and Furniture Paint in Charcoal, and that was it. Because it’s a gel-type consistency with a hard finish, no topcoat was needed!  (Again, this paint is no longer available!)

Transform a plain IKEA Rast dresser into a fun bar cart with this tutorial!

Step Ten: Add the Hardware and Casters to the Bar Cart

After letting it thoroughly dry, I popped in my new hardware from Hickory Hardware and my casters, and rolled my bar cart inside!  Isn’t she cute?!?

Transform a plain IKEA Rast dresser into a fun bar cart with this tutorial!

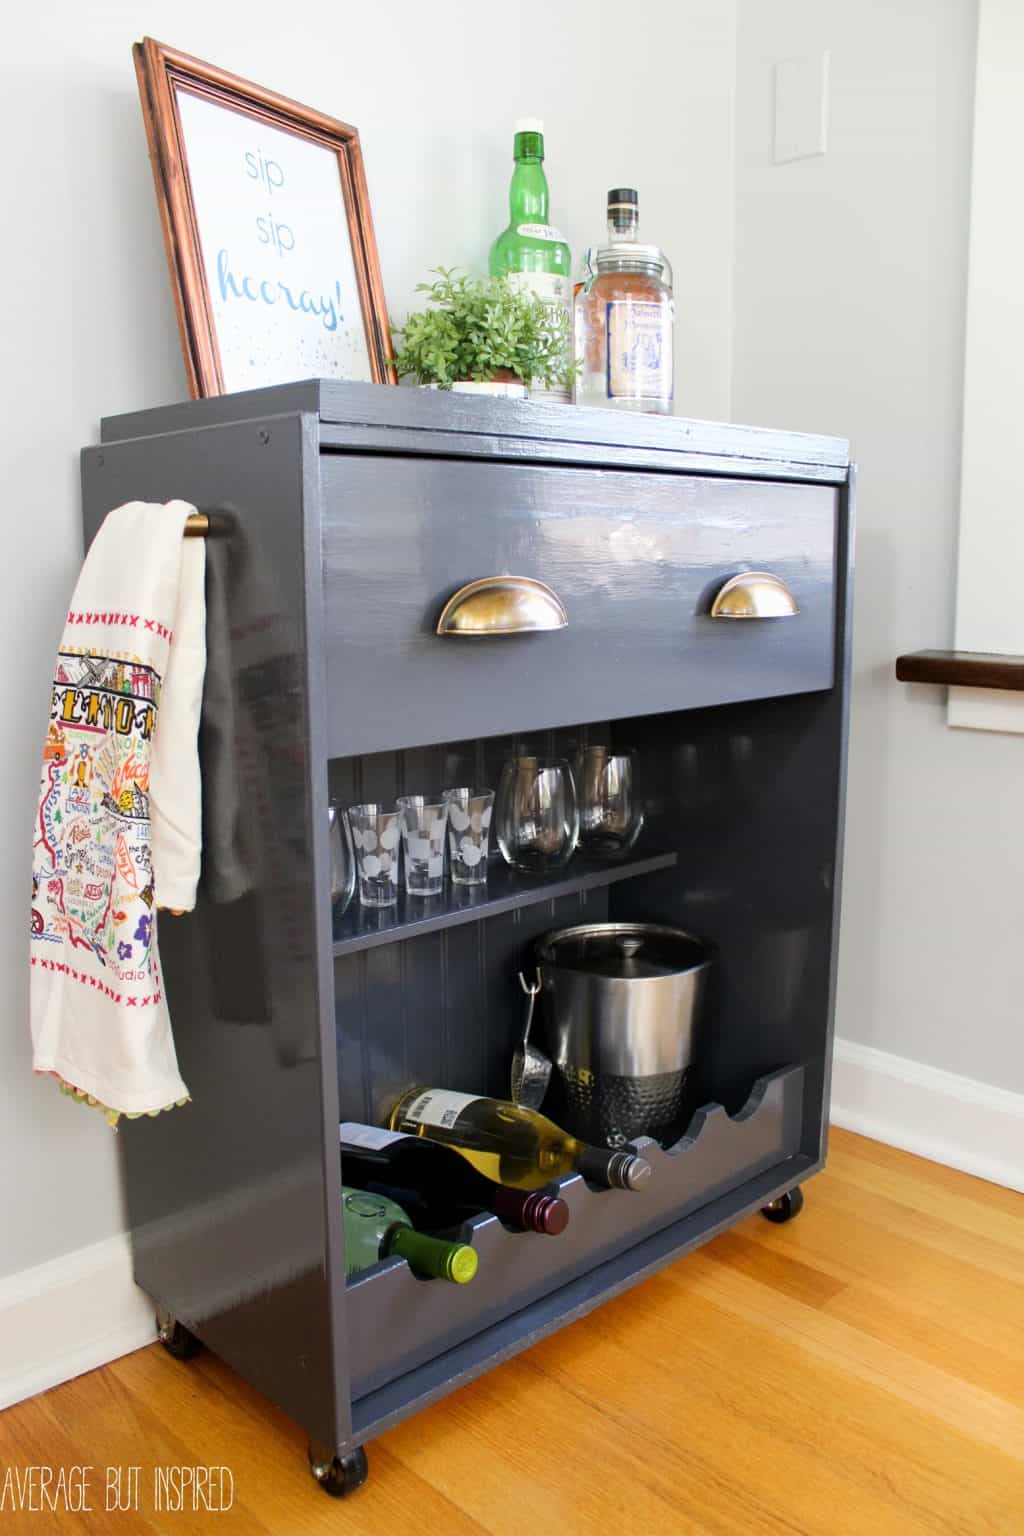
She’s so perfect for a small at-home bar, too!  Wine rests in the bottom scalloped shelf, and glassware fits right in the little shelf above.

Transform a plain IKEA Rast dresser into a fun bar cart with this tutorial!
The drawer is the perfect spot for storing things like bottle openers, wine stoppers, martini shakers, coasters, etc. And I just LOVE how the gorgeous hardware pops against the charcoal finish of the piece!

Transform a plain IKEA Rast dresser into a fun bar cart with this tutorial!
The drawer pulls I added to each side are a great place to hang tea towels. They also serve as handles for moving the bar cart around. Double duty!

Transform a plain IKEA Rast dresser into a fun bar cart with this tutorial!
And the little tray-edging I added around the top is a great way to prevent things from falling off the cart when it’s moving.  

Transform a plain IKEA Rast dresser into a fun bar cart with this tutorial!

Transform a plain IKEA Rast dresser into a fun bar cart with this tutorial!

I’m so happy with how my IKEA bar cart hack turned out!  Can we raise a glass and cheers to that?  Transform a plain IKEA Rast dresser into a fun bar cart with this tutorial!
I really hope you enjoyed this IKEA Rast hack! Now go have a drink.  Cheers!

– Bre

Filed Under: DIY, Furniture

DIY Plywood Picture Frame

October 14, 2015 by Bre 20 Comments

Give your large scale art a pretty "frame" with this easy DIY plywood poster frame project! You don't even have to cut the wood yourself! Find out all the details on how to "frame" your art in under 10 minutes!

If you’re looking for an inexpensive way to “frame” a poster, art, or large photograph, I have the solution for you!  This DIY Plywood Picture Frame is not only the easiest thing to make, but it’s super inexpensive, too!     Give your large scale art a pretty "frame" with this easy DIY plywood picture frame project! You don't even have to cut the wood yourself! Find out all the details on how to "frame" your art in under 10 minutes!
I made this plywood picture frame so that I could hang an awesome vintage wrapping paper map of Chicago in my basement. It prettied up a wall down there as part of my Basement Makeover that I just finished!  I thought that guests who are staying down there might enjoy checking out the lay of the land!

Give your large scale art a pretty "frame" with this easy DIY plywood poster frame project! You don't even have to cut the wood yourself! Find out all the details on how to "frame" your art in under 10 minutes!
Also, it was totally inexpensive and a very simple project – just how I like it.  

Give your large scale art a pretty "frame" with this easy DIY plywood poster frame project! You don't even have to cut the wood yourself! Find out all the details on how to "frame" your art in under 10 minutes!

Supplies Needed for a Plywood Picture Frame

Some of these links are affiliate links.  To read my full disclosure policy, please click here.

  • 1/4″ birch plywood, cut to desired size (approximately 3-4″ wider and taller than the poster to be framed)
  • Wood stain (I used Minwax Dark Walnut – my fave), or paint
  • Spray adhesive
  • Decorative furniture tacks
  • 3M Command Large Picture Hanging Strips

How to Make a DIY Plywood Picture Frame

Now, guys, I have to apologize here for a MAJOR BLOGGER FAIL.  I recently started a new photo organization system and somehow I am completely DISorganized as a result.  I have searched everywhere and I cannot find my tutorial photos for this project!  I think I may have accidentally deleted them; they are nowhere to be found.  So I’m really sorry, but I don’t have step-by-step photos. I think it’s OK though because it is seriously SO simple! 

Step One: Cut the Plywood to Size

First, go to Home Depot’s precut wood aisle (sometimes called “project panels”), and find the 1/4″ thick birch plywood.  This wood is thin, but sturdier than other types of plywood.  Then have one of their employees cut it to the desired size for you.  Alternatively, cut if yourself if you are skilled with the saw!

Step Two: Sand and Stain the Plywood

Sand down the rough edges and stain it or paint it.

Step Three: Apply Spray Adhesive

Once it’s fully dry, apply spray adhesive to the back of the picture or poster you want to display.  Also carefully apply a thin layer of spray adhesive to the plywood, but be careful not to spray it on the edges of the plywood that will not be covered with the poster.  Press the poster into place, making sure to gently smooth out any wrinkles.

Step Four: Add Pushpins or Tacks

For a decorative touch, add furniture tacks or push pins to the corners of the poster.  I used furniture tacks, which were longer than the depth of the plywood.  Because of that, I let them stick out so that they wouldn’t push through the back of the wood.  

Give your large scale art a pretty "frame" with this easy DIY plywood poster frame project! You don't even have to cut the wood yourself! Find out all the details on how to "frame" your art in under 10 minutes!

Step Five: Hang the Plywood Picture Frame

Finally, I hung the plywood poster frame with Command Large Picture Hanging Strips. They work perfectly for this type of project! Since the wood is so thin, it would have been difficult to hang the frame with regular picture hangers.

That’s it!  So easy, right?  Almost as easy as popping a picture into a real frame, but a little more unique!  

Give your large scale art a pretty "frame" with this easy DIY plywood poster frame project! You don't even have to cut the wood yourself! Find out all the details on how to "frame" your art in under 10 minutes!

Filed Under: DIY

DIY Faux Copper Planters

May 8, 2015 by Bre 13 Comments

DIY Faux Copper Planters give the look of aged copper at a fraction of the price!

I love copper accents for home accessories, but I don’t love the price tag.  That stuff is expensive, man!  We put copper gutters on the front of our house last year and let me tell you – ouch.  

So it came as no surprise to me that real copper planters for my front porch were out of the question.  I was going to have to use my plain black urns again this year.  That is until I found out about copper patina paint, and made some DIY Faux Copper Planters!

I.AM.OBSESSED.  

DIY Faux Copper Planters give the look of aged copper at a fraction of the price! Learn how to use copper patina paint to create a beautiful faux copper finish.

This was such a fun project, and I am going to “copperize” everything because, well, I can!

Supplies Needed to Make DIY Faux Copper Planters 

This post contains affiliate links.  To read my full disclosure policy, please click here.

  • Terracotta pots
  • Paintbrush
  • Modern Masters Metal Effects Copper Paint and Green Patina Kit

How to Make DIY Faux Copper Planters with Copper Patina Paint

First I wiped down my terracotta pots to remove dirt and dust.  

DIY Faux Copper Planters give the look of aged copper at a fraction of the price!

Next, I applied two coats of Modern Masters Metal Effects Primer, which came in the copper patina paint kit, per the instructions on the bottle.  

I primed the inner rim of the pots because I knew that some of the inner rim would be visible even after I planted flowers.

DIY Faux Copper Planters give the look of aged copper at a fraction of the price!
After allowing the primer to thoroughly dry, I applied a coat of the Copper Reactive Metallic Paint, which also came in the kit.   

DIY Faux Copper Planters give the look of aged copper at a fraction of the price!

My pots were so shiny!

DIY Faux Copper Planters give the look of aged copper at a fraction of the price!
Then a crazy storm decided to move in, so I had to transfer this operation to the messy garage. (It WILL be cleaned out this summer. Public accountability.)

I added a second coat of Copper Reactive Metallic Paint, and while it was still wet, I sprayed on the Green Patina Aging Solution (again, this came in the copper patina paint kit).  In this photo you can kind of see the spots where it was sprayed.  

DIY Faux Copper Planters give the look of aged copper at a fraction of the price!
The Activator started working immediately, and it was super exciting to see the green patina appearing right before my eyes.

DIY Faux Copper Planters give the look of aged copper at a fraction of the price!
Within about ten minutes, the pot looked like this!  I felt like a science geek because this was making me so happy.

She used the Modern Masters copper patina paint set to create faux copper planters.
I let my pots sit in the garage overnight, and I filled them with flowers the next afternoon while I pretended my children were not throwing dirt at one another.

DIY Faux Copper Planters give the look of aged copper at a fraction of the price!

The copper patina looks realistic enough to pass inspection – in my opinion at least!

DIY Faux Copper Planters give the look of aged copper at a fraction of the price!

DIY Faux Copper Planters give the look of aged copper at a fraction of the price! Copper patina paint gives this realistic look.

Can you believe what kind of copper patina you can achieve with a paint set?

pots - copper finish closeup

My little guy likes them, too. Or so he says.

DIY Faux Copper Planters give the look of aged copper at a fraction of the price!
I’m so happy spring is finally here and I have some color near my front door. The fact that I got the copper look for less also makes me ecstatic! I am so thankful for this copper paint! 

– Bre

Filed Under: DIY

IKEA Hack – Painted IKEA Spontan Magnetic Board (or Svensas Magnetic Board)

March 10, 2015 by Bre 10 Comments

So cool! You can easily customize a plain magnet board, like the SPONTAN from IKEA, with chalk paint!

Once upon a time I purchased the Spontan Magnetic Board from IKEA.  Why?  I don’t know other than that when I step into IKEA, I suddenly feel the urge to purchase lots of things that I have no need for.

I ultimately decided to incorporate it into my son’s “vintage aviation bedroom.”  To add to the theme, I customized the magnetic board, and am happy to share this Painted IKEA Spontan Magnetic Board with you! (2021 UPDATE: IKEA magnetic boards are now sold as Svensas Memo Boards).  

So cool! You can easily customize a plain magnet board, like the SPONTAN from IKEA, with chalk paint!

Supplies Needed to Customize an IKEA Magnet Board

This post contains affiliate links.  To read my full disclosure policy, please click here.

  • Electronic cutting machine (I LOVE my Cricut Joy) *See the tutorial below if you don’t have or don’t want a cutting machine! You can still do this!
  • Chalk paint in color(s) of your choice
  • Varnish
  • Paint Brush

How to Paint an IKEA Spontan or IKEA Svensas

To get this look, I cut airplane stencils on my cutting machine.  (At the time I had a Silhouette Portrait – now I use a Cricut Joy).

If you don’t have an electronic cutting machine, you could easily print clip art from your computer and trace the design onto contact paper to make a sticky stencil, or use stickers in the size and shape you desire.

Once my stencils were ready, I placed them onto the IKEA Spontan board.  

So cool! You can easily customize a plain magnet board, like the SPONTAN from IKEA, with chalk paint!
Next, I used a small foam roller to apply two coats of chalk paint over the entire board – including over the contact paper stencils.

I used DecoArt’s Americana Decor Chalky Finish paint in white.  Again, you can pick any color you like!  (Don’t you think the washing machine is the PERFECT work surface?)

So cool! You can easily customize a plain magnet board, like the SPONTAN from IKEA, with chalk paint!
Once the paint was totally dry, I removed my contact paper stencils to reveal the vintage airplane design! I was SO happy to see that they turned out well!

So cool! You can easily customize a plain magnet board, like the SPONTAN from IKEA, with chalk paint!
I then painted a coat of varnish over the entire magnet board just to make sure the finish stayed on well.

Since I will be using magnets on there and rotating my son’s artwork, I wanted to make sure the finish is durable.  

magnet board - seal with varnish

This was a fun project because I had no idea if it would actually turn out well.  I love that I finally used my random IKEA purchase, and my son is pumped to have a place to display his artwork from school!  

So cool! You can easily customize a plain magnet board, like the SPONTAN from IKEA, with chalk paint!
Next up in the room is painting the bookshelf to match the gray chalk painted dresser that I finished late last year. I can’t wait to get the room finished!  

IMG_1590

– Bre

Filed Under: DIY

DIY Wood Slice Serving Tray

November 14, 2014 by Bre 36 Comments

DIY Wood Slice Serving Tray Tutorial

Wood slices are all the rage amongst crafters these days, so it’s no surprise that I had to make some type of wood slice craft!

I turned mine into a rustic wood slice serving tray with wood burned detailing.  Tres chic!  (Or should I say “tray” chic in this case?)

DIY Wood Slice Serving Tray Tutorial

Wood Slice Serving Tray Supplies

This post contains affiliate links. For more information, please read my disclosure policy.

I loved this project because it allowed me to work with materials I’d never used before, and to create something that I actually have a need for!  The supplies I used were the following:

  • Walnut Hollow Basswood Country Plank
  • Creative Woodburner Value Pen
  • Watco Butcher Block Oil & Finish
  • Stencil (and pencil)
  • Drawer pulls (and drill)

How to Make a DIY Serving Tray

Step One:

Once I had my supplies together, I started by lightly sanding my wood slice and then taping a stencil to it.

Wood Slice - stencil

Step Two:

I traced the design onto my wood slice in pencil.

Wood Slice - drawn pattern
Step Three:

I plugged in my woodburning tool and anxiously waited for it to heat up.

I had never used one of these so I was a little nervous about starting something on fire.  (If you know me at all, you know this is a legitimate concern.  For real.)Wood Slice - burning tool

DIY Serving Tray Step Four:

Once I got started burning my design into the wood slice, I found that it was really easy to do!  The tool does get hot to hold, however, so I had to take little breaks here and there.

It didn’t take long and the smell wasn’t too bad – thank goodness! I did NOT want to set off the fire alarm during my son’s naptime! Wood Slice - begninning burning

Step Five:

After I finished burning the entire design, I let the wood slice sit for a while. Then I drilled holes into the piece so that I could screw in the drawer pulls for handles.

Step Six:

Next, I coated the entire wood slice with butcher block oil to help seal the piece. Butcher block oil is completely food safe and FDA approved, so I was confident using it on something that I knew I’d be putting food on.

As with the previous step, I forgot to take a picture of the butcher block oil application, but trust me, it’s nothing exciting. It tints the wood ever so slightly, but it doesn’t change the color in any dramatic way.

Wood Slice Serving Tray Step Seven:

Once the butcher block oil dried, I went to screw in my hardware. At that point, I noticed that the pulls I’d purchased were two different finishes. ANNOYING!

Since I didn’t have the receipt, I decided to spray paint them so they’d look the same.

Wood Slice - spray painted hardware
Step Eight:

After the hardware dried, I screwed the handles onto the wood slice and admired my rustic wood slice serving tray!Woodslice - serving tray empty plain horizontal
Then I served my kids a “fancy snack” of cheese and crackers.  (Trust me – this is way nicer than the animal crackers or raisins I usually toss into a bowl for them every afternoon.)  Woodslice - serving tray plain vertical
I think this is a perfect DIY gift, and one that can easily be personalized with a monogram, quote, or other meaningful design.

You could also add some cool hardware for handles to really make your wood slice serving tray unique!

Filed Under: DIY

Turn a Crate into a Rolling Firewood Caddy

August 27, 2014 by Bre 22 Comments

blank

Wooden crates are everywhere: the craft store, home improvement stores, and even big box stores!  They’re super accessible, and because of that, perfect for a wide variety of DIY projects.  Today I’ll show you how to turn a crate into a rolling firewood caddy!  Love this! It's so easy to make a rolling firewood caddy with a wood crate. Learn how to customize a crate for looks and function. It's a great piece of fireplace decor!

DIY rolling firewood caddy made from an unfinished crate available at Michaels.

I am in love with my little firewood caddy.  It has opened up my entire fireplace (I used to have a fireplace screen covering the firebox), and added a personal touch to my living room.

DIY rolling firewood caddy made from an unfinished crate available at Michaels.

It was also really, really easy to put together.  Score!

This post contains affiliate links.  To read my full disclosure policy, please click here.

I started with a plain wooden crate.  (Although I linked to one online, if you get a 40% off coupon for Michaels, you can get them much cheaper there.)   

Unfinished crate.
Next, I sanded the crate’s rough spots and then primed the entire thing with a brown spray primer that looks red in this photo.  I swear it’s not red.
blank
Once the primer dried, I painted the crate with the Americana Decor chalky finish paint that I had leftover from my grain sack coffee table makeover.  I intentionally made the paint look streaky so that some of the brown primer would show through, as I wanted the crate to have an antique look to it.
blank

After the paint dried, I lightly sanded in areas to give a further distressed look.

Next, I decided to add some text on the front of my crate.  I wanted it to look like a vintage crate I picked up at a flea market or something.  Since this was going in my fireplace, I decided to make up a fake timber company bearing my last name.

(Sidenote: I bet I would have been an awesome lumberjack if I had taken that career path.  I look really good in flannel.)

I downloaded some free rustic-looking fonts and a pine tree image, typed out my text using the Word Art function in Word, reversed the text, and printed it out on freezer paper so that I could do an image transfer.  I followed a freezer paper image transfer tutorial, and it worked really well.

blank
blank
blank
Once the text dried, I added some brackets to the exterior sides of the crate.  I think this helped make it look even more “vintage,” which is just what I wanted.
blank
Then I screwed four casters to the bottom of the crate.  Since the crate would be holding firewood, I wanted to be able to easily move it.  I am too weak to lift it up when it’s filled with wood!  The casters did the trick perfectly.
blank
It looked pretty cute just like this, but I wanted to be able to mask the ugly staining on the back wall of my firebox, so I needed to add some more height.
DIY rolling firewood caddy made from an unfinished crate available at Michaels.
I fixed this problem by adding a galvanized metal pail into my crate.
blank
It was the perfect addition!
DIY rolling firewood caddy made from an unfinished crate available at Michaels.
I had so much fun turning my plain crate into a functional and decorative accessory for my home!
 
What have you made with a wooden crate?
 
– Bre

Filed Under: DIY

  • « Go to Previous Page
  • Page 1
  • Interim pages omitted …
  • Page 11
  • Page 12
  • Page 13
  • Page 14
  • Go to Next Page »

Primary Sidebar

Let’s Connect!

Hi, I’m Bre! Thanks for visiting Average But Inspired, where I show you how to work with what you’ve got to create a home you love.

Bre of Average But Inspired - a DIY and craft blog

Love DIY? Subscribe to Get Posts E-mailed!

How Can I Help You?

blank

My DIY Kitchen Makeover Reveal!

blank

How to Create a Faux Antique Brass Finish with Paint

blank

How to Paint Over Tile

blank

How to Paint a Countertop to Look Like Marble!

Looking for Something?

Copyright © 2013-2022, Bre Eggert (Average But Inspired). All rights reserved.
  • Home
  • DIY
  • Crafts
  • Home Decor
  • Privacy Policy and Copyright Policy
  • Disclosures
  • Contact Me