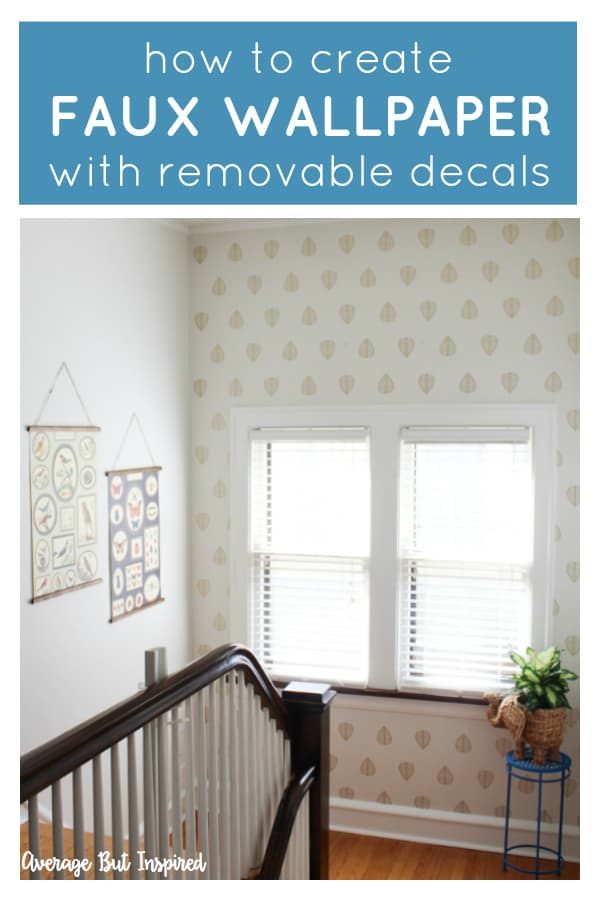
In order to brighten up our foyer and stairwell, we recently painted it Seapearl by Benjamin Moore. While we love the updated look, parts were looking a little stark for our taste. So, I added vinyl wall decals to create an accent wall, and I can’t wait to show you how to apply wall decals in your own home!
You might be wondering why I chose vinyl wall decals to create an accent wall instead of removable wallpaper (like I used in my new home on my removable wallpaper built-ins makeover). The reason is because it would be really tricky to put removable wallpaper around the window AND it would have been much more expensive!
So, if you’re wanting that wallpaper look but intimidated by the process, you should consider applying vinyl decals in a pattern instead!
First things first . . . I have to show you what the accent wall looked like after its paint job but before it got the faux wallpaper treatment. SO plain, and I was so over that metal wall decor over the window.

Supplies Needed to Apply Wall Decals
Thank you to Kenna Sato Designs for providing the wall decals you see in this post. The project and opinion are my own. Also, this post contains affiliate links. To read my full disclosure policy, please click here.
- Vinyl wall decals (I used these gold leaf wall decals)
- Vinyl or wallpaper smoother
- Laser level
- Pencil
- Tape measure
- Ladder or step stool
How to Apply Wall Decals
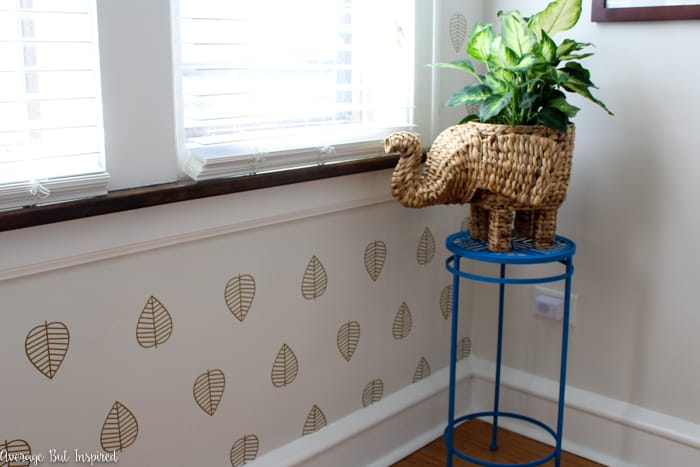
After surfing Etsy one night, I fell in love with the adorable, unique, and custom vinyl decals from Kenna Sato Designs. It hit me that these decals would be the perfect solution for my boring wall! I narrowed it down to about five patterns, and then settled on the Autumn Leaf Wall Decals in Matte Gold. I figured that these leaf decals would be the perfect ones for my house – whimsical but not over the top.
I got five sets of decals for my wall, and they arrived in large sheets.
I cut them apart, grabbed my laser level (you DEFINITELY want a laser level for a project like this!), tape measure, and a pencil, and got to work!
Step One: Find the Center of the Wall and Apply the First Decal
I started right above the window and placed my first leaf decal in the center of the wall. To apply the decal, I pressed it against the wall, rubbed over it with the wallpaper smoothing tool, and removed the backer paper. You can see that process well in the video in this post.
I then placed leaf decals along my laser level line eight inches apart – alternating their direction up and down.
Step Two: Apply the Next Row of Decals, and Repeat
After I finished the first row, I moved three inches down and started the next row. I continued the same process across, and then the same process down. After I finished the bottom row, I moved up to the top (the hardest part of the job – I saved the worst for last – ha!).
I spread out my wall decal application for a few days so that I could take my time and minimize mistakes. I think that made a big difference in the quality of my work and led to an awesome finished product!
So . . . are you ready to see how my wall decals have made a huge difference in the look of my stairwell? I think they definitely look like wallpaper! (Hey . . . if you prefer a hand-painted accent wall, check out this post, too!)
Some people say that wall decals are tacky, but I don’t agree. I think that there are some that can be tacky, but if done right, wall decals can add personality in a classy way!
These gorgeous leaf decals paired with my new DIY Wall Art and Wall Art Hangers and wicker elephant planter have made this space one of my favorites in my home! I keep stopping at the top of the stairs and admiring it.
And, in case you’re wondering, these wall decals do not damage walls upon application or removal! You really just peel them off and there is no damage to the wall.
I am thrilled with how these vinyl wall decals transformed the look of my stairwell! This accent wall has so much personality now and it makes me so happy! If you have any bare walls that need a quick pick me up that requires no commitment (seriously – you just peel off the decals when you tire of them, and they won’t damage your paint!), I one-hundred-percent recommend Kenna Sato Designs’ wall decals to you!
Let me know what you think of my patterned wall decals in the comments below. I love to hear from you!