• Skip to primary navigation
  • Skip to main content
  • Skip to primary sidebar
Average But Inspired logo - DIY and craft

Average But Inspired

Craft a home you love. DIY and craft tutorials.

  • About
    • Contact Me
    • Disclosures
    • Privacy Policy and Copyright Policy
  • DIY
    • Furniture
  • Crafts
    • Dollar Store Crafts
    • Seasonal
      • Patriotic & Summer
      • Valentine’s Day
      • Easter & Spring
      • Fall & Halloween
      • Christmas & Winter
  • Home Decor
    • Organization
  • Shop
    • DIY Swag
    • DIY Guides
  • Home

DIY

IKEA Bathroom Vanity Hack: IKEA Silveran for a Shallow Space

June 17, 2019 by Bre 2 Comments

This IKEA bathroom vanity hack is the perfect solution for small bathrom storage and countertop space. Learn how to hack the IKEA Silveran.

Like many bathrooms in old homes, our upstairs hall bathroom is small!  We just renovated it (check it out in this 1920’s bathroom renovation post), and knew we had to work in as much storage and countertop space as we could, while getting the period-correct look we wanted. 

That’s where our IKEA bathroom vanity hack comes in! 

We hacked the IKEA Silveran sink cabinet and turned it into the perfect bathroom vanity and bathroom storage solution for a small bathroom! 
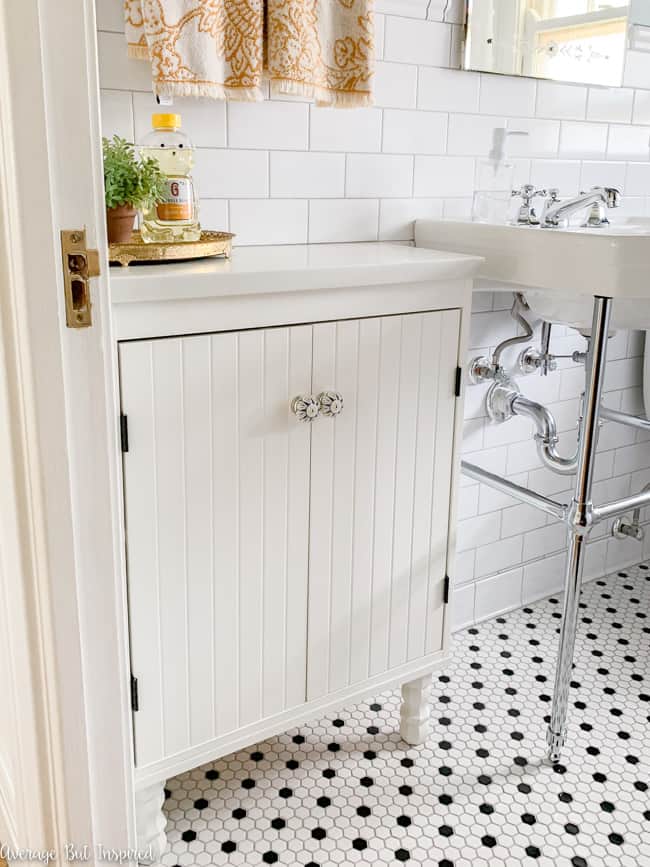
This IKEA Silveran bathroom vanity hack is a perfect small bathroom storage solution! Customized with turned legs and a quartz countertop, this Silveran cabinet is the perfect addition to this small bathroom.

This IKEA bathroom storage hack might be perfect for your small bathroom, or it might inspire you to modify a different IKEA piece for your bathroom! 

NOTE: As of 2024 the Silveran line has been discontinued, but this IKEA bathroom cabinet could be a good substitute!

There are so many possibilities if you think creatively about how to use IKEA furniture in your space.

This post contains affiliate links.  To read my full disclosure policy, please click here.

Before I show you what we did here, I want to thank Marti at Project Palermo (also a Chicago girl!), who previously posted an IKEA Silveran hack, and who gave me the inspiration to also hack this piece! 

Although my hack is slightly different from hers, she definitely deserves credit for being the hacking pioneer!

OK, so anyway, I desperately needed a shallow depth vanity to fit this tight spot next to the console sink, and my Google searches revealed the Silveran. 

At just 9 7/8″ deep, it was the perfect fit!  It comes just like this – white, and with no legs or countertop.  It’s super basic, and meant to work with legs and a sink you purchase separately from IKEA!  The IKEA Silveran sink cabinet in white.

When assembled, it doesn’t even have a back!  The IKEA SIlveran sink cabinet can be hacked to create a beautiful sink vanity in a small bathroom.

We started by cutting a piece of plywood to fit the back and the bottom, and used my brad nailer to secure both pieces into place. 

TIP: Some of the nails went in crookedly and poked out in places we didn’t want.  No problem! We used a metal file to sand and smooth them, making them a non-issue.

Adding a plywood base and plywood back to the IKEA Silveran sink cabinet is the beginning of a useful IKEA bathroom vanity hack.

We also secured the back part of the cabinet with the wall mounting hardware provided with the sink cabinet.Learn how to customize the IKEA Silveran sink cabinet to create small space storage.

Once the back and bottom were mounted to the vanity, we attached these 6″ unfinished wood table legs using the corresponding furniture leg mounting plates. 

We initially attached these 9″ legs, but they were too tall and made the vanity quite unsteady, so I went back and got 6″ legs instead.  Those worked much better!  Add turned wood legs to the IKEA Silveran sink cabinet for a custom look.

Next, we attached trim pieces along the bottom front and sides, where the plywood meets the Silveran cabinet.  We used wood glue only for this!  Adding wood trim around the base of the IKEA Silveran sink cabinet gives it a finished look.

Once that dried, we attached trim pieces at the joint of the back plywood and the cabinet, also in order to give a more finished appearance.  Adding trim around the IKEA Silveran sink cabinet gives it a finished appearance.

While the glue on those trim pieces dried, I ran up to Sherwin-Williams and got my own custom IKEA white paint color made!  I brought one of the pre-finished doors with me and they color matched it.  Brilliant!  Need the formula for IKEA white furniture finish? Get paint custom color matched and get the finish right every time. See how the IKEA Silveran sink cabinet in white looks when customized.

I got to work priming and painting all of the newly-added unfinished wood pieces, and was so happy that the white was a super close match to the original finish of the Silveran cabinet. 

Because of that, I left the original cabinet the color it came to me, and just painted the pieces we added.  Less work = happier me.Add prefinished shelving to the IKEA Silveran sink cabinet for more functional storage.

Although the Silveran came with an interior shelf, it was shallower depth than the cabinet, and not very functional.  Because of that, I cut pre-finished Home Depot shelving to size and used that instead.  

I added some cute blue and white ceramic knobs, and then the final step was getting a custom countertop made! Add pretty drawer knobs to an IKEA piece for an easy upgrade.

My contractor took the measurements to his “guy” and had a quartz scrap cut to size. He added it to the hacked Silveran vanity and got it into place in the bathroom.  It is perfect for this tight bathroom spot! 

TIP:  Our contractor fastened the Silveran to the wall for maximum stability.  Because he had to drill through the wall tile, we saved extra wall tiles so that if we ever decide to remove our Silveran vanity, we can replace the wall tiles with perfectly-matched tile.The IKEA Silveran sink cabinet is customized with a quartz countertop and wooden legs. It is the perfect small bathroom storage vanity!

It gives us just what we need in here – a place to store necessary supplies and a spot to set things while primping and cleaning up.  🙂

This IKEA Silveran hack is a great bathroom vanity storage solution! Learn how to customize the Silveran to fit your bathroom needs in this post.

The perfect small bathroom storage solution!  This IKEA Silveran bathroom vanity hack is fantastic! See how a plain sink cabinet became a functional vanity and storage spot for a small bathroom. The shallow depth cabinet is perfect for tight spots!

Although this particular IKEA bathroom vanity hack might not be the perfect bathroom storage solution for your space, I hope it gives you some inspiration and ideas on how to modify IKEA furniture to fit your needs! 

Don’t be scared – just get started and figure things out as you go along.  We made about four separate trips to Home Depot for this project because we modified our plan as we went along.  🙂

You May Like This IKEA Bar Cart Hack, Too!  blank

Filed Under: DIY

How to Build a Backyard Fire Pit

July 11, 2018 by Bre 6 Comments

blank

One of the most rewarding DIY projects my husband and I have completed is building a fire pit in our family’s tiny backyard.  Spending time together relaxing, roasting marshmallows, and eating way too many s’mores is the perfect way to enjoy the yard.  It was not a difficult project, and I can’t wait to show you how to build a backyard fire pit of your own!

Learn how to build a beautiful custom backyard fire pit for any size yard! Make memories with bonfires, s'mores, roasted marshmallows and more. This tutorial teaches you how to build your own fire pit!

Supplies Needed to Build a Backyard Fire Pit

This post contains affiliate links.  To read my full disclosure policy, please click here.

Fire Pit Supplies:

  • 36″ Galvanized Metal Fire Ring
  • Landscape bricks (we used approximately 65 3″ x 8.2″ Mini Flagstone Wall bricks from Lowes)
  • DAP DynaGrip Adhesive
  • Caulk Gun
  • Paver base
  • Paver sand
  • Pea gravel

Tools:

  • Tamper
  • Level (long length)
  • Hammer
  • Mallet
  • Chalk
  • Knife

Optional:

  • Landscape Weed Barrier Fabric
  • Netting Staples

How to Build a Fire Pit in Your Backyard

Before Building a Backyard Fire Pit – Things to Consider

Before you build a fire pit in your backyard, there are a few things to take into consideration.  The first is whether there are any buried cables in the area that you need to be careful of when digging. 

The second is if your city, town, village, whatever has any codes or regulations that will impact your project. 

And the third is whether your fire pit will negatively impact any neighbors (smoke sensitivities, etc.).  Think about all of this before beginning work to ensure a happy fire pit experience!

Phase One: Clear the Land

Once you have those things figured out, the first step in all of this is to clear out the area where you’re placing the fire pit.  As you can see from this picture, we had a lot of plants (namely, giant hosta, which are difficult to remove), to clear.  

Learn how to build a beautiful custom backyard fire pit for any size yard! Make memories with bonfires, s'mores, roasted marshmallows and more. This tutorial teaches you how to build your own fire pit!

Once the plants were removed, we got to work raking up the area and getting the ground level.  The kids got involved in this part of the project, which was fun!  

Learn how to build a beautiful custom backyard fire pit for any size yard! Make memories with bonfires, s'mores, roasted marshmallows and more. This tutorial teaches you how to build your own fire pit!

We used our level to make sure we got the ground as flat and as even as we could, and then we laid down the landscape weed barrier fabric to prevent vegetation (like those darn hosta), from growing up around our eventual fire pit.  

Learn how to build a beautiful custom backyard fire pit for any size yard! Make memories with bonfires, s'mores, roasted marshmallows and more. This tutorial teaches you how to build your own fire pit!

Next, we figured out where we wanted the fire pit, and used chalk to make a circle several inches wider than the galvanized fire ring.  Then we cut that circle out of the landscape barrier.  

Learn how to build a beautiful custom backyard fire pit for any size yard! Make memories with bonfires, s'mores, roasted marshmallows and more. This tutorial teaches you how to build your own fire pit!

You might be wondering why we used a galvanized fire ring in our fire pit construction, when many other fire pit tutorials do not use one.  The main reason is that we wanted our fire pit to be extra durable, and also for the landscape bricks not to get charred by the flames. 

One other benefit of using the fire ring is that you can purchase accessories, like grill grates and fire pit screens, that fit perfectly over the fire ring. 

Finally, we also thought it made it easier to create a perfect circle with the landscape bricks.  While this added a little extra cost to the construction, it was worth it in our minds.

Learn how to build a beautiful custom backyard fire pit for any size yard! Make memories with bonfires, s'mores, roasted marshmallows and more. This tutorial teaches you how to build your own fire pit!

Phase Two: Preparing the Ground for Landscape Bricks

The next step was to fill in the circle with paver base.  Once that was poured, my husband got to work with the tamper, pounding it down and getting a level surface that was slightly lower than the surrounding ground.

Learn how to build a beautiful custom backyard fire pit for any size yard! Make memories with bonfires, s'mores, roasted marshmallows and more. This tutorial teaches you how to build your own fire pit!

Next, we poured paver sand around the perimeter of the circle – so where the galvanized fire ring and the landscape bricks would sit.  We again used the tamper to make that paver sand flat.

Then we placed the galvanized fire ring into the paver sand, using a mallet to pound it into the paver sand, paver base, and ground ever so slightly, and we laid our first row of landscape bricks around the fire ring. 

NOTE: it’s important to leave a space of about 2.5″ between the fire ring and the landscape bricks because if you place the landscape bricks right against the ring, by the time you get to the top row of landscape bricks, they will be too close to the fire ring and will be jutting out farther than your base row of bricks.  You will have to disassemble and start over. 

(Prior to gluing our bricks together, we stacked all four rows to see how this would work, and it didn’t!  That’s how we knew to put that space between the fire ring and the landscape bricks at the bottom.)

Learn how to build a beautiful custom backyard fire pit for any size yard! Make memories with bonfires, s'mores, roasted marshmallows and more. This tutorial teaches you how to build your own fire pit!

Once the first row of landscape bricks was laid, it was time to move onto the next row.  We used DAP DynaGrip adhesive to hold our bricks together.  We simply applied it to the stones and pressed them down, making sure to stagger them rather than laying them directly one on top of the other.  

Learn how to build a beautiful custom backyard fire pit for any size yard! Make memories with bonfires, s'mores, roasted marshmallows and more. This tutorial teaches you how to build your own fire pit!

We repeated this process two more times, making our fire pit four rows of landscape bricks high.  Note that once the landscaping went in, the first row of bricks was essentially “underground.”  

Learn how to build a beautiful custom backyard fire pit for any size yard! Make memories with bonfires, s'mores, roasted marshmallows and more. This tutorial teaches you how to build your own fire pit!

We added inexpensive pea gravel inside the fire pit, and with that, our backyard fire pit was complete!

Over the following weeks, I spent time landscaping around the area to make it look nicer. 

Learn how to build a beautiful custom backyard fire pit for any size yard! Make memories with bonfires, s'mores, roasted marshmallows and more. This tutorial teaches you how to build your own fire pit!

This project took us about 8 hours to complete, and that included ripping out all the pre-existing landscape and running to Home Depot a few times for extra supplies. 

At the end of the day I can honestly say that if you’ve ever thought about adding a fire pit to your backyard, you should go for it!  It brings a huge element of fun to your outdoor space and is a wonderful memory maker for your family and friends.  

Learn how to build a beautiful custom backyard fire pit for any size yard! Make memories with bonfires, s'mores, roasted marshmallows and more. This tutorial teaches you how to build your own fire pit!

I’d appreciate it if you’d pin this post to help others find out how to build a backyard fire pit!  

Learn how to build a backyard fire pit for any size yard! Make memories with bonfires, s'mores, roasted marshmallows and more. This tutorial teaches you how to build your own fire pit! #backyardfirepit #firepit #diyfirepit #budgetfirepit

Once you’ve done that, come over and roast a marshmallow with me!  🙂

-Bre

Filed Under: DIY

How to Apply Wall Decals in a Pattern

April 25, 2018 by Bre 20 Comments

blank

In order to brighten up our foyer and stairwell, we recently painted it Seapearl by Benjamin Moore.  While we love the updated look, parts were looking a little stark for our taste. So, I added vinyl wall decals to create an accent wall, and I can’t wait to show you how to apply wall decals in your own home!

Make your own removable wallpaper with wall decals! This post will show you how to get a faux wallpaper look that removes easily when you tire of it. Wall decals are the perfect DIY wallpaper solution! #removablewallpaper #wallpaper #fauxwallpaper #walldecals

You might be wondering why I chose vinyl wall decals to create an accent wall instead of removable wallpaper (like I used in my new home on my removable wallpaper built-ins makeover).  The reason is because it would be really tricky to put removable wallpaper around the window AND it would have been much more expensive!

So, if you’re wanting that wallpaper look but intimidated by the process, you should consider applying vinyl decals in a pattern instead!  

First things first . . . I have to show you what the accent wall looked like after its paint job but before it got the faux wallpaper treatment.  SO plain, and I was so over that metal wall decor over the window.

Make a big impact with no commitment! Learn how to apply wall decals for a faux wallpaper look. It's a low-cost project that adds the wallpaper look to your home, and it's easier than hanging wallpaper.

Supplies Needed to Apply Wall Decals

Thank you to Kenna Sato Designs for providing the wall decals you see in this post.  The project and opinion are my own.  Also, this post contains affiliate links.  To read my full disclosure policy, please click here.

  • Vinyl wall decals (I used these gold leaf wall decals)
  • Vinyl or wallpaper smoother
  • Laser level
  • Pencil
  • Tape measure
  • Ladder or step stool

How to Apply Wall Decals

After surfing Etsy one night, I fell in love with the adorable, unique, and custom vinyl decals from Kenna Sato Designs.  It hit me that these decals would be the perfect solution for my boring wall!  I narrowed it down to about five patterns, and then settled on the Autumn Leaf Wall Decals in Matte Gold.  I figured that these leaf decals would be the perfect ones for my house – whimsical but not over the top.

I got five sets of decals for my wall, and they arrived in large sheets.  

Make a big impact with no commitment! Learn how to apply wall decals for a faux wallpaper look. It's a low-cost project that adds the wallpaper look to your home, and it's easier than hanging wallpaper.

I cut them apart, grabbed my laser level (you DEFINITELY want a laser level for a project like this!), tape measure, and a pencil, and got to work! 

Step One: Find the Center of the Wall and Apply the First Decal

I started right above the window and placed my first leaf decal in the center of the wall.  To apply the decal, I pressed it against the wall, rubbed over it with the wallpaper smoothing tool, and removed the backer paper.  You can see that process well in the video in this post.

Make a big impact with no commitment! Learn how to apply wall decals for a faux wallpaper look. It's a low-cost project that adds the wallpaper look to your home, and it's easier than hanging wallpaper.

I then placed leaf decals along my laser level line eight inches apart – alternating their direction up and down.

Step Two: Apply the Next Row of Decals, and Repeat

After I finished the first row, I moved three inches down and started the next row.  I continued the same process across, and then the same process down.  After I finished the bottom row, I moved up to the top (the hardest part of the job – I saved the worst for last – ha!).

Make a big impact with no commitment! Learn how to apply wall decals for a faux wallpaper look. It's a low-cost project that adds the wallpaper look to your home, and it's easier than hanging wallpaper.

I spread out my wall decal application for a few days so that I could take my time and minimize mistakes.  I think that made a big difference in the quality of my work and led to an awesome finished product!

So . . . are you ready to see how my wall decals have made a huge difference in the look of my stairwell?  I think they definitely look like wallpaper! (Hey . . . if you prefer a hand-painted accent wall, check out this post, too!)

Make a big impact with no commitment! Learn how to apply wall decals for a faux wallpaper look. It's a low-cost project that adds the wallpaper look to your home, and it's easier than hanging wallpaper.

Some people say that wall decals are tacky, but I don’t agree.  I think that there are some that can be tacky, but if done right, wall decals can add personality in a classy way!

Make a big impact with no commitment! Learn how to apply wall decals for a faux wallpaper look. It's a low-cost project that adds the wallpaper look to your home, and it's easier than hanging wallpaper.

These gorgeous leaf decals paired with my new DIY Wall Art and Wall Art Hangers and wicker elephant planter have made this space one of my favorites in my home!  I keep stopping at the top of the stairs and admiring it.

Make a big impact with no commitment! Learn how to apply wall decals for a faux wallpaper look. It's a low-cost project that adds the wallpaper look to your home, and it's easier than hanging wallpaper.

And, in case you’re wondering, these wall decals do not damage walls upon application or removal!  You really just peel them off and there is no damage to the wall.

Make a big impact with no commitment! Learn how to apply wall decals for a faux wallpaper look. It's a low-cost project that adds the wallpaper look to your home, and it's easier than hanging wallpaper.

I am thrilled with how these vinyl wall decals transformed the look of my stairwell!  This accent wall has so much personality now and it makes me so happy!  If you have any bare walls that need a quick pick me up that requires no commitment (seriously – you just peel off the decals when you tire of them, and they won’t damage your paint!), I one-hundred-percent recommend Kenna Sato Designs’ wall decals to you!  

Make a big impact with no commitment! Learn how to apply wall decals for a faux wallpaper look. It's a low-cost project that adds the wallpaper look to your home. It's the perfect faux wallpaper for an accent wall.

Let me know what you think of my patterned wall decals in the comments below.  I love to hear from you!


Filed Under: DIY, home decor

DIY Poster Hanger: An Easy and Affordable Art Idea

April 22, 2018 by Bre Leave a Comment

blank

Learn how to make a DIY poster hanger or wall art hanger for thin canvases. You’ll never buy these again!

Sometimes you need an inexpensive way to hang a poster or printed piece of artwork – am I right? 

With the crazy price of frames, knowing how to make your own DIY poster hanger or wall art hanger can be a definite budget-saver!  It’s so easy, and you can make pretty-yet-affordable art display hangers in no time.

Make a DIY poster hanger or wall art hanger with simple supplies! This post shows you how to create your own with trim.

Supplies Needed for a DIY Wall Art Hanger

This post contains affiliate links.  Please read my disclosure policy for more information.

  • Wood trim pieces
  • Stain or wood stain cloths (these are my favorite for no-mess and no-odor!)
  • Hand saw with miter box
  • Hot glue gun
  • Permanent mounting tape
  • Scissors
  • Twine, ribbon, or string

How to Make a DIY Poster Hanger

Purchase a piece of thin wood trim at the hardware or home improvement store.  I bought 3/4″ wood trim with embossed leaf detailing to give my poster hanger a little “something extra.”

If you prefer a simpler look, you could use a flat profile screen trim instead!

Embossed vine trim is turned into an adorable DIY poster hanger - such a cute way to display artwork.

Cut the trim in two pieces to be slightly longer than the art piece you want to hang.  (My photo shows four pieces because I was hanging two pieces of art.)  All you need is a hand saw and miter box to cut thin wood like this!

Then stain the wood trim the color you like.  I love to use wood stain cloths because they’re so much easier to use than regular stain.  They also have no odor, which makes them perfect for using indoors! 

Wood stain cloths make it easy to stain indoors. These pieces will become a DIY poster hanger.

Once the stain is dry, hot glue a piece of twine to the back of the top piece of wood trim.  Glue it a couple of inches in from both ends of the wood trim.

To make your own poster hanger, hot glue twine, ribbon, or string to the back of a piece of wood trim.

Next, place permanent mounting tape on the back of both pieces of wood trim.  (Note: if the mounting tape you use is wider than the piece of trim, apply it and then cut along the top or bottom edge to remove the excess tape.)

Put permanent mounting tape on the back of wood trim to make a DIY poster hanger.

Remove the protective layer that remains on the mounting tape, and press into place along the bottom edge of the art.

Remove the covering on the permanent mounting tape and press it onto the poster.

Repeat the process with the top piece so that the twine, ribbon, or string is hanging freely at the top to allow the art to hang.

Learn how to make a DIY poster hanger with wood trim and mounting tape!

Press the pieces into place one more time and hang your art.

I Think You’ll Like These Other DIY Ideas!

  • DIY Plywood Poster Frame
  • Thrifted Art Makeover

I just love how this inexpensive art adds a fun touch to my upstairs hallway. 

DIY poster hangers are a great way to display posters and thin canvases.

This “art” is actually decorative wrapping paper sheets (unfortunately these specific prints are no longer available).

Make a DIY poster hanger with trim and mounting tape. I'll show you how!

Can you believe it’s that easy to make a DIY poster hanger?

A diy poster hanger adds a pretty, decorative touch to inexpensive artwork.

When I get tired of it, I will just swap it out and re-use the DIY Wall Art Hangers to hang other art!  

A DIY poster hanger or DIY wall art hanger is a great way to hang a poster or thin canvas.

Filed Under: DIY, home decor Tagged With: DIY home decor

How to Paint a Mirror Frame Without Removing the Mirror

April 4, 2018 by Bre 13 Comments

blank

Last week was spring break for my kids and we had a lot of fun with little adventures and taking it easy at home!  Being on more of a relaxed schedule gave me some extra time to get little projects done around the house, like repainting the mirror that hangs in my foyer.  Here’s what it looked like, pre-paint job.Give an old mirror new life with a paint job! Learn how to paint a mirror frame without removing the mirror with this surprising trick!

I purchased that mirror right before my daughter (first child) was born – thinking that once she arrived I would never again have time to go to a store in my life.  So I rushed into the purchase and bought the first thing I found to fill the wall.  Needless to say, the faux silver finish wasn’t really doing it for me anymore (ever, really!), and with our foyer freshly repainted and new brass ceiling light on the way, I needed to give the mirror some pep!

The problem was that I couldn’t get the mirror out of the mirror frame!  I tried really hard but it just would not budge.  Whoever made it did a great job with the glue.  Having spent a lot of time trying to get the mirror out, I was invested at this point and ready to paint!  So I figured out a SUPER EASY way to paint a mirror frame without removing the mirror, and I didn’t even damage the mirror in the process!

You won’t believe this trick.  I rubbed Aquaphor all along the edges where the mirror met the mirror frame.

Give an old mirror new life with a paint job! Learn how to paint a mirror frame without removing the mirror with this surprising trick!

The reason I used Aquaphor is because it’s what I had on hand.  You could absolutely use Vaseline or petroleum jelly, which is cheaper than Aquaphor!  (Funny note about Aquaphor: I became addicted to it in college when I went on Accutane for my major acne problem.  It saved my lips and my skin from burning to a crisp!  Now I always have it at home, and I use it for everything!)  Give an old mirror new life with a paint job! Learn how to paint a mirror frame without removing the mirror with this surprising trick!

See that nice line of Aquaphor all around the mirror?  It saved me during this mirror painting project!

Now that you know the trick of how to paint a mirror frame without removing the mirror, let me show you how I repainted my mirror and another fun way I used Aquaphor in this project!  I started by painting the mirror with a red chalk paint.  Notice that I got some paint on the mirror, but on the parts where the Aquaphor covered the glass.Give an old mirror new life with a paint job! Learn how to paint a mirror frame without removing the mirror with this surprising trick!

After that paint dried, I used Aquaphor to help create a distressed finish on the mirror frame.  Watch this video to see just how easy it is to distress painted furniture with Aquaphor or Vaseline!


Although the section I distressed in the video isn’t very dramatic, you can definitely use Aquaphor or Vaseline to make the distressed areas more prominent, like on other parts of this mirror.

Give an old mirror new life with a paint job! Learn how to paint a mirror frame without removing the mirror with this surprising trick!

After all the paint dried, I used a flat head screwdriver to gently remove any paint that made its way onto the mirror.  It came up instantly because of the Aquaphor!  I just wiped it up with a paper towel and then used glass cleaner to remove any residue.Give an old mirror new life with a paint job! Learn how to paint a mirror frame without removing the mirror with this surprising trick!

It was so easy to remove the metallic finish on this mirror and give it a new look.  But hey, guess what?  I’m not sure I like the new look so I may repaint again!    Give an old mirror new life with a paint job! Learn how to paint a mirror frame without removing the mirror with this surprising trick!

Give an old mirror new life with a paint job! Learn how to paint a mirror frame without removing the mirror with this surprising trick!

Even though I’m undecided on the actual paint job, I can’t believe how easy it is to paint a mirror frame without removing the mirror!  So, I’m not all that worried about repainting it if I still don’t love it after a month or so.Give an old mirror new life with a paint job! Learn how to paint a mirror frame without removing the mirror with this surprising trick!

What do you think?  Do you like the two-tone distressed finish, or do you think it would look better as a solid color?  Give an old mirror new life with a paint job! Learn how to paint a mirror frame without removing the mirror with this surprising trick!

Let me know what you think in the comments below!

Give an old mirror new life with a paint job! Learn how to paint a mirror frame without removing the mirror with this surprising trick!

-Bre

Filed Under: DIY, Furniture

Easy DIY Canvas Art

October 25, 2017 by Bre 4 Comments

blank

Raise your hand if you’re guilty of hanging art on your walls that is too small.  Or not hanging any art at all.  (Hand raised.  Head hung in shame.)  Until recently, I had two prints hanging in my master bedroom that I knew were totally the WRONG size for the wall, but I was too lazy to do anything about it.  That all changed when I got a dash of inspiration and created this easy DIY canvas art with my secret decorating and DIY weapon – luxe wrapping paper!

Upgrade bare walls with DIY Canvas Art that you can make with wrapping paper and paint! Learn how to make gorgeous DIY wall art with this tutorial. No artistic talent needed! #canvas #wallart #diydecor

I’ve used wrapping paper on other projects (like these Upgraded IKEA Bookshelves and this Trash to Treasure Table), and its versatility never ceases to amaze me!

This time I turned it into pretty canvas wall art, and I’m convinced that anyone (yes, anyone!) can make DIY wall art for their homes with this trick!

Supplies Needed to Make Easy DIY Canvas Art

This post contains affiliate links.  To read my full disclosure policy, please click here.

  • Canvas panels (I used 12″ x 24″ panels)
  • Luxe wrapping paper (this is the print I used.  Make sure to use a heavyweight wrapping paper for less chance of wrinkling and tearing)
  • Mod Podge in finish of your choice (I used matte)
  • Foam brushes
  • Optional: brayer
  • Scissors
  • Acrylic paints in colors of your choice (I used this color, this color, and this color)
  • Liquid gold leaf
  • Artist’s paint brushes
  • Double-sided permanent tape
  • Optional – For Wooden Frames (follow this tutorial, which requires 1″x2″ pieces of lumber, hand saw, brad nailer, 3/4″ corner braces, and wood stain)Upgrade bare walls with DIY Canvas Art that you can make with wrapping paper and paint! Learn how to make gorgeous DIY wall art with this tutorial. No artistic talent needed! #canvas #wallart #diydecor

How to Make Easy DIY Canvas Art

Aaaah I’m so excited to show you how to make your own large-scale canvas art!  You’ll feel like an artist when all is said and done – I just know it!

Step One: Cover the Canvas with Wrapping Paper

I began by cutting my wrapping paper slightly larger than the portion of the canvas that I was covering.

Then I applied a thin layer of Mod Podge to the canvas, and pressed the wrapping paper onto the canvas – removing air bubbles as I went.  I used a brayer to help with this part, but if you don’t have one, it’s not totally necessary (just helpful!).

Upgrade bare walls with DIY Canvas Art that you can make with wrapping paper and paint! Learn how to make gorgeous DIY wall art with this tutorial. No artistic talent needed! #canvas #wallart #diydecor

Step Two: Paint the Canvas

While the Mod Podge was drying, I painted the empty part of the canvas in this color, which is a pretty navy blue.  I left a little gap between the wrapping paper portion of the canvas and the blue paint because I knew I’d be painting that part of the canvas gold.Upgrade bare walls with DIY Canvas Art that you can make with wrapping paper and paint! Learn how to make gorgeous DIY wall art with this tutorial. No artistic talent needed! #canvas #wallart #diydecor

Once the paint dried, I used gold acrylic paint to add a border between the navy paint and the wrapping paper.

Upgrade bare walls with DIY Canvas Art that you can make with wrapping paper and paint! Learn how to make gorgeous DIY wall art with this tutorial. No artistic talent needed! #canvas #wallart #diydecor

I bet you’ll enjoy this post on 7 Ways to Decorate with Wrapping Paper, too!

Step Three: Fasten the Wrapping Paper to the Back of the Canvas

Once the paint was dry, I flipped the canvas over and attached the wrapping paper to the sides and back with double-sided permanent tape.

Upgrade bare walls with DIY Canvas Art that you can make with wrapping paper and paint! Learn how to make gorgeous DIY wall art with this tutorial. No artistic talent needed! #canvas #wallart #diydecor

Step Four: Topcoat with Mod Podge

Then I flipped the canvas over and put a thin layer of Mod Podge on top of the wrapping paper for extra adhesion and protection.  You probably don’t have to do this – especially if you like the texture of the wrapping paper as-is – but I wanted to make sure these pieces of art are durable!

Upgrade bare walls with DIY Canvas Art that you can make with wrapping paper and paint! Learn how to make gorgeous DIY wall art with this tutorial. No artistic talent needed! #canvas #wallart #diydecor

Step Five: Get Artsy with the Paint and Gold Leaf

After about 20 minutes when the Mod Podge was dry, I added random brushstrokes of a different shade of navy blue paint to the top of the canvas.

Then I added gold leaf streaks to the gold painted portion of the canvas.  These little touches added some dimension and made things look less flat!

Upgrade bare walls with DIY Canvas Art that you can make with wrapping paper and paint! Learn how to make gorgeous DIY wall art with this tutorial. No artistic talent needed! #canvas #wallart #diydecor

Upgrade bare walls with DIY Canvas Art that you can make with wrapping paper and paint! Learn how to make gorgeous DIY wall art with this tutorial. No artistic talent needed! #canvas #wallart #diydecor

Upgrade bare walls with DIY Canvas Art that you can make with wrapping paper and paint! Learn how to make gorgeous DIY wall art with this tutorial. No artistic talent needed! #canvas #wallart #diydecor

Step Six: Build a Canvas Frame

Once everything dried, I built canvas frames by following this tutorial.  These frames went together really easily and gave my easy DIY canvas art a finished look!

Upgrade bare walls with DIY Canvas Art that you can make with wrapping paper and paint! Learn how to make gorgeous DIY wall art with this tutorial. No artistic talent needed! #canvas #wallart #diydecor

Upgrade bare walls with DIY Canvas Art that you can make with wrapping paper and paint! Learn how to make gorgeous DIY wall art with this tutorial. No artistic talent needed! #canvas #wallart #diydecor

Can you believe how easy it is to make your own art with wrapping paper?

Upgrade bare walls with DIY Canvas Art that you can make with wrapping paper and paint! Learn how to make gorgeous DIY wall art with this tutorial. No artistic talent needed! #canvas #wallart #diydecor

There’s really no reason NOT to have pretty walls with art this easy and inexpensive!  (I’m typing that so I remember it – trust me, I have some walls that need help!)

Upgrade bare walls with DIY Canvas Art that you can make with wrapping paper and paint! Learn how to make gorgeous DIY wall art with this tutorial. No artistic talent needed! #canvas #wallart #diydecor

If you agree and like this idea, I’d appreciate it if you’d pin this post to help others find it!

Upgrade bare walls with DIY Canvas Art that you can make with wrapping paper and paint! Learn how to make gorgeous DIY wall art with this tutorial. No artistic talent needed! #canvas #wallart #diydecor

So what do you think?  Will you try making art for your home with wrapping paper?

-Bre

Filed Under: DIY, home decor

  • « Go to Previous Page
  • Page 1
  • Interim pages omitted …
  • Page 9
  • Page 10
  • Page 11
  • Page 12
  • Page 13
  • Page 14
  • Go to Next Page »

Primary Sidebar

Let’s Connect!

Hi, I’m Bre! Thanks for visiting Average But Inspired, where I show you how to work with what you’ve got to create a home you love.

Bre of Average But Inspired - a DIY and craft blog

Love DIY? Subscribe to Get Posts E-mailed!

How Can I Help You?

blank

My DIY Kitchen Makeover Reveal!

blank

How to Create a Faux Antique Brass Finish with Paint

blank

Limewash Stone Fireplace Makeover: Bye Bye Orange Stone Fireplace, Hello Neutral Stone Beauty!

blank

How to Paint a Countertop to Look Like Marble!

Looking for Something?

Copyright © 2013-2022, Bre Eggert (Average But Inspired). All rights reserved.
  • Home
  • DIY
  • Crafts
  • Home Decor
  • Privacy Policy and Copyright Policy
  • Disclosures
  • Contact Me