• Skip to primary navigation
  • Skip to main content
  • Skip to primary sidebar
Average But Inspired logo - DIY and craft

Average But Inspired

Craft a home you love. DIY and craft tutorials.

  • About
    • Contact Me
    • Disclosures
    • Privacy Policy and Copyright Policy
  • DIY
    • Furniture
  • Crafts
    • Dollar Store Crafts
    • Seasonal
      • Patriotic & Summer
      • Valentine’s Day
      • Easter & Spring
      • Fall & Halloween
      • Christmas & Winter
  • Home Decor
    • Organization
  • Shop
    • DIY Swag
    • DIY Guides
  • Home

Easter

DIY Mr. & Mrs. Moss Bunny Topiaries

March 13, 2015 by Bre 23 Comments

These moss bunny topiaries are SO CUTE for Easter and spring!

Make a set of adorable DIY Bunny Topiaries for your spring and easter decor! This post shows you the step-by-step instructions for making them.

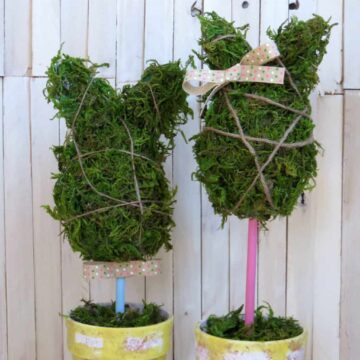
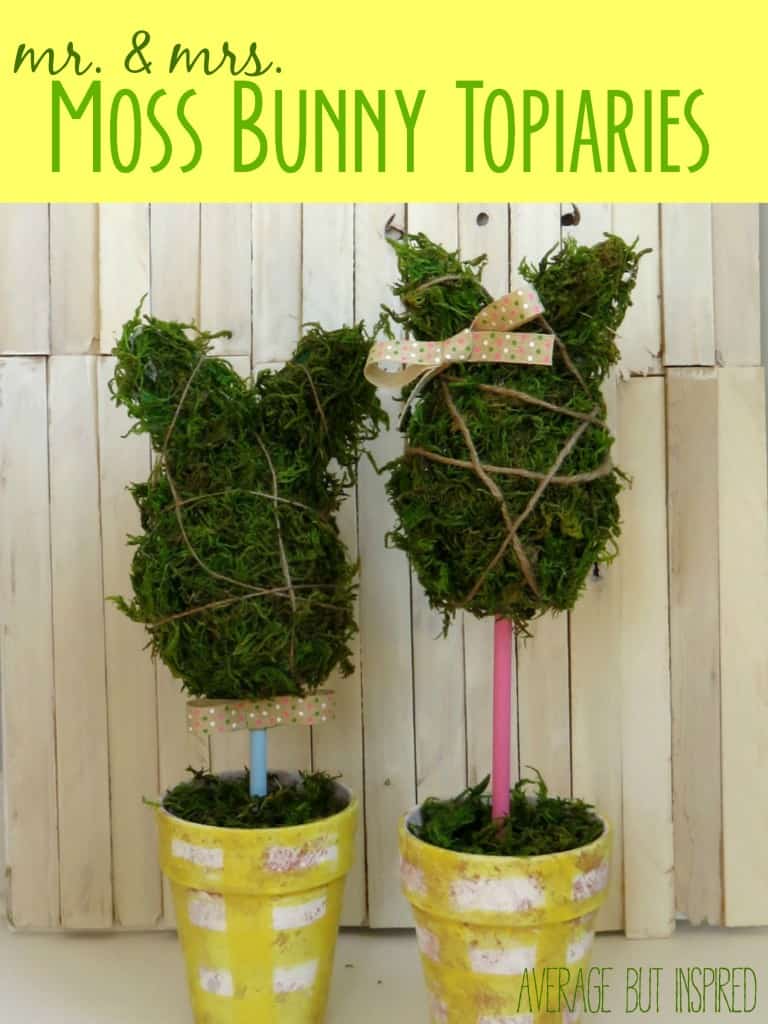
When you think of spring, I bet you think of bunnies and greenery, don’t you?  This craft combines those things into total cuteness: a DIY bunny topiary that’s SO easy to make, and even cuter when displayed as a pair of Mr. and Mrs. Moss Bunny Topiaries! 

Make a bunny topiary for Easter or spring! Moss bunny topiaries are a great spring craft or Easter decoration! Click through to get the full tutorial on how to make your own from averageinspired.com.

Topiaries are a staple in traditional decor styles, so why not mix it up and make some ultra-cute ones for your spring decor?

DIY Bunny Topiary Supplies

This post contains affiliate links.  Please read my disclosure policy for more information.

  • Foam egg
  • Floral foam
  • Foam core board
  • Acrylic paint (colors: green, blue, pink, and whatever color you want for your pots)
  • Terracotta flower pots
  • Wooden dowel
  • Toothpicks
  • Craft moss
  • Hot glue & glue gun
  • Twine
  • Ribbon
  • Pencil
  • Craft knife / utility knife

How to Make DIY Bunny Topiaries

No need to hunt down a premade bunny form – we’re going to make our own to create these adorable bunny topiaries!
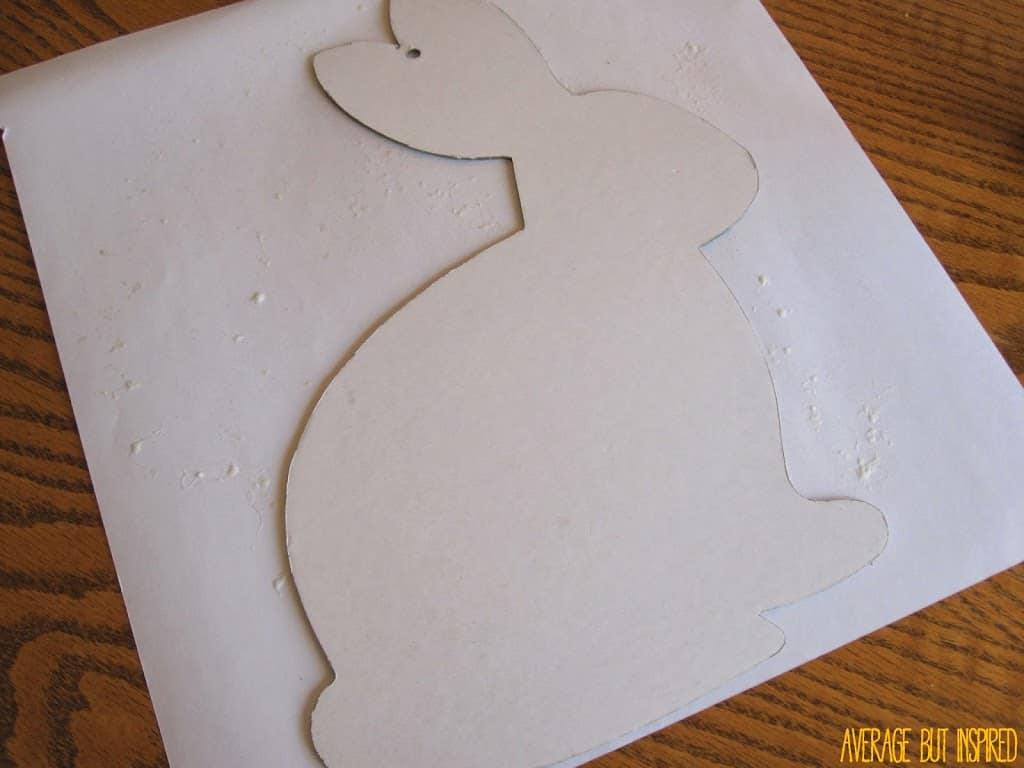
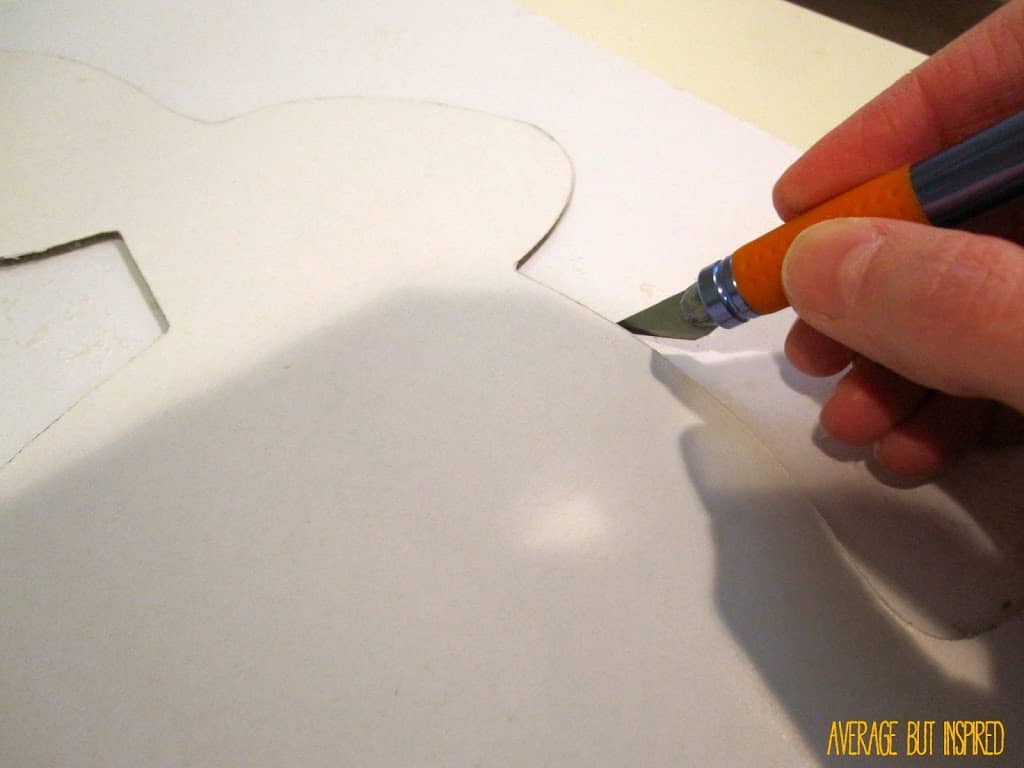
Make the Bunny Ears

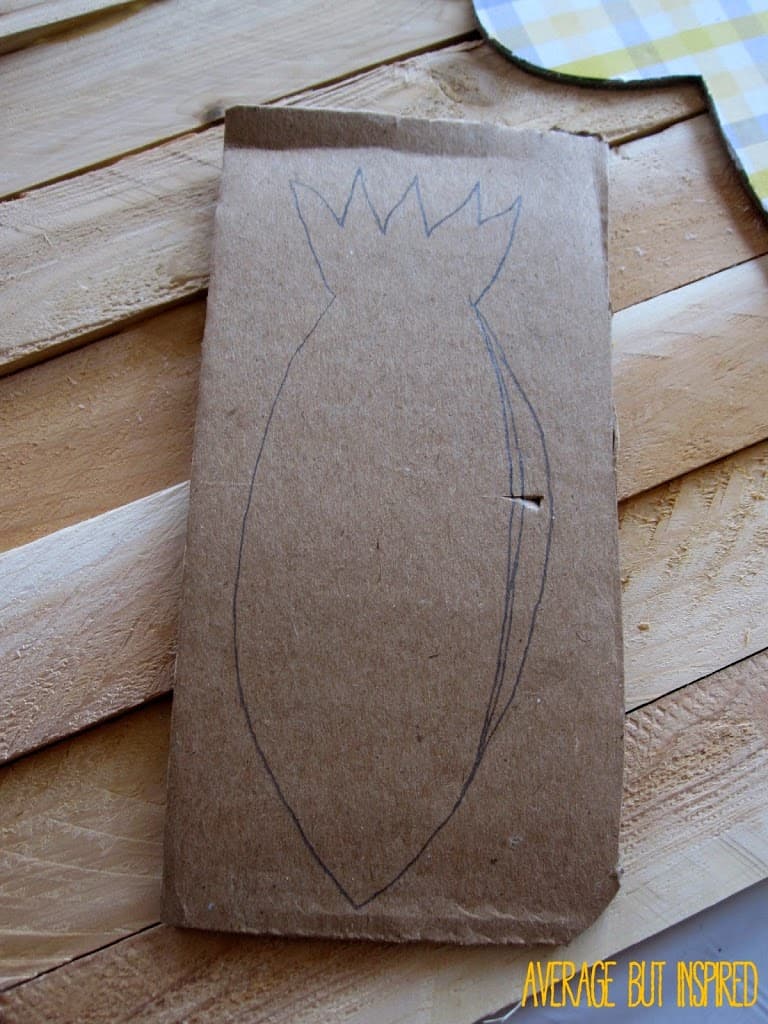
First, draw bunny ears onto the foam core board. Then use a craft knife or utility knife to cut them out.

(The ears don’t have to be perfectly shaped because any imperfections will be hidden by the moss. So . . . don’t stress about this!)

Next, paint the bunny ears green.  This will help mask any bare spots you have once you’ve glued on your moss.  

Go ahead and paint the foam egg, too, while you’ve got the green paint out.

Learn how to make moss bunny topiaries with foam eggs!

Make the Base of the Bunny Topiary

Once dry, gently push a toothpick into the bottom of each foam board ear.  

Learn how to make moss bunny topiaries with foam eggs!

Then push each ear into the foam egg.

Learn how to make moss bunny topiaries with foam eggs!

Already looking a little bunny-ish, don’t you think?

Apply Moss to the Bunny Form

Now you’re ready to apply your moss! To do this, hot glue the heck out of the egg and stick moss EVERYWHERE!

Since I used loose moss, I made a GIGANTIC mess. Be prepared for a fun clean up. Ha!

Learn how to make moss bunny topiaries with foam eggs!

I also added twine around my bunnies for a rustic look and to help keep some of the moss in place.  

Push Dowels Into the Base of the Bunnies

After everything is “mossed,” push one dowel into the bottom of each foam egg. You could leave the dowels natural color, or paint them like I did!

Then, push the other end of each dowel into floral foam in the bottom of terracotta pots. 

I painted the flower pots in a cute yellow and white gingham pattern, but you could paint them however you like or leave them plain.

Learn how to make moss bunny topiaries with foam eggs!

Finally, fill the flower pots with leftover moss. 

With that, your DIY bunny topiary is complete!

Since I’m “extra,” I made a two bows for my bunny topiaries; a hair bow for the Mrs. and a bow tie for the Mr.  (Notice how the boy bunny is shorter than the girl bunny?  I did that on purpose.  Girl Power – ha!)

Moss bunny topiaries are a great spring craft or Easter decoration! Click through to get the full tutorial on how to make your own from averageinspired.com.

I couldn’t be happier with these little moss bunny topiaries hanging out on my mantel.

They are so cute up there, especially paired with Spring Bunny Gumball Machine decor.

Moss bunny topiaries are a great spring craft or Easter decoration! Click through to get the full tutorial on how to make your own from averageinspired.com.

Filed Under: Easter

5 Simple DIY Easter Hostess Gifts to Make

April 17, 2014 by Bre Leave a Comment

blank

Looking for a way to thank someone for hosting you for Easter brunch or dinner? Here are six simple DIY Easter hostess gifts to make today!

Easter is right around the corner!

I’m excited to celebrate this wonderful holiday with people I love.  I’m also excited that I’ve been trusted with bringing a vegetable dish to this year’s celebration. I’m now a “grown up.”  

In addition to my vegetable dish, I will be bringing a hostess gift.  This will further solidify my status as an adult, and will also show my mom how thankful I am for her hard work and her effort in preparing our special Easter meal.

If you’re lucky like me and don’t have to host an entire Easter brunch or dinner, perhaps you’ll want to bring an easy Easter hostess gift, too.

Get some great DIY Easter hostess gift ideas to make. Don't show up empty handed to Easter Sunday brunch!

This post was originally published in 2014, but updated in 2023.

Easy DIY Easter Hostess Gifts to Make

I love DIY hostess gifts because I think they show that you put extra thought into what you are giving the recipient.  And, there are plenty of simple yet beautiful DIY Easter hostess gifts to make: all of them easy!

DIY Easter Hostess Gifts to Make

Don't show up empty-handed this Easter Sunday! Here are easy Easter hostess gifts you can make to thank your host and show your appreciation.

blank

Bunny Napkins

Purchase some adorable fabric napkins for your Easter brunch hostess, and fold them to look like bunnies! Not only will this gift work for Easter Sunday, but she'll be able to use them for any other occasion.

blank

Customized Hand Soap Set

Surprisingly, this is a Dollar Tree DIY hostess gift! Use an electronic cutting machine, like a Cricut, to monogram a hand towel with the host or hostess' initials, and add some flair to a dollar store soap dish and soap - also with added embellishments.

blank

White Chocolate Popcorn (Easter Mix)

Make a large batch of this delicious white chocolate Easter popcorn and package it in a darling container for a fantastic Easter hostess gift that will satisfy her sweet tooth.

blank

DIY Bunny Planters

Upgrade a flower pot with felt bunny ears, and include a succulent as a kind way of wishing your hostess a Happy Easter!

blank

DIY Egg Shaped Soap

Handmade soaps in an egg carton are a totally adorable way to say thank you to your host or hostess! This is one of the most clever gift ideas around.

blank

Free Spring Flowers Monogrammed Printable

Download a free printable with the host or hostess' monogram, and put it in a pretty frame. This is a lovely way to thank him or her for hosting Easter brunch!

All of these DIY gift ideas show you care and that you’re appreciative of the effort put into hosting you. Remember that the beauty behind a host or hostess gift is the thought that goes into it; not the amount of money spent.

Shop Easter Gifts for the Hostess

And listen, if you don’t have time to make something, there are plenty of lovely gifts you can purchase, too.

Here are several Easter hostess gifts you can purchase on Amazon for speedy delivery!

Scroll through the images and click on them to learn more and shop.

blank

Happy Easter to you and yours!

Six DIY Easter hostess gifts to thank him or her for hosting you on Easter Sunday! These are great hostess gifts to make for anyone.

Filed Under: Easter, Holiday

Dollar Store Easter Bunny Decor

March 27, 2014 by Bre 33 Comments

blank

Since the beginning of time, I have been a sucker for a good makeover.

All of my Barbies got makeovers when I was little.  Some of my favorite TV shows have involved makeovers (think What Not To Wear and Extreme Makeover: Home Edition (DON’T JUDGE – they always got me when they moved that bus!)).  And I love a good makeover for myself at the Bobbi Brown counter every once in awhile.

So how excited do you think I was when I spotted an ugly cardboard bunny decoration at Dollar Tree that I knew could be made adorably happy and springy with a little TLC?  Goodbye weird bunny displaying an image of another bunny holding an egg almost as large as itself, as well as the lie that “[s]pring is here . . . ” (it is not here.  In fact, it may never be coming to Chicago.  LIES!).  Hello cuteness!

Turn a dollar store Easter decoration into an adorable piece of decor for your spring home! Get the full tutorial at averageinspired.com.
Loved this makeover!  It was super easy and super inexpensive.  And it adds a dose of happiness to my back door.  Hippity Hoppity!
Turn a dollar store Easter decoration into an adorable piece of decor for your spring home! Get the full tutorial at averageinspired.com.
 Supplies Needed for Dollar Store Easter Bunny Decor
  • Cardboard bunny from Dollar Tree
  • Small piece of cardboard for your carrot (I used part of a shipping box rescued from the recycling bin)
  • 2 pieces of 12″ x 12″ scrapbook paper (1 for the body of the bunny; 1 for the carrot)
  • Spray adhesive
  • Wood shims
  • Wood glue
  • Acrylic paint (two colors – one for wood background; one for text), and brush
  • Ribbon
  • Hot glue
  • Scissors or x-acto knife
  • Optional: Green felt (for carrot top); Twine or ribbon (for a bow at bunny’s neck); Cotton ball or pom pom (for bunny’s tail); Paint tips (for easy text painting)
Now, here’s how I did this!
STEP ONE

Spray your bunny and the scrapbook paper with spray adhesive.  Adhere the bunny to the paper and press down all over to ensure a good bond.

blank
STEP TWO

Cut around the bunny with your x-acto knife or scissors.

blank
STEP THREE
Draw a carrot shape on your cardboard.  (Fix it over and over again until it doesn’t look totally deformed, as shown in the photo below.)  Repeat steps two and three to decorate your carrot.
blank
STEP FOUR
Take two of the wood shims and place them parallel to one another, vertically on your table.  Place some wood glue at the bottom and begin to affix your other shims perpendicular to those lying on the table.  Glue shims all the way to the top.
blank
STEP FIVE
Once your wood shim backdrop has dried (it might take a couple of hours), paint it however you like.  I used watered-down acrylic paint for a more unfinished look.
blank
STEP SIX
Once the paint has dried, determine the placement of your bunny and carrot (but don’t glue them yet).  Then, write your text in pencil, wherever you like.
blank
STEP SEVEN
Now, paint over your text with acrylic paint.  I used acrylic paint bottle tips, which made painting the text really easy.  Then I went over that painted writing with a small paintbrush to give it a flatter and broader look.
blank
blank
STEP EIGHT
Affix your bunny and carrot to your wood background.  Add any decorative elements you like (for example, a ribbon at the bunny’s neck and a cotton ball or pom pom at the tail).  Glue your ribbon at the top of the wood background for hanging.
Turn a dollar store Easter decoration into an adorable piece of decor for your spring home! Get the full tutorial at averageinspired.com.
Cute, right?
blank
I feel like this makeover would get Clinton and Stacy’s stamp of approval.  What do you think?  Turn a dollar store Easter decoration into an adorable piece of decor for your spring home! Get the full tutorial at averageinspired.com.
– Bre

Filed Under: Dollar Tree, Easter, Holiday

  • « Go to Previous Page
  • Page 1
  • Page 2
  • Page 3

Primary Sidebar

Let’s Connect!

Hi, I’m Bre! Thanks for visiting Average But Inspired, where I show you how to work with what you’ve got to create a home you love.

Bre of Average But Inspired - a DIY and craft blog

Love DIY? Subscribe to Get Posts E-mailed!

How Can I Help You?

blank

How to Paint a Countertop to Look Like Marble!

blank

7 Tips for Hosting a Party on a Budget

blank

Limewash Stone Fireplace Makeover: Bye Bye Orange Stone Fireplace, Hello Neutral Stone Beauty!

blank

My DIY Kitchen Makeover Reveal!

Looking for Something?

Copyright © 2013-2022, Bre Eggert (Average But Inspired). All rights reserved.
  • Home
  • DIY
  • Crafts
  • Home Decor
  • Privacy Policy and Copyright Policy
  • Disclosures
  • Contact Me