• Skip to primary navigation
  • Skip to main content
  • Skip to primary sidebar
Average But Inspired logo - DIY and craft

Average But Inspired

Craft a home you love. DIY and craft tutorials.

  • About
    • Contact Me
    • Disclosures
    • Privacy Policy and Copyright Policy
  • DIY
    • Furniture
  • Crafts
    • Dollar Store Crafts
    • Seasonal
      • Patriotic & Summer
      • Valentine’s Day
      • Easter & Spring
      • Fall & Halloween
      • Christmas & Winter
  • Home Decor
    • Organization
  • Shop
    • DIY Swag
    • DIY Guides
  • Home

Easter

Pretty DIY Paper Mache Bunny

March 8, 2018 by Bre 2 Comments

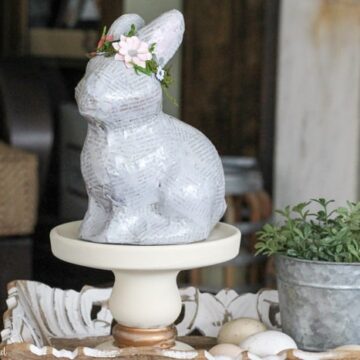
Make a beautiful paper mache bunny or paper mache rabbit as spring decor that evokes memories of the past.

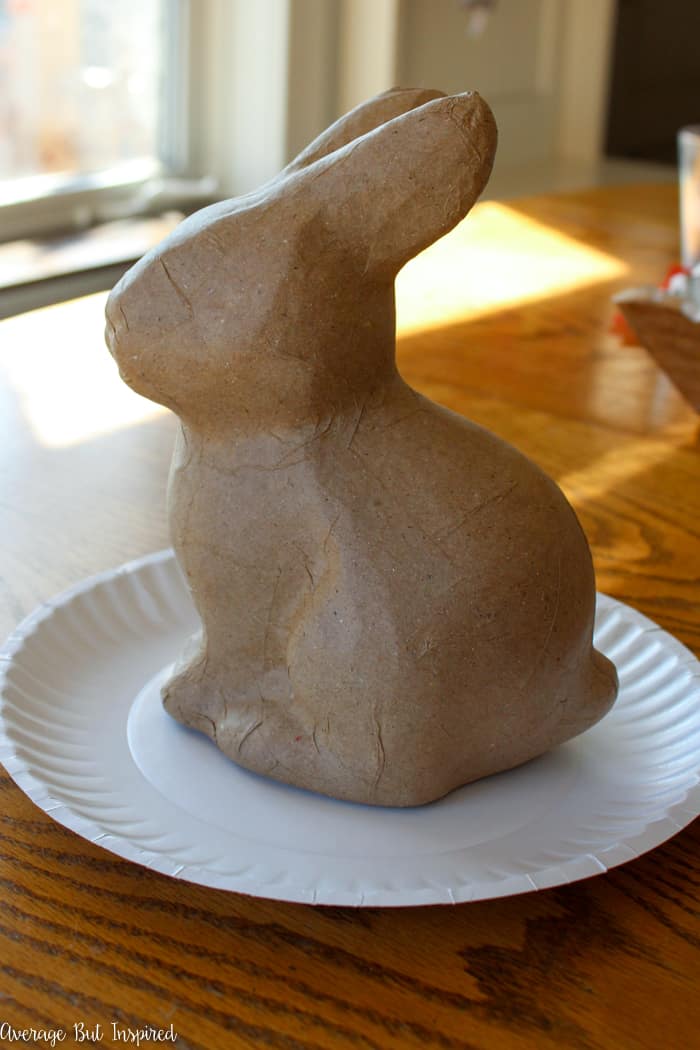
I just love how Target always finds ways to make my bill higher than it should be.  On my most recent trip, for example, I tossed this unfinished paper mache bunny into my cart without giving it a second thought.  She felt right at home amongst the toilet paper and socks.

Transform an unfinished paper mache bunny into a charming and pretty vintage paper mache bunny with simple supplies like newspaper and paper flowers. This paper mache bunny will add such a pretty touch to your spring or Easter decor!

After bringing her home and staring at her for a couple of days, I felt inspired to give her a new look, and now my DIY Paper Mache Bunny looks like this – perfect for spring decor!

Transform an unfinished paper mache bunny into a charming and pretty vintage paper mache bunny with simple supplies like newspaper and paper flowers. This paper mache bunny will add such a pretty touch to your spring or Easter decor!

Keep reading and I’ll teach you how to make one of your own.

Supplies Needed for a DIY Paper Mache Bunny

Some of these links are affiliate links.  Please read my disclosure policy for more information.

  • Unfinished paper mache bunny
  • Newspaper
  • Scissors
  • Mod Podge (matte finish)
  • Gray acrylic paint
  • Pink acrylic paint
  • Water
  • Paint brush
  • Glamour Dust glitter paint
  • Moss
  • Small faux flowers
  • Hot glue gun

How to Make a Paper Mache Bunny or Paper Mache Rabbit

Begin by cutting a newspaper into tiny strips.  Once you have a big collection of strips, paste them to the unfinished paper mache bunny with Mod Podge.

Transform an unfinished paper mache bunny into a charming and pretty vintage paper mache bunny with simple supplies like newspaper and paper flowers. This paper mache bunny will add such a pretty touch to your spring or Easter decor!

You can overlap the strips, but don’t make any area too thick. Just a slight overlap of newspaper works well.

Once the newspaper is dried to the bunny, put a thin topcoat of Mod Podge all over the bunny.

After that dries, water down some gray acrylic paint and lightly cover the bunny so that the newspaper words are muted but still visible.  I think the words give the bunny some character and vintage-looking charm!

Transform an unfinished paper mache bunny into a charming and pretty vintage paper mache bunny with simple supplies like newspaper and paper flowers. This paper mache bunny will add such a pretty touch to your spring or Easter decor!

Then, add some light pink paint in the inner portions of the ears.

Transform an unfinished paper mache bunny into a charming and pretty vintage paper mache bunny with simple supplies like newspaper and paper flowers. This paper mache bunny will add such a pretty touch to your spring or Easter decor!

When the gray and pink paints are dry, cover the entire bunny with a coat of Glamour Dust glitter paint.  This will give the bunny a beautiful shine when the sunlight hits it!  It’s a really subtle glitter and not overwhelming.

DIY Bunny Planters are another adorable DIY Easter or Spring Decor Craft you might enjoy!

(You could also sprinkle very fine glitter into Mod Podge and use that as a topcoat.)

However, if you don’t like the glitter look, you could leave the bunny as-is, or seal with another coat of Mod Podge.

Transform an unfinished paper mache bunny into a charming and pretty vintage paper mache bunny with simple supplies like newspaper and paper flowers. This paper mache bunny will add such a pretty touch to your spring or Easter decor!

Finally, hot glue moss and faux flowers around the bunny’s head to create an adorable flower crown.  This is my favorite part of this bunny!

Transform an unfinished paper mache bunny into a charming and pretty vintage paper mache bunny with simple supplies like newspaper and paper flowers. This paper mache bunny will add such a pretty touch to your spring or Easter decor!

And that is all you have to do to make a beautiful DIY Paper Mache Bunny for your spring or Easter decor!

Transform an unfinished paper mache bunny into a charming and pretty vintage paper mache bunny with simple supplies like newspaper and paper flowers. This paper mache bunny will add such a pretty touch to your spring or Easter decor!

This easy project is one that you can leave out until summer!  It’s not overly Easter, so you can pass it off a little longer than some other decorations.

Transform an unfinished paper mache bunny into a charming and pretty vintage paper mache bunny with simple supplies like newspaper and paper flowers. This paper mache bunny will add such a pretty touch to your spring or Easter decor!

I guess that, in the end, I’m glad I have no self-control in Target and that I bought that unfinished paper mache bunny, because this project is pretty sweet and will add a little cuteness to my spring decor.

Filed Under: Easter, Holiday

Dollar Store Planter Stakes Makeover

March 29, 2017 by Bre 8 Comments

blank

If you haven’t been to Dollar Tree recently, GET OVER THERE!  They have so much cute stuff for spring and Easter!  It’s one of the best times of year to stock up on craft supplies.  Last week I showed you the cute wreath I made with an unexpected Dollar Tree supply, and this week I’m showing you how to upgrade some Dollar Tree plastic bunny planter stakes with a faux finish makeover!  This dollar store planter stakes makeover is so quick and easy, and totally adorable!  Give plastic dollar store planter stakes a beautiful makeover with a faux metal finish! Learn how to easily upgrade the look of these cute spring garden decorations in this post.

Supplies Needed for a Dollar Store Planter Stakes Makeover

Some of these links are affiliate links, which means that I earn a small commission at no added cost to you if you purchase through them.  To read my full disclosure policy, please click here.

  • Plastic bunny garden stakes (from Dollar Tree)
  • Silver spray paint
  • Acrylic paint in dark gray, off white, and brown
  • Stencil brush
  • Paper towel
  • Decorative ribbon

How to Give Dollar Store Planter Stakes a Metal Makeover

I started with these cute bunny planter stakes.  They come in two colors (pink and purple), and are pretty cute on their own!  I just wanted a slightly different look for my planter stakes – one that looked like metal.  The criss-cross pattern on these little guys reminded me of chain link fencing, so I went with a weathered metal finish!Give plastic dollar store planter stakes a beautiful makeover with a faux metal finish! Learn how to easily upgrade the look of these cute spring decorations in this post.

I gave each planter stake a coat of silver spray paint that works on plastic.  I didn’t photograph this step because it was freezing outside.  But, the stakes were very shiny and space-age like!  Give plastic dollar store planter stakes a beautiful makeover with a faux metal finish! Learn how to easily upgrade the look of these cute spring decorations in this post.

I wanted to bring the high shine look down a bit, so I used a dense stencil brush (sometimes called a pouncer), to brush on dark gray acrylic paint all over the bunnies.  I made sure to let some of the shiny silver spray paint show through though.Give plastic dollar store planter stakes a beautiful makeover with a faux metal finish! Learn how to easily upgrade the look of these cute spring decorations in this post.

After this coat of paint dried, I dabbed some white acrylic paint onto certain parts of the bunnies.  I then removed most of it with the paper towel.  Give plastic dollar store planter stakes a beautiful makeover with a faux metal finish! Learn how to easily upgrade the look of these cute spring decorations in this post.

Finally, I dabbed some brown acrylic paint on spots in order to give a slightly rusty look.  I wanted my bunnies to look like junky bunnies – bunnies you’d find at a flea market.Give plastic dollar store planter stakes a beautiful makeover with a faux metal finish! Learn how to easily upgrade the look of these cute spring decorations in this post.

Once everything was dry, I tied some ribbon into one of the bunnies’ hair, and a ribbon around the other’s neck.  I wanted to give these bunnies a little style.Give plastic dollar store planter stakes a beautiful makeover with a faux metal finish! Learn how to easily upgrade the look of these cute spring decorations in this post.

Then I took my bunnies outside and plopped them into the planters that flank my garage.  Give plastic dollar store planter stakes a beautiful makeover with a faux metal finish! Learn how to easily upgrade the look of these cute spring decorations in this post.

Do you want to know a secret about the plants that are in my planter?

Promise not to tell?

They’re FAKE!  Yep!  I ordered them on Amazon.  They’re amazing and withstood the entire Chicago winter and are in perfect condition!  I love that I have a little pop of green by the door all year round.

Give plastic dollar store planter stakes a beautiful makeover with a faux metal finish! Learn how to easily upgrade the look of these cute spring decorations in this post.

Give plastic dollar store planter stakes a beautiful makeover with a faux metal finish! Learn how to easily upgrade the look of these cute spring decorations in this post.

Give plastic dollar store planter stakes a beautiful makeover with a faux metal finish! Learn how to easily upgrade the look of these cute spring decorations in this post.

And I think these bunnies are the perfect spring addition to my fake plants.  (Am I super tacky?  Maybe.  But hey, these things are the PERFECT solution for someone with a black thumb and bad weather.)

Give plastic dollar store planter stakes a beautiful makeover with a faux metal finish! Learn how to easily upgrade the look of these cute spring decorations in this post.

Jasper likes them, too (the bunnies and the fake plants).  Side note: I swear he has eyes.  He just needs a haircut.

Give plastic dollar store planter stakes a beautiful makeover with a faux metal finish! Learn how to easily upgrade the look of these cute spring decorations in this post.

Every time I look out the window and see my fake metal bunny garden stakes I smile.  They’re such a cute way to welcome spring!  Go grab some of these at Dollar Tree before they’re gone.

-Bre

You May Also Like These DIY Solar Light Planters

blank

Filed Under: Dollar Tree, Easter, Holiday

DIY Dollar Tree Easter Wreath

March 22, 2017 by Bre 10 Comments

blank

There’s just something about springtime and Dollar Tree crafts – for me they seem to go hand in hand.  I’ve made quite a few Easter crafts with things I’ve purchased at Dollar Tree, like my Spring Bunny Gumball Machines.  

I’m not sure I can replicate the popularity of that project, but I tried with this Dollar Tree Easter Wreath that I made with a deviled egg tray of all things!

SO CUTE! Turn a plastic deviled egg tray into an adorable Easter wreath or Spring wreath! Get the full tutorial for this Dollar Tree Easter Wreath in this post!

Dollar Tree Easter Wreath Supplies

Some of these links are affiliate links, which means I earn a small commission if you purchase through them.  To read my full disclosure policy, please click here.

  • Plastic egg tray
  • Faux eggs (I used foam eggs when I created this project, but it seems that Dollar Tree no longer sells those. The linked eggs are a great substitute!)
  • Craft moss
  • Ribbon
  • Spray paint
  • Hot glue and glue gun
  • Command hooks, mini size
  • Foam bunny floral pick
  • Twine
  • Washi Tape in patterns of your choice
SO CUTE! Turn a plastic deviled egg tray from Dollar Tree into an adorable Easter wreath or Spring wreath! Get the full tutorial in this post!

How to Make a Dollar Tree Egg Tray Wreath

This Easter wreath or spring wreath is unique and really fun to put together!  (And hey, you might like this other unique Dollar Tree DIY spring wreath tutorial, too!)

Step One: Paint the Deviled Egg Tray

Begin by spray painting the back side of the deviled egg tray.  Be careful not to overspray (like I did), because spray paint will run over the edge of the tray and onto the front.  

This will leave splotchy paint marks around the edges.  They’re not too noticeable, but they’re annoying.  🙂

SO CUTE! Turn a plastic deviled egg tray from Dollar Tree into an adorable Easter wreath or Spring wreath! Get the full tutorial in this post!

Step Two: Prepare The Decorative Eggs

While the deviled egg tray is drying, pull all of the foam eggs off of their wooden sticks, if that’s the type of faux eggs you’re using.

Tap your fingers and grow increasingly impatient as you wait for your spray paint to dry.  (I detest waiting for paint to dry!)

SO CUTE! Turn a plastic deviled egg tray from Dollar Tree into an adorable Easter wreath or Spring wreath! Get the full tutorial in this post!

Step Three: Attach the Eggs to the Tray

Once the paint has dried, fire up the glue gun and get to work attaching the faux eggs into their little spots on the egg tray.

SO CUTE! Turn a plastic deviled egg tray from Dollar Tree into an adorable Easter wreath or Spring wreath! Get the full tutorial in this post!

Step Four: Decorate the Center of the Tray

Next, fill up the center part of the egg tray.  Glue some moss at the bottom part of it, and then glue a foam bunny in there, too.

If you’re feeling ambitious, cut a piece of twine or string and attach it at the top of the center part of the tray.  Then wrap some washi tape around it to look like little bunting pieces.  So cute!

SO CUTE! Turn a plastic deviled egg tray from Dollar Tree into an adorable Easter wreath or Spring wreath! Get the full tutorial in this post!

Step Five: Create a Wreath Hanger

Once everything is in place and fully dried, flip it over carefully and attach two mini Command hooks upside down to the back.  Then you can run your ribbon through the hooks and tie it up for hanging!

SO CUTE! Turn a plastic deviled egg tray from Dollar Tree into an adorable Easter wreath or Spring wreath! Get the full tutorial in this post!

And that is how you make an adorable Egg Tray Easter Wreath with Dollar Tree supplies!

SO CUTE! Turn a plastic deviled egg tray from Dollar Tree into an adorable Easter wreath or Spring wreath! Get the full tutorial in this post!

It could not be easier (or much less expensive)!

SO CUTE! Turn a plastic deviled egg tray from Dollar Tree into an adorable Easter wreath or Spring wreath! Get the full tutorial in this post!

Filed Under: Dollar Tree, Easter, Holiday

Spring Bunny Flower Pot Gumball Machine

March 7, 2016 by Bre 24 Comments

blank

This DIY flower pot gumball machine craft is the perfect Easter decor or spring decoration to make!

Last Christmas I saw photos of tiny toy trucks and mini Christmas trees in old gumball machines.  They were absolutely adorable and it was an idea that I loved!  I have been hunting for the perfect gumball machine since then, but haven’t stumbled upon the right one just yet.  

But that’s okay because for my Easter decor I made my own flower pot gumball machines with the cutest little bunnies!  They’re so fun to make and just as cute as real gumball machines!  

Adorable! Make these bunny gumball machines for your Easter decor or spring decor this year! Click through for the full tutorial and supply list.

I mean, come on!  These are cute, right?

Supplies for Spring Bunny Gumball Machine

Some of these links are affiliate links.  Please read my disclosure policy for more information.

  • Small terracotta pots
  • Small candy jars with lids 
  • Small wood finials or drawer knobs
  • Strong, multi-purpose glue
  • Craft paint (the type of paint I used is no longer available. Substitute with a matte finish acrylic paint for the same look – this yellow craft paint and this light blue craft paint will be great)
  • Foam brush
  • Foam bunnies (I bought mine at Michaels but they don’t have them online.  Linked bunnies are similar.  Pull them off the floral pick stick for this project.)
  • Floral moss
  • Hot glue and glue gun
  • Decorative spring ribbon

Instructions for Making a Flower Pot Gumball Machine

Begin by painting the flower pot, candy jar lid, and wooden knob with craft paint of your choice. A multi-surface craft paint will work best since you’re covering different types of surfaces.

Adorable! Make these bunny gumball machines for your Easter decor or spring decor this year! Click through for the full tutorial and supply list.

Next, place floral moss into the bottom of the candy jar.

Here’s another adorable DIY spring flower pot craft you can make!

Adorable! Make these bunny gumball machines for your Easter decor or spring decor this year! Click through for the full tutorial and supply list.

Put hot glue onto the bottom of the foam bunnies and press them into the floral moss that’s in the bottom of the candy jar.

Adorable! Make these bunny gumball machines for your Easter decor or spring decor this year! Click through for the full tutorial and supply list.

Screw the lid on the candy jar, and glue the finial or knob to the top.  

Adorable! Make these bunny gumball machines for your Easter decor or spring decor this year! Click through for the full tutorial and supply list.

Flip the dry, painted flower pot over and cover the bottom with glue. I used a strong multi-surface glue, which is my favorite for adhering all kinds of things – even glass and terra cotta!

Adorable! Make these bunny gumball machines for your Easter decor or spring decor this year! Click through for the full tutorial and supply list.

Press the candy jar onto the glue and let it sit, untouched, for the time indicated on the glue packaging.  This will make sure that the glass and terra cotta properly bond to one another.  

Add some decorative ribbon where the two meet for a cute, final touch!

Adorable! Make these bunny gumball machines for your Easter decor or spring decor this year! Click through for the full tutorial and supply list.

I just love this little DIY spring decor project!  

Adorable! Make these bunny gumball machines for your Easter decor or spring decor this year! Click through for the full tutorial and supply list.

I kept one for myself and am bringing the other to my elderly neighbor this week. She will probably be like “what is this?!?” but hopefully it will bring her some Easter cheer, nonetheless!

Adorable! Make these bunny gumball machines for your Easter decor or spring decor this year! Click through for the full tutorial and supply list.

What do you think about my spin on the gumball machine decor idea?  

Adorable! Make these bunny gumball machines for your Easter decor or spring decor this year! Click through for the full tutorial and supply list.

Will you be making a flower pot gumball machine for yourself this spring or Easter?

Filed Under: Crafts, Dollar Tree, Easter, Holiday

10 Minute DIY Bunny Wreath {Video Tutorial}

February 27, 2016 by Bre Leave a Comment

blank

Learn how to make an adorable DIY bunny wreath with Deco Mesh and dollar store supplies!

Easter will be here soon!  Can you believe it?  (We have snow on the ground and I’m thinking about Easter.  It doesn’t seem right.)

Anyway, because it will be here before we know it, I don’t think it’s too early to share this adorable 10 minute DIY bunny wreath with you!   

Adorable! This DIY Bunny Wreath is a perfect addition to your Easter decor or spring decor! Plus, a video tutorial makes it easy to make on your own!

DIY Bunny Wreath Supplies

These are the supplies I used to make the bunny wreath as shown in this post. Feel free to modify them to fit your needs! Also, this post contains affiliate links. Please read my full disclosure policy for more information.

12″ wire wreath form (white or spray painted white)

White stiffened felt

Light pink craft felt

Iridescent white deco mesh

White pipe cleaners

Floral pick carrot

Wired ribbon

Fabric scissors

Hot glue gun

One quick word on the felt I used for this DIY spring wreath: stiffened felt is what you need for the base layer of the ears (the white part) because it holds it shape. If you use regular felt, the ears will be floppy and not stand up properly.

You can use regular craft felt for the inner pink part of the bunny ears, but you definitely want stiffened felt for the outer part!

Note that this could absolutely be a DIY Dollar Tree Easter wreath! Instead of using felt for the ears, use a Dollar Tree bunny ears headband!

DIY Easter Bunny Wreath Tutorial

To make your own bunny wreath for spring or easter, you’ll only need around ten minutes. Really!

Now, unlike my usual practice, I only made a video tutorial for this project. I felt like it’s a little easier to see the process of making the wreath by watching it.

(And please know that I made this video in 2016. It’s now 2023 and my video skills have drastically improved!)

If you prefer a written tutorial, you might enjoy another Easter wreath project I made – this adorable egg tray wreath!

The video is posted on my Facebook page – right here!  Simply click over to check it out! (And hey, maybe you’d like to follow along while you’re there!)

Adorable! This 10 Minute Bunny Wreath is a perfect addition to your Easter decor or spring decor! Plus, a video tutorial makes it easy to make on your own!

Once you watch it and become convinced that you must make your own, come back here to download the FREE bunny ears template

Bunny Ears Template

Download the FREE template for the outer and inner bunny ears right here!

Thanks for watching and “hoppy” creating!

Filed Under: Easter, Holiday

20 Minute Easter Grass “Egg Hunt” Sign

March 17, 2015 by Bre 12 Comments

In just 20 minutes you can make a fun "egg hunt" sign for Easter with inexpensive supplies!

Last week when I shared my Mr. & Mrs. Moss Bunny Topiaries, I mentioned that I’d gone on somewhat of a spring crafting binge.  So you’ll have to forgive me, but you’ll be seeing quite a few “springy” projects around here over the next few weeks!  Today is no exception; it doesn’t get much springier than plastic Easter grass and sparkly eggs, in my opinion!  So I combined the two and made this fun Easter grass “egg hunt” sign!  Use Easter grass to make a cute "egg hunt" Easter decoration for your spring mantel! Click through to get the full tutorial from averageinspired.com. [Read more…] about 20 Minute Easter Grass “Egg Hunt” Sign

Filed Under: Easter

  • « Go to Previous Page
  • Page 1
  • Page 2
  • Page 3
  • Go to Next Page »

Primary Sidebar

Let’s Connect!

Hi, I’m Bre! Thanks for visiting Average But Inspired, where I show you how to work with what you’ve got to create a home you love.

Bre of Average But Inspired - a DIY and craft blog

Love DIY? Subscribe to Get Posts E-mailed!

How Can I Help You?

blank

How to Paint a Door to Look Like Wood (It’s Easier Than You Think!)

blank

7 Tips for Hosting a Party on a Budget

blank

Limewash Stone Fireplace Makeover: Bye Bye Orange Stone Fireplace, Hello Neutral Stone Beauty!

blank

My DIY Kitchen Makeover Reveal!

Looking for Something?

Copyright © 2013-2022, Bre Eggert (Average But Inspired). All rights reserved.
  • Home
  • DIY
  • Crafts
  • Home Decor
  • Privacy Policy and Copyright Policy
  • Disclosures
  • Contact Me