• Skip to primary navigation
  • Skip to main content
  • Skip to primary sidebar
Average But Inspired logo - DIY and craft

Average But Inspired

Craft a home you love. DIY and craft tutorials.

  • About
    • Contact Me
    • Disclosures
    • Privacy Policy and Copyright Policy
  • DIY
    • Furniture
  • Crafts
    • Dollar Store Crafts
    • Seasonal
      • Patriotic & Summer
      • Valentine’s Day
      • Easter & Spring
      • Fall & Halloween
      • Christmas & Winter
  • Home Decor
    • Organization
  • Shop
    • DIY Swag
    • DIY Guides
  • Home

Organization

An Organized Linen Closet Makeover {How to Get Maximum Storage in a Small Space}

January 23, 2018 by Bre 13 Comments

Thank you to Cost Plus World Market for sponsoring this post.  The linen closet makeover ideas you’ll see are all my own!  Also, this post contains affiliate links.  To read my full disclosure policy, you may click here.

In the history of my blog, I’m not sure I’ve shared a more humiliating space than my linen closet before I gave it a 100% completely necessary makeover.  You see, my linen closet was so disorganized that my method of putting away clean sheets and towels was to throw them in there and hope they’d stay put on the random shelf upon which they landed.  Thankfully, that is no longer the case.  I’ve finished a complete linen closet makeover with help from my friends at Cost Plus World Market, and am excited to share some tips on how to get maximum storage in such a small space!

Before the Linen Closet Makeover {A Dark Time in History}

You may think I’m exaggerating about the state of my linen closet before its makeover.  I wish I were, but the photos don’t lie.  (I cannot believe I’m posting these on the internet!  My mom raised me better than this, I promise!)  This organized linen closet makeover is something to see! A once messy and dysfunctional linen closet is now beautiful and neat, thanks to these linen closet organization tips. #linencloset #organization #linenclosetorganization

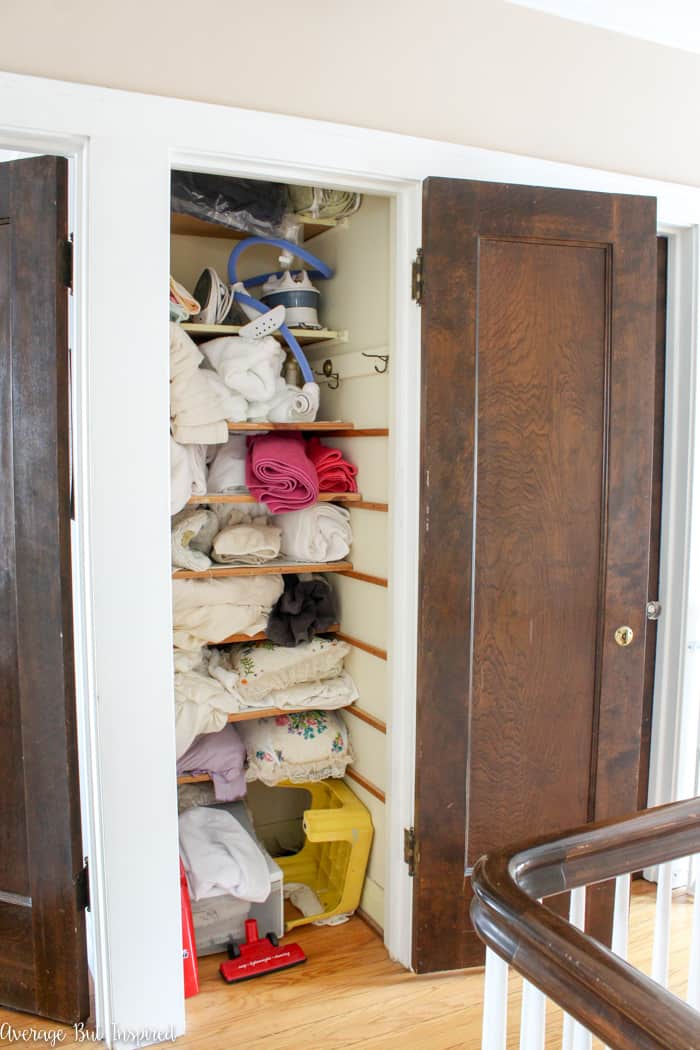
In case you can’t get a full understanding of the horrific nature of my linen closet from that photo, let me drive the point home by showing you some extreme closeups of the shelves.  This organized linen closet makeover is something to see! A once messy and dysfunctional linen closet is now beautiful and neat, thanks to these linen closet organization tips. #linencloset #organization #linenclosetorganization

I know.

There’s no excuse to have a linen closet that looks like it’s hours away from being condemned by the city.  I’m not even going to try and make one up.  I’m just going to embrace it as my dirty little secret (that’s no longer a secret).

Tip One:  Acknowledge you have a problem and that you need to do something about it!

The Linen Closet Makeover In Progress {Things are Improving}

After convincing myself that others must have messy linen closets just like mine, and that posting these photos on my blog won’t make you think less of me, I got down to business and cleared everything out of the linen closet.

Once I had everything out where I could see it, I was able to throw away or donate so many things!  I had more holiday-theme hand towels, threadbare bath towels, and mismatched sheets than anyone needs or wants.  (I also had a broken stick vacuum in there that I haven’t used in years.  Why?)

Tip Two: Empty everything out of the closet and throw away or donate what you don’t need or use.  Keep only the essentials!

After the shelves were emptied, I was able to assess the space I was working with.  I even pulled out a tape measure and measured shelves so that I could get baskets and storage containers that would perfectly fit the space and maximize my small closet’s functionality.This organized linen closet makeover is something to see! A once messy and dysfunctional linen closet is now beautiful and neat, thanks to these linen closet organization tips. #linencloset #organization #linenclosetorganization

Tip Three:  Take exact measurements of shelves and empty spaces so that you can buy baskets and storage containers that will fit the space perfectly – maximizing the area you’re working with.

Since I had everything out of there, I decided to freshen up the trim paint and add patterned shelf liner because I’m a firm believer that if the space looks nice, you’ll want to keep it looking that way.  This organized linen closet makeover is something to see! A once messy and dysfunctional linen closet is now beautiful and neat, thanks to these linen closet organization tips. #linencloset #organization #linenclosetorganization

Tip Four: Make it look pretty.  You’re more likely to keep it looking nice that way.

Next, I got to work putting everything back into the closet.

The Linen Closet Makeover Completed {Hallelujah!}

Is it weird that I keep opening the door to the linen closet and just staring at it?  (My husband says yes, it is very weird.)This organized linen closet makeover is something to see! A once messy and dysfunctional linen closet is now beautiful and neat, thanks to these linen closet organization tips. #linencloset #organization #linenclosetorganization

But guys, this is such a dramatic before and after!  Before we get into the nitty gritty on how this space actually WORKS and LOOKS BEAUTIFUL, let me give you a side-by-side comparison so you can see the old with the new.  This organized linen closet makeover is something to see! A once messy and dysfunctional linen closet is now beautiful and neat, thanks to these linen closet organization tips. #linencloset #organization #linenclosetorganization

It was really bad, wasn’t it?

So let me fill you in on what I did to achieve maximum storage in such a small space!  This organized linen closet makeover is something to see! A once messy and dysfunctional linen closet is now beautiful and neat, thanks to these linen closet organization tips. #linencloset #organization #linenclosetorganization

First, I gave everything its own space.  Large things that we use on a regular basis, like sheets and towels, were shelved.  Rolling the towels allowed me to store more on each shelf than if I had left them folded flat!  This organized linen closet makeover is something to see! A once messy and dysfunctional linen closet is now beautiful and neat, thanks to these linen closet organization tips. #linencloset #organization #linenclosetorganization

Next, for smaller items, like wash cloths and hand towels, I used beautiful lined baskets to corral them!  These items used to be stuffed anywhere I could find a spot, and it was almost impossible to find them!  Now, with a designated space, they will be easy to locate and won’t fall down on the floor all the time.  This organized linen closet makeover is something to see! A once messy and dysfunctional linen closet is now beautiful and neat, thanks to these linen closet organization tips. #linencloset #organization #linenclosetorganization

Items that are used less regularly, like bulky blankets and quilts, also got their own space in the linen closet.  Laundry baskets or hampers that double as decorative storage, like this one I purchased, are perfect for the bottom of the linen closet.  When the blankets are being used on the beds, this tote basket will store clothes to be taken for dry cleaning.This organized linen closet makeover is something to see! A once messy and dysfunctional linen closet is now beautiful and neat, thanks to these linen closet organization tips. #linencloset #organization #linenclosetorganization

The blankets and items we rarely use are perfect for the very top, hard-to-reach, part of the linen closet.  Because they’re not used frequently, a lidded basket just like this is a fantastic way to store them and keep them dust and critter free! This organized linen closet makeover is something to see! A once messy and dysfunctional linen closet is now beautiful and neat, thanks to these linen closet organization tips. #linencloset #organization #linenclosetorganization

And you might be wondering where I stashed the bold beach towels you saw in my “before” picture?  Well, they got their own basket, too, since we hardly ever get to use them here in Chicago!  Not gonna lie to you – I love that my linen closet looks more cohesive now that their bold colors are hidden from plain sight!  This organized linen closet makeover is something to see! A once messy and dysfunctional linen closet is now beautiful and neat, thanks to these linen closet organization tips. #linencloset #organization #linenclosetorganization

Labels on baskets where items are not readily seen will help ensure that things are put back where they belong!  I used these boxed gift tags so that I can easily change the tags if the basket contents change.  This organized linen closet makeover is something to see! A once messy and dysfunctional linen closet is now beautiful and neat, thanks to these linen closet organization tips. #linencloset #organization #linenclosetorganization

Tip Five: Give everything a designated place in the closet.

In addition to the baskets I used in this linen closet makeover, I also maximized my storage space by using kitchen storage containers just like these  to hold bath essentials like cotton swabs, soaps, and cotton balls!  They’re much prettier than the boxes and bags these products originally come in, and they fit more nicely on the shelves this way!  This organized linen closet makeover is something to see! A once messy and dysfunctional linen closet is now beautiful and neat, thanks to these linen closet organization tips. #linencloset #organization #linenclosetorganization

(P.S. that Citrus Breeze Linen Spray makes your sheets smell like Heaven.  I wish I were Oprah and could have clean sheets every single day, but since I can’t, I will be happy with the lovely fragrance this spray gives my sheets.)

Adding hooks to the side of the closet is another great way to maximize a small closet space.  This organized linen closet makeover is something to see! A once messy and dysfunctional linen closet is now beautiful and neat, thanks to these linen closet organization tips. #linencloset #organization #linenclosetorganization

These wire hooks are so affordable and add a cute touch to a typically utilitarian element!  Things like bath robes would be right at home in here!

Tip Six: Look for storage opportunities in unexpected places!  

With these changes, my disaster of a linen closet is now an organized linen closet that I can be proud of!  I may even show it off to guests who visit my home now.  (“Hey, go get your own towels, guests!”)  This organized linen closet makeover is something to see! A once messy and dysfunctional linen closet is now beautiful and neat, thanks to these linen closet organization tips. #linencloset #organization #linenclosetorganization

Even though my linen closet was hidden from sight, it always bothered me to know that it was such a mess.  There was no reason for it, other than pure laziness. But now that I have a beautifully organized linen closet, I resolve to keep it neat and tidy.  If you have any spaces similar to this in your home, I would encourage you to do the same!  I can’t tell you how good it feels to have this space put together now!

Like What You See?  Shop the Post!

Pop in to your local Cost Plus World Market (use their convenient store finder here), for all of your linen closet organization supplies, or click on any of these images to shop my linen closet makeover!

blank

-Bre

Filed Under: Organization

Dollar Tree Pizza Pan Craft: Pretty Memo Board

August 9, 2017 by Bre 4 Comments

blank

Pizza pans from Dollar Tree are the new “hot” crafting item.  People have so many creative ways to use them, and I’m going to add another Dollar Tree pizza pan craft idea with this pretty memo board project!

It's so easy and fun to make a pizza pan magnet board! This inexpensive project will help you get organized in a stylish way.

This is a great project because it is really fast to make and the supplies used are inexpensive!

Supplies Needed to Make a Dollar Tree Pizza Pan Memo Board

Some of these links are affiliate links, which means I earn a small commission at no added cost to you if you purchase through them. To read my full disclosure policy, please click here.

  • Pizza pan (they’re $1 at Dollar Tree – don’t buy anywhere else!)
  • Scrapbook paper
  • Spray adhesive (permanent)
  • Elmer’s ProBond Adhesive
  • Pencil
  • Scissors
  • Multi-surface acrylic paint or chalky finish paint in the color of your choice (I used this paint)
  • Small paintbrush
  • Natural Rope (1/4″ thick)
  • Ribbon
  • Small 3M Command Hooks

It's so easy and fun to make a pizza pan magnet board! This inexpensive project will help you get organized in a stylish way.

Dollar Tree Pizza Pan Craft Instructions

This pizza pan craft project is fun to make!

Step One: Paint the Pizza Pan

To begin, flip the pizza pan so its upside down, and paint around the outer edge.  This will ensure that if your scrapbook paper circle isn’t perfectly shaped (mine definitely was not!), it will still look nice and not as much like a pizza pan!  

It's so easy and fun to make a pizza pan magnet board! This inexpensive project will help you get organized in a stylish way.

What kind of paint do you use on a pizza pan?

Make sure to use a paint that has good adhesion properties!  I used chalk paint because it sticks to just about anything.  You could also paint a Dollar Tree pizza pan with a multi-surface acrylic paint.  Two coats of acrylic paint will likely be needed, whereas you can probably get away with just one coat of chalk paint.

Step Two: Cut Scrapbook Paper to Fit the Pizza Pan

Once the paint has dried, trace the pizza pan onto the scrapbook paper.  

Then cut about 1/4″ smaller than the circle you traced.  

It's so easy and fun to make a pizza pan magnet board! This inexpensive project will help you get organized in a stylish way.

Step Three: Spray the Pizza Pan and Scrapbook Paper with Spray Adhesive

Next, spray the pizza pan and the scrapbook paper with spray adhesive, and carefully place the scrapbook paper onto the pizza pan.  It will be hard, if not impossible, to move the paper once it’s made contact with the pizza pan, so be very careful in your placement.  

It's so easy and fun to make a pizza pan magnet board! This inexpensive project will help you get organized in a stylish way.

If there is a significant amount of scrapbook paper sticking over one side or the other, you can carefully trim the excess with the scissors.  

Step Four: Add Rope to the Edge

Next, cut a piece of rope long enough to wrap around the pizza pan.  

It's so easy and fun to make a pizza pan magnet board! This inexpensive project will help you get organized in a stylish way.

Glue the rope around the edge of the pizza pan and weigh it down with heavy objects or craft clamps to get it to lie in place and form a strong bond with the pizza pan.  

It's so easy and fun to make a pizza pan magnet board! This inexpensive project will help you get organized in a stylish way.

It's so easy and fun to make a pizza pan magnet board! This inexpensive project will help you get organized in a stylish way.

Step Five: Get the Pizza Pan Memo Board Ready to Hang

When everything has dried, flip the pizza pan over and press two 3M Command hooks to the back of the pizza pan, upside down. 

It's so easy and fun to make a pizza pan magnet board! This inexpensive project will help you get organized in a stylish way.

Run a ribbon through the hooks and tie a bow at the top, and then you’re ready to hang your Dollar Tree pizza pan memo board!  

It's so easy and fun to make a pizza pan magnet board! This inexpensive project will help you get organized in a stylish way.

It is just that easy to upgrade a pizza pan to a stylish and functional magnet board!  

This Dollar Tree pizza pan craft idea is so cute! See how she turned a pizza pan into a cute memo board that's stylish and functional.

Two important things on this to-do list: (1) call mom; (2) buy wine.  (That’s my to-do list; not my daughter’s.)

It's so easy and fun to make a pizza pan magnet board! This inexpensive project will help you get organized in a stylish way.

And I just have to show you these adorable magnets my daughter picked out for her magnet board – they’re animals and pretty glass gems!

It's so easy and fun to make a pizza pan magnet board! This inexpensive project will help you get organized in a stylish way.

I might have to borrow those animal heads for my own workspace!  🙂

If you enjoyed this project, would you please pin it so others can find it, too?  It's so easy and fun to make a pizza pan magnet board! This inexpensive project will help you get organized in a stylish way.

Now that we have a cute magnet board for my daughter’s room, let’s hope that it will help control some of the clutter she manages to keep in there!

-Bre

Filed Under: Crafts, Dollar Tree, Organization

How to Organize Digital Photos Using Amazon Photos

January 3, 2017 by Bre 85 Comments

blank

Digital photo clutter is real, and the thought of organizing thousands of digital photos on multiple devices is pretty overwhelming.  I, like many others, have let this task go for too long and absolutely have to get my digital photos organized and under control!

As an Amazon Prime member, I have come up with a system for how to organize digital photos using Amazon Photos – Amazon’s online photo storage program – and guys . . . it is pretty quick, simple, and inexpensive!

This photo organization system works, so if you’re in the same boat as me and feeling overwhelmed by your digital photo collection, think about giving this a try. Organizing thousands of family photos can be overwhelming! But this post teaches you how to organize digital photos with Amazon Photos! It's a service that you're probably already paying for, so why not learn to use it?

How to Organize Digital Photos Using Amazon Photos

First things first . . . this post contains affiliate links, which means I earn a small commission at no added cost to you if you purchase through them.  To read my full disclosure policy, please click here.

Step One: Sign Up for Amazon Prime (if you Don’t Already Have an Account)

I am pretty sure that everyone I know has Amazon Prime.  If you do, you can skip this step of the process – you’re already good to go.  (If you don’t know about the Amazon Photos benefit of your Prime Membership, however, you might want to read this anyway.)

If you don’t already have Amazon Prime, how are you still alive?!?  No, but seriously, I couldn’t live without it.

For $139 a year or $14.99 per month (as of February 3, 2022), you get free 2-day shipping on Amazon purchases, free instant streaming movies and TV, free book downloads, free streaming music, AND, important to this post, free access to Amazon Photos.

Amazon Photos Unlimited Full-Resolution Storage

Amazon Photos gives you UNLIMITED full-resolution photo storage (and 5 GB of video storage) with your Prime membership.  

You can download the full-resolution photos back to your devices at any time.  Many other online photo storage systems (including Google – (unless you pay extra)) downgrade the quality of your photos, and many do not allow you to re-download photos to your devices once you’ve uploaded them.

That means that you can store all of your photos off of your computer, phone, external hard drive, etc., and save all kinds of space and speed on those devices.

Amazon Photos App Syncs With Your Phone

I downloaded the Amazon Photos app on my phone and now have my iPhone photos automatically syncing with my Amazon Photos account.  I know they’re safely stored off of my phone and I can delete them without worrying and without constantly running out of space on my phone.

Plus, my husband downloaded the app, synced his phone with our family photo account, and has his iPhone photos going in there, too.

So, if you don’t have Amazon Prime already, you should strongly consider getting it.  It is life-changing!  You can get a free 30-day Amazon Prime trial by registering at that link.

You probably won’t want to begin uploading your photos to Amazon during your free trial, but definitely take advantage of the free shipping and other features to see if you like it.  Then, if you do, get that photo organization going!

Step Two: Gather All of Your Photo Sources

These days most of us have photos on many sources: computers, tablets, phones, cameras, thumb drives, external hard drives, and more.

If you’re going to be organizing many years’ worth of photos, you’ll need to think about where all of your photos are located.  Remember that you might have some old devices (like that defunct laptop you used ten years ago), that contain family photos.

Get all of those devices into one place so you have convenient access to everything.  Once you’re in the groove, you’ll be glad you won’t have to stop to go device hunting!

Organizing thousands of family photos can be overwhelming! But this post teaches you how to use Amazon to organize digital family photos in a quick and inexpensive way. Get tips on organizing and printing years' worth of family photos without getting overwhelmed.

Step Three: Do Some Weeding

At this point, begin to think about how you want to tackle your photo organization process: do you want to do everything all at once or do you need to break this task up into more manageable chunks?

For me, working year-by-year seems to make the most sense,  You could broaden out from there, or take smaller chunks of time, like months, for example.

Once you’ve settled on your initial timeframe, get your first device and start looking through the photos in the decided-upon timeframe.  You’ll need to do some eliminating here, so look for photos to delete, such as blurry photos, duplicates, near-duplicates, irrelevant or not meaningful photos, etc.

Repeat this weeding process for each device on which you have photos.  Doing this initial sweep will cut down on your photo uploading time, so it’s a good idea to do this step.

Organizing thousands of family photos can be overwhelming! But this post teaches you how to use Amazon to organize digital family photos in a quick and inexpensive way. Get tips on organizing and printing years' worth of family photos without getting overwhelmed.

Step Four: Upload Photos to Amazon Photos and Group Them

Once you’ve done the initial pass through on your photos, it’s time to start uploading them to Amazon Photos.

I uploaded photos for the year from multiple devices – one device at a time.  I used the Amazon Photos app on my phone to upload my phone’s photos wirelessly.

Once everything was uploaded, I sorted the photos by “date taken” and then added all of the pictures taken in 2016 (for example) to an album for that year.  You could choose to group your photos differently – any meaningful way that works for you will be great!

The great thing is that on your photos homepage, a little timeline appears on the righthand side of the screen, which breaks the photos down by year and month.  This way you can quickly navigate to a particular set of photos if you want.  Organizing thousands of family photos can be overwhelming! But this post teaches you how to use Amazon to organize digital family photos in a quick and inexpensive way. Get tips on organizing and printing years' worth of family photos without getting overwhelmed.

A sorting feature also appears on the lefthand side, without having to do anything.

Photos are automatically given tags, like “Food,” “Beach,” and “Bridge,” people in photos are recognized with facial recognition software (depending on where you live; this is illegal in some states) so you can quickly find photos of one particular person in that grouping, and photos are tagged by location (if they were taken on a device with geotagging turned on – like a mobile device).

Organizing thousands of family photos can be overwhelming! But this post teaches you how to use Amazon to organize digital family photos in a quick and inexpensive way. Get tips on organizing and printing years' worth of family photos without getting overwhelmed.

Step Five: Do a Second Pass Through to Weed Out “the Uglies”

Even though you did some photo removal in Step Three, I guarantee there will be photos that slipped through the cracks and were uploaded to your Amazon Photos account.

Take time to go back through the photos you’ve uploaded and scan for duplicates (or near duplicates), blurry photos, and photos that are just plain ugly and not worthy of keeping.

Remember that you don’t NEED three variations of every single event in your life.  That is photo clutter.

So do some editing of your photo collection and weed out the uglies.

Step Six: Decide How To Preserve Your Photos

At this point, you have made it SO far in your photo organization quest.  It’s actually really exciting to feel like you have a handle on your digital photos.  Even just knowing where they all are and that they’re safe and accessible to you is a fantastic feeling!

But you’ll probably want to do something with them other than keep them on the Amazon cloud somewhere.

I decided to do several things with the first year of photos I have uploaded: (1) print a hardcover photo book of a special family vacation; (2) print a hardcover photo book of the highlights of my family’s year (a family yearbook of sorts); (3) print a copy of each picture from the year to store in archival photo boxes (like these awesome ones and maybe some of these for a decorative touch); and (4) leave all of the photos on Amazon Photos since I get unlimited storage.

I was able to do all of my photo printing through Amazon.  Also, the Amazon Photos books start at $19.99, but when I ordered mine, they had a 75% off coupon, so I got them for $5 a piece.  Yes, $5!  That is insane!

Anyway, I know I still have a lot of work ahead of me.  I have THOUSANDS of pictures to get through.  But all in all, this method of storing and organizing digital family photos is manageable and effective, and it’s one that’s going to work for me and my family.

In the future I will be better about keeping up with current family photos so that I don’t have to play this catch up game.  At least I have a plan in place and a great solution to my family photo organization dilemma!

I hope this post helps you get your family photos organized, too!  Please let me know if it does, and let me know if you have any tips of your own to add.

Amazon Photos Frequently Asked Questions

In the time since I’ve written this blog post, I’ve gotten lots of questions about Amazon Photos, so I thought it would be helpful to answer some of them here!

It may also be helpful for you to read the comments below, as many people have offered their opinions on Amazon Photos. This post is intended to help you organize your photos, and I do not have all of the answers for all of your questions.

Finally, I kindly request that you do not email me with questions; I do not have the ability to personally help you with your photo projects. Thank you!

1. Is Amazon Photos free?

Amazon Photos is free for anyone with an Amazon account!  Read number two below about the storage differences with a paid Amazon Prime account versus a regular Amazon account.

2.  Is Amazon Photos storage really unlimited?

If you have Amazon Prime, yes it is!  Photo storage is truly unlimited, and video storage is up to 5 gigabytes of video.  You can add extra video storage for a fee.

Non-Prime members can store 5 gigabytes of photos for free.

3.  How do I access my pictures on Amazon Photos?

On a laptop or a desktop, you can go to Amazon Photos and sign in to view and manage your photos.  On a mobile device, download the Amazon Photos app to store and manage your photos.

4.  Is Amazon Photos for personal use only?

Yes, according to Amazon’s terms and conditions, use of Amazon Photos is for personal photography only.  Professional photographers and commercial uses are not permitted.

5.  Which is better – Google photos or Amazon Photos?

Well, I think that’s a matter of personal preference!  However, in the Amazon Photos vs. Google Photos debate, I will say Amazon Photos because, as I mentioned above, Amazon Photos doesn’t downgrade the quality of the image in any way, and you get unlimited storage as a Prime member!  Google photos only gives you 15 gigabytes of storage and it downgrades your photo quality.

6.  What happens to my photos if I need to cancel my Amazon Prime account?

Before canceling your Prime account, you can download all of your photos from Amazon Photos to an external hard drive or cloud location of your choice.

Then you will have everything saved in the original, high-resolution format and all of your pictures will be safe and sound.

Organizing thousands of family photos can be overwhelming! But this post teaches you how to use Amazon to organize digital family photos in a quick and inexpensive way. Get tips on organizing and printing years' worth of family photos without getting overwhelmed.

Filed Under: Organization

No Mudroom, No Problem: No Mudroom Solutions for Any Home

June 10, 2016 by Bre 6 Comments

blank

In the house of my dreams, I would have three things that I don’t have in my current home: (1) a screened-in porch; (2) a transom window or two; and (3) a mudroom.  Dreamer Bre would pick numbers 1 or 2; realist Bre would pick number 3.

A mudroom would be practical and fabulous; a perfect little spot for my family to stash all belongings as soon as they come in the door.  And of course it would be hidden so that nobody would have to see the mounds of shoes, backpacks, purses, jackets, winter gear, etc. that accumulate all too quickly.

Since a mudroom like this just isn’t in the cards for my home, I’ve figured out a way to create fake mudrooms of sorts in my foyer and also at my back door.  

Neither spot is the perfect mudroom of my dreams, but they function well and help keep my family (and our stuff) relatively organized.  Because of that, I thought I’d share these “no mudroom solutions” to hopefully help you, too!

Just because you don't have a mudroom doesn't mean your entryway can't be organized. Learn how to create a fake mudroom in your home with 5 essential elements to any organized entryway! These no mudroom solutions will get your home organized in no time.

Because of several key components in each of these spaces, my home’s lack of a mudroom is a non-issue.  All of my family’s things have a place to go, which keeps clutter and disorganization at bay.  

No Mudroom Solutions: Elements of a Faux Mudroom

So what do you need to create a fake mudroom?  Here’s where to start! (P.S. this is an old photo! I updated the pictures in this post after I originally wrote it!)

In need of no mudroom solutions? This post gives you five essentials to keeping an organized entry!

 The product images in this post contain affiliate links. Please read my disclosure policy for more information.

No Mudroom Idea No. 1: Wall Hooks

Wall hooks are so important in any fake mud room!  You must have a place for your family members and visitors to hang their bags and jackets, especially if your coat closet is small.  

Double hooks or coat wall hooks are a great way to get more storage in the same amount of space.

And, lower hooks give small children a place to hang their belongings instead of throwing them on the floor.

If your space is really tight, folding wall hooks are a game changer! I have these in my new home and absolutely love them!

Wall hooks are one essential no mudroom solution. If you're looking for a way to organize your small entryway, this post shows you how!

No Mudroom Solutions No. 2: Bench or Seating

A place to sit is essential in entry spaces.  It gives people a comfortable place to take off their shoes or put them on, and it serves as another drop zone, too.  

Storage benches are a fantastic option because they pull double duty. Whether they have a seat that lifts to store things inside, or compartments underneath to store shoes or add storage baskets, you can definitely use one as an entryway organizer.

If you don’t have a storage bench, even a small chair or stool will do. Give it extra functionality by keeping a small boot tray underneath and an umbrella stand next to it.

No Mud Room Idea No. 3: Drop Zone Area

Having a place to drop your keys, bag, sunglasses, or whatever else is in your hands when you walk in the front door or back door is so important to maintaining order at the entry!

A little console table near the door is perfect for this job.  You can find affordable entryway tables in just about any shape or size, so no matter how small your space, you can make something work!

If you’re really squeezed for space, a wall-mounted folding table that opens up only when you need it could be a perfect solution! Or, even a shallow wall-mounted shelf could work.

Finally, I personally love a wall-mounted key hook holder. As a reformed “where are my keys?” person, this has been a game changer for my sanity!

Need no mudroom solutions? Here's one: a wall-mounted key hook holder and small bench help keep this small entryway organized.

Small Entryway Idea No. 4:  Baskets and Trays

I cannot stress the importance of baskets in entry spaces!  There are so many uses for them!

I use one under the bench as a shoe tray, and it’s great because my kids know exactly where to put their shoes when they come in the door.  

I also have one next to the entry table to put umbrellas in, and in the winter I stick a small one next to the bench for a place to deposit scarves, hats, and gloves (which I then put into my super small but super Organized Coat Closet!).

A hanging rope basket that hangs from a hook is where I stash the dog leashes and dog accessories.

You can never have too many baskets or trays: trust me!

No Mudroom Solution No. 5: Hall Tree

If you have the space for it, a hall tree is an amazing all-in-one solution to the no mudroom problem.  

It combines storage and seating into one piece, and there are tons of ready-made options available in stores these days!  I love the piece we have next to our back door!

No mudroom? No problem! Get these great "no mudroom ideas" to help you achieve an organized entryway.

I bet you have a lot of these entryway organizer items in your home already!  So, if you struggle with containing clutter and maintaining organization in your home, try and set up a mudroom of sorts with what you have on hand.

Then, see what works and what doesn’t. You can add more organizational tools to the mix over time, and get your small entryway working (and looking) better for everyone!  

Filed Under: home decor, Organization

Dollar Store-ganization: Binder Ring Organization Ideas

October 30, 2015 by Bre 4 Comments

blank

You’ll love these smart binder ring organization ideas! Get your daily life in order with these genius binder ring uses.

Welcome to Part 3 of my series, Dollar Store-ganization, where I share tips and tricks for getting organized with products from the dollar store.  

The goal of this series is to show that you don’t have to spend a fortune to get your life (or stuff!), in order!  

Binder rings are awesome little tools for organization and are so CHEAP! This post has great ideas on how to use them to organize everyday items.

This post contains affiliate links. Please read my disclosure policy for more information.

In case you missed it, Part One of this series was all about mesh laundry bag organizing ideas.

And, Part 2 focused on utility closet organization with dollar store items.

This post is all about the mighty binder ring (aka looseleaf ring or book ring) – the often overlooked but oh-so-valuable binder ring.  Seriously.  

Binder rings are awesome little tools for organization and are so CHEAP! This post has great ideas on how to use them to organize everyday items.

I’m sure you’re thinking that the binder ring can’t really be that useful, but it is!  And because you get six book rings for $1.25 at Dollar Tree, you’re about to fall in love!  

Binder rings are awesome little tools for organization and are so CHEAP! This post has great ideas on how to use them to organize everyday items.

Here are some of my favorite ways to use these babies!  

Binder Ring Greeting Card Organization

If you save cards that you receive, they can quickly accumulate and become difficult to contain.  I used to keep mine loose in a box in my closet.  And it would fall on my head all.of.the.time, sending cards flying everywhere.  SO ANNOYING!

Binder rings are awesome little tools for organization and are so CHEAP! This post has great ideas on how to use them to organize everyday items.

Now I pop them onto binder rings, which keeps them together and makes them easy to look back at.  

I put mine on different rings depending on the occasion and/or sender.  Now if the box falls on my head, at least the cards do not fly everywhere!  

P.S. this is a perfect way to organize Christmas cards you receive! At the end of the holiday season, punch holes in each card and slide them onto a binder ring. You’ll have a fun card keepsake.

Organize Paint Chips with Binder Rings

Binder rings are the PERFECT place to corral paint chips!  

Put the colors you already have in your house on one, and the colors you may want to use in the future on another!  This makes it easy to pop them into your purse and match with home accessories on the go!  

Binder rings are awesome little tools for organization and are so CHEAP! This post has great ideas on how to use them to organize everyday items.

Plus, having them in one spot means you’ll be less likely to forget what color your living room is painted (ahem, ahem . . . not that I’d know anything about that).

This would work equally well for fabric swatches!

Corral Ponytail Holders with Binder Rings

Life changing, this one is.  Keep all of those ponytail holders in one spot on a binder ring!  

Binder rings are awesome little tools for organization and are so CHEAP! This post has great ideas on how to use them to organize everyday items.

This is the best way to have ponytail holders on the go (like in your purse or car), or even at home (like in your makeup bag).  

You’ll never be hunting for ponytail holders in random places again if you put them on a binder ring!  (I was a chronic “I bet I can find one in my jeans pocket!” girl before I started this method of keeping them together!)

Takeout Menu Organization

If you order delivery or takeout a lot, then you probably have lots of restaurant menus at home.  

Binder rings are awesome little tools for organization and are so CHEAP! This post has great ideas on how to use them to organize everyday items.

Putting menus onto a binder ring will keep your junk drawer organized and make your pizza delivery order stress-free since you’l never be missing your menus again!  

Organize Scarves with Binder Rings

Clip binder rings through a hanger and then weave your scarves through them for an instant scarf organizer!  

Binder rings are awesome little tools for organization and are so CHEAP! This post has great ideas on how to use them to organize everyday items.

You’ll be able to see your scarf collection clearly and avoid having them fall all over the floor!  

I’m sure there are tons of other ways to use binder rings to get organized – let me know if you have any ideas to add to this list!


Filed Under: Dollar Tree, Organization

Dollar Store-ganization: Mesh Laundry Bag Organization Ideas

September 3, 2015 by Bre 9 Comments

Mesh laundry bags from the dollar store are a GREAT organization tool! This post gives you lots of ideas on how to use them to get organized!

Hello and welcome to Part 2 of my new series, Dollar Store-ganization, where I share tips and tricks for getting organized with products from the dollar store.  The goal of this series is to show that you don’t have to spend a fortune to get your life in order!  In the Dollar Store-Ganization series, Average But Inspired shares tips and tricks for organizing your life, one dollar store product at a time!
Last month I showed you how I whipped my closets into shape with dollar store plastic bins, and this month I’ve got some great ideas on how to get organized with dollar store mesh laundry bags!  Mesh laundry bags from the dollar store are a GREAT organization tool! This post gives you lots of ideas on how to use them to get organized!
My dollar store currently has three packs of mesh laundry bags for $1. That’s incredible! A couple of summers ago they had different shapes and sizes of bags, so you never know what you’ll find.

I ADORE these bags for organizing because: (a) they’re cheap; (b) they’re washable if they get dirty (obviously); and (c) they’re see-through so you can easily see the contents within.

I’m sure there are about a million things you can use them for, but here are some of my favorite mesh laundry bag organization ideas!

Puzzle Storage

Keep puzzle pieces together and easily accessible in mesh laundry bags!  This system has been working for my family for years!  Mesh laundry bags from the dollar store are a GREAT organization tool! This post gives you lots of ideas on how to use them to get organized!

Winter Gear “Packets”

This is a new idea I’m going to test out this winter with my kids.  I plan to have them put their hats, mittens, scarves, etc. into a mesh laundry bag when they get home, and then put it in their designated drop zone area.  I hope this will keep their things together in one place, so that the next time they go to put them on they aren’t hunting for a missing glove or hat, and costing me precious time!  Mesh laundry bags from the dollar store are a GREAT organization tool! This post gives you lots of ideas on how to use them to get organized!

Bath Toy Storage

If mesh laundry bags aren’t PERFECT for bath toys, I don’t know what is!  Pop the bag on a 3M Command Hook in the tub and let the toys dry off in there when bath time is over.  If the bag starts to get slimy or gross, just toss it in the washing machine!  (And yes, real life – we have hideous yellow tile in my kids’ bathroom.)  Mesh laundry bags from the dollar store are a GREAT organization tool! This post gives you lots of ideas on how to use them to get organized!

Socks (or Unmentionables)

If your socks share drawer space with anything else, things can get out of hand pretty quickly.  Especially if it’s a small drawer.  Segregating them with a mesh bag is an easy way to keep things tidy! Mesh laundry bags from the dollar store are a GREAT organization tool! This post gives you lots of ideas on how to use them to get organized!

Food Packets

I don’t know about you, but I’m constantly “losing” food packets (like onion soup mix, Italian dressing mix, taco seasoning), in my pantry.  They fall down to a different shelf or something – I don’t know.  Putting them in their own special container helps mitigate this problem!  Mesh laundry bags from the dollar store are a GREAT organization tool! This post gives you lots of ideas on how to use them to get organized!

Purse Items

If you are like me, you carry 12 million things around in your purse.  Little pouches are great for corralling things like lipstick, mints, sunglasses, etc., but they’re not see-through!  Tiny mesh laundry bags are perfect for inside a dark purse because you can easily spot what’s in there and grab your necessities in a hurry!Mesh laundry bags from the dollar store are a GREAT organization tool! This post gives you lots of ideas on how to use them to get organized!

Reusable Food Container Lid Storage

When I’m trying to clean up the kitchen, there’s nothing I hate more than being unable to quickly find the lids to my reusable food containers.  Inevitably the lids are nowhere to be found, or are not with their proper containers, and I spend a ton of time trying to find them.  Keeping them in their own mesh laundry bags will keep them together and eliminate the “where is the lid?!?” problem!

Mesh laundry bags from the dollar store are a GREAT organization tool! This post gives you lots of ideas on how to use them to get organized!

I’m sure there are lots of other wonderful organization uses for mesh laundry bags.  If you can think of any, please tell me about them in the comments below!  I may update this post to include your idea – giving you credit, of course!

Thanks for stopping by and make sure to come back for future Dollar Store-ganization ideas!  And if you enjoyed this post, please “pin it” to help share these ideas!  Mesh laundry bags from the dollar store are a GREAT organization tool! This post gives you lots of ideas on how to use mesh laundry bags to get organized!

-Bre

Filed Under: Organization

  • « Go to Previous Page
  • Page 1
  • Page 2
  • Page 3
  • Go to Next Page »

Primary Sidebar

Let’s Connect!

Hi, I’m Bre! Thanks for visiting Average But Inspired, where I show you how to work with what you’ve got to create a home you love.

Bre of Average But Inspired - a DIY and craft blog

Love DIY? Subscribe to Get Posts E-mailed!

How Can I Help You?

blank

How to Paint Over Tile

blank

7 Tips for Hosting a Party on a Budget

blank

Limewash Stone Fireplace Makeover: Bye Bye Orange Stone Fireplace, Hello Neutral Stone Beauty!

blank

How to Create a Faux Antique Brass Finish with Paint

Looking for Something?

Copyright © 2013-2022, Bre Eggert (Average But Inspired). All rights reserved.
  • Home
  • DIY
  • Crafts
  • Home Decor
  • Privacy Policy and Copyright Policy
  • Disclosures
  • Contact Me