
• Skip to primary navigation
  • Skip to main content
  • Skip to primary sidebar
Average But Inspired logo - DIY and craft

Average But Inspired

Craft a home you love. DIY and craft tutorials.

  • About
    • Contact Me
    • Disclosures
    • Privacy Policy and Copyright Policy
  • DIY
    • Furniture
  • Crafts
    • Dollar Store Crafts
    • Seasonal
      • Patriotic & Summer
      • Valentine’s Day
      • Easter & Spring
      • Fall & Halloween
      • Christmas & Winter
  • Home Decor
    • Organization
  • Shop
    • DIY Guides
  • Home

paint

Inside My Moody Green Bathroom Makeover

August 9, 2025 by Bre 2 Comments

I re-did my kids’ bathroom – again – this time with a moody green and sophisticated feel.

It feels like just last summer that I made over my kids’ bathroom: taking it from boring to more colorful and (at the time) age-appropriate.

But now they’re teenagers and I found out they actually hated the polka dot wall (gasp!), and they didn’t really like the blue vanity either (gasp #2!).

So, when I had the opportunity to partner with BEHR to create some Pinterest content using their 2026 Color of the Year, Hidden Gem, I decided the bathroom was getting yet another facelift.

Out went the polka dots, greige walls, and the blue vanity . . . and in came a deep and dramatic smoky blue-green paint color for the walls and deep tan (almost taupe) color for the vanity (BEHR Smoked Tan, to be precise).
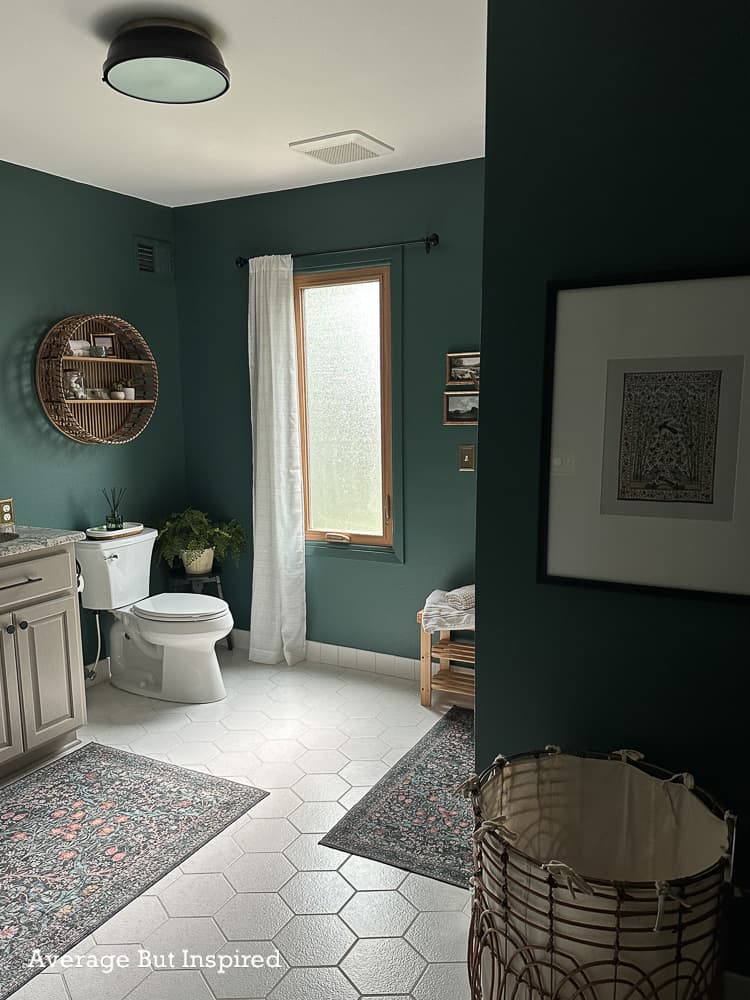
Bathroom painted in BEHR Hidden Gem, the 2026 Color of the Year. Vanity is in BEHR Smoked Tan from the 2026 Color Trends Palette. It features oak wood accents and vintage styling for a moody and cozy bathroom look.

I painted the walls in Hidden Gem (eggshell finish, which is what I like in bathrooms for the mildew-resistant properties and easy-to-clean finish), and the window frame and door trim in Hidden Gem (semi-gloss finish).

Bathroom painted in BEHR Hidden Gem, the 2026 Color of the Year. Vanity is in BEHR Smoked Tan from the 2026 Color Trends Palette. It features oak wood accents and vintage styling for a moody and cozy bathroom look.

Shop This Bathroom

This post contains affiliate links. Please read my disclosure policy for more information.

  • Machine-washable dark green area rug
  • Machine-washable dark green runner (in front of tub)
  • Antique brass switches and faceplates
  • Vintage textile art print (digital download)
  • 3 pack gold frame wall art
  • Taupe windowpane pattern shower curtain
  • 5 light black and brass vanity light
  • Dome enameled ceiling light
  • Bamboo bathroom bench
  • Black and brass towel hooks
  • Matte black sink faucets

Then I repainted the vanity in BEHR Smoked Tan, which is a color I pulled directly from the BEHR 2026 Color Trends Palette. It was a perfect complement for the dark green walls and also the color of the pre-existing granite countertop.

Bathroom painted in BEHR Hidden Gem, the 2026 Color of the Year. Vanity is in BEHR Smoked Tan from the 2026 Color Trends Palette. It features oak wood accents and vintage styling for a moody and cozy bathroom look.

All of the finishes and “big things” (like lighting, faucets, cabinetry, etc.) stayed the same in here, but I did update some of the accessories like the rug, shower curtain, light switches, and artwork.

Bathroom painted in BEHR Hidden Gem, the 2026 Color of the Year. Vanity is in BEHR Smoked Tan from the 2026 Color Trends Palette. It features oak wood accents and vintage styling for a moody and cozy bathroom look.

I love how this shade of green works well with the oak doors and oak window frame in this bathroom. It gave this bathroom a completely different look without requiring a renovation – my favorite!

Bathroom painted in BEHR Hidden Gem, the 2026 Color of the Year. Vanity is in BEHR Smoked Tan from the 2026 Color Trends Palette. It features oak wood accents and vintage styling for a moody and cozy bathroom look.

I’m thinking that I might paint the ceiling in Hidden Gem, too, for a cozy color-drenched effect like I gave my cottage bathroom, but I am a little worried it could be too dark. Not to mention the neck cramps involved with painting a ceiling. Thoughts on that? Let me know in the comments, and thanks for checking out this hall bathroom version 2.0.

Filed Under: home decor Tagged With: paint

Polka Dot Wall: DIY Painted Accent Wall

September 2, 2021 by Bre 2 Comments

Paint a polka dot wall to add a fun statement to your home decor! This painted accent wall idea is simple enough for any DIY'er to tackle!

Months ago I set out to give my kids’ bathroom a facelift, and over the summer I slowly (very slowly!) I pulled it all together. Of course I veered from the original modern vintage bathroom makeover plans (I never can stick to a plan exactly!), and part of that involved this Polka Dot Wall, which is a super easy DIY painted accent wall idea!

Paint a polka dot wall to add a fun statement to your home decor! This painted accent wall idea is simple enough for any DIY'er to tackle!

Accent walls are one of my favorite ways to add personality to a space (take, for example, my painted grid accent wall), so when the bathroom makeover was feeling a little bland to me, I decided a quick and easy paint job is what it needed.

In just a couple of hours I was able to paint this charming bathroom accent wall, and I’m going to show you how you can paint a polka dot wall of your own!

Painted Polka Dot Wall Supplies

This post contains affiliate links. To learn more, please read my full disclosure policy.

To create the DIY polka dot accent wall as shown in this post, these are the supplies used.

  • Round floral foam (tip: have several of these on hand so you can swap them out as they get gross or if you need to take a break during the project. You can’t wash them out or keep them fresh, so it’s better to have several.)
  • Stencil brush
  • Paint (latex paint or even craft paint will work here!)
  • Paint tray
  • Level (note: a laser level is the best choice if you have one available)
  • Paper or card stock
  • Knife

How to Paint a Polka Dot Accent Wall

Don’t let the instructions I provide make this seem harder than it is. This accent wall is incredibly easy to paint.

Plan Out the Accent Wall

Begin by setting up a laser level at a mid-point on the wall. If you don’t have a laser level, lightly draw a level line on the wall with pencil that can be erased once all of the polka dots have been painted.

Next, decide how far apart you want the polka dots to be from one another (both horizontally and vertically), and cut a sheet of paper to that size. (For reference, my polka dots are about 9″ apart.). The paper will serve as the polka dot spacer. That’s a very important job.

Paint the First Row of Polka Dots on the Wall

Now it’s time to start painting the accent wall!

Gently paint one side of the round floral foam with paint. As tempting as it may be to dip the floral foam into the paint and apply the foam to the wall, don’t do that. There will be too much paint on the foam and it will run down the wall. (Not that I’d know anything about that.)

Press the foam onto the wall and paint the first polka dot.

Paint a polka dot wall to add a fun statement to your home decor! This painted accent wall idea is simple enough for any DIY'er to tackle!

Next, using the paper spacer you previously created, continue painting polka dots on the wall – along the horizontal line.

Paint the Second Row of Polka Dots

Once that first row of polka dots is complete, it’s time to move up or down along the wall. This step is hard to describe with written directions, so you may want to watch my TikTok video on how to paint a polka dot wall for additional help!

You can use the laser level or draw a level line to create the next rows of polka dots, or you can simply use that paper spacer only. (I did a mixture of both in this project.)

Click to view any of the posts in this series!

  • Vintage Modern Bathroom Makeover Plans
  • How to Paint a Bath Tub
  • How to Paint Bath Fixtures with a Lasting Finish
  • DIY Polka Dot Accent Wall
  • Modern Vintage Bathroom Makeover Reveal
Paint a polka dot wall to add a fun statement to your home decor! This painted accent wall idea is simple enough for any DIY'er to tackle!

To use the paper spacer only, flip the paper spacer vertically and run it up (or down) the wall from the first polka dot you painted. Place your finger at the edge of the paper, and then flip it horizontally. The end of that paper is where the first polka dot on the next row will go.

Paint a polka dot wall to add a fun statement to your home decor! This painted accent wall idea is simple enough for any DIY'er to tackle!

This will offset the polka dots with each row as you’ll see on my polka dot accent wall.

Continue this process until you cover the entire wall in polka dots.

Paint Polka Dots Along Edges or in Corners

Once you have finished painting the full polka dots, there will likely be some spots along edges of walls (or in my case, along the large mirror that I didn’t want to remove), or in corners, that need partial polka dots.

Simply cut the floral foam circle to size with a knife, and place those partial polka dots wherever they’re needed!

Paint a polka dot wall to add a fun statement to your home decor! This painted accent wall idea is simple enough for any DIY'er to tackle!

The Painted Polka Dot Accent Wall

It only took around two hours to complete this accent wall project, and to add some whimsy and fun to this previously boring bathroom!

The benefit of a painted bathroom accent wall is that there’s no peeling like you would potentially get with wallpaper in a high-moisture space, and paint is cheaper than adding a wood wall treatment. Plus, as soon as we grow tired of the polka dots, I can easily repaint. It’s just one wall, after all!

Paint a polka dot wall to add a fun statement to your home decor! This painted accent wall idea is simple enough for any DIY'er to tackle!

Let me know what you think of this painted accent wall idea! I love to hear from you in the comments below, and on my Instagram!

Filed Under: DIY Tagged With: accent wall, paint

How to Paint a Radiator the Easy Way!

July 8, 2016 by Bre 40 Comments

blank

My house has many enormous, old radiators.  Slowly but surely, I’ve been painting them to fix years of neglect (think chipping paint and/or rust spots), or poor paint color choices from previous owners (think mustard yellow).  

I can honestly say that, until recently, radiator painting was my LEAST FAVORITE JOB IN THE HISTORY OF THE WORLD.

But now I’ve finally figured out how to paint a radiator the easy way, and I am happy to pass along my tips to you!

Before I figured out how to paint radiators with the method I’m going to tell you about, I painted them by hand.  Each of the medium-sized radiators I brush-painted took about a week of half-day painting sessions to complete.  

A week of stinky oil-based paint smell in my house, blocked off areas so that paint would not get smudged, and the mess that accompanies any painting job.

Needless to say, I was really dreading painting the radiators in my living room, which were gigantic yellow monstrosities.  Here’s one . . . 

Radiator painting can be time consuming and tedious, but not with this tutorial! Lean how to paint a radiator the easy way! Save time and frustration. This is a BEFORE photo.

And here’s the other. . . 

Radiator painting can be time consuming and tedious, but not with this tutorial! Lean how to paint a radiator the easy way! Save time and frustration. This is a BEFORE photo.

I figured that each of these yellow beasts would take me about two weeks to refinish.  And that’s why painting these radiators kept getting pushed to the bottom of the to-do list.

But now I know the SECRET of how to paint a radiator the easy way, and I am so glad to tell you that this method is life-changing.  Seriously!

Supplies Needed to Paint a Radiator the Easy Way

Thank you to HomeRight for providing the product used in this post.  The project and opinions are all my own.  Also, this post contains affiliate links.  Please read my disclosure policy for more information.

  • The KEY to painting a radiator is a spray painter.  I am telling you that it makes all the difference in the world (and is MUCH cheaper than hiring a painter to tackle your radiators).  I used the HomeRight Finish Max Sprayer for the first radiator I refinished in this room, and the HomeRight Super Finish Max Sprayer for the second radiator I refinished in this room.  Both sprayers worked great for refinishing radiators, but you can read about why I liked the Finish Max Extra Fine Finish Sprayer more in the updated portion of this post near the end!
  • 3M Advanced Masking Film
  • Scotch Blue Painter’s Tape
  • Spray Painting Mask (I wore a head sock like this; no joke.  I didn’t post a photo of myself in it because I looked a little bit like a murderer or a terrorist.)
  • Rustoleum Metal Primer
  • Rustoleum Protective Enamel (I used a Satin finish)
  • Acetone (for thinning the oil-based paint to use in the sprayer)  (NOTE: if you use the HomeRight Super Finish Max Sprayer I talk about in the updated section of this post below, you will not need Acetone.)
  • Mineral spirits (for cleaning up the sprayer once you’re finished)
  • Wire brush
  • TSP pre-paint cleaner
  • Vacuum with a hose extension or long feather dusters
  • Recommended: lead paint testing kit

Instructions for How to Paint a Radiator

Before you do anything, make sure the radiator is turned off!  Painting radiators is a job best done in the spring or summer, when you’re not using them.

Step One: Remove Loose Paint

Begin by scraping any loose paint areas from the radiator using the metal brush.  

VERY IMPORTANT:  YOUR RADIATOR COULD HAVE LEAD PAINT ON IT.  MAKE SURE TO USE ALL PROPER PRECAUTIONS BEFORE SCRAPING PAINT, AS INHALATION OF LEAD PAINT CAN HAVE SERIOUS HEALTH CONSEQUENCES.  TO LEARN MORE, PLEASE VISIT THIS LINK.

Radiator painting can be time consuming and tedious, but not with this tutorial! Lean how to paint a radiator the easy way! Save time and frustration.

Step Two: Clean the Radiator

Next, clean the radiator like the Queen of England is coming to visit, and her butler will be giving the place a white-glove inspection.  

Begin by vacuuming as much dust off of it as you can, and then washing it down with TSP.  Once it’s dry, dust it again.  I promise you, it will still be dirty.  

Radiator painting can be time consuming and tedious, but not with this tutorial! Lean how to paint a radiator the easy way! Save time and frustration.

Step Three: Protect Surrounding Surfaces

After you’ve cleaned the radiator, protect the entire area around the radiator with the masking film.  Tape it everywhere.  The last thing you want is oil-based paint all over your walls or floors.  

The masking film is actually really easy to hang and goes up pretty quickly.  I told my kids it was our new curtains; they were not impressed.  

Radiator painting can be time consuming and tedious, but not with this tutorial! Lean how to paint a radiator the easy way! Save time and frustration.

Step Four: Prime the Radiator

Once you have the entire area protected, set up your sprayer and thin the primer according to the manufacturer’s directions.  (NOTE: if you use the HomeRight Super Finish Max Sprayer I talk about in the updated section of this post below, you will not need to thin the primer.)  

Then spray the entire radiator with primer.  It will already look a million times better!

(TIP: If you’ve never before used the sprayer you’ll be using for this job, you should test it out on a piece of cardboard first.)

(TIP: Oil-based paint smells REALLY, REALLY bad.  Make sure you have the windows open and a fan going when you do this.)

Radiator painting can be time consuming and tedious, but not with this tutorial! Lean how to paint a radiator the easy way! Save time and frustration.

Step Five: Paint the Radiator

Let the primer dry according to the manufacturer’s directions, and then spray the protective enamel as the topcoat.  Smile at your spouse or significant other because you’re so happy with the way this project is going!  Seriously – you will not believe how much time you’re saving because of using the paint sprayer.

Radiator painting can be time consuming and tedious, but not with this tutorial! Lean how to paint a radiator the easy way! Save time and frustration.

Once the entire radiator is sufficiently covered, clean the paint sprayer like the Queen’s butler will also be giving it the white glove inspection.  Prepare yourself that it will be a pain, simply because you’ve used oil-based paint for your radiator painting project, and oil-based paint is chronically frustrating and time-consuming to clean up.  

Still, even though the clean-up process is a bit involved, the entire project can be completed in less than a day, which is SO MUCH FASTER than hand brushing a radiator.

Radiator painting can be time consuming and tedious, but not with this tutorial! Lean how to paint a radiator the easy way! Save time and frustration.

The finish is SO smooth (unlike the finish on the radiators that I hand-brushed), and I am thrilled with the result!  I vow to NEVER paint a radiator by hand again.  Never.

Radiator painting can be time consuming and tedious, but not with this tutorial! Lean how to paint a radiator the easy way! Save time and frustration.

Thank goodness the mustard yellow radiator paint is gone!  

Radiator painting can be time consuming and tedious, but not with this tutorial! Lean how to paint a radiator the easy way! Save time and frustration.

I still have one of the radiators in my living room left to paint, but I’ll get that done in the next month or so.  I wanted to make sure this method actually worked before I tackled both of the yellow beasts at once!

Update: Radiator Painting with HomeRight Super Finish Max Sprayer

Although I planned to spray paint that second radiator last fall, I didn’t get around to it before we turned the heat back on.  It all worked out in the end, however, because HomeRight came out with a new version of the Finish Max Sprayer, the HomeRight Super Finish Max Sprayer, which has a few more features that made radiator painting even easier than when I originally wrote this post!

The feature I liked best about this new version of the sprayer is that I didn’t have to thin the primer, and I only thinned the radiator paint a tiny bit (and just as a precaution).  

I don’t even think thinning the paint was necessary; I only thinned it a little because I still had acetone left from the radiator I spray-painted last year.  Not having to thin the paint and do straining tests to see if it will work in the sprayer was a huge timesaver!

I also really liked that this new version of the sprayer has a flow control dial built right in, so I could easily adjust the amount of paint coming out of the sprayer depending on which part of the radiator I was working on.  

The Super Finish Max Sprayer also comes with different nozzles and air caps so it can be used on a wide array of projects like cabinets, furniture, fences, decks, and more.  (I most recently used it to paint my oak kitchen cabinets!)

I took my yellow radiator from this . . .

blank

to this . . . 

blank

even faster than I did the first time around.

I cannot emphasize how much easier the HomeRight Finish Max Sprayer and the HomeRight Super Finish Max Sprayer made this job.  Anyone who knows me has heard me complain about hand-painting my radiators in the past.  I promise that all anyone’s heard about this project is how wonderfully easy it was!  

Radiator painting can be time consuming and tedious, but not with this tutorial! Lean how to paint a radiator the easy way! Save time and frustration.

If you have any radiators to paint in your home, I absolutely recommend that you use this approach to paint them – do not hand-paint them.  You will want to pull your hair out!  

Filed Under: DIY Tagged With: home improvement, paint

Primary Sidebar

Let’s Connect!

Hi, I’m Bre! Thanks for visiting Average But Inspired, where I show you how to work with what you’ve got to create a home you love.

Bre of Average But Inspired - a DIY and craft blog

Love DIY? Subscribe to Get Posts E-mailed!

How Can I Help You?

blank

How to Paint a Door to Look Like Wood (It’s Easier Than You Think!)

blank

How to Create a Faux Antique Brass Finish with Paint

blank

My DIY Kitchen Makeover Reveal!

blank

How to Paint Over Tile

Looking for Something?

Copyright © 2013-2022, Bre Eggert (Average But Inspired). All rights reserved.
  • Home
  • DIY
  • Crafts
  • Home Decor
  • Privacy Policy and Copyright Policy
  • Disclosures
  • Contact Me