• Skip to primary navigation
  • Skip to main content
  • Skip to primary sidebar
Average But Inspired logo - DIY and craft

Average But Inspired

Craft a home you love. DIY and craft tutorials.

  • About
    • Contact Me
    • Disclosures
    • Privacy Policy and Copyright Policy
  • DIY
    • Furniture
  • Crafts
    • Dollar Store Crafts
    • Seasonal
      • Patriotic & Summer
      • Valentine’s Day
      • Easter & Spring
      • Fall & Halloween
      • Christmas & Winter
  • Home Decor
    • Organization
  • Shop
    • DIY Swag
    • DIY Guides
  • Home

Fall and Halloween

DIY Dollar Tree Pumpkin Picture Frames

September 19, 2018 by Bre 2 Comments

Fall is my favorite season for Dollar Tree crafts and makeovers, so when I saw their fresh crop of fall arrivals, I suddenly felt inspired to get dollar store crafty. (You might like my Dollar Tree Pumpkin Sign Project or Candy Corn Topiary, too!) 

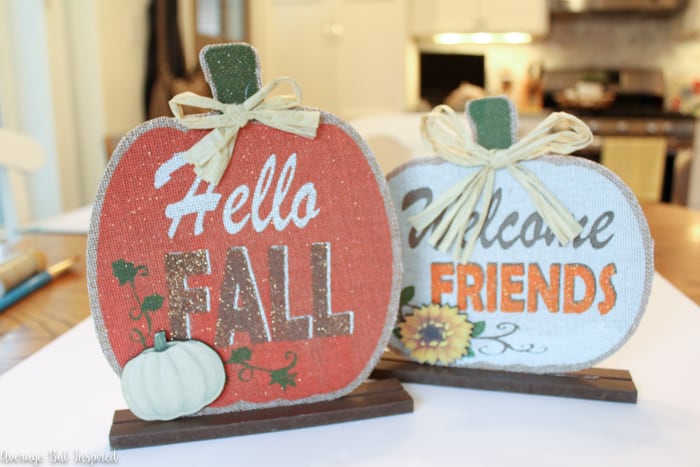
I purchased a couple of their fall pumpkin chipboard decorations (NOTE: even though this post was written in 2018, Dollar Tree currently has these same decorations in the 2021 season and I linked them in the supply list!), and knew I could turn them into something cuter and more personal – DIY pumpkin picture frames, to be precise! 

So cute! Transform Dollar Tree pumpkin decorations into adorable pumpkin picture frames that are perfect for displaying fall photos! #dollartree #dollartreecrafts #dollartreedecor #fallcrafts

Supplies Needed to Create Dollar Tree Fall Pumpkin Picture Frames

  • Chipboard pumpkin decorations from Dollar Tree
  • Acrylic paints in colors of your choice (I used cream, beige, and orange)
  • Paint brushes
  • Dollar Tree fall ribbon
  • Scissors
  • Twine
  • Raffia
  • Hot glue gun and hot glue

How to Create Dollar Tree Fall Pumpkin Picture Frames

Begin by ripping off the decorative accent portions of the chipboard pumpkins (for example, the raffia and the chipboard flower and/or pumpkin).  Once those are off, rip off the printed layer of the chipboard.  This came off easily!  

So cute! Transform Dollar Tree pumpkin decorations into adorable pumpkin picture frames that are perfect for displaying fall photos! #dollartree #dollartreecrafts #dollartreedecor #fallcrafts

Next, paint the pumpkins whatever color you like.  I went for a white pumpkin look, so I used a cream acrylic paint and then added some beige lines to give the pumpkins a bit of dimension.  I then painted the stand portion of the project orange.  

So cute! Transform Dollar Tree pumpkin decorations into adorable pumpkin picture frames that are perfect for displaying fall photos! #dollartree #dollartreecrafts #dollartreedecor #fallcrafts

After the paint dried, I tied ribbon and raffia around the top of each pumpkin for some cute detail and color.  

So cute! Transform Dollar Tree pumpkin decorations into adorable pumpkin picture frames that are perfect for displaying fall photos! #dollartree #dollartreecrafts #dollartreedecor #fallcrafts

Then I wrapped twine around the top and bottom portions of each pumpkin and hot glued it to the back of each pumpkin.  

So cute! Transform Dollar Tree pumpkin decorations into adorable pumpkin picture frames that are perfect for displaying fall photos! #dollartree #dollartreecrafts #dollartreedecor #fallcrafts

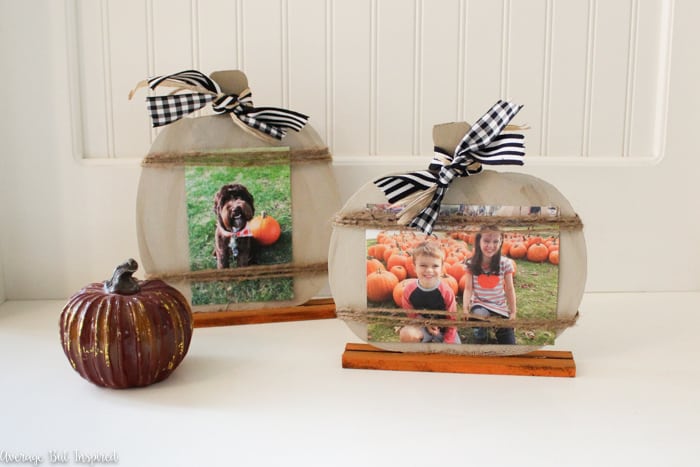
When the hot glue dried, the pumpkin frames looked like this.  

So cute! Transform Dollar Tree pumpkin decorations into adorable pumpkin picture frames that are perfect for displaying fall photos! #dollartree #dollartreecrafts #dollartreedecor #fallcrafts

Super cute, but even cuter once I added pictures of my kids at the pumpkin patch, and my dog posing with a pumpkin.  

So cute! Transform Dollar Tree pumpkin decorations into adorable pumpkin picture frames that are perfect for displaying fall photos! #dollartree #dollartreecrafts #dollartreedecor #fallcrafts

The twine holds the photos in place, and these little Dollar Tree pumpkin frames are the perfect spot to display fall themed photos!  

So cute! Transform Dollar Tree pumpkin decorations into adorable pumpkin picture frames that are perfect for displaying fall photos! #dollartree #dollartreecrafts #dollartreedecor #fallcrafts

It doesn’t get much easier than this, so I’d appreciate it if you would pin this project on Pinterest to help others find it!  So cute! Transform Dollar Tree pumpkin decorations into adorable pumpkin picture frames that are perfect for displaying fall photos! #dollartree #dollartreecrafts #dollartreedecor #fallcrafts

Will you be heading to Dollar Tree to find some of these chipboard pumpkins to transform into pumpkin picture frames?

Filed Under: Crafts, Dollar Tree, Fall and Halloween, Holiday

A Pumpkin Filled Fall Mantel

September 12, 2018 by Bre 10 Comments

blank

The weather has started turning cooler and the sun has begun setting earlier with each passing day.  Although I’m still in somewhat of a summer mindset, there’s no denying that fall is on its way.

Because of that, I’m so glad to be part of the Decorate Your Mantel Fall Blog Hop, which is hosted by my friend Amy at My Life From Home.

It gave me the kick in the pants that I needed to pull my fall decor from storage, pick up a few new items, and get things moving toward a cozier look in my house!  Beautiful! See how this blogger used inexpensive items like faux pumpkins, book pages, and acorns to create a pretty fall mantel in shades of green, orange, and white.

Although I love the vibrant colors that fall brings, I went with a muted look for this mantel.  For some reason it just felt right this time around.  Maybe I’m craving a break from the sun and brightness of the summer – who knows?Beautiful! See how this blogger used inexpensive items like faux pumpkins, book pages, and acorns to create a pretty fall mantel in shades of green, orange, and white.

Buckets, bowls, and containers in varying shades of silver give faux pumpkins the height they need to flank the mirror.  Beautiful! See how this blogger used inexpensive items like faux pumpkins, book pages, and acorns to create a pretty fall mantel in shades of green, orange, and white.

Although each pumpkin is different, the commonalities in their pedestals makes the look cohesive.

The picture frame holds oak leaves cut from book pages (a terrible piece of chick lit I read back in the early 2000’s.  My tastes have matured since then.  Ha!), and acorns I gathered from my mom’s yard over Labor Day weekend.  Beautiful! See how this blogger used inexpensive items like faux pumpkins, book pages, and acorns to create a pretty fall mantel in shades of green, orange, and white.

Beautiful! See how this blogger used inexpensive items like faux pumpkins, book pages, and acorns to create a pretty fall mantel in shades of green, orange, and white.

Faux floral picks stuffed in a wood centerpiece box I use all the time completes the look.

Beautiful! See how this blogger used inexpensive items like faux pumpkins, book pages, and acorns to create a pretty fall mantel in shades of green, orange, and white.

Beautiful! See how this blogger used inexpensive items like faux pumpkins, book pages, and acorns to create a pretty fall mantel in shades of green, orange, and white.

P.S. the new candelabra I put in the fireplace is totally beautiful when it’s all lit up.  Just perfect for my non-functional fireplace.  Beautiful! See how this blogger used inexpensive items like faux pumpkins, book pages, and acorns to create a pretty fall mantel in shades of green, orange, and white.

To me there’s something very peaceful and comforting about this year’s fall mantel.  I love looking at it and thinking of all the fun fall activities ahead for me and my family.

Have you begun decorating for fall yet?  What type of look are you going with this year?

-Bre

Filed Under: Fall and Halloween, Holiday, home decor

DIY Thanksgiving Turkey Place Cards

November 8, 2017 by Bre 6 Comments

blank

We made it past the sugar-rush of Halloween and thoughts are turning to the next big event – Thanksgiving. 

How we’re already here again is beyond me, but the fact is that planning for this special holiday is in full swing (at my house especially because I’m hosting this year (yikes!)). 

To make my Thanksgiving celebration extra special, I’m making some adorable DIY Thanksgiving Turkey Place Cards to set a festive tone at the table, and I’m showing you how to make them, too! 

Make adorable Thanksgiving Turkey Place Cards with wooden beads for your Thanksgiving table this year! Learn how to make these DIY Thanksgiving place cards with this easy tutorial! #Thanksgiving #placecards #ThanksgivingTable

Supplies Needed to Make DIY Thanksgiving Place Cards

Some of these links are affiliate links.  Please read my disclosure policy for more information.

  • Wooden beads in two sizes
  • Hot glue & glue gun
  • Card stock in brown shades
  • Decorative feathers
  • Fine-point Sharpie
  • Gold paint pen
  • Scissors
Make adorable Thanksgiving Turkey Place Cards with wooden beads for your Thanksgiving table this year! Learn how to make these DIY Thanksgiving place cards with this easy tutorial! #Thanksgiving #placecards #ThanksgivingTable

How to Make Thanksgiving Turkey Place Cards

You can whip up a bunch of these Thanksgiving place cards in no time at all!  They’re so simple to make! 

Begin by hot gluing a small wooden bead to a larger wooden bead.  

Make adorable Thanksgiving Turkey Place Cards with wooden beads for your Thanksgiving table this year! Learn how to make these DIY Thanksgiving place cards with this easy tutorial! #Thanksgiving #placecards #ThanksgivingTable

Next, trim a feather to fit the turkey and hot glue it to the center back of the large wooden bead.  

Make adorable Thanksgiving Turkey Place Cards with wooden beads for your Thanksgiving table this year! Learn how to make these DIY Thanksgiving place cards with this easy tutorial! #Thanksgiving #placecards #ThanksgivingTable

Cut four oval shapes from the card stock (2 from each color of paper), and then put some little fringes on the edges to make them look like feathers. 

Many of mine were deformed – I had a hard time cutting these at first!  If you’re like me, just play around with it until you get a decent shape.

Make adorable Thanksgiving Turkey Place Cards with wooden beads for your Thanksgiving table this year! Learn how to make these DIY Thanksgiving place cards with this easy tutorial! #Thanksgiving #placecards #ThanksgivingTable

Hot glue those feathers to the back of the larger wooden bead, too.  

I Think You’ll Like These Other Thanksgiving Posts, Too!

DIY “Thankful For” Wreath

Funky Pilgrim Vases

Make adorable Thanksgiving Turkey Place Cards with wooden beads for your Thanksgiving table this year! Learn how to make these DIY Thanksgiving place cards with this easy tutorial! #Thanksgiving #placecards #ThanksgivingTable

Use a Sharpie to give your turkey some dots (I mean, eyeballs). . . 

Make adorable Thanksgiving Turkey Place Cards with wooden beads for your Thanksgiving table this year! Learn how to make these DIY Thanksgiving place cards with this easy tutorial! #Thanksgiving #placecards #ThanksgivingTable

And use your gold pen to write your guests’ names on the feathers! 

Make adorable Thanksgiving Turkey Place Cards with wooden beads for your Thanksgiving table this year! Learn how to make these DIY Thanksgiving place cards with this easy tutorial! #Thanksgiving #placecards #ThanksgivingTable

Easy and done!  

Make adorable Thanksgiving Turkey Place Cards with wooden beads for your Thanksgiving table this year! Learn how to make these DIY Thanksgiving place cards with this easy tutorial! #Thanksgiving #placecards #ThanksgivingTable

Isn’t that the cutest little Thanksgiving place card?  

Make adorable Thanksgiving Turkey Place Cards with wooden beads for your Thanksgiving table this year! Learn how to make these DIY Thanksgiving place cards with this easy tutorial! #Thanksgiving #placecards #ThanksgivingTable

Because these turkey place cards are sturdy, they’re like a little party favor for your Thanksgiving guests!  (Toss in some leftovers and you’ll be the “hostess with the mostess!”)

Make adorable Thanksgiving Turkey Place Cards with wooden beads for your Thanksgiving table this year! Learn how to make these DIY Thanksgiving place cards with this easy tutorial! #Thanksgiving #placecards #ThanksgivingTable

Please make sure to “pin” this post so others can find this fun idea for decorating their Thanksgiving tables.  

Make adorable Thanksgiving Turkey Place Cards with wooden beads for your Thanksgiving table this year! Learn how to make these DIY Thanksgiving place cards with this easy tutorial! #Thanksgiving #placecards #ThanksgivingTable

Filed Under: Fall and Halloween, Holiday

Dollar Tree Silver Tray Wreath

September 19, 2017 by Bre 6 Comments

blank

Over the years I’ve made quite a few pieces of door decor or wreaths from Dollar Tree supplies.  (Take my Fourth of July Tinsel Wreath or my Egg Tray Wreath for Easter, for example.)  I just can’t help myself!  Every time I go to Dollar Tree I find cute new supplies that call out to me, and I am forced to create.  It’s a real problem, friends (the creating and the fact that products at Dollar Tree talk to me.  HA!)!  On a recent trip, I bought supplies to make an atypical fall wreath for my backdoor – and today I’m going to show you how to transform a Dollar Tree silver tray from the party supply section into a beautiful Silver Tray Wreath!  Transform a silver tray into a wreath! Learn how to make a Dollar Tree silver tray sparkle as a beautiful fall wreath in this post.

Supplies Needed to Make a Silver Tray Wreath

Some of these links are affiliate links.  Please read my full disclosure policy here.

  • Silver tray (I purchased a nickel plated metal serving tray at Dollar Tree)
  • Chalkboard paint
  • Paintbrush
  • Light gray and dark gray acrylic paint
  • Sponge
  • Chalk
  • Faux fall leaves (I also purchased them at Dollar Tree, but here’s an alternative)
  • Hot glue gun and hot glue
  • Mini 3M Command Hooks
  • Ribbon

How to Make a Silver Tray Wreath for Fall

I started with this plain silver tray from the party supply section at Dollar Tree.  These are actually really sturdy and they come in three shapes/sizes.  They’re great for crafting and entertaining!  Transform a silver tray into a wreath! Learn how to make a Dollar Tree silver tray sparkle as a beautiful fall wreath in this post.

Next, I turned the center of the silver tray into a chalkboard with my favorite chalkboard paint.  I used two coats of chalkboard paint to make sure there was good coverage!  Transform a silver tray into a wreath! Learn how to make a Dollar Tree silver tray sparkle as a beautiful fall wreath in this post.

Once the chalkboard paint was dry, I worked to take the shine down on the silver tray, and to make it look like it is aged or antique.  I began by lightly sponging on acrylic paint in a light gray color.  I gently dabbed the light gray paint all around the edge of the tray.Transform a silver tray into a wreath! Learn how to make a Dollar Tree silver tray sparkle as a beautiful fall wreath in this post.

When that light gray paint dried, I then used by sponge to rub dark gray acrylic paint along the raised portions of the silver tray.  Unlike with the light gray paint where I dabbed the color on, this time I rubbed the color on in order to accent those raised portions of the tray.  Transform a silver tray into a wreath! Learn how to make a Dollar Tree silver tray sparkle as a beautiful fall wreath in this post.

This painting technique went a long way toward giving my Dollar Tree silver tray an aged look!  Transform a silver tray into a wreath! Learn how to make a Dollar Tree silver tray sparkle as a beautiful fall wreath in this post.

Once that paint dried, I cut leaves off of my Dollar Tree fall leaf garland and began to hot glue them around the bottom 1/3 to 1/2 of the silver tray.  I layered them and angled them in different ways, rather than lying them flat and in a row.Transform a silver tray into a wreath! Learn how to make a Dollar Tree silver tray sparkle as a beautiful fall wreath in this post.

Transform a silver tray into a wreath! Learn how to make a Dollar Tree silver tray sparkle as a beautiful fall wreath in this post.

Next, I flipped the tray over and attached two 3M Mini Command Hooks to the back, upside down.  These things are my go-to for just about everything that needs a hook.  I love them!  I then ran a ribbon through the hooks and tied it at the top.  Transform a silver tray into a wreath! Learn how to make a Dollar Tree silver tray sparkle as a beautiful fall wreath in this post.

Then I flipped the tray over and gently ran a piece of chalk all over the chalkboard portion of the tray to season it.  Next, I tried to write “Hello” in fancy script on the front.  (Note: need to practice chalkboard lettering!)  Transform a silver tray into a wreath! Learn how to make a Dollar Tree silver tray sparkle as a beautiful fall wreath in this post.

Before I hung up my Silver tray wreath, I bent my ribbon streamers and hot glued them to the edges of the tray.  Then my silver tray wreath was ready to be displayed on my backdoor!  Transform a silver tray into a wreath! Learn how to make a Dollar Tree silver tray sparkle as a beautiful fall wreath in this post.

I love the pretty touch it adds to the door, and it was such an affordable way to bring some charm to the back porch!  Transform a silver tray into a wreath! Learn how to make a Dollar Tree silver tray sparkle as a beautiful fall wreath in this post.

Can you see why I love to go to Dollar Tree so much?  What’s your favorite thing to buy there?  Also, if you enjoyed this project, I would appreciate it if you would PIN it to share the love!  Transform a silver tray into a wreath! Learn how to make a Dollar Tree silver tray sparkle as a beautiful fall wreath in this post.

-Bre

You Might Also Like This Dollar Tree Project!

DIY Fork, Spoon, and Knife Kitchen Plates Decor

blank

Filed Under: Crafts, Dollar Tree, Fall and Halloween, Holiday

How to Decorate for Fall Entertaining with Color, Texture, and Pattern

August 31, 2017 by Bre 8 Comments

blank

Thank you to Cost Plus World Market for sponsoring this post.  The fall decor and entertaining ideas you’ll see are all my own.  This post contains affiliate links, and to read my full disclosure policy you can click here.

The kids are back in school and the weather here in Chicago is getting more crisp with each passing day.  My favorite season is almost here, and I cannot wait to share my love of all-things-fall with my family and friends!  Intimate gatherings with comforting foods and cozy decor (like at the Beer Tasting Party I hosted last fall), are right around the corner, and I’m getting ready for fall entertaining by creating a dining room that’s filled with gorgeous color, texture, and pattern.  After one visit to my local Cost Plus World Market store in the South Loop, I think I’m all set!  Fall decor made simple! This post gives three tips for fall decorating using color, texture, and pattern to create a fall dining room that shines.

Back in the day my fall decor was a little more, shall we say, obvious.  At one point I remember declaring that my house would look as though a pumpkin patch had exploded inside of it.  While I still love pumpkins, fall leaves, and scarecrows as much as the next pumpkin spice latte loving lady, my taste has matured a bit, and now I’m decorating for fall in a more subtle way.  Fall decor made simple! This post gives three tips for fall decorating using color, texture, and pattern to create a fall dining room that shines.

Working with colors, textures, and patterns that embody the changing season, I’ve created a lovely fall dining room that’s perfect for entertaining!  This year I think my first get together will be a fondue party.  (Except for the lactose intolerant, who doesn’t love a party that centers on cheese?  Am I right?)Fall decor made simple! This post gives three tips for fall decorating using color, texture, and pattern to create a fall dining room that shines.

I bet your friends and family would enjoy a nice evening at your home this fall, so let me give you my tips on how to decorate for fall entertaining with color, texture, and pattern!

Pick an Inspiration Object for Color

It was so easy to pull together a look that works for the changing season because I started with these salad plates as my inspiration.  I love the fall oranges, reds, and yellows, and the fact that these plates have such an interesting design.  Fall decor made simple! This post gives three tips for fall decorating using color, texture, and pattern to create a fall dining room that shines.

These plates served as the jumping off point for all of the other items that adorn my entertaining space this fall.  I think that’s a great way to decorate a room: find an interesting object you like and allow it to guide your subsequent decor choices.  Even if you think you have no idea how to decorate, using an inspiration item’s colors to inform your other choices will help you make good decisions.

For example, I chose these golden yellow buffet napkins because that color is in the plate.  I guarantee you I never would have purchased anything this color if I would have seen it in isolation.  But with the plates, it works!  Fall decor made simple! This post gives three tips for fall decorating using color, texture, and pattern to create a fall dining room that shines.

The same is true for the gorgeous blue pressed glass goblets.  Sure they’re pretty on their own, but look how gorgeous they are with the contrasting gold napkins!  Thank you, salad plates, for putting these colors together for me.Fall decor made simple! This post gives three tips for fall decorating using color, texture, and pattern to create a fall dining room that shines.

Add Some Texture

Once you’ve followed your inspiration object’s color lead, it’s great to add in some items with texture.  Because I had a lot of color already happening in this entertaining space, I decided to add texture with neutral elements so as not to go overboard.  Fall decor made simple! This post gives three tips for fall decorating using color, texture, and pattern to create a fall dining room that shines.

These placemats woven from natural materials are my new favorite thing.  They will work for any single occasion, holiday, event . . . you name it!  And they’re not boring.  Their woven pattern and thickness makes them assets to the table instead of something that’s commonly overlooked.

Fall decor made simple! This post gives three tips for fall decorating using color, texture, and pattern to create a fall dining room that shines.

And don’t even get me started on these fabulous wood handled utensils (forks, knives, and spoons).  To me, wood is a perfect decor element for fall because it’s just so “nature-y.”  (My inner outdoorsman is coming out there with that “word.”)  You cannot help but pick up these utensils.
Fall decor made simple! This post gives three tips for fall decorating using color, texture, and pattern to create a fall dining room that shines.

And finally, this pretty puff ball wreath on the mirror opposite the dining table is 100% texture.  A fall wreath on a mirror is a pretty fall decorating idea to use in the dining room. See more fall decor ideas in this post.

Fall decor made simple! This post gives three tips for fall decorating using color, texture, and pattern to create a fall dining room that shines.

Play with Pattern

Because the salad plates that inspired this fall entertaining space already have a lot of pattern, I worked with simpler patterns on other things in an effort to layer the look in a way that is not overwhelming.  Fall decor made simple! This post gives three tips for fall decorating using color, texture, and pattern to create a fall dining room that shines.

This striped table runner, for example, grounds the entire table.  It uses the same shades seen elsewhere on the table, but has a simple pattern that makes it interesting and not overpowering.  Fall decor made simple! This post gives three tips for fall decorating using color, texture, and pattern to create a fall dining room that shines.

And using pattern in a different way, by creating small groupings of similar objects, is another way to get a sophisticated look.  Fall decor made simple! This post gives three tips for fall decorating using color, texture, and pattern to create a fall dining room that shines.

Here I used three mini faux kale pots to perk up the butler tray stand in the corner of the room.  Fall decor made simple! This post gives three tips for fall decorating using color, texture, and pattern to create a fall dining room that shines.

Metallic candles and white pumpkins grouped throughout the table also create understated patterns, which make an impact on the dining table.  Fall decor made simple! This post gives three tips for fall decorating using color, texture, and pattern to create a fall dining room that shines.

Fall decor made simple! This post gives three tips for fall decorating using color, texture, and pattern to create a fall dining room that shines.

And there you have it; my fall dining room ready to shine!  All of the colors, textures, and patterns brought in through gorgeous products have created a beautiful setting for entertaining friends and family this fall!  I can hardly wait to invite someone over.  (What are you doing this weekend?  ;-))

Love the Look?  Shop This Post!

If you found my tips for fall decorating helpful, the good news is that Cost Plus World Market’s Fall Gathering Event has begun! Now through September 10, 2017, you can save 50% on all dining furniture, 20% on all bar carts, 30% on all open stock dinnerware, flatware and wine glasses, and 30% on all open stock table linens. Head into your local store (find it here!), and check out all the amazing deals for yourself or shop online…no coupon code needed!  Just scroll through and click on any of these images to shop this post!

blank

Happy fall decorating and entertaining!

-Bre

Filed Under: Fall and Halloween, home decor

Bundt Pan Pumpkins Upcycle

September 27, 2016 by Bre 17 Comments

blank

Transform bundt pans into adorable pumpkins for fall or Halloween!

Sometimes I buy things at Goodwill for no reason at all.  These mini bundt cake pans that I got for .50 a piece are an example.  

I have no idea why I brought them home with me.  I don’t really bake (unless you consider making Tollhouse cookies from the pre-made dough tube to be baking. LOL.)  

These mini bundt cake pans were turned into adorable pumpkins for fall decor!

So these little bundt pans sat in my basement until I got the idea to transform them into pumpkins for some fall decor in my kitchen!  

Adorable! Turn mini bundt cake pans into whimsical pumpkin decor for your home or kitchen this fall! Mini bundt cake pans are all over thrift stores. Get some and make this cute fall decor DIY!

Do they look like pumpkins to you?  I think they do, but my son says no.  I think he’s thinking too literally.  Four year olds.  

Supplies Needed to Make Bundt Pan Pumpkins

Here’s what I used to upcycle these bundt pans into decorative pumpkins! Feel free to supplement with things you already have on hand. Also, some of these are affiliate links, and you can learn more about that in my disclosure policy.

  • Mini bundt cake pans (look for them at the thrift store! But if you really need them, you can buy them at that link)
  • Orange multi-surface craft paint
  • Ivory multi-surface craft paint
  • Chip brush
  • Decorative scrapbook paper (in colors of your choice to serve as pumpkin backdrop)
  • Decorative scrapbook paper in green shades (to serve as the leaves of your pumpkin)
  • Double sided tape
  • Thin cork
  • Raffia
  • High heat hot glue and glue gun
  • Picture frames

How to Make Bundt Cake Pan Pumpkins

First you have to transform those mini bundt cake pans with some paint!  

Get out your brush and mix up some orange shades for your pumpkins.  Paint and let them dry.  

Turn mini bundt cake pans into pumpkins for your fall decor! These are a perfect fall decoration for the kitchen or anywhere else in the home!

Cut decorative scrapbook paper to the size of the opening of your picture frames.  Tape the scrapbook paper onto the frame backing and put the frames back together (minus the glass).  

Turn mini bundt cake pans into pumpkins for your fall decor! These are a perfect fall decoration for the kitchen or anywhere else in the home!

Hot glue the bundt cake pans onto the scrapbook paper in the frames.

Turn mini bundt cake pans into pumpkins for your fall decor! These are a perfect fall decoration for the kitchen or anywhere else in the home!

Cut a strip of the thin cork and glue it into a spiral.  Glue it to the scrapbook paper at the top of the bundt cake pan.  

Turn mini bundt cake pans into pumpkins for your fall decor! These are a perfect fall decoration for the kitchen or anywhere else in the home!

Tie some raffia in a knot and hot glue that to the scrapbook paper and cork pumpkin stem.  

Turn mini bundt cake pans into pumpkins for your fall decor! These are a perfect fall decoration for the kitchen or anywhere else in the home!

Cut some leaves out of green scrapbook paper and hot glue those to the raffia, cork stem, and/or bundt cake pan.  

Turn mini bundt cake pans into pumpkins for your fall decor! These are a perfect fall decoration for the kitchen or anywhere else in the home!

And then your bundt pan pumpkins are finished!  

Turn mini bundt cake pans into pumpkins for your fall decor! These are a perfect fall decoration for the kitchen or anywhere else in the home!

So cute, right?!?  

Turn mini bundt cake pans into pumpkins for your fall decor! These are a perfect fall decoration for the kitchen or anywhere else in the home!

Love Pumpkin Crafts? You’ll Like These Posts, Too!

20 Unique Pumpkin Crafts

Turn mini bundt cake pans into pumpkins for your fall decor! These are a perfect fall decoration for the kitchen or anywhere else in the home!

I think this was a perfect use for some of my mini bundt cake pans!  And I think my son is wrong.  These TOTALLY look like pumpkins.  DUH, little man.

Turn mini bundt cake pans into pumpkins for your fall decor! These are a perfect fall decoration for the kitchen or anywhere else in the home!

I popped these babies in my kitchen for a little touch of fall – kitchen style!  

Turn mini bundt cake pans into pumpkins for your fall decor! These are a perfect fall decoration for the kitchen or anywhere else in the home!

I have a few more of these little bundt cake pans left over, so if you have other ideas of what I could make them into, let me know!  

Turn mini bundt cake pans into pumpkins for your fall decor! These are a perfect fall decoration for the kitchen or anywhere else in the home!

And I’d love for you to ‘pin’ this post if you enjoyed it!  

-Bre

Filed Under: Fall and Halloween, Holiday

  • « Go to Previous Page
  • Page 1
  • Page 2
  • Page 3
  • Page 4
  • Page 5
  • Go to Next Page »

Primary Sidebar

Let’s Connect!

Hi, I’m Bre! Thanks for visiting Average But Inspired, where I show you how to work with what you’ve got to create a home you love.

Bre of Average But Inspired - a DIY and craft blog

Love DIY? Subscribe to Get Posts E-mailed!

How Can I Help You?

blank

How to Paint a Door to Look Like Wood (It’s Easier Than You Think!)

blank

How to Paint Over Tile

blank

7 Tips for Hosting a Party on a Budget

blank

How to Paint a Countertop to Look Like Marble!

Looking for Something?

Copyright © 2013-2022, Bre Eggert (Average But Inspired). All rights reserved.
  • Home
  • DIY
  • Crafts
  • Home Decor
  • Privacy Policy and Copyright Policy
  • Disclosures
  • Contact Me