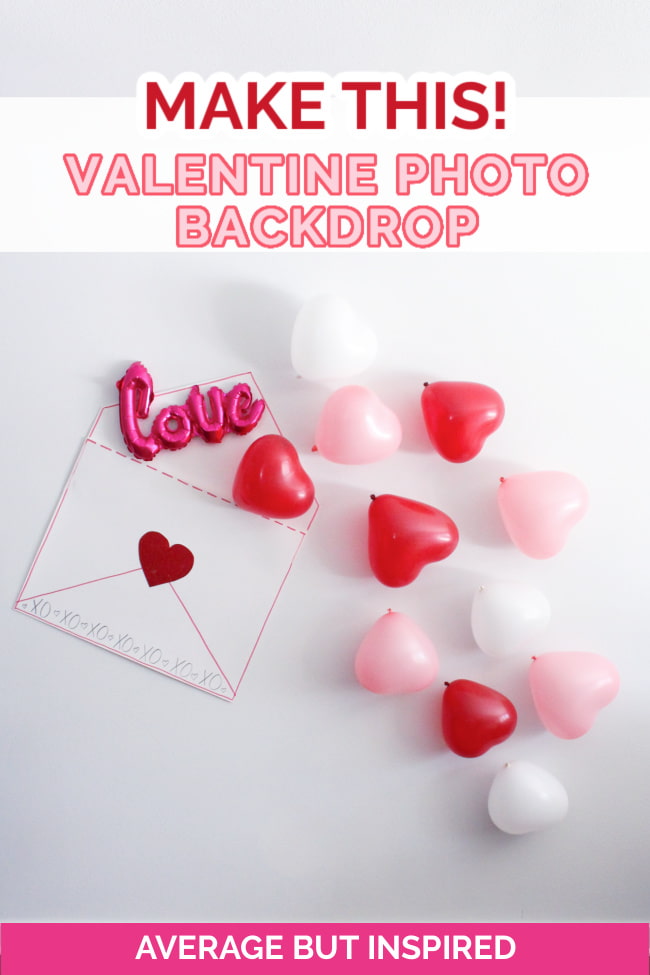
• Skip to primary navigation
  • Skip to main content
  • Skip to primary sidebar
Average But Inspired logo - DIY and craft

Average But Inspired

Craft a home you love. DIY and craft tutorials.

  • About
    • Contact Me
    • Disclosures
    • Privacy Policy and Copyright Policy
  • DIY
    • Furniture
  • Crafts
    • Dollar Store Crafts
    • Seasonal
      • Patriotic & Summer
      • Valentine’s Day
      • Easter & Spring
      • Fall & Halloween
      • Christmas & Winter
  • Home Decor
    • Organization
  • Shop
    • DIY Swag
    • DIY Guides
  • Home

Valentine's Day

DIY Valentine’s Backdrop: Love Letter Photo Background

February 8, 2022 by Bre Leave a Comment

Valentine’s Day isn’t the biggest holiday, but it sure is one of the cutest! My family celebrates with a chocolate fondue Valentine’s Day party (and everything you can imagine to dip, dunk, and drizzle). This year I decided to be “extra” and make a fun DIY Valentine’s Backdrop or photo booth to go with our celebration!

Make an adorable DIY Valentine photo backdrop for your Valentine's Day celebration! This is the cutest love note inspired photo backdrop, and you can make it with dollar store supplies!

The idea for this Love Letter Photo Background or Valentine’s photo backdrop came to me in the middle of the night. (I guess I have to thank my husband for stealing the sheets so I’d wake up freezing and have this idea pop into my head!)

I’ve been all about Valentine’s love letter crafts this year (check out my video for a DIY Love Note Door Hanger), so this was the natural progression, I suppose.

Valentine’s Backdrop Supplies

I made this totally with items from Dollar Tree, so it just goes to show you that you can be cute and frugal! (Curious about the best craft supplies to buy at Dollar Tree? Read that post!)

Here are the exact Valentine’s backdrop products I used (please note that some of these links are affiliate links. Read my disclosure policy for more information.)

  • Poster Board (x2)
  • Markers
  • Heart-Shaped Balloons
  • Metallic “Love” balloon
  • Heart cutout or glitter cardstock
  • Poster Putty
  • Masking Tape

DIY Valentine’s Photo Backdrop Instructions

This Valentine’s Day decor goes together so easily! I’ll show you how to make it here, and you can also get printable directions at the bottom of this post!

Step One: Make a Large Envelope with Poster Board, Wrapping Paper, or Construction Paper

Cut one of the poster boards into a “V” shape along one of the widest sides.

Then, tape that poster board to the other poster board. Apply the tape along the back of the poster boards so that there is no tape showing on the front of the “envelope.” Also apply tape along the left and right edges.

Next, decorate the poster board envelope with markers and a heart.

Such a fun Valentine's Day decor idea! Make a giant envelope from poster board, and create a cute Valentine photo backdrop wall!

Step Two: Attach the Envelope to the Wall

Using the poster putty, attach the envelope to a wall. This is where you begin to construct your adorable Valentine photo booth!

Step Three: Fasten Heart Balloons to the Valentine Backdrop

Finally, blow up the heart-shaped balloons and the “love” word balloon, and attach them to the wall. You may find that it is easier to attach the balloons to the wall with masking tape instead of poster putty.

Attach heart-shaped balloons to a wall to create a fun Valentine photo wall! Use it in a photo booth or at a Valentine's Day party!

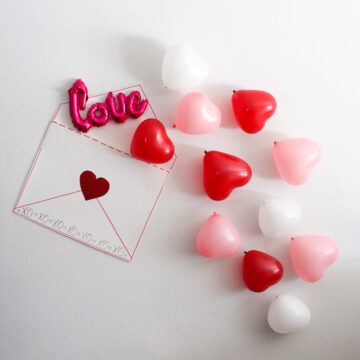
I made it look as though the balloons were spilling out of the giant love note / envelope.

Make a super cute love note DIY Valentine's Backdrop for your Valentine's Day party! This easy DIY photo backdrop comes together quickly and is so cute!

My whole family had fun posing in front of our Valentine’s Day photo wall. Yes, even Jasper the dog.

And, as promised, here are the printable step-by-step instructions for how to make your own DIY Valentine’s Backdrop. Let me know what you think of this fun Valentine’s Day party idea!

DIY Valentine's Day Photo Backdrop

DIY Valentine's Day Photo Backdrop

Yield: 1
Prep Time: 5 minutes
Active Time: 20 minutes
Estimated Cost: $4

Make the cutest DIY Valentine's Backdrop for your Valentine's Day party or Valentine decor! This easy and affordable photo backdrop features balloons and poster board, and comes together easily.

Materials

  • Poster board - 2 sheets
  • Heart-shaped balloons - 1 package / 12 balloons
  • "LOVE" foil balloon - 1 count
  • Markers
  • Construction paper / scrapbook paper

Tools

  • Ruler
  • Pencil
  • Scissors
  • Masking tape
  • Poster putty

Instructions

  1. With the poster board set so the widest side is toward you, cut the top into an inverted "V" shape, or to a point.
  2. Tape that cut poster board to the other poster board along the back. This means there is no tape on the front of the poster board yet.
  3. Next, tape along the top left and right edges where the two poster boards meet. This secures those edges, but leaves the long seam open.
  4. Decorate the poster boards with markers to make them look like a large envelope. I drew a dashed line along the edge where the two boards meet (to look like a folded edge), and a solid line along the rest of the envelope. I also drew an inverted "V" at the bottom of the poster board to look like the fold at the bottom of the envelope.
  5. If desired, cut a heart out of scrapbook paper and attach it to the envelope. Or, draw one. I also wrote "XOXOXO" along the bottom of the envelope.
  6. Use poster putty to attach the giant envelope to the wall.
  7. Next, blow up heart-shaped balloons in varying sizes. Attach the balloons to the wall with masking tape to make them look like they're falling out of the envelope.
  8. Finally, blow up the foil "LOVE" balloon and attach that to the wall the same way.
  9. Take pictures in front of your DIY Valentine Backdrop, and enjoy the memories of your fun day!

Notes

  1. I purchased all supplies for this DIY Photo Backdrop from Dollar Tree. Unfortunately, none of the products I used are available online at Dollar Tree's website. I have linked similar products that are available on Amazon in case this helps.
  2. I found that the balloons stuck to the wall better if I applied the tape to the wall, and then pressed the balloon onto the tape. I think this allowed the "flattest" part of the balloon to make contact with the wall, which helps the balloons stay put.

    Recommended Products

    As an Amazon Associate and member of other affiliate programs, I earn from qualifying purchases.

    • 42 Inch Red LOVE Foil Balloons for Valentines Day Decor, 4Pcs Reusable Large Love Mylar Letter Valentines Day Balloons, for Engagement Anniversary Wedding Bridal Shower Valentines Day Decorations
      42 Inch Red LOVE Foil Balloons for Valentines Day Decor, 4Pcs Reusable Large Love Mylar Letter Valentines Day Balloons, for Engagement Anniversary Wedding Bridal Shower Valentines Day Decorations
    • 100Pack Heart Shaped Balloons, White Light Pink Red Heart Balloons Premium Helium Love Latex Balloons For Wedding Valentine's Day Decorations(With Pink & White Ribbon)
      100Pack Heart Shaped Balloons, White Light Pink Red Heart Balloons Premium Helium Love Latex Balloons For Wedding Valentine's Day Decorations(With Pink & White Ribbon)
    • 5 pack - Poster Boards
      5 pack - Poster Boards
    • Scotch General Purpose Masking Tape
      Scotch General Purpose Masking Tape
    © Bre
    Project Type: Crafts / Category: Valentine's Day
    blank

    Filed Under: Valentine's Day

    Dollar Tree House Valentine’s Day DIY

    January 19, 2021 by Bre Leave a Comment

    blank

    If you follow any Dollar Tree crafters on Instagram or YouTube, you know that the Dollar Tree house is one of the most popular crafting items around!

    blank

    Only available in-store and online once in awhile, these cute wooden houses are the perfect craft blanks to update for any style of decor or season!  I gave my Dollar Tree house an adorable new look for Valentine’s Day and turned it into a Love Shack!

    I’ve had the Love Shack song stuck in my head for weeks now – ha!

    Dollar Tree House “Love Shack” Supplies

    This post contains affiliate links.  To read my full disclosure policy, please click here.

    These are the supplies I used to create this project.  Feel free to modify anything you like to create a custom look of your own!

    • Dollar Tree wooden house
    • Scrapbook paper in patterns and colors of your choice
    • Hot glue gun (and glue)
    • Letter stickers
    • Colored baker’s twine

    How to Make a Dollar Tree Wood House Into a Valentine’s Day Love Shack

    This process is so easy, and I’ve also put together a video to show you the basic process!

    Step One: Line the House 

    First things first, upgrade the Dollar Tree house’s printed backing!  While it is cute, adding scrapbook paper in a pattern of your choice makes it even cuter and more personal!

    Simply trace the outline of the house onto scrapbook paper, and then cut and trim to fit inside the wooden house.  This will likely take you several times of trimming to get it just right – don’t get discouraged!

    Once cut, press it into the house.  You can secure it with double-sided tape if necessary.

    Line a Dollar Tree house with scrapbook paper.

    Step Two: Wrap the House with Bakers Twine

    Next, place a small dot of hot glue on the back of the house, and press the end of a long piece of baker’s twine onto that hot glue.

    Wrap the twine around the base of the house multiple times – criss-crossing the twine as you go.

    Wrap baker's twine around the Dollar Tree house.

    Glue the end of the baker’s twine down with another dot of hot glue.  Careful not to burn your fingers!

    Step Three: Cut out Paper Hearts

    Now, transport yourself back to preschool when you learned to cut symmetrical paper hearts by folding a piece of paper in half and cutting one side of the heart so that the fold is in the center.

    Cut paper hearts from scrapbook paper in different shapes, sizes, and colors.

    Cut many hearts in varying shapes, sizes, colors, and patterns.  This will give you a more interesting Love Shack when finished!

    Step Four: Glue the Hearts to the Twine

    Lay out the paper hearts in an interesting arrangement, and then hot glue them to the baker’s twine on the wooden house.

    Hot glue paper hearts to the baker's twine to create the Love Shack Valentine's Day decoration.

    Step Five:  Make a Placard with Stickers and Scrapbook Paper

    Now, cut and layer scrapbook paper rectangles, and write a word or phrase with letter stickers.  

    Fasten letter stickers to scrapbook paper to create a little sign for the Valentine's Day decor.

    If you have a Cricut machine, you could cut vinyl letters instead!  (I LOVE my Cricut Joy, which is the smallest electronic cutting machine.)

    Then, hot glue that placard to the Dollar Tree house.

    Hot glue scrapbook paper with letter stickers onto the Dollar Tree house.

    The Finished Dollar Tree House Valentine’s Day Love Shack

    In just about fifteen minutes you have created the cutest little DIY Valentine’s Day decor!

    Transform a Dollar Tree wooden house into a cute Valentine's Day decoration.

    This little Love Shack makes me happy every time I look at it.  What does not make me happy is that I cannot stop hearing the B-52’s in my head all day!

    If you like this project, too, I’d be grateful if you would “pin” this post to help others find it!

    This is so cute! Turn a Dollar Tree house into the cutest little Love Shack for Valentine's Day! This Dollar Tree DIY for Valentine's Day is great for tiered trays, shelf styling, and more!

    -Bre


    Filed Under: Dollar Tree, Valentine's Day

    Easy DIY Scrap Wood Valentines

    February 1, 2018 by Bre 4 Comments

    blank

    Valentine’s Day – are you in the “love it” or “leave it” camp when it comes to this holiday?  As you can guess, I’m on the side of “love it,” because it’s such a cute holiday!  Because of that, I wanted to share a quick and adorable Valentine’s Day craft that you can make for yourself or to give away as a sweet gift.  These Easy DIY Scrap Wood Valentines are a great way to use up any wood scraps you have stashed, or are very inexpensive to make with craft wood from the store!  These adorable and easy DIY Scrap Wood Valentines are a perfect Valentine's Day Craft to keep for yourself or give away! Use up your scrap wood stash or purchase inexpensive craft wood to make these cute keepsakes.

    Plus, you can customize this project to match your own personal taste, so you don’t have to make yours quite as “rustic” as mine!

    Supplies Needed for Scrap Wood Valentines

    This post contains affiliate links.  To read my full disclosure policy, please click here.

    • This music sheet (download the 760 px option and print it on cardstock like what’s linked below)
    • Scrap wood in size of your choice OR pre-cut wood just like this
    • Plain cream or white cardstock
    • Permanent double-sided tape
    • Clear drying glue that’s suitable for use on wood
    • Glitter (I used red and silver)
    • Matte Acrylic or Chalky Finish Paint (I used this kind in Romance (red), Relic (dark gray), and Primitive (cream))
    • Chip brush
    • Letter stamp set
    • Scissors
    • Pencil
    • OPTIONAL: stain or stain wipes (and disposable gloves)

    Instructions for Making Scrap Wood Valentines

    The first step of this project is optional, but if you’d like, you can stain your wood piece prior to painting it.  I stained my wood so that I could give it a distressed look with some of the stained finish peeking through the paint.  I used my favorite stain wipes for this part because the stain dries quickly and is odorless!These adorable and easy DIY Scrap Wood Valentines are a perfect Valentine's Day Craft to keep for yourself or give away! Use up your scrap wood stash or purchase inexpensive craft wood to make these cute keepsakes.

    After the stain dried, I dry brushed chalky finish paint onto the wood blocks.  I did a streaky application so that the stained finish would show through in parts.  These adorable and easy DIY Scrap Wood Valentines are a perfect Valentine's Day Craft to keep for yourself or give away! Use up your scrap wood stash or purchase inexpensive craft wood to make these cute keepsakes.

    While the paint dried, I printed out this sheet music onto a piece of cardstock.  (Tip: the New York library has digitized thousands of publications within the public domain and made them available for free!  That’s where I found this sheet music.)  Then I drew a hearts on parts of the lyrics that talk about love and all that good stuff, and cut them out.  These adorable and easy DIY Scrap Wood Valentines are a perfect Valentine's Day Craft to keep for yourself or give away! Use up your scrap wood stash or purchase inexpensive craft wood to make these cute keepsakes.

    Next, I attached double-sided permanent tape to the back of the hearts, and pressed them onto my wood blocks.  These adorable and easy DIY Scrap Wood Valentines are a perfect Valentine's Day Craft to keep for yourself or give away! Use up your scrap wood stash or purchase inexpensive craft wood to make these cute keepsakes.

    I then used letter stamps to put some sentimental sayings onto the blocks with paint.  I made my lettering a bit uneven to give an imperfect and rustic look, but you can definitely make yours look more refined!  These adorable and easy DIY Scrap Wood Valentines are a perfect Valentine's Day Craft to keep for yourself or give away! Use up your scrap wood stash or purchase inexpensive craft wood to make these cute keepsakes.

    Once that paint dried, I outlined the paper hearts with glue, and sprinkled glitter onto that.  Even though I was going for a rustic look on these wood scrap valentines, I had to add a little sparkle.  That’s just me. These adorable and easy DIY Scrap Wood Valentines are a perfect Valentine's Day Craft to keep for yourself or give away! Use up your scrap wood stash or purchase inexpensive craft wood to make these cute keepsakes.

    And that is all it takes to make these adorable scrap wood valentines that you can display in your home throughout the holiday, or give to a friend as a special little gift.  So sweet, right?!?  These adorable and easy DIY Scrap Wood Valentines are a perfect Valentine's Day Craft to keep for yourself or give away! Use up your scrap wood stash or purchase inexpensive craft wood to make these cute keepsakes.

    I made this project on FB Live, too, so check out the video!

    And, if you’re looking for some other Valentine’s Day project ideas, check out my Holidays Project Gallery!

    -Bre

    You May Also Like this DIY Modern Metal Wreath Project!  blank


    Filed Under: Holiday, Valentine's Day

    All You Need is Love (And Target) – Free Printable

    February 10, 2017 by Bre 2 Comments

    blank

    Hey friends- Thanks for your love on my DIY American Girl Doll Bed that I made for the Monthly DIY Challenge earlier this week.  I had so much fun with my first “real” building project and I’m glad you liked it, too!  Now, since Valentine’s Day is just around the corner, I wanted to share my version of a Valentine with YOU; it’s a free printable that’s available in two color combos, and honestly, I think you could display it all year!
    Download this free "All You Need is Love" printable for Valentine's Day or as a gift for your girlfriends. It comes in two color combos!

    I got the idea for this print the other day when I picked up my son from preschool.  His teacher said to me, “I saw you walking into Target the other day and you had the biggest smile on your face.  I could tell you were going to your happy place.”  HA!  It’s totally the truth.  I looooooove Target and regularly find excuses to go there.  (On that particular day, my son needed a new set of Pokemon cards (I made him pay for them himself, by the way), so we really needed to get over there.)

    And let’s be honest, I am not the only one who feels this way about Target.  Most women I know share this affection for the big box retailer in red.  I bet you’re one of them.  So download a copy of this All You Need is Love 8×10 printable in the color combo of your choice, print it at home or at your local print shop, pop in a frame and enjoy!Download this free "All You Need is Love" printable for Valentine's Day or as a gift for your girlfriends. It comes in two color combos!

    This would be a fun gift to give your girlfriends for Valentine’s Day, too!  Just click here to download:

    Love and Target Black & White Print

    Love and Target Pink & Red Print

    These prints are for personal use only, please!  I hope you enjoy them!  Please “pin” to share the love!

    Download this free "All You Need is Love" printable for Valentine's Day or as a gift for your girlfriends. It comes in two color combos!

    Love and Target; what more could a girl need?

    Happy Valentine’s Day, friends!

    Bre

    Filed Under: Holiday, Valentine's Day

    How to Make a Paper Heart Garland: Valentine Garland DIY

    February 1, 2017 by Bre 2 Comments

    blank

    Valentine’s Day is one of the most adorable holidays. It’s a fact. And making a DIY Valentine’s decoration, like a paper heart garland, is an easy way to get in the Valentine’s spirit.

    The Valentine’s garland I’m going to show you how to make is one of those easy DIY projects that’s great for all ages: kids and adults alike.

    And, because it’s a paper craft, it’s very inexpensive to make. Because of that, it could be a great ladies’ night craft project, too!

    In just ten minutes you can make an adorable Paper Heart Garland that's a perfect Valentine's Day craft or party decor! Watch the video and learn how to make your own in no time!

    This post contains affiliate links. Please read my disclosure policy for more information.

    Valentine Heart Garland Supplies

    Here are the supplies you’ll want to make the lovely garland shown in this post. Feel free to modify the materials used to suit your own preferences!

    • Card stock or scrapbook paper (be careful not to choose card stock that is too thick)
    • Paper cutter (or scissors, a ruler, and a pencil)
    • Glue Dots (or hot glue and hot glue gun. *See note about difference between hearts made with Glue Dots and those made with the hot glue gun.)
    • Twine, ribbon, string, or yarn
    • Optional: pom poms or pom pom trim, tape, heart stickers or Valentine’s Day stickers
    Learn how to make a cute Valentine garland in this post. Paper hearts form an adorable DIY decorations.

    How to Make a Paper Heart Valentine’s Day Garland

    Before I jump in to showing you how to make this Valentine garland, please note that I have linked a video tutorial and a printable version of these project instructions at the end of this post.

    Start by cutting card stock or scrapbook paper into strips. I recommend paper strips that are 1″ – 1.5″ wide, and between 11″ – 12″ long.

    A paper cutter makes it much easier to cut the paper to the desired length and width, but you can also do this with a ruler, pencil, and scissors if necessary!

    Once you have the paper strips cut, take one and fold it in half.

    Folding scrapbook paper into heart shapes.

    Unfold that paper, and then place a Glue Dot at the end of the paper strip (on the front of the paper strip). Fold the other end inward toward that Glue Dot, and connect the strip so that it becomes a heart.

    Note: Glue Dots are lightweight and allow the paper hearts to look lovely just like this. If you use hot glue instead, the weight of the glue will distort the heart shapes. You will need to place a line of glue in the inner fold, and connect the upper part of the heart into that fold.

    Paper hearts made from cardstock and scrapbook paper.

    Make as many of these paper heart shapes as you’d like to fill out your Valentine garland. Once you have enough hearts, glue them together – side by side – with either Glue Dots or hot glue.

    Glue the paper hearts together to create a DIY Valentine garland.

    Then, attach ribbon, twine, or yarn to the ends as a way to hang the heart garland. (And hey, why not also make this adorable DIY Valentine’s Backdrop, hang up your new garland, and have an impromptu friends or family photo shoot?)

    DIY Valentine’s Garland Video and Printable Tutorial

    It may be easier to understand the exact steps for making this heart garland if you watch a video on how to do it.

    Please know that this is one of the very first videos I made – years ago! It is not nearly as good as videos I make now, BUT it will show you exactly what I’m describing in the steps above.

    Also, you can print the instructions in this card!

    How to Make a Paper Heart Garland

    How to Make a Paper Heart Garland

    Yield: 1
    Prep Time: 5 minutes
    Active Time: 10 minutes

    This DIY Valentine's Day decoration is great for all ages. Make a paper heart garland and hang it for a festive touch.

    Materials

    • Card stock or scrapbook paper
    • Paper cutter (or scissors, ruler, and pencil)
    • Glue Dots (or hot glue)
    • Ribbon, twine, or yarn

    Instructions

    1. Cut paper into strips of desired length and width. I recommend strips that measure 1" or 1.5" wide by 11" or 12" long.
    2. Fold a strip in half.
    3. Unfold the paper strip. Place a Glue Dot or hot glue at the end, and fold the other end over to meet it. This creates a paper heart shape.
    4. If you used hot glue, the weight of the glue may distort the heart. Run a line of hot glue in the inner fold, and bring that top fold down to connect at the bottom.
    5. Attach all of the paper hearts with Glue Dots or hot glue.
    6. Add twine, ribbon, or yard to the ends of the garland so that you can hang it.
    © Bre
    Project Type: Paper Crafts / Category: Crafts
    blank

    I hope you found this easy Valentine’s garland tutorial enjoyable! Thanks for reading and happy Valentine’s Day!

    Filed Under: Crafts, Holiday, Valentine's Day

    DIY Vintage-Look Paper Mache Heart Boxes

    January 25, 2017 by Bre 2 Comments

    blank

    Give paper mache heart boxes a vintage look with this project tutorial! Such a cute Valentine’s Day craft!

    Paper mache boxes are a craft store staple.  I see them all the time yet I never buy them – mainly because I never know what to do with them.  

    But last week my kids and I took a field trip to Hobby Lobby (it was a field trip because it was SO FAR AWAY), and three paper mache heart boxes found their way into my shopping cart (thanks, kids).  

    Give paper mache boxes a vintage look with this project tutorial! Such a cute Valentine's Day craft!

    They’re pretty cute so I decided to embellish them a bit and make them look a little more festive for Valentine’s Day.  

    With some hot glue, paint, and scrapbook paper, I gave them a total facelift!  And I’ll show you how to, too!

    Give paper mache boxes a vintage look with this project tutorial! Such a cute Valentine's Day craft!

    Now they’re cute little containers perfect for giving to anyone sweet!

    Supplies Needed to Make Vintage Paper Mache Heart Boxes

    This post contains affiliate links. Please read my disclosure policy for more information.

    • Paper mache heart box
    • Hot glue and glue gun
    • Acrylic paint in colors of your choice
    • Dark brown acrylic paint or wax
    • Metallic creme wax in rose gold
    • Patterned scrapbook paper
    • Paper towel
    • Scissors
    • Paintbrush
    • Pencil

    How to Make Vintage Paper Mache Heart Boxes

    These paper mache boxes are so simple to make!  

    I started by drawing designs on the box tops with a pencil.  

    Give paper mache boxes a vintage look with this project tutorial! Such a cute Valentine's Day craft!

    Next, I fired up the trusty old glue gun and covered those designs in glue.  

    This was a little tricky because, as you know, hot glue gets all stringy.  It was a difficult to get the designs not to look like one big connected heap of hot glue, but by working slowly it went okay.  

    Give paper mache boxes a vintage look with this project tutorial! Such a cute Valentine's Day craft!

    After the hot glue completely hardened, I painted each of the boxes with chalky finish paint.  Acrylic craft paint will work just fine, too!

    Give paper mache boxes a vintage look with this project tutorial! Such a cute Valentine's Day craft!

    They looked pretty basic though, and the designs did not really show up all that well, so I took some dark brown wax and brushed it all over.  

    I made sure to brush it on roughly and really focus on the hot glue designs to add some dimension to the boxes.  This also muted the colors, which I was happy about!

    Looking for Valentine’s Day Ideas? How About These?

    Scrap Wood Valentines

    Easy Paper Heart Garland

    Brown wax can be tough to find or expensive, so you could also water down some dark brown acrylic paint and put hardly any on the brush. Then, you can go over those raised areas and deposit the smallest amount of paint. It will give a similar effect to the wax.

    Give paper mache boxes a vintage look with this project tutorial! Such a cute Valentine's Day craft!

    Finally, I decided to really make the hot glue designs pop by highlighting them with metallic wax!  

    I rubbed a little on a paper towel and passed over the designs.  This really helped them stand out!  

    Give paper mache boxes a vintage look with this project tutorial! Such a cute Valentine's Day craft!

    Finally, I traced the bottom of each heart onto some cute scrapbook paper.  I cut the paper hearts out and laid them inside of each box.  

    This way there’s a cute little surprise inside each box when it’s opened.  

    Give paper mache boxes a vintage look with this project tutorial! Such a cute Valentine's Day craft!

    Fill these babies with some candy and you’ve got a cute little gift for someone special!  

    Give paper mache boxes a vintage look with this project tutorial! Such a cute Valentine's Day craft!

    I saw some paper mache heart boxes just like these at Dollar Tree, too, so keep your eyes out for them!  

    Give paper mache boxes a vintage look with this project tutorial! Such a cute Valentine's Day craft!

    The possibilities are endless for how to decorate these, but I do really like the vintage look mine have!  

    Give paper mache boxes a vintage look with this project tutorial! Such a cute Valentine's Day craft!

    Well now I need to go eat some of these candy hearts from the photos.  It’s the right thing to do . . . I wouldn’t want my kids’ teeth to rot from eating them.

    Give paper mache boxes a vintage look with this project tutorial! Such a cute Valentine's Day craft!

    Filed Under: Holiday, Valentine's Day

    • Page 1
    • Page 2
    • Go to Next Page »

    Primary Sidebar

    Let’s Connect!

    Hi, I’m Bre! Thanks for visiting Average But Inspired, where I show you how to work with what you’ve got to create a home you love.

    Bre of Average But Inspired - a DIY and craft blog

    Love DIY? Subscribe to Get Posts E-mailed!

    How Can I Help You?

    blank

    7 Tips for Hosting a Party on a Budget

    blank

    Limewash Stone Fireplace Makeover: Bye Bye Orange Stone Fireplace, Hello Neutral Stone Beauty!

    blank

    My DIY Kitchen Makeover Reveal!

    blank

    How to Paint Over Tile

    Looking for Something?

    Copyright © 2013-2022, Bre Eggert (Average But Inspired). All rights reserved.
    • Home
    • DIY
    • Crafts
    • Home Decor
    • Privacy Policy and Copyright Policy
    • Disclosures
    • Contact Me