• Skip to primary navigation
  • Skip to main content
  • Skip to primary sidebar
Average But Inspired logo - DIY and craft

Average But Inspired

Craft a home you love. DIY and craft tutorials.

  • About
    • Contact Me
    • Disclosures
    • Privacy Policy and Copyright Policy
  • DIY
    • Furniture
  • Crafts
    • Dollar Store Crafts
    • Seasonal
      • Patriotic & Summer
      • Valentine’s Day
      • Easter & Spring
      • Fall & Halloween
      • Christmas & Winter
  • Home Decor
    • Organization
  • Shop
    • DIY Swag
    • DIY Guides
  • Home

Summer

Dollar Tree DIY Fourth of July Decor: Firecracker Decorations

May 19, 2022 by Bre 1 Comment

Have you seen a cuter Dollar Tree DIY Fourth of July Decor project? Make these DIY firecrackers to light up your holiday display!

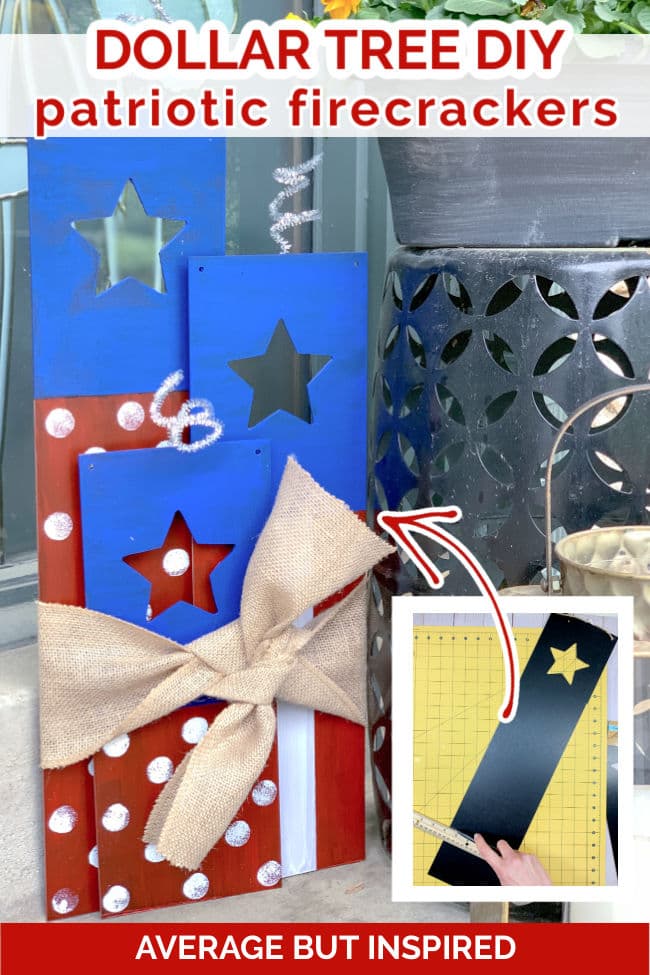
Put your patriotic spirit on display with this Dollar Tree DIY Fourth of July Decor project. These DIY firecracker decorations will put the sparkle in your celebrations!

Make these DIY firecracker decorations for your Fourth of July decor! This is an easy Dollar Tree DIY Fourth of July decor idea.

This post contains affiliate links. Please read my disclosure policy for more information.

As soon as I saw some adorable vertical signs with star cutouts at Dollar Tree, I knew I had to turn them into firecracker decorations for my Fourth of July decor. I could see them looking perfect with my Dollar Tree DIY Fourth of July Wreath!

The signs are sturdy and well-made, so they’re the perfect base for a lasting holiday decor piece.

Let me show you how to make your own patriotic firecracker decor with Dollar Tree supplies – you’re going to love this!

DIY Firecracker Decor Supplies

These are the supplies I used to make the firecrackers as shown in this post. Feel free to substitute items to personalize this project however you like!

  • The star cutout vertical signs I used are no longer sold, but you can use these Dollar Tree wood planks and stencil on a star or glue on a star.
  • Six thin wood pieces, like the Dollar Tree Tumbling Tower game pieces
  • Masking tape
  • Craft paint – red, white, and blue
  • Silver pipe cleaners or chenille stems
  • Burlap ribbon
  • Craft knife and ruler
  • Hot glue gun
  • Paint brushes – 1″ craft brush and foam dauber
  • Recommended: wood filler

Dollar Tree DIY Fourth of July Decor Instructions

First things first, if you make this I recommend doing something I did not do: fill the holes at the top of the signs once you remove the twine hangers. I should have done that!

Once the wood filler is dry, use a craft knife and a ruler to cut two of the vertical signs at the base. You’ll want to have each of the signs be a different height.

Dollar Tree vertical signs with star cutouts are the perfect base to make DIY firecracker decorations for the Fourth of July.

Next, paint these bad boys.

I taped them off so that I could paint the tops blue and the bottoms red.

Once that paint dried, I added polka dot detailing to the bottoms of two of the firecrackers with a foam dauber. I taped off the center of the other firecracker so that I could paint a stripe.

Dollar Tree star cutout signs are the perfect base for DIY firecracker decor.

To add dimension to this firecracker display, I hot glued game pieces from Dollar Tree’s version of Jenga along the edge of two of the firecrackers, and then glued the firecrackers on top of one another.

Use Dollar Tree Jenga wood blocks to make space between the firecrackers.

This helped separate the firecrackers from one another and gave the decor more of a 3D look.

I wrapped silver pipe cleaners around my fingers and glued those to the top of each firecracker, because obviously these needed wicks!

Pipe cleaners serve as wicks on these festive Fourth of July firecracker decorations.

And finally, I tied them all together in a cute little firecracker bundle with some extra-wide burlap ribbon. (Don’t worry – I made sure to bush off all of the pipe cleaner and ribbon debris you see in this picture!)

Tie the firecrackers together with burlap ribbon to create a cute Fourth of July decoration.

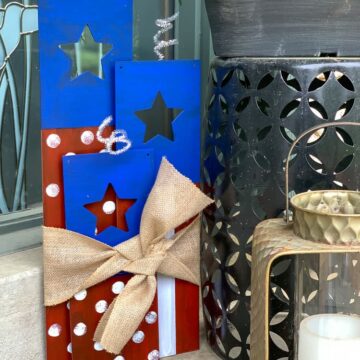
The Finished DIY Firecracker Decorations

And with that, these patriotic firecracker decorations were ready to go on display! First I tried them outdoors . . .

Make these DIY firecracker decorations for your Fourth of July decor! This is an easy Dollar Tree DIY Fourth of July decor idea.

and then I moved them inside next to the limewashed stone fireplace.

Make these DIY firecracker decorations for your Fourth of July decor! This is an easy Dollar Tree DIY Fourth of July decor idea.

I can’t decide where I like them better! Maybe they’ll just keep moving around, or maybe you’ll leave me a comment below and let me know where you think they look best!

Filed Under: Dollar Tree, Patriotic Tagged With: Dollar Tree, Summer

How to Paint a Straw Tote for a Trendy Summer Bag

July 17, 2018 by Bre 2 Comments

blank

Create a custom straw tote bag with this easy straw bag painting tutorial!

If you’ve been in any stores recently or shopped online, then you’ve definitely noticed that straw bags are the must have this summer.  Every store has them and they’re all so cute! 

Although I already have a small straw purse, I wanted a larger one for every day use, but I didn’t want a large price tag. 

That’s why I decided to paint a straw tote and get a cute summer bag at a fraction of the price! 

Grab a plain straw bag and customize it with paint and a DIY fabric tassel! It's so easy to get this trendy straw bag look for summer without spending a fortune. Learn how in this post!

This was a super simple project that left me with a darling straw tote, and I can’t wait to show you just how to make your own!

Supplies Needed to Paint a Straw Purse

This post contains affiliate links.  To read my full disclosure policy, please click here.

  • Straw tote bag (Linked bag is similar to the one used in this post)
  • Multi-surface acrylic paints in colors of your choice
  • Artist paintbrush
  • Letter stencil
  • Masking tape (to hold stencil in place)
  • Scrap fabric (to make tassel)
  • Embroidery floss (to make tassel)
  • Pinking shears (to make tassel)
  • Optional: premade bag tassel

How to Paint a Straw Tote Bag

Before I show you how I customized my plain straw tote, let me show you how boring it was initially. 

Grab a plain straw bag and customize it with paint and a DIY fabric tassel! It's so easy to get this trendy straw bag look for summer without spending a fortune. Learn how in this post!

I knew it could be so much cuter, so I grabbed my acrylic paints and got to work! 

Grab a plain straw bag and customize it with paint and a DIY fabric tassel! It's so easy to get this trendy straw bag look for summer without spending a fortune. Learn how in this post!

I began by painting a band of aqua at the bottom of the bag, simply following the lines in the straw as my guide.  

Then I found a letter stencil I’ve had for YEARS in my craft stash and taped that onto the bag. 

Grab a plain straw bag and customize it with paint and a DIY fabric tassel! It's so easy to get this trendy straw bag look for summer without spending a fortune. Learn how in this post!

I couldn’t get it totally flush with the bag, but I did the best I could.  

I chose a coordinating color of paint for the stencil and I got to work, gently applying the paint to the stencil and trying to prevent any bleed through from happening. 

To do this, I used the stencil as more of a guide than an actual stencil.  

Grab a plain straw bag and customize it with paint and a DIY fabric tassel! It's so easy to get this trendy straw bag look for summer without spending a fortune. Learn how in this post!

Thankfully there was no bleed through or smudges, and the tote looked great!

It was missing a little something, however, so I whipped up a fabric tassel with some scrap fabric. 

I Think You’ll Like These Other Bag and Purse Ideas, Too!

DIY Upcycled Shirt Tote Bag

No-Sew Clutch Purse (From a Placemat!)

To do this, just cut narrow strips of fabric with pinking shears, lay them on top of each other, fold in half and secure near the top with embroidery floss!

Making fabric tassels could not be easier! Get the how to in this post, and see how cute fabric tassels look on purses!

I covered the embroidery floss with another piece of scrap fabric for a more “finished” look.  

Grab a plain straw bag and customize it with paint and a DIY fabric tassel! It's so easy to get this trendy straw bag look for summer without spending a fortune. Learn how in this post!

And I attached that right to the tote bag.

Grab a plain straw bag and customize it with paint and a DIY fabric tassel! It's so easy to get this trendy straw bag look for summer without spending a fortune. Learn how in this post!

And that is all it took to upgrade a plain straw tote to a cute, personalized straw tote bag for summer!  

So what are you waiting for?  Summer will be gone before we know it, so paint a straw tote for yourself ASAP!  How would you customize yours?

Filed Under: Crafts Tagged With: Summer

DIY Fourth of July Wreath Made with Dollar Tree Supplies

June 11, 2017 by Bre Leave a Comment

blank

Make a patriotic Dollar Tree craft to celebrate Memorial Day and the Fourth of July!

I can’t believe it’s that time of year again where patriotic decor is lining the shelves.  The Fourth of July will be here before we know it!  

Last week my daughter begged me to take her to Dollar Tree so she could buy her daddy a Father’s Day present (so sweet), and while we were there I picked up some supplies to make a fun Fourth of July Wreath that took ten minutes TOTAL to make.  I promise!  

Make a DIY Fourth of July Wreath with supplies from Dollar Tree! This wreath cost $5 total to make! The tinsel garland adds a festive and sparkly touch for the Fourth of July.

This patriotic wreath is so sparkly and fun for the Fourth!  It reminds me of fireworks.

I made a tinsel garland wreath for Christmas long before I was blogging, so I was excited to have a new holiday to make one for!  

Anyway, RUN to Dollar Tree and get what you need to make this adorable tinsel garland wreath for the Fourth of July.

DIY Dollar Tree Patriotic Wreath Supplies

This post contains affiliate links. Please read my disclosure policy for more information.

  • Wire wreath form
  • Patriotic tinsel garland (buy two strands to be safe)
  • Patriotic headband with glitter stars
  • Chalkboard Star (no longer sold at Dollar Tree, so I recommend getting a wood star cutout and painting it black for the chalkboard look)
  • Hot glue gun and hot glue
  • Scissors
Make a DIY Fourth of July Wreath with supplies from Dollar Tree! This wreath cost $5 total to make! The tinsel garland adds a festive and sparkly touch for the Fourth of July.

How to Make a Dollar Tree DIY Patriotic Wreath

To learn how to make your own tinsel garland wreath for the Fourth of July, watch this fun video I made showing you just how to do it!  

The only thing to mention is that I cut the sparkly stars off of the headband (not shown in the video) to glue onto the chalkboard star.

If you enjoyed this project, please pin this post to Pinterest or share it on Facebook to share the love!  I’d really appreciate it!

Make a DIY Fourth of July Wreath with supplies from Dollar Tree! This wreath cost $5 total to make! The tinsel garland adds a festive and sparkly touch for the Fourth of July.

Filed Under: Crafts, Dollar Tree, Holiday, Patriotic Tagged With: Dollar Tree, Summer, Wreath

Summer Fun Bubble Paint Tea Towels

June 8, 2017 by Bre 4 Comments

blank

Looking for a fun summer kids craft idea? Here’s a unique one: bubble painting!

Well, it’s been a minute or two since I’ve posted, friends.  What can I say – end of the school year craziness combined with Memorial Day fun and work projects left me a little pressed for time!  You know how it goes.  

Anyway, my kids are off of school now (yay?), and I’m going to have to figure out how to get some projects done while they’re home (short of locking them in their bedrooms for an hour or two each day.  (I kid, I kid.)).

To help with that, this week I got my little guy involved in helping make some fun Bubble Paint Tea Towels for the kitchen!  

Turn your kids' bubble solution into bubble paint and make these adorable bubble paint tea towels for your kitchen! Bubble paint tea towels are easy to make and a great project to have the kids help with!

I needed a new set of tea towels for the summer months (my most recent set said “Hello Spring,” so clearly they had to go), so we decided to make some together.  

And what says summer more than bubbles (OK, probably a lot of things, but bubbles is high up on the list!)?  

This was a perfect project to have kids involved with!

Supplies Needed to Make Bubble Paint Crafts

This post contains affiliate links. Please read my disclosure policy for more information.

For the project shown in this post, we painted with bubbles by using plain white tea towels as our canvas. Other ideas for bubble painting include paper, blank canvases, t-shirts, and more!

  • Plain white tea towels
  • Bubbles
  • Multi-surface acrylic paint in colors of your choice
  • Large piece of cardboard
  • Masking tape
  • Decorative fringe or trim
  • Fabric glue
  • Plastic cups for mixing

How to Make Bubble Paint

Learn from my mistakes and don’t do what I did!  I tried to make my bubble paint by using dish soap, but I couldn’t get the consistency right to actually make bubbles.  

Turn your kids' bubble solution into bubble paint and make these adorable bubble paint tea towels for your kitchen! Bubble paint tea towels are easy to make and a great project to have the kids help with! Learn how to make your own bubble paint in this post.

Skip that and go straight to the good stuff – your kids’ bubble solution.  Pour some into a cup and add multi-surface acrylic paint to it.  

Turn your kids' bubble solution into bubble paint and make these adorable bubble paint tea towels for your kitchen! Bubble paint tea towels are easy to make and a great project to have the kids help with! Learn how to make your own bubble paint in this post.

Stir it all up and you’ll have beautiful bubble paint!  Just mix until you get the color saturation you want.

This project gets a little messy, so I recommend heading outside.  

Turn your kids' bubble solution into bubble paint and make these adorable bubble paint tea towels for your kitchen! Bubble paint tea towels are easy to make and a great project to have the kids help with!

Bring a foam board or piece of cardboard with you and tape a white tea towel to the board so that it lies flat.  

More Summer Fun for the Kids!

Sand Shapes Art

Beach in a Bottle

Then have fun with your kids (or by yourself – no shame!), blowing paint bubbles all over the tea towel!  

Turn your kids' bubble solution into bubble paint and make these adorable bubble paint tea towels for your kitchen! Bubble paint tea towels are easy to make and a great project to have the kids help with!

You’ll probably have to move around a lot, depending on how the breeze is blowing, and you may even run after some good bubbles with your tea towel board.  It’s okay; embrace the crazy.  

Turn your kids' bubble solution into bubble paint and make these adorable bubble paint tea towels for your kitchen! Bubble paint tea towels are easy to make and a great project to have the kids help with!

We figured out that it works best if you get really close to the tea towel and blow the bubble right near it.  Less chance of escaping; better chance of popping.  

Turn your kids' bubble solution into bubble paint and make these adorable bubble paint tea towels for your kitchen! Bubble paint tea towels are easy to make and a great project to have the kids help with!

Let the tea towel dry thoroughly before bringing it inside.  Once it’s dry, embellish with fringe or other trim of your choice.  I just glued it on with fabric glue so it was a super easy addition!  

Turn your kids' bubble solution into bubble paint and make these adorable bubble paint tea towels for your kitchen! Bubble paint tea towels are easy to make and a great project to have the kids help with!

After the trim glue dries, hang up your new tea towels and add a summery touch to your kitchen!  

Turn your kids' bubble solution into bubble paint and make these adorable bubble paint tea towels for your kitchen! Bubble paint tea towels are easy to make and a great project to have the kids help with!

And remember: you don’t have to paint with bubbles on tea towels only. You could try bubble painting on paper, a canvas, a white t-shirt: whatever!

Turn your kids' bubble solution into bubble paint and make these adorable bubble paint tea towels for your kitchen! Bubble paint tea towels are easy to make and a great project to have the kids help with!

I feel like bubble painting on canvas could result in some cool modern art for your home!  

Turn your kids' bubble solution into bubble paint and make these adorable bubble paint tea towels for your kitchen! Bubble paint tea towels are easy to make and a great project to have the kids help with!

-Bre

Filed Under: Crafts Tagged With: Summer

Beach in a Bottle {A DIY Vacation Souvenir}

June 3, 2016 by Bre 5 Comments

blank

This beach craft idea is a perfect souvenir from any beach day! It’s a fun beachy craft for kids and adults alike.

Last week I was on vacation in Seabrook Island, South Carolina.  It was AMAZING!  

My family and I have been going there every year for the past several years, and it’s starting to feel like our home away from home.  

It’s really quiet there with no commercial development on the island, so it’s the perfect place to feel like you’re actually getting away.  

Seabrook Island, South Carolina beach scenery.

This post contains affiliate links. Please read my disclosure policy for more information.

You never have to fight for a spot on the beach and there’s always some good nature to be seen.  For “city folks” who consider mice and squirrels to be wildlife, that’s pretty exciting stuff.  

Because we treasure our time at the beach, we decided to bring a little of it home with us in this Beach in a Bottle DIY Vacation Souvenir craft.  

Is a beach vacation in your future? If the answer is yes, bring the beach home with you with this fun Beach in a Bottle DIY Vacation Souvenir! Click through for the tutorial. This beach craft for kids is adorable and fun to make.

This is a fantastic way to bring some sand and shells home in your suitcase.  All you need is a pack of mini glass bottles and some time on the beach!

Is a beach vacation in your future? If the answer is yes, bring the beach home with you with this fun Beach in a Bottle DIY Vacation Souvenir! Click through for the tutorial.

Simply fill the glass bottles maybe halfway with sand (dry sand is best).  My kids LOVED filling up their bottles!  

blank

Then, hunt for some tiny shells and other beach treasures like reeds or small pieces of driftwood.  

Here Are Some Other Beach Crafts You Might Like!

DIY Straw Tote Bag

Kids Painted Beach Bags Craft

This was a really great beach activity for kids and toddlers.

blank

Stick all of your beach finds into the bottles and you have a perfect DIY beach vacation souvenir!  

Is a beach vacation in your future? If the answer is yes, bring the beach home with you with this fun Beach in a Bottle DIY Vacation Souvenir! Click through for the tutorial.

These tiny bottles have already found places of honor in my kids’ bedrooms.  They’re such a great memory of our favorite vacation spot.  

Is a beach vacation in your future? If the answer is yes, bring the beach home with you with this fun Beach in a Bottle DIY Vacation Souvenir! Click through for the tutorial.

If you have a beach trip coming up, make sure to pin this post so you’ll remember to get some mini glass bottles before your trip!  

Is a beach vacation in your future? If the answer is yes, bring the beach home with you with this fun Beach in a Bottle DIY Vacation Souvenir! Click through for the tutorial.

Happy beach day!

-Bre

Filed Under: Crafts Tagged With: Summer

Primary Sidebar

Let’s Connect!

Hi, I’m Bre! Thanks for visiting Average But Inspired, where I show you how to work with what you’ve got to create a home you love.

Bre of Average But Inspired - a DIY and craft blog

Love DIY? Subscribe to Get Posts E-mailed!

How Can I Help You?

blank

How to Paint a Countertop to Look Like Marble!

blank

Limewash Stone Fireplace Makeover: Bye Bye Orange Stone Fireplace, Hello Neutral Stone Beauty!

blank

My DIY Kitchen Makeover Reveal!

blank

How to Create a Faux Antique Brass Finish with Paint

Looking for Something?

Copyright © 2013-2022, Bre Eggert (Average But Inspired). All rights reserved.
  • Home
  • DIY
  • Crafts
  • Home Decor
  • Privacy Policy and Copyright Policy
  • Disclosures
  • Contact Me