• Skip to primary navigation
  • Skip to main content
  • Skip to primary sidebar
Average But Inspired logo - DIY and craft

Average But Inspired

Craft a home you love. DIY and craft tutorials.

  • About
    • Contact Me
    • Disclosures
    • Privacy Policy and Copyright Policy
  • DIY
    • Furniture
  • Crafts
    • Dollar Store Crafts
    • Seasonal
      • Patriotic & Summer
      • Valentine’s Day
      • Easter & Spring
      • Fall & Halloween
      • Christmas & Winter
  • Home Decor
    • Organization
  • Shop
    • DIY Guides
  • Home

Crafts

Thrift Shop Picture Frame Makeover

May 22, 2015 by Bre 10 Comments

Update a thrift shop picture frame with paint and plywood! Learn how to make a boutique-style picture frame with this simple tutorial.

Over the past couple of years, I’ve developed a real love of scouring thrift shops for treasures that I can use in my home.  The prizes that I bring home almost always get a makeover.  Rarely do they go out on display in their original condition, although that certainly would lead to an interesting look in my home.

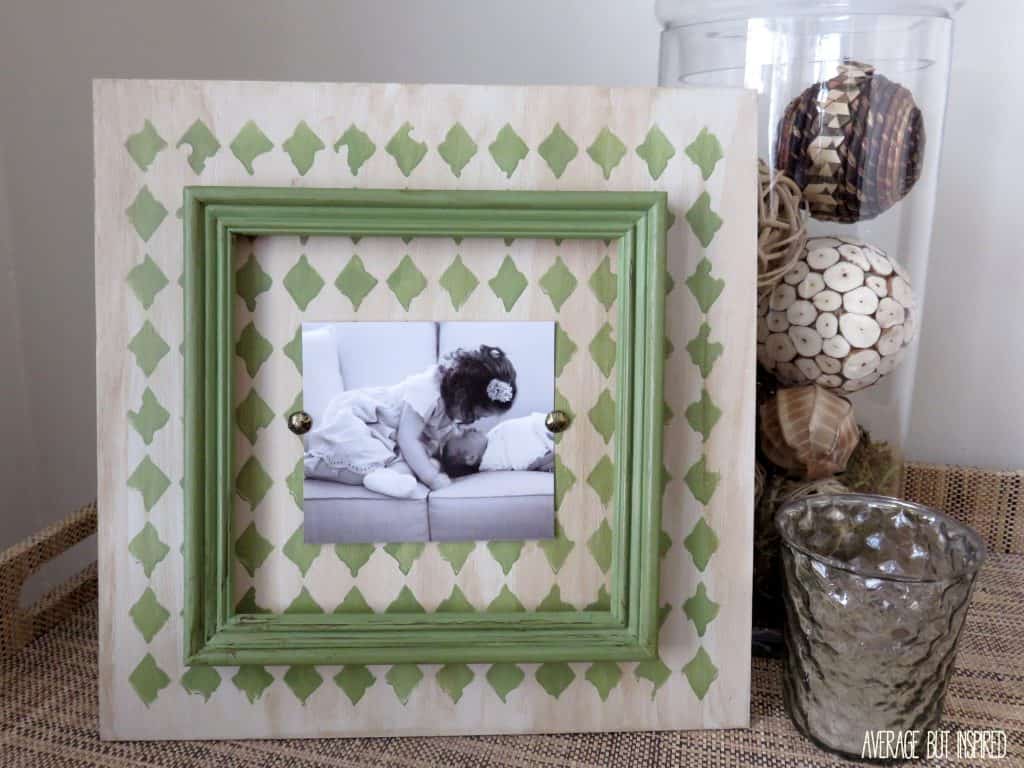
Picture frames are one of the best things to pick up at thrift shops because they are so easily modified to fit any style of decor.  With a little paint and plywood, I updated a simple square frame from Goodwill (complete with 1980’s seahorse art), and turned it into a beautiful boutique-style frame.  Update a thrift shop picture frame with paint and plywood! Learn how to make a boutique-style picture frame with this simple tutorial.
[Read more…] about Thrift Shop Picture Frame Makeover

Filed Under: Crafts

A Fingerprint Tea Towel for the Mom Who Bakes {A Mother’s Day Craft and Gift}

April 28, 2015 by Bre 14 Comments

Turn kids' thumbprints into cookies on a cute tea towel. It's the perfect gift for a mom or grandma who bakes! Plus, the free downloadable quote can be used as a template for your own tea towel!

The day when we honor some of the most important women in our lives – Mother’s Day – is coming up soon!  This year my kids and I made the cutest Mother’s Day craft and gift, which we are sending to my mother-in-law as part of her gift.

Although we don’t get to see her that often, she loves to bake with my kids every time we get together. It is one of their favorite things to do with Grandma, so naturally we wanted to incorporate their special activity into their gift to her.  With a little help from me, my kids made this Mother’s Day fingerprint tea towel, using their thumbprints to make cookies all over it.  Turn kids' thumbprints into cookies on a cute tea towel. It's the perfect gift for a mom or grandma who bakes! Plus, the free downloadable quote can be used as a template for your own tea towel!

This project was really fun, inexpensive, and I think it will make a great keepsake that any mother or grandmother who likes to bake would appreciate.  Turn kids' thumbprints into cookies on a cute tea towel. It's the perfect gift for a mom or grandma who bakes! Plus, the free downloadable quote can be used as a template for your own tea towel!

Supplies Used to Make a Mother’s Day Fingerprint Tea Towel

Here are the supplies we used to make our fingerprint tea towel.  (Products marked with an asterisk are affiliate links, which means that I receive a small commission at no added cost to you if you purchase through them.  You can read my full disclosure policy here.)

  • Thin flour sack tea towels* (I got mine at Target)
  • Sharpie fabric markers*
  • Light brown fabric paint* or multi-surface acrylic paint

How To Make Your Own Fingerprint Tea Towel

Turn kids' thumbprints into cookies on a cute tea towel. It's the perfect gift for a mom or grandma who bakes! Plus, the free downloadable quote can be used as a template for your own tea towel!

First, I found a cute quote that I wanted on our tea towel.  I typed it up and printed it out.  If you would like a copy, I’m happy to share and you can download it HERE and print it out for yourself.  (NOTE: Change the year if you’d like to add that part, or just don’t trace it onto the tea towel.)  Turn kids' thumbprints into cookies on a cute tea towel. It's the perfect gift for a mom or grandma who bakes! Plus, the free downloadable quote can be used as a template for your own tea towel!

Next, I ironed the flour sack towel and figured out where I wanted the quote to go.  I placed the printed quote underneath the towel and traced the text with my Sharpie fabric markers.  It was really easy to see the text underneath and get some good penmanship on there.  I was pretty proud of myself for thinking of that.  (Hey, if I don’t pat myself on the back, who will?)  Turn kids' thumbprints into cookies on a cute tea towel. It's the perfect gift for a mom or grandma who bakes! Plus, the free downloadable quote can be used as a template for your own tea towel!

Now came the fun part . . . allowing my kids to put paint on their hands and get messy.  Awesome.  But it actually wasn’t too messy because I just put it on their tiny little thumbs and had them stamp around the quote.  Of course they loved it.  Turn kids' thumbprints into cookies on a cute tea towel. It's the perfect gift for a mom or grandma who bakes! Plus, the free downloadable quote can be used as a template for your own tea towel!

Finally, I added some black dots to their dried thumbprints to make them look like chocolate chip cookies.  So cute!  Turn kids' thumbprints into cookies on a cute tea towel. It's the perfect gift for a mom or grandma who bakes! Plus, the free downloadable quote can be used as a template for your own tea towel!

Here’s another great DIY Mother’s Day Gift Idea!

Of course this baking tea towel would make a great gift on its own, but we added some cute baking accessories and tied them all together with baker’s twine to complete the gift.  I just know my mother-in-law is going to love it as much as we loved making it.  Turn kids' thumbprints into cookies on a cute tea towel. It's the perfect gift for a mom or grandma who bakes! Plus, the free downloadable quote can be used as a template for your own tea towel!

This is a special DIY Mother’s Day gift that any baker would love to receive.

This is such a sweet DIY Mother's Day gift! Let your kids use their fingerprints to create "cookies" on this painted tea towel. Print the template for the saying on the front of the tea towel, and create a cute Mother's Day gift for any grandma or mom!

– Bre

Filed Under: Crafts, Holiday

Paint Splattered Pouches {An Easy Dollar Bin Upgrade}

April 21, 2015 by Bre 12 Comments

Fun project! Customize plain pouches with splatter paint for a fun new look! Great project for kids, too!

Every time I step into Target, my cart takes on a mind of its own and directs me to aisles and places in the store that I never intended to visit.  The Dollar Spot is one of those places.  Do I ever really need a cute new notebook for my daughter with the latest, popular Disney character emblazoned on the front?  Or yet another rubber stamp with the letter “B” on it (but this one has a quatrefoil background print, Bre!)?  No.  The answer is always NO.  But I go there anyway – all.the.time.

On one of those recent visits to the Dollar Spot, I found some cute fully-lined, linen pouches for $3 a piece.  They were the perfect size for inside my purse and I liked the metallic thread that was woven throughout.  Upgrade some plain pouches with a little paint! This 15 minute project makes a perfect gift or project for kids!
I easily could have left them as is, but come on . . . what fun would that be? With a little paint, I gave them a totally fun new look!  Fun project! Customize plain pouches with splatter paint for a fun new look! Great project for kids, too!
[Read more…] about Paint Splattered Pouches {An Easy Dollar Bin Upgrade}

Filed Under: Crafts

Dollar Store Magnetic Chip Clip Holder

April 8, 2015 by Bre 26 Comments

Create a DIY magnetic chip clip holder with Dollar Tree supplies.

There’s nothing worse than craving a salty, crunchy chip, and opening the package to find they’ve gone stale.  (You know I’m right!)

To prevent such a catastrophe, you must make this DIY Dollar Store Magnetic Chip Clip Holder!

This is such a great idea! Quickly update a dollar store burner cover into a magnetic chip clip holder. Never be without a chip clip in your pantry again!

Not only will you have lots of chip clips to help keep those salty snacks fresh and tasty, but you’ll also have a fantastic way to organize those chip clips! 

Alright, so people, I’m telling you that if you’re not a regular Dollar Tree shopper, you need to become one, stat.

It is my absolute favorite place for cheap party supplies (read my post on the best Dollar Tree party supplies), and cheap craft supplies (read my post on 10 craft supplies to buy at Dollar Tree, and the follow up with ten more).

This is such a great idea! Quickly update a dollar store burner cover into a magnetic chip clip holder. Never be without a chip clip in your pantry again!

Oh, I also love it for strange stove burner covers with roosters plastered all over them.  At the risk of sounding like an idiot, I really have no idea what you do with a burner cover. I’m guessing it’s something for an electric stove. . . ?  I’ve never had one of those so I don’t really know.  

Yeah, so anyway, I bought a set of two of these burner covers for, well, $1 (now $1.25), never planning to use them for their intended purpose.  Instead, I always planned to use them for something “magnety” (made up word referring to something that can be used with magnets.).

Anyway, these bad boys hid out in my china cabinet for about six months until a wonderful moment of inspiration hit.  You see, I was giving my children their 78th snack of the day when I got super annoyed that I couldn’t find any more binder clips (my makeshift chip clips), in my junk drawer.  

At that moment I knew that my world would become a better place if I always had easy access to chip clips so that my children’s snacks could be easily resealed and not spill all over the pantry as they usually do.  Out of hiding came the rooster covers.

DIY Chip Clip Holder Supplies

This post contains affiliate links.  To learn more, please read my full disclosure policy.

  • Metal burner covers 
  • 12″ x 12″ scrapbook paper in pattern of your choice
  • Mod Podge (decoupage glue)
  • Foam brush
  • Ribbon
  • Clothespins
  • Acrylic paint
  • Tiny magnets
  • Scissors

How to Make a Magnetic Chip Clip Holder

Since roosters aren’t my favorite animal in the world, I decided to cover this bad boy up, pronto.  I traced around the burner cover on a piece of 12 x 12 scrapbook paper, and then cut it out.

This is such a great idea! Quickly update a dollar store burner cover into a magnetic chip clip holder. Never be without a chip clip in your pantry again!

Next up, I applied a thin layer of ModPodge (decoupage glue) to the top of the burner cover and put my scrapbook paper on top.  Bye bye, rooster!  

This is such a great idea! Quickly update a dollar store burner cover into a magnetic chip clip holder. Never be without a chip clip in your pantry again!

I smoothed out the wrinkles, and after it seemed dry, I put another thin layer of decoupage glue on top.  

This is such a great idea! Quickly update a dollar store burner cover into a magnetic chip clip holder. Never be without a chip clip in your pantry again!

Once everything was dry, I hot glued a ribbon around the entire edge of the burner cover.  

This is such a great idea! Quickly update a dollar store burner cover into a magnetic chip clip holder. Never be without a chip clip in your pantry again!

Then I painted some clothespins with acrylic paint and hot glued tiny magnets to the back of each one.  Super duper easy!  

This is such a great idea! Quickly update a dollar store burner cover into a magnetic chip clip holder. Never be without a chip clip in your pantry again!

And you guys, for real, this has been a total game changer in the world of proper snack sealing and storage.

This is such a great idea! Quickly update a dollar store burner cover into a magnetic chip clip holder. Never be without a chip clip in your pantry again!

I love a good Dollar Store craft and organization combo project (kind of like my Dollar Tree pizza pan memo board)!

Magnetic Chip Clips & Holder

Filed Under: Dollar Tree

How to Make a DIY Placemat Clutch Purse

March 27, 2015 by Bre 22 Comments

blank

It’s really strange but some of my most creative ideas come to me right as I’m falling asleep or randomly in the middle of the night.  This is one of those ideas – making a DIY placemat clutch purse!

Cute idea! Turn a placemat into a clutch purse without a sewing machine! Learn to make this DIY placemat clutch in this post.

I have NO idea why I thought of this.  Maybe it’s because I go out to the clubs all the time and am in constant need of cute clutch purses.  (Um . . . no.)  

Maybe it’s because I’m totally in tune with the fashion trends.  (Womp womp.)  

Maybe it’s because my brain is strange.  (Ding Ding Ding – we have a winner!)

Regardless of the reasoning behind the clutch, I’m pleasantly surprised with how cute it turned out!  Bonus was that it really did not take long to make!  

Cute idea! Turn a placemat into a clutch purse without a sewing machine!

Supplies Needed for a DIY Placemat Clutch Purse

This post contains affiliate links.  To read my full disclosure policy, please click here.

  • Placemat
  • Large sewing needle
  • Embroidery floss
  • Velcro
  • Buttons or other embellishments
  • Iron
  • Fabric glue or hot glue

How to Make a Placemat Purse

First, determine how wide you want your clutch to be.  I thought that it would be too wide if I simply folded the placemat in half.  I turned the placemat to be vertical on the table and then folded the left and right sides inward about one inch.  I pinned those and ironed them down.  

Cute idea! Turn a placemat into a clutch purse without a sewing machine!
Once the sides were ironed, I folded the placemat in half, horizontally, with the ironed sides facing in. Then I began to sew those seams shut along the edges.  

Cute idea! Turn a placemat into a clutch purse without a sewing machine!
I sewed about two-thirds of the way up.  Once I reached that point, I only sewed the bottom layer of the placemat.  The top layer was left untouched.  (I hope this description makes sense. . . )

Cute idea! Turn a placemat into a clutch purse without a sewing machine!
Next I folded the top layer of the placemat over, facing outward, and ironed it. I then sewed it down, using my embroidery floss again.  

Cute idea! Turn a placemat into a clutch purse without a sewing machine!

Cute idea! Turn a placemat into a clutch purse without a sewing machine!
Then I glued Velcro to both of the flaps. I think I was a little aggressive in my Velcro application. I definitely did not need to use that huge strip on the bottom flap . . . I think those little Velcro dots would have been sufficient. What can I say? I love Velcro?  

Cute idea! Turn a placemat into a clutch purse without a sewing machine!

Finally, I sewed on some cute little buttons for a fun dose of the blingety bling.  

Cute idea! Turn a placemat into a clutch purse without a sewing machine!
Cute, right?!  

I kind of need to go out so I can use this. . . .it’s not exactly practical for the playground with my kiddos.  

Cute idea! Turn a placemat into a clutch purse without a sewing machine!
So what do you think? Would you try and pass off a DIY placemat clutch as a purse?

Turn a placemat into a super cute purse! Learn to make a DIY placemat clutch in this post. You don't even need a sewing machine.

– Bre

Filed Under: Crafts

Chalk Painted Grapevine Wreath {A Wreath for All Seasons}

February 20, 2015 by Bre 26 Comments

Average But Inspired shows you how to give a grapevine wreath a totally unique look with chalk paint!

I love the look of embellished grapevine wreaths on front doors, but I could never use them because my front door is dark stained wood and the wreath just blended right in with the door. (This is even more of a problem since I refinished my door last summer.)

On a recent trip to Michaels, however, I decided to go out on a limb and purchase a grapevine wreath anyway. (I like to live dangerously, people!) And of course, when I got it home, I immediately knew that it wasn’t going to work without some tweaking. Duh. So I got a little crazy and decided to PAINT it.

What tha’ what?

And now I have a chalk painted grapevine wreath adorning my front door. And part of me really likes it, and the other part isn’t so sure about it. (Maybe when it is no longer -31 with windchill I will have the luxury of standing outside my front door and really studying the wreath to decide if I like it. But for now, it will stay there because I have nothing else to replace it with.)  Average But Inspired shows you how to give a grapevine wreath a totally unique look with chalk paint!

[Read more…] about Chalk Painted Grapevine Wreath {A Wreath for All Seasons}

Filed Under: Crafts

  • « Go to Previous Page
  • Page 1
  • Interim pages omitted …
  • Page 16
  • Page 17
  • Page 18
  • Page 19
  • Page 20
  • Page 21
  • Go to Next Page »

Primary Sidebar

Let’s Connect!

Hi, I’m Bre! Thanks for visiting Average But Inspired, where I show you how to work with what you’ve got to create a home you love.

Bre of Average But Inspired - a DIY and craft blog

Love DIY? Subscribe to Get Posts E-mailed!

How Can I Help You?

blank

How to Create a Faux Antique Brass Finish with Paint

blank

Limewash Stone Fireplace Makeover: Bye Bye Orange Stone Fireplace, Hello Neutral Stone Beauty!

blank

7 Tips for Hosting a Party on a Budget

blank

How to Paint Over Tile

Looking for Something?

Copyright © 2013-2022, Bre Eggert (Average But Inspired). All rights reserved.
  • Home
  • DIY
  • Crafts
  • Home Decor
  • Privacy Policy and Copyright Policy
  • Disclosures
  • Contact Me