• Skip to primary navigation
  • Skip to main content
  • Skip to primary sidebar
Average But Inspired logo - DIY and craft

Average But Inspired

Craft a home you love. DIY and craft tutorials.

  • About
    • Contact Me
    • Disclosures
    • Privacy Policy and Copyright Policy
  • DIY
    • Furniture
  • Crafts
    • Dollar Store Crafts
    • Seasonal
      • Patriotic & Summer
      • Valentine’s Day
      • Easter & Spring
      • Fall & Halloween
      • Christmas & Winter
  • Home Decor
    • Organization
  • Shop
    • DIY Swag
    • DIY Guides
  • Home

Holiday

How to Make the Cutest Paper Christmas Tree Garland

December 4, 2018 by Bre 4 Comments

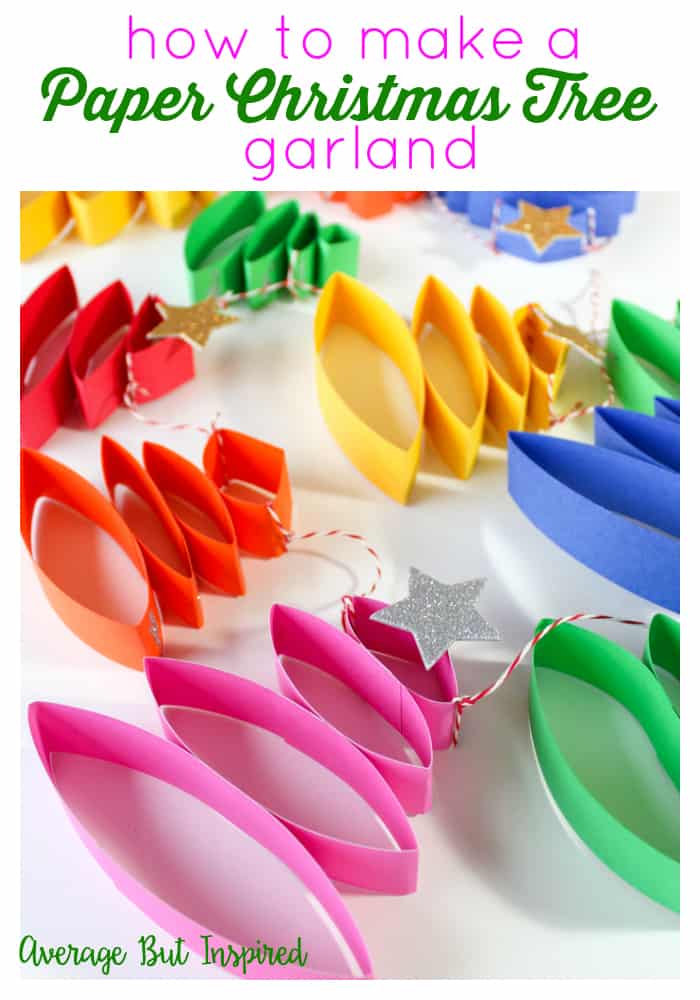
Learn how to make a paper Christmas tree garland. This Christmas paper craft is a great craft for all ages!

I don’t know about you, but Christmastime brings out my desire to craft like no other time of year!  Whether it’s making decor for my house or gifts for someone else, I just want to make make make!

Unfortunately the added time constraints of this season can leave little time for crafting, but as creative people, WE MUST MAKE!

So, let’s take time to indulge our inner craft gods and goddesses and create something special – even if it’s a super quick craft like this adorable Paper Christmas Tree Garland.

(And check out my other Christmas and Winter Crafts in the linked project gallery!)

Adorable! Learn how to make the cutest paper Christmas tree garland in this post. It's so easy to create a cute Christmas garland! #papergarland #diygarland #christmastreegarland #papercrafts

Taking a little bit of time to create will help you feel more fulfilled and less stressed – trust me.

Supplies Needed for a Paper Christmas Tree Garland

This post contains affiliate links.  Please read my disclosure policy for more information.

  • Colored cardstock (make sure to buy cardstock that’s colored on both sides – unlike scrapbook paper, which is usually white on the back.)
  • Paper cutter (or scissors and a ruler)
  • Glue Dots (optional: you could also use a hot glue gun for this part!)
  • Glitter stars
  • Hot glue gun and glue
  • Twine or string

How to Make a Paper Christmas Tree Garland

Okay, I was creatively uninspired and sorting through my craft supplies to see what I could make for a Christmas craft.  I found a whole bunch of 8.5″ x 11″ rainbow cardstock that I bought for who knows what reason.

I grabbed it and my paper cutter and started messing around.  A little while later, I figured out how to make these adorable paper Christmas trees and I decided to make this garland.  It’s so easy!

Step One: Cut Cardstock Strips

Begin by cutting four, 11″ long and 1″ wide strips of cardstock.  If you have a paper cutter, this is SUPER easy!

Adorable! Learn how to make the cutest paper Christmas tree garland in this post. It's so easy to create a cute Christmas garland! #papergarland #diygarland #christmastreegarland #papercrafts

If you don’t have a paper cutter, you need to get one!  I bought mine back in 2005 when I was wedding planning and I have used it so much since then!  If you don’t have a paper cutter, you can either measure with a ruler and cut with scissors, or just eyeball it and cut freehand.

Next, shorten these strips of paper as follows:

For larger paper Christmas trees: keep one strip 11″ long, cut one down to 9″, cut another down to 7″, and cut the last one down to 5″.

Adorable! Learn how to make the cutest paper Christmas tree garland in this post. It's so easy to create a cute Christmas garland! #papergarland #diygarland #christmastreegarland #papercrafts

For smaller paper Christmas trees:  cut one strip down to 9″, cut one down to 7″, cut another down to 5″, and cut the last one down to 3″.  

Step Two: Create Paper Rings

Next, use the Glue Dots or double-sided tape to attach each strip together at the ends to form rings.  Alternatively, use hot glue to create the paper rings.

Adorable! Learn how to make the cutest paper Christmas tree garland in this post. It's so easy to create a cute Christmas garland! #papergarland #diygarland #christmastreegarland #papercrafts

Then, take the largest ring and press it down in half, so that the folds are crisp.

Place more of the Glue Dots, double-sided tape, or hot glue in the middle.

Adorable! Learn how to make the cutest paper Christmas tree garland in this post. It's so easy to create a cute Christmas garland! #papergarland #diygarland #christmastreegarland #papercrafts

Repeat this process with the other rings and stack them one on top of the other.  For the smallest ring, push it into a point at the top so that it looks like the top of a Christmas tree!

Repeat this process until you have a forest of paper Christmas trees.

Step Three: Embellish the Paper Trees

At this point, adorn the tops of the trees with chipboard stars, add glitter to the edges to look like snow, glue on sequins to look like ornaments – whatever you want!

Adorable! Learn how to make the cutest paper Christmas tree garland in this post. It's so easy to create a cute Christmas garland! #papergarland #diygarland #christmastreegarland #papercrafts

Step Four: Tie Together with Twine

After the trees are complete, tie them together with twine or string to create a darling paper Christmas tree garland.  

Adorable! Learn how to make the cutest paper Christmas tree garland in this post. It's so easy to create a cute Christmas garland! #papergarland #diygarland #christmastreegarland #papercrafts

This garland is so unique!  I haven’t seen any like it online, and I love the festive touch it adds in my kitchen.  

Adorable! Learn how to make the cutest paper Christmas tree garland in this post. It's so easy to create a cute Christmas garland! #papergarland #diygarland #christmastreegarland #papercrafts

This simple project did not take much time at all, and I’m so glad I made it a priority because crafting is what lessens my stress!  

Adorable! Learn how to make the cutest paper Christmas tree garland in this post. It's so easy to create a cute Christmas garland! #papergarland #diygarland #christmastreegarland #papercrafts

Taking time to do things I enjoy is part of what helps me keep my head on straight during the hectic holiday season.  I hope you will do the same for yourself!  

Adorable! Learn how to make the cutest paper Christmas tree garland in this post. It's so easy to create a cute Christmas garland! #papergarland #diygarland #christmastreegarland #papercrafts
 

Filed Under: Christmas, Holiday

Tips for Taking Great DIY Christmas Card Photos

November 19, 2018 by Bre Leave a Comment

blank

These days it’s almost unheard of to send a holiday card that is not a family photo, whatever your family consists of.  Whether it’s a whole group of people, just you, or your best furry friend, the holidays are a time to re-connect and share a snapshot of you and/or your loved ones with others! 

With the photography tools available to ALL of us these days, it’s so easy to take great looking photos for your holiday cards. To help, I’m giving you tips for taking great DIY Christmas Card Photos on your own, without hiring a professional photographer!  (And guess what – these tips will work for ANY family photos you want to take in the future; not just holiday card photos!) 

These are such great tips for taking DIY Christmas Card Photos! Save yourself money and get high quality photos with these ideas!

This post contains affiliate links.  To read my full disclosure policy, please click here.

DIY Holiday Card Photo Tip 1: Plan Ahead

Instead of snapping a picture of your family in front of whatever random background is in the location you’re at, spend 10 minutes planning ahead and the results will be worth it! 

First up, plan the location of the photo.  If you have time to go to a location with pretty scenery, you’ll instantly upgrade your holiday photo game.  Whether it’s a hotel lobby with pretty Christmas trees or the woods with natural scenery, plopping your people in a scenic spot will help your photo tremendously.  

These are such great tips for taking DIY Christmas Card Photos! Save yourself money and get high quality photos with these ideas!

Next, think about whether you want or need any “props” for your photos.  If you’re going to the woods, for example, maybe you should bring a blanket for everyone to sit on.  If you’re taking the photo in your living room, do you want to add in a cute holiday pillow to make the photo more festive?  Take a look at this amazing Pinterest board for lots of great prop and pose ideas.

Finally, if possible, plan the outfits your family will be wearing in the photo to avoid clashing colors, graphic or “message” t-shirts, etc.  You don’t want to look unnatural with overly matching looks, but coordinating colors goes a long way for a professional-looking photo.

DIY Christmas Card Photos Tip 2: Get Them Smiling

When it comes to taking a holiday photo of a group, you’re almost guaranteed to get someone who doesn’t want to cooperate – especially a child or a pet.  Bring some treats along with you to help soften any attitude.  

Another great tip to get a really natural look in photos is to say something that makes the people being photographed laugh.  I often tell my kids that they can say a “bad” word they’re not allowed to say (before you jump on me in the comments, these “bad” words are things like “butt” and “fart.”  Not really the bad words you might be thinking of.)  This makes them crack up and I get awesome, natural faces in our photos instead of cheesy, faked smiles!

DIY Holiday Card Photo Tip 3: Technology is On Your Side

Thanks to smartphones, it is SO much easier to take a great holiday photo these days.  These tiny devices can take such nice photos, especially if you know how to use some of the most basic features that are built right in! 

Brush up on camera skills for your particular phone with a quick Google search.  You’re bound to find tutorials that will teach you things about your phone’s camera that you didn’t know before, like how to brighten the image before even taking it and how to set the timer for a group shot.

Add-on accessories for smartphone cameras can also be very useful – especially when taking group photos that you want to be part of!  I love my phone tripod and remote control, which lets me set up my phone as a camera anywhere and snap the photo wirelessly when we’re all in place.  It makes taking family photos so much easier!  

These are such great tips for taking DIY Christmas Card Photos! Save yourself money and get high quality photos with these ideas!

And if you’re going for super high-quality, pull out the trusty old camera to take even sharper images.  Just make sure to minimize use of the built-in flash and use natural lighting instead.  That always leads to a better image!

DIY Christmas Card Photos Tip 4:  Edit, Edit, Edit!

Finally, the best thing you can do for your DIY holiday card photos is edit them before printing!  The good news is that you don’t even need an expensive editing program to do it. 

While I use Adobe Lightroom for editing my blog photos, there are awesome online programs that you can use, too!  PicMonkey is my personal favorite. 

These are such great tips for taking DIY Christmas Card Photos! Save yourself money and get high quality photos with these ideas!

If you don’t want to use an external editing program, use the editing tools built in on your phone or computer.  You can’t edit as much, but something is better than nothing!

Use the editing tools to do things like crop the photo to a good proportion, brighten the photo, enhance the colors, smooth away stray hairs, etc.  Simple fixes like that will make a world of difference in your pictures!

Now that you have all these great tips for taking a wonderful holiday card photo, get out there and do it.  Then make sure to order your cards or print your photos to add into your cards.  

Do you have any DIY holiday photo tips to share?  Make sure to share them in the comments below!

-Bre

Filed Under: Christmas, Holiday

DIY Thanksgiving Embroidery Hoop Wreath

October 31, 2018 by Bre 4 Comments

blank

Another Halloween has come and gone, and Thanksgiving will be here before we know it.  Although there’s increasing pressure from every direction to jump straight into Christmas, I remain steadfast in my dedication to giving Thanksgiving the respect it deserves!  As such, I made this little Thanksgiving Embroidery Hoop Wreath to help acknowledge the holiday AND keep my family grateful during this special season!  The “interactive” component lets you and your family add things for which you’re thankful all season long – so sweet!

Make a beautiful Thanksgiving embroidery hoop wreath to help you remember what you're grateful for this season!

Supplies Needed for Embroidery Hoop Thanksgiving Wreath

This post contains affiliate links.  To read my full disclosure policy, please click here.

  • Embroidery hoop
  • Craft felt (2 sheets)
  • Scissors
  • Ribbon
  • Faux feathers
  • Faux pumpkin floral pick
  • “Thankful” word art
  • E6000 glue
  • Large popsicle sticks
  • Optional: Rose Gold wax and cloth

How to Make an Embroidery Hoop Thanksgiving Wreath

Before I jump into the tutorial, I have to tell you that I did not buy anything new to make this project!  I’ve challenged myself NOT to buy any craft supplies for the rest of 2018, so I’m only using what I’ve got.  The first project I made in my “craft stash de-stash challenge”, was my leaf stamped tea towels, and this is the second project in my challenge!

To give my Thanksgiving wreath something “special,” I applied rose gold wax to the outer edges of the embroidery hoop, but that is totally optional!  You could leave your embroidery hoop plain or paint it.  Make a beautiful Thanksgiving embroidery hoop wreath to help you remember what you're grateful for this season!

Next, I stacked two sheets of acrylic felt on top of each other and put them into the embroidery hoop.  Make a beautiful Thanksgiving embroidery hoop wreath to help you remember what you're grateful for this season!

When they were secure, I cut off the excess felt from around the edge of the embroidery hoop.  This created a pocket in my wreath.  Make a beautiful Thanksgiving embroidery hoop wreath to help you remember what you're grateful for this season!

Next, I tied several different ribbons to the top of the embroidery hoop.  I mixed some burlap, gingham, and solid cream colored ribbon for a fun look.  Make a beautiful Thanksgiving embroidery hoop wreath to help you remember what you're grateful for this season!

After that, I put some feathers and pumpkin picks into the ribbon.  This really bulked up the top of the wreath and gave it an abundant look – perfect for the Thanksgiving season!  Make a beautiful Thanksgiving embroidery hoop wreath to help you remember what you're grateful for this season!

Finally, I glued the “thankful” word art to the front of the felt pocket.  I carefully applied a bit of the rose gold wax to the word art to make it blend better with the embroidery hoop.Make a beautiful Thanksgiving embroidery hoop wreath to help you remember what you're grateful for this season!

To make this Thanksgiving wreath even more special, I wrote some things my family and I are thankful for on popsicle sticks and put those in the pocket.  We will add to this in the weeks leading up to Thanksgiving.  I think it will be a great conversation starter at dinner!  Make a beautiful Thanksgiving embroidery hoop wreath to help you remember what you're grateful for this season!

I think this wreath is beautiful and sentimental, and perfect for the Thanksgiving season.  Make a beautiful Thanksgiving embroidery hoop wreath to help you remember what you're grateful for this season!

It’s currently on my fall mantel, but I will probably move it into the kitchen so we can all easily see it and remember to add our “grateful sticks” each day!  Make a beautiful Thanksgiving embroidery hoop wreath to help you remember what you're grateful for this season!

How do you remember to be grateful for the blessings in your life during this time of year?

-Bre

You May Also Like These DIY Thanksgiving Place Cardsblank


Filed Under: Fall and Halloween, Holiday

DIY Vintage Bug Halloween Decorations

October 10, 2018 by Bre Leave a Comment

blank

Forget mummies, witches, and skeletons – the thing that scares me most at Halloween is the plethora of creepy crawly insects at every turn.  From spiders to centipedes, those little buggers are enough to make me squirm.

I overcame my fear of these pests to make some Creepy Crawly Vintage Bug Halloween Decorations to add to my interior decor (you saw my outdoor decor in my Halloween porch post last week), and think they turned out too cute not to share!

Cute and creepy! Make these vintage bug Halloween decorations with inexpensive craft supplies! They're a fun Halloween craft for all ages.

Thank you to DecoArt, Inc. for providing the paint used in this post.  The project is all my own.  Also, this post contains affiliate links.  To read my full disclosure policy, please click here.

Supplies Needed to Create Vintage Bug Display Halloween Decorations

  • Unfinished wood plaques
  • Small plastic bug toys
  • Multi-surface acrylic paint (I used gold, black tie, chocolate, and cotton ball)
  • Paint brushes
  • Stencils (I used a harlequin pattern, polka dots, and stripes)
  • E6000 glue
  • Metal label holders
  • Paper
  • Plate stands

How to Create Vintage Bug Display Halloween Decorations

Begin by painting the edges of the unfinished wood plaques with gold multi-surface paint.

Cute and creepy! Make these vintage bug Halloween decorations with inexpensive craft supplies! They're a fun Halloween craft for all ages.

Then paint the tops of the wood plaques with ivory multi-surface paint.

Cute and creepy! Make these vintage bug Halloween decorations with inexpensive craft supplies! They're a fun Halloween craft for all ages.

Once the paint has dried, use stencils to add pattern to the plaques with black multi-surface paint.

Cute and creepy! Make these vintage bug Halloween decorations with inexpensive craft supplies! They're a fun Halloween craft for all ages.Cute and creepy! Make these vintage bug Halloween decorations with inexpensive craft supplies! They're a fun Halloween craft for all ages.

Set the plaques aside to dry.  Paint the plastic bug toys with gold multi-surface paint.

Cute and creepy! Make these vintage bug Halloween decorations with inexpensive craft supplies! They're a fun Halloween craft for all ages.

Once that paint has dried, highlight the details on the bug toys with bronze multi-surface paint.  This will make the bugs look aged.

Cute and creepy! Make these vintage bug Halloween decorations with inexpensive craft supplies! They're a fun Halloween craft for all ages.

Next, add metal label holders and labels to the wooden plaques.  I printed my labels out on regular printer paper.

Cute and creepy! Make these vintage bug Halloween decorations with inexpensive craft supplies! They're a fun Halloween craft for all ages.

Finally, glue the bugs to the plaques with glue that attaches plastic to wood.  E6000 is my new favorite multi-purpose glue!

Cute and creepy! Make these vintage bug Halloween decorations with inexpensive craft supplies! They're a fun Halloween craft for all ages.

Display the Vintage Bug Decorations with plate stands or tiny easels (I’ve even seen them at Dollar Tree)!  Cute and creepy! Make these vintage bug Halloween decorations with inexpensive craft supplies! They're a fun Halloween craft for all ages.

Super creepy and also super cute!  Cute and creepy! Make these vintage bug Halloween decorations with inexpensive craft supplies! They're a fun Halloween craft for all ages.

Please PIN this image to Pinterest to help others find this fun Halloween craft project!  And, if you’re looking for another adorable DIY Halloween decor idea, check out my DIY Yarn Ghost Art post for a macrame-inspired ghost decoration.

Cute and creepy! Make these vintage bug Halloween decorations with inexpensive craft supplies! They're a fun Halloween craft for all ages. #halloweendecorations #halloweencrafts #halloweendecor

Filed Under: Fall and Halloween, Holiday

Dollar Store Halloween Porch Decor

October 4, 2018 by Bre 7 Comments

blank

While I absolutely love Halloween, I’m not typically a big decorator for the holiday.  I’m not really sure why – it is what it is.  But this year is different because my kids (ages 6 and 8) insisted that we “go all out” and make our house the spookiest on the block.  They wanted to spend my entire life’s savings on Halloween decorations, so I had to rein them in and take them to Dollar Tree to get their fix.

We put up their decorations over the weekend and I’m happy to share their vision** with you!  (**Everything you see is what they picked out.  My version of a Halloween porch would have looked a lot different!  It was hard to let them drive this bus, but I’m glad they got a chance to express their creativity and vision for a Halloween porch.)

This Halloween porch is filled with dollar store items! Check out the post to see how to use dollar store Halloween decorations to deck out your home for Halloween.

The caution tape was a big hit with my kids.  I think we bought four different types.  Currently only two are displayed on our porch (wrapped around the mum planters and along one of the sidelights), but I’ve been told that the others will definitely be going up for Halloween night.

Planters wrapped in caution tape are a great Halloween decorating idea!

This “creepy” skeleton dude is the splurge item on the porch.  Press his hand and his eyes glow red and he says all kinds of weird stuff to you (REALLY LOUDLY).  The kids were lucky they caught me in a generous moment during one of our Home Depot trips.  🙂

This post is filled with ideas for decorating your porch for Halloween with dollar store items!

The planters are my favorite part of the porch.  They’re filled with lots of random Dollar Tree finds, but it kind of works!

Fill an outdoor planter with dollar store Halloween decorations for a spooky look on your front porch! This Halloween front porch has lots of budget-friendly ideas!

I mean, when doesn’t a skull look good next to your front door?Fill an outdoor planter with dollar store Halloween decorations for a spooky outdoor Halloween display! This post has lots of good dollar store Halloween decor ideas!Glittered skulls in an outdoor lantern are a fabulous way to decorate for Halloween! These dollar store Halloween porch decor ideas are not to be missed!

Now this doormat combo is a huge point of contention with my kids.  My mom gave me this personalized pumpkin doormat earlier this fall and I love it.  The kids say it’s too cute.  They want it gone.  What do you think?  Should it stay or should it go?Layered doormats make a beautiful statement at the front door.

Well, that’s the end of my Halloween front porch tour.  My porch is so tiny that there’s not much to see!  I hope you enjoyed seeing my kids’ handiwork.  Stop by on Halloween night for some candy!

This Halloween front porch is filled with dollar store Halloween decorations. See how to decorate your Halloween porch on a budget!

Filed Under: Dollar Tree, Fall and Halloween, Holiday

DIY Dollar Tree Pumpkin Picture Frames

September 19, 2018 by Bre 2 Comments

blank

Fall is my favorite season for Dollar Tree crafts and makeovers, so when I saw their fresh crop of fall arrivals, I suddenly felt inspired to get dollar store crafty. (You might like my Dollar Tree Pumpkin Sign Project or Candy Corn Topiary, too!) 

I purchased a couple of their fall pumpkin chipboard decorations (NOTE: even though this post was written in 2018, Dollar Tree currently has these same decorations in the 2021 season and I linked them in the supply list!), and knew I could turn them into something cuter and more personal – DIY pumpkin picture frames, to be precise! 

So cute! Transform Dollar Tree pumpkin decorations into adorable pumpkin picture frames that are perfect for displaying fall photos! #dollartree #dollartreecrafts #dollartreedecor #fallcrafts

Supplies Needed to Create Dollar Tree Fall Pumpkin Picture Frames

  • Chipboard pumpkin decorations from Dollar Tree
  • Acrylic paints in colors of your choice (I used cream, beige, and orange)
  • Paint brushes
  • Dollar Tree fall ribbon
  • Scissors
  • Twine
  • Raffia
  • Hot glue gun and hot glue

How to Create Dollar Tree Fall Pumpkin Picture Frames

Begin by ripping off the decorative accent portions of the chipboard pumpkins (for example, the raffia and the chipboard flower and/or pumpkin).  Once those are off, rip off the printed layer of the chipboard.  This came off easily!  

So cute! Transform Dollar Tree pumpkin decorations into adorable pumpkin picture frames that are perfect for displaying fall photos! #dollartree #dollartreecrafts #dollartreedecor #fallcrafts

Next, paint the pumpkins whatever color you like.  I went for a white pumpkin look, so I used a cream acrylic paint and then added some beige lines to give the pumpkins a bit of dimension.  I then painted the stand portion of the project orange.  

So cute! Transform Dollar Tree pumpkin decorations into adorable pumpkin picture frames that are perfect for displaying fall photos! #dollartree #dollartreecrafts #dollartreedecor #fallcrafts

After the paint dried, I tied ribbon and raffia around the top of each pumpkin for some cute detail and color.  

So cute! Transform Dollar Tree pumpkin decorations into adorable pumpkin picture frames that are perfect for displaying fall photos! #dollartree #dollartreecrafts #dollartreedecor #fallcrafts

Then I wrapped twine around the top and bottom portions of each pumpkin and hot glued it to the back of each pumpkin.  

So cute! Transform Dollar Tree pumpkin decorations into adorable pumpkin picture frames that are perfect for displaying fall photos! #dollartree #dollartreecrafts #dollartreedecor #fallcrafts

When the hot glue dried, the pumpkin frames looked like this.  

So cute! Transform Dollar Tree pumpkin decorations into adorable pumpkin picture frames that are perfect for displaying fall photos! #dollartree #dollartreecrafts #dollartreedecor #fallcrafts

Super cute, but even cuter once I added pictures of my kids at the pumpkin patch, and my dog posing with a pumpkin.  

So cute! Transform Dollar Tree pumpkin decorations into adorable pumpkin picture frames that are perfect for displaying fall photos! #dollartree #dollartreecrafts #dollartreedecor #fallcrafts

The twine holds the photos in place, and these little Dollar Tree pumpkin frames are the perfect spot to display fall themed photos!  

So cute! Transform Dollar Tree pumpkin decorations into adorable pumpkin picture frames that are perfect for displaying fall photos! #dollartree #dollartreecrafts #dollartreedecor #fallcrafts

It doesn’t get much easier than this, so I’d appreciate it if you would pin this project on Pinterest to help others find it!  So cute! Transform Dollar Tree pumpkin decorations into adorable pumpkin picture frames that are perfect for displaying fall photos! #dollartree #dollartreecrafts #dollartreedecor #fallcrafts

Will you be heading to Dollar Tree to find some of these chipboard pumpkins to transform into pumpkin picture frames?

Filed Under: Crafts, Dollar Tree, Fall and Halloween, Holiday

  • « Go to Previous Page
  • Page 1
  • Interim pages omitted …
  • Page 4
  • Page 5
  • Page 6
  • Page 7
  • Page 8
  • Interim pages omitted …
  • Page 17
  • Go to Next Page »

Primary Sidebar

Let’s Connect!

Hi, I’m Bre! Thanks for visiting Average But Inspired, where I show you how to work with what you’ve got to create a home you love.

Bre of Average But Inspired - a DIY and craft blog

Love DIY? Subscribe to Get Posts E-mailed!

How Can I Help You?

blank

Limewash Stone Fireplace Makeover: Bye Bye Orange Stone Fireplace, Hello Neutral Stone Beauty!

blank

How to Paint a Door to Look Like Wood (It’s Easier Than You Think!)

blank

How to Paint Over Tile

blank

How to Paint a Countertop to Look Like Marble!

Looking for Something?

Copyright © 2013-2022, Bre Eggert (Average But Inspired). All rights reserved.
  • Home
  • DIY
  • Crafts
  • Home Decor
  • Privacy Policy and Copyright Policy
  • Disclosures
  • Contact Me