• Skip to primary navigation
  • Skip to main content
  • Skip to primary sidebar
Average But Inspired logo - DIY and craft

Average But Inspired

Craft a home you love. DIY and craft tutorials.

  • About
    • Contact Me
    • Disclosures
    • Privacy Policy and Copyright Policy
  • DIY
    • Furniture
  • Crafts
    • Dollar Store Crafts
    • Seasonal
      • Patriotic & Summer
      • Valentine’s Day
      • Easter & Spring
      • Fall & Halloween
      • Christmas & Winter
  • Home Decor
    • Organization
  • Shop
    • DIY Swag
    • DIY Guides
  • Home

Holiday

A Classic Christmas Mantel

December 7, 2017 by Bre 12 Comments

I’m so happy to be back in the swing of things with a festive and classic Christmas mantel that I’m sharing today as part of the Decorate Your Mantel blog hop!

My friend Amy at My Life From Home has been hosting this hop for the last year or so, and I’ve loved participating.  I missed the fall edition due to lack of preparedness, but now I’m ready to share my Christmas mantel! 
This post contains affiliate links.  To read my full disclosure policy, please click here.

So come on in and let me show you around!Get the classic Christmas look with traditional red and green decor! A classic Christmas mantel is so easy to put together!

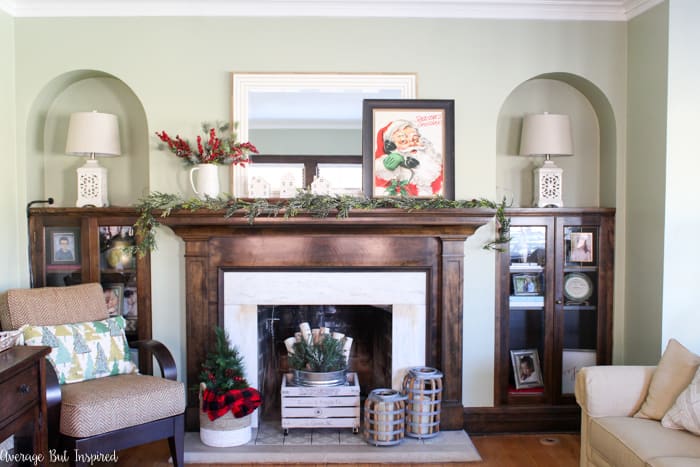
I’ve always gravitated toward a more classic Christmas style, filled with reds and greens and your typical Christmas icons, like Santas and Christmas trees.  What can I say?  I’m old school.

My mantels in the past have reflected that (like this one, and this one), but I think that this year’s Christmas mantel is my favorite because it’s classic, simple, and fun all at the same time!  Get the classic Christmas look with traditional red and green decor! A classic Christmas mantel is so easy to put together!

My new favorite textured stoneware pitcher is pulling decor duty for this mantel, serving as a nice vase for my faux greenery. I like how the iced greenery coordinates with the glittery garland on the mantel!  Get the classic Christmas look with traditional red and green decor! A classic Christmas mantel is so easy to put together!

And I’m so happy that I found a spot for my cute porcelain snow houses that I got at Target in Bullseye’s Playground (they should really rename that section “Breighanne’s Playground!”).  Target doesn’t have those little houses anymore, but you can find some adorable ones here!  Get the classic Christmas look with traditional red and green decor! A classic Christmas mantel is so easy to put together!

I propped those little houses up on the bottom side of my wood planter box to give them some height over the garland.  They’re happy to be nestled in close to my cute Santa art print.  This art print might not be everyone’s favorite (like my husband), but I couldn’t resist this vintage-looking Santa!Get the classic Christmas look with traditional red and green decor! A classic Christmas mantel is so easy to put together!

Get the classic Christmas look with traditional red and green decor! A classic Christmas mantel is so easy to put together!

I moved the stockings to the bookcases this year (hey – all the song says is that they need to be hung “by the chimney with care.”  I think this qualifies), and still need to add family photos to the photo stocking holders!  Ooops.

Get the classic Christmas look with traditional red and green decor! A classic Christmas mantel is so easy to put together!

So there you have it – my classic Christmas mantel .  I hope you enjoyed seeing how I made the classic look work for me!

Filed Under: Christmas, Holiday

Upcycled Tile Christmas Ornaments

December 6, 2017 by Bre 4 Comments

blank

Use leftover tile or tile samples to make beautiful Christmas ornaments – I’ll show you how!

You know the old saying “when life hands you lemons, make lemonade?”  Well I’ve got a new twist on that for you and it goes like this: “when your neighbor hands you leftover tile samples, make Christmas ornaments.”

Tile samples can be turned into beautiful ornaments with this tutorial! These upcycled tile Christmas ornaments are so easy to make and fun for all ages! #upcycle #ChristmasCrafts #ChristmasOrnaments

Over the summer, my neighbor brought me many different marble tile samples that he didn’t need anymore, because he and his wife figured I’d find some use for them.  (I think they’ve seen enough of my weekend projects in the garage to know that I never turn down good materials!

(Let’s be honest – I never turn down any materials – good or bad.))  

So anyway, the tile samples sat in various places in my house since that time, just collecting dust, until this past Sunday. 

My seven-year-old daughter was having a tough day and was sulking in her bedroom.  I had had enough of that doom and gloom, so I snatched her out of there and told her we were making a craft project together. 

I had nothing planned, but when I spotted those tile samples on my desk, I knew we needed to turn them into ornaments. And I’m going to show you how we did it.

Supplies Needed for Repurposed Tile Ornaments

This post contains affiliate links. Please read my disclosure policy for more information.

  • Small tiles (sheets of mosaic tiles work great)
  • Rubber stamps – letter rubber stamps and Christmas rubber stamps
  • Multi-surface acrylic paint
  • Small artist paint brushes
  • Ribbon
  • Multi-surface craft glue
  • Scissors
  • Stiffened felt

Instructions for Upcycled Tile Christmas Ornaments

We gathered multi-surface acrylic paints in various colors (primarily metallics, glitters, and pink (yes, pink.  She’s seven, after all.), and Christmas-themed and letter rubber stamps, and we set off to work!

Tile samples can be turned into beautiful ornaments with this tutorial! These upcycled tile Christmas ornaments are so easy to make and fun for all ages! #upcycle #ChristmasCrafts #ChristmasOrnaments

We applied thin layers of paint to the rubber stamps and gently pressed them onto the tiles, fixing mistakes as we went along (trust me, there were lots of those!).  

Tile samples can be turned into beautiful ornaments with this tutorial! These upcycled tile Christmas ornaments are so easy to make and fun for all ages! #upcycle #ChristmasCrafts #ChristmasOrnaments

She worked on making ornaments for her friends, while I played along.

Tile samples can be turned into beautiful ornaments with this tutorial! These upcycled tile Christmas ornaments are so easy to make and fun for all ages! #upcycle #ChristmasCrafts #ChristmasOrnaments

After a while, my five-year-old son also got in on the action and he mass-produced about 29 of these things in an hour (they are all lime green). 

I Think You’ll Also Like This Christmas Craft

DIY Marbled Ornaments

My daughter and I preferred to work more slowly and thoughtfully, and once all of our creations dried, we turned our tiles into actual ornaments. 

We used multi-surface glue to attach pretty ribbon to the backs of the ornaments.

Tile samples can be turned into beautiful ornaments with this tutorial! These upcycled tile Christmas ornaments are so easy to make and fun for all ages! #upcycle #ChristmasCrafts #ChristmasOrnaments

Once that glue had set a bit, we cut pieces of stiffened felt and glued those over the ribbon.  This made the ribbon a little sturdier, which is great for ornaments that are on the heavier side.

Tile samples can be turned into beautiful ornaments with this tutorial! These upcycled tile Christmas ornaments are so easy to make and fun for all ages! #upcycle #ChristmasCrafts #ChristmasOrnaments

We let them dry overnight, just to be sure the glue was really holding everything together, and then our ornaments were finished!  

Tile samples can be turned into beautiful ornaments with this tutorial! These upcycled tile Christmas ornaments are so easy to make and fun for all ages! #upcycle #ChristmasCrafts #ChristmasOrnaments

They turned out so much cuter than I expected!  

Tile samples can be turned into beautiful ornaments with this tutorial! These upcycled tile Christmas ornaments are so easy to make and fun for all ages! #upcycle #ChristmasCrafts #ChristmasOrnaments

My daughter’s tile ornaments are so sweet, but I didn’t take pictures of them because she put all of her friends’ names on them and I didn’t think I should put those on the Internet. 

Tile samples can be turned into beautiful ornaments with this tutorial! These upcycled tile Christmas ornaments are so easy to make and fun for all ages! #upcycle #ChristmasCrafts #ChristmasOrnaments

So . . . you’re stuck with my generic Christmas sayings.  

Tile samples can be turned into beautiful ornaments with this tutorial! These upcycled tile Christmas ornaments are so easy to make and fun for all ages! #upcycle #ChristmasCrafts #ChristmasOrnaments

In the end, a day that started out very rough turned out to be a wonderful one that I won’t soon forget. We made more than ornaments on Sunday – we made wonderful memories together. 

Tile samples can be turned into beautiful ornaments with this tutorial! These upcycled tile Christmas ornaments are so easy to make and fun for all ages! #upcycle #ChristmasCrafts #ChristmasOrnaments

That sounds cheesy, but this project helped remind me how important it is to really be there for our kids when they need a little extra attention.  AND it also reminded me how important is to never throw anything away – HA!

Tile samples can be turned into beautiful ornaments with this tutorial! These upcycled tile Christmas ornaments are so easy to make and fun for all ages! #upcycle #ChristmasCrafts #ChristmasOrnaments

If you agree, or if you just think this is a fun project, please make sure to “pin” this project to help others find it!  You can pick up tile samples just like the ones we used, or less expensive ceramic versions, at any home improvement store, so replicating this project is very easy!


Filed Under: Christmas, Crafts, Holiday

Colorful Merry & Bright Free Printables for Christmas

November 30, 2017 by Bre 2 Comments

blank

Yesterday I had so much fun sharing my daughter’s bedroom all decorated for Christmas in a way that’s outside of my normal decor comfort zone.  Sparkles, sequins, and glitter – oh my!  I firmly believe it’s great to mix things up now and again, so her Christmas bedroom was the perfect reason to do that!

For her Christmas bedroom, I created a set of three “Merry & Bright” prints to temporarily take the place of her regular artwork over the bed.  These free Christmas printables come in two color combinations! Merry and Bright printables are sure to add some festivity to your Christmas decor! #printables #freeprintables #Christmasprintables

And because I think they turned out really cute (and were such an inexpensive way to bring some Christmas cheer to the space), I’m sharing a version of them with you!  I’ve minimized them into a single print so you can use it in one frame, and I’ve added a traditional red and green color scheme for those who aren’t crazy about the rainbow colored one!

These free Christmas printables come in two color combinations! Merry and Bright printables are sure to add some festivity to your Christmas decor! #printables #freeprintables #Christmasprintables

Just print the PDF file at your local print shop on 8.5 x 11 paper and trim to fit an 8×10 frame, OR print the .jpg file at the photo printer at 8×10 size.  I printed the ones in my daughter’s room at Costco’s photo shop, and I have to say that I wasn’t thrilled about how the colors came out.  So . . . you might be better off printing at Kinko’s, for example.

These free Christmas printables come in two color combinations! Merry and Bright printables are sure to add some festivity to your Christmas decor! #printables #freeprintables #Christmasprintables

Please understand that these printables are for your personal use only!  They are not to be re-sold or used commercially.  Thank you for understanding!

If you enjoy this print, please pin this post so others can find it, too!  These free Christmas printables come in two color combinations! Merry and Bright printables are sure to add some festivity to your Christmas decor! #printables #freeprintables #Christmasprintables

CLICK HERE TO DOWNLOAD THE FREE MERRY & BRIGHT PRINTABLES

I hope your holidays are merry & bright!

-Bre

Filed Under: Christmas, Holiday

Colorful Christmas Kids Bedroom

November 29, 2017 by Bre 46 Comments

blank

The Most Wonderful Time of the Year is here, and I couldn’t be more excited to deck the halls and make my home festive!  Over the years I’ve shown you some of my Christmas decor, but it’s always been focused on the communal areas of the home.  Today I am switching things up a bit for the Come Home for Christmas Blog Hop, hosted by my friends Vicki & Jenn at 2 Bees in a Pod, and I’m sharing my daughter’s Colorful Christmas Kids Bedroom.  It’s a departure from my typically traditional holiday home decorating style, but it makes me so happy because it’s filled with sparkles, glitter, metallics and more!  

blank

This post contains affiliate links. To read my full disclosure policy, please click here.

Before I jump into sharing my daughter’s colorful Christmas bedroom, I wanted to let you know that you’ll find links to 32 different Christmas room tours at the bottom of this post!  Every day focuses on a different space in the home.  I hope you’ll visit my friends’ posts and see how they are decorating different areas of their homes for the holidays!

Now, come on in and visit a Christmas bedroom that is truly merry & bright!  Deck the halls with these fun Colorful Christmas Kids Bedroom decor ideas!

I have to be honest, my seven-year-old’s room is usually a mess.  She’s somewhat of a packrat (just like her mama!), so we did a lot of cleaning and purging to get this space up to snuff for the holidays.  Seeing my daughter’s reaction when she saw all of this colorful Christmas decor was priceless.  The magic of the season means so much to children, so it’s extra fun to give them some of the seasonal sparkle in their bedrooms!Deck the halls with these fun Colorful Christmas Kids Bedroom decor ideas!

This little tree sitting on top of the Painted Butterfly Bench is something I’ve had for years and almost donated last year.  I’m glad I didn’t because it’s perfect for this young child’s Christmas bedroom.  (See, being a packrat can pay off!)  Its greens and pinks got me started on the color scheme that winds itself through the room.  Deck the halls with these fun Colorful Christmas Kids Bedroom decor ideas! Furry throws and pillows and bright colors make the room special for the holiday season!

We gave my daughter’s room a festive look for Christmas that feels young at heart by switching out the bedding for a plain white duvet, accented with an incredibly soft pink throw with metallic pink polka dots (link to similar throw).  Let me tell you that I am obsessed with this throw and might steal it from her.

Adding to the coziness factor is the faux fur pillows.  These are also incredibly soft, and were such a bargain!  Pillow covers are my new favorite way to instantly change your decor’s look (wrapping paper previously held this coveted spot.).  Deck the halls with these fun Colorful Christmas Kids Bedroom decor ideas! Furry throws and pillows and bright colors make the room special for the holiday season!

And for my sequin-obsessed daughter, I had to get this flippy sequin Christmas tree pillow.  The tree can be gold or white, depending on which way you flip the sequins.  So much fun built right into a pillow, friends!  Deck the halls with these fun Colorful Christmas Kids Bedroom decor ideas! Furry throws and pillows and bright colors make the room special for the holiday season!

Deck the halls with these fun Colorful Christmas Kids Bedroom decor ideas! Furry throws and pillows and bright colors make the room special for the holiday season!

The Merry & Bright prints over the bed are covering the regular artwork, and similar versions are available HERE as FREE PRINTABLES (2 color combos and in a single 8×10)!  And, the 3D Glitter Snowflake removable decals that Paper Riot Co. gave me are a perfect accent above those!  (P.S. you can enter to win a set right now on my Instagram feed!  Click here to find the entry.)  Deck the halls with these fun Colorful Christmas Kids Bedroom decor ideas! Furry throws and pillows and bright colors make the room special for the holiday season!

The festive new look has us all wanting to spend more time in my daughter’s room.  We even let Jasper the dog get in on the action (he’s not usually allowed on the furniture).  He gives that cozy throw blanket his stamp of approval.  Deck the halls with these fun Colorful Christmas Kids Bedroom decor ideas! Furry throws and pillows and bright colors make the room special for the holiday season!

Now, if I can figure out a way to get my daughter to keep her room this clean going forward, I will have received the best Christmas present ever!  (But wait – please don’t tell my husband this.  I would still like a real present under the tree.  :-))  Deck the halls with these fun Colorful Christmas Kids Bedroom decor ideas! Furry throws and pillows and bright colors make the room special for the holiday season!

Now that you’ve seen how I decked out my daughter’s bedroom for Christmas, please visit my friends to see each of their spaces!  Remember – the Thursday and Friday posts won’t be live until later this week, so make sure to check back!

MONDAY (11/27) – Entryway / Foyer

My Creative Days

Lydi Out Loud

Our Home Made Easy

Craving Some Creativity

Lehman Lane

Slightly Coastal

The Crowned Goat

TUESDAY (11/28) – Living Room

Green With Decor

Little Red Brick House

Catherina’s Creative Corner

Houseful of Handmade

1915 House

All Things Big and Small

WEDNESDAY (11/29) – Bedroom

2 Bees in a Pod – Vicki

Average But Inspired

Bliss Ranch

Keys to Inspiration

Country Design Style

Making it in the Mountains

THURSDAY (11/30) – Dining Room

Little Bits of Home

Two Purple Couches

Worthing Court

The Inspired Hive

DIY Beautify

Refresh Restyle

FRIDAY (12/1) – Kitchen

2 Bees in a Pod – Jenn

Robb Restyle

The Honeycomb Home

Chatfield Court

Home with Cupcakes and Crinoline

blank

Thanks for visiting and happy holidays!

-Bre

Filed Under: Christmas, Holiday

How to Make a Dollar Store Christmas Cloche

November 15, 2017 by Bre 2 Comments

blank

Make a charming DIY Christmas Cloche with Dollar Tree supplies!

I hope you all will forgive me for posting about Christmas before Thanksgiving, but listen . . . if you’re going to do any Christmas crafts, now’s the time to get started! 

So here we go – my first Christmas-related post of the season . . . and it’s a cute one!  Run over to Dollar Tree to pick up the essential supplies for this project and get to work making a beautiful Dollar Store Christmas Cloche for your Christmas decor!  

Christmas cloches filled with holiday miniatures have been a Pinterest staple for years, but this simple version is probably the most budget-friendly one around!

Transform a dollar store ornament and other supplies into a pretty Christmas Cloche for your DIY Christmas decor! #dollarstore #dollartree #Christmasdecor

Supplies Needed to Make a Dollar Store Christmas Cloche

Some of these are affiliate links.  Please read my disclosure policy for more information.

  • Dollar Tree cylinder vase
  • Dollar Tree foam discs
  • Dollar Tree miniature church, building, etc.
  • Woodgrain shelf liner
  • Fake snow
  • Spray adhesive
  • Hot glue and hot glue gun
  • Scissors

How to Make a Dollar Tree Christmas Cloche

Guys, this project will take you all of ten minutes to make.  TEN MINUTES!  I promise. 

I whipped this up right before I had to go volunteer at my kids’ school library (I’m getting real friendly with the Dewey Decimal System, friends!) – easiest project ever!

Transform a dollar store ornament and other supplies into a pretty Christmas Cloche for your DIY Christmas decor! #dollarstore #dollartree #Christmasdecor

Begin by spraying one side of the foam disc with spray adhesive.  

Transform a dollar store ornament and other supplies into a pretty Christmas Cloche for your DIY Christmas decor! #dollarstore #dollartree #Christmasdecor

Then press some fake snow onto that disc.  

Transform a dollar store ornament and other supplies into a pretty Christmas Cloche for your DIY Christmas decor! #dollarstore #dollartree #Christmasdecor

Next, cut two strips of 12″ woodgrain scrapbook paper or the woodgrain shelf liner available at Dollar Tree to be a little wider than the edge of your disc. 

(If you happen to have woodgrain paper that is longer than traditional 12″ scrapbook paper, you may only need to cut one strip of paper.)  

Transform a dollar store ornament and other supplies into a pretty Christmas Cloche for your DIY Christmas decor! #dollarstore #dollartree #Christmasdecor

Fire up that hot glue gun and wrap the woodgrain paper around the edge of the foam disc.  Make the top edge of the paper flush with the edge of the foam disc that has the fake snow on it. 

Here Are Other Dollar Tree Christmas DIY Projects You’ll Enjoy!

  • Candy Cane Wreath
  • Large Gift Tag Decor

Then flip the disc over and trim the excess scrapbook paper from around the bottom edge of the foam disc.

(If you used the woodgrain adhesive shelf liner, you won’t need to use the hot glue gun. You could just stick the shelf liner to the foam disc.)

Transform a dollar store ornament and other supplies into a pretty Christmas Cloche for your DIY Christmas decor! #dollarstore #dollartree #Christmasdecor

Hot glue the ornament or miniature building to the foam disc (snowy side), and place the cylinder vase on top. 

That’s all you need to make a cute Christmas Cloche for your holiday decor!  

Transform a dollar store ornament and other supplies into a pretty Christmas Cloche for your DIY Christmas decor! #dollarstore #dollartree #Christmasdecor

I paired my cloche with adorable white ceramic houses.

Transform a dollar store ornament and other supplies into a pretty Christmas Cloche for your DIY Christmas decor! #dollarstore #dollartree #Christmasdecor

I just love the simplicity of these little houses.  (My kids asked me 89348 times if they could paint them.  NO.  No, you may not paint my little white houses!)

Transform a dollar store ornament and other supplies into a pretty Christmas Cloche for your DIY Christmas decor! #dollarstore #dollartree #Christmasdecor

This simple look is perfect for Christmas decor, or to be left out all winter.  Make sure to “pin it” so you’ll remember to make this for your seasonal decor!

Transform a dollar store ornament and other supplies into a pretty Christmas Cloche for your DIY Christmas decor! #dollarstore #dollartree #Christmasdecor

Filed Under: Christmas, Crafts, Dollar Tree, Holiday

DIY Thanksgiving Turkey Place Cards

November 8, 2017 by Bre 6 Comments

blank

We made it past the sugar-rush of Halloween and thoughts are turning to the next big event – Thanksgiving. 

How we’re already here again is beyond me, but the fact is that planning for this special holiday is in full swing (at my house especially because I’m hosting this year (yikes!)). 

To make my Thanksgiving celebration extra special, I’m making some adorable DIY Thanksgiving Turkey Place Cards to set a festive tone at the table, and I’m showing you how to make them, too! 

Make adorable Thanksgiving Turkey Place Cards with wooden beads for your Thanksgiving table this year! Learn how to make these DIY Thanksgiving place cards with this easy tutorial! #Thanksgiving #placecards #ThanksgivingTable

Supplies Needed to Make DIY Thanksgiving Place Cards

Some of these links are affiliate links.  Please read my disclosure policy for more information.

  • Wooden beads in two sizes
  • Hot glue & glue gun
  • Card stock in brown shades
  • Decorative feathers
  • Fine-point Sharpie
  • Gold paint pen
  • Scissors
Make adorable Thanksgiving Turkey Place Cards with wooden beads for your Thanksgiving table this year! Learn how to make these DIY Thanksgiving place cards with this easy tutorial! #Thanksgiving #placecards #ThanksgivingTable

How to Make Thanksgiving Turkey Place Cards

You can whip up a bunch of these Thanksgiving place cards in no time at all!  They’re so simple to make! 

Begin by hot gluing a small wooden bead to a larger wooden bead.  

Make adorable Thanksgiving Turkey Place Cards with wooden beads for your Thanksgiving table this year! Learn how to make these DIY Thanksgiving place cards with this easy tutorial! #Thanksgiving #placecards #ThanksgivingTable

Next, trim a feather to fit the turkey and hot glue it to the center back of the large wooden bead.  

Make adorable Thanksgiving Turkey Place Cards with wooden beads for your Thanksgiving table this year! Learn how to make these DIY Thanksgiving place cards with this easy tutorial! #Thanksgiving #placecards #ThanksgivingTable

Cut four oval shapes from the card stock (2 from each color of paper), and then put some little fringes on the edges to make them look like feathers. 

Many of mine were deformed – I had a hard time cutting these at first!  If you’re like me, just play around with it until you get a decent shape.

Make adorable Thanksgiving Turkey Place Cards with wooden beads for your Thanksgiving table this year! Learn how to make these DIY Thanksgiving place cards with this easy tutorial! #Thanksgiving #placecards #ThanksgivingTable

Hot glue those feathers to the back of the larger wooden bead, too.  

I Think You’ll Like These Other Thanksgiving Posts, Too!

DIY “Thankful For” Wreath

Funky Pilgrim Vases

Make adorable Thanksgiving Turkey Place Cards with wooden beads for your Thanksgiving table this year! Learn how to make these DIY Thanksgiving place cards with this easy tutorial! #Thanksgiving #placecards #ThanksgivingTable

Use a Sharpie to give your turkey some dots (I mean, eyeballs). . . 

Make adorable Thanksgiving Turkey Place Cards with wooden beads for your Thanksgiving table this year! Learn how to make these DIY Thanksgiving place cards with this easy tutorial! #Thanksgiving #placecards #ThanksgivingTable

And use your gold pen to write your guests’ names on the feathers! 

Make adorable Thanksgiving Turkey Place Cards with wooden beads for your Thanksgiving table this year! Learn how to make these DIY Thanksgiving place cards with this easy tutorial! #Thanksgiving #placecards #ThanksgivingTable

Easy and done!  

Make adorable Thanksgiving Turkey Place Cards with wooden beads for your Thanksgiving table this year! Learn how to make these DIY Thanksgiving place cards with this easy tutorial! #Thanksgiving #placecards #ThanksgivingTable

Isn’t that the cutest little Thanksgiving place card?  

Make adorable Thanksgiving Turkey Place Cards with wooden beads for your Thanksgiving table this year! Learn how to make these DIY Thanksgiving place cards with this easy tutorial! #Thanksgiving #placecards #ThanksgivingTable

Because these turkey place cards are sturdy, they’re like a little party favor for your Thanksgiving guests!  (Toss in some leftovers and you’ll be the “hostess with the mostess!”)

Make adorable Thanksgiving Turkey Place Cards with wooden beads for your Thanksgiving table this year! Learn how to make these DIY Thanksgiving place cards with this easy tutorial! #Thanksgiving #placecards #ThanksgivingTable

Please make sure to “pin” this post so others can find this fun idea for decorating their Thanksgiving tables.  

Make adorable Thanksgiving Turkey Place Cards with wooden beads for your Thanksgiving table this year! Learn how to make these DIY Thanksgiving place cards with this easy tutorial! #Thanksgiving #placecards #ThanksgivingTable

Filed Under: Fall and Halloween, Holiday

  • « Go to Previous Page
  • Page 1
  • Interim pages omitted …
  • Page 6
  • Page 7
  • Page 8
  • Page 9
  • Page 10
  • Interim pages omitted …
  • Page 17
  • Go to Next Page »

Primary Sidebar

Let’s Connect!

Hi, I’m Bre! Thanks for visiting Average But Inspired, where I show you how to work with what you’ve got to create a home you love.

Bre of Average But Inspired - a DIY and craft blog

Love DIY? Subscribe to Get Posts E-mailed!

How Can I Help You?

blank

Limewash Stone Fireplace Makeover: Bye Bye Orange Stone Fireplace, Hello Neutral Stone Beauty!

blank

7 Tips for Hosting a Party on a Budget

blank

How to Paint a Door to Look Like Wood (It’s Easier Than You Think!)

blank

How to Paint a Countertop to Look Like Marble!

Looking for Something?

Copyright © 2013-2022, Bre Eggert (Average But Inspired). All rights reserved.
  • Home
  • DIY
  • Crafts
  • Home Decor
  • Privacy Policy and Copyright Policy
  • Disclosures
  • Contact Me