• Skip to primary navigation
  • Skip to main content
  • Skip to primary sidebar
Average But Inspired logo - DIY and craft

Average But Inspired

Craft a home you love. DIY and craft tutorials.

  • About
    • Contact Me
    • Disclosures
    • Privacy Policy and Copyright Policy
  • DIY
    • Furniture
  • Crafts
    • Dollar Store Crafts
    • Seasonal
      • Patriotic & Summer
      • Valentine’s Day
      • Easter & Spring
      • Fall & Halloween
      • Christmas & Winter
  • Home Decor
    • Organization
  • Shop
    • DIY Swag
    • DIY Guides
  • Home

Holiday

Pool Noodle Pumpkins: A Fun Fall Craft!

October 14, 2019 by Bre 2 Comments

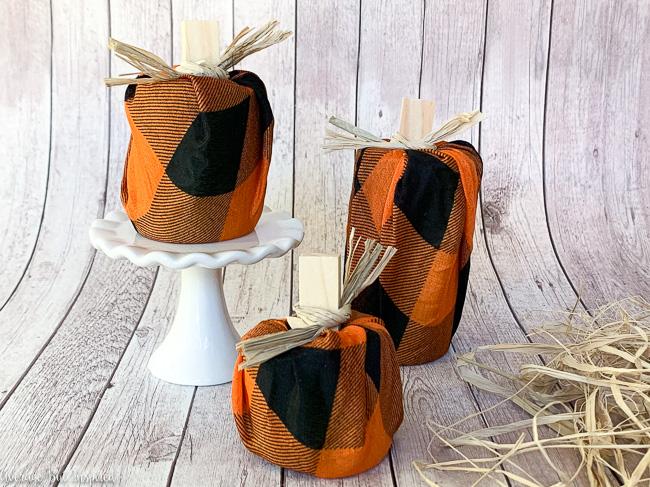
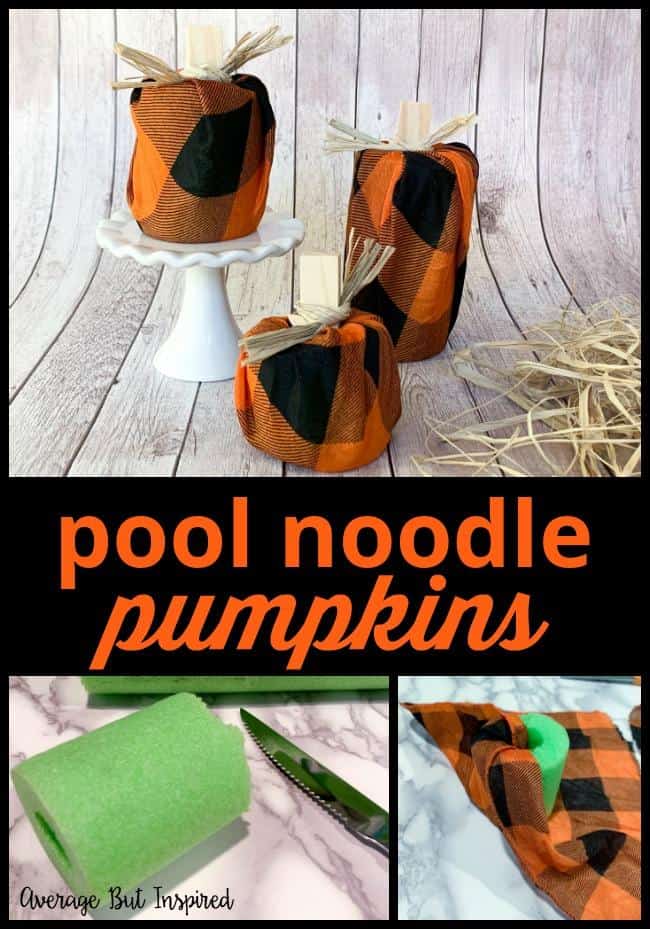
Make an easy and adorable craft this fall: pool noodle pumpkins! This is a perfect large group activity or craft night idea!

While cleaning out my husband’s car this weekend, I found a pool noodle left behind after a trip to our local swimming pool this summer. 

A jolt of inspiration hit and I grabbed the pool noodle, ran inside, and got to work making some adorable Pool Noodle Pumpkins for my fall decor! 

Cute! These DIY POOL NOODLE PUMPKINS are super easy to make and oh-so-adorable! This is a great fall craft for groups because it's so cheap to make!

This post contains affiliate links. Please read my disclosure policy for more information.

I wasn’t totally sure if pool noodles transformed into pumpkins would be cute, but I gave it a try anyway.  And thankfully, they’re darling! 

Pool noodle pumpkins are the cutest craft in the patch!

Pool noodle pumpkins are also extremely easy to make and very, very cheap. 

These would be a perfect fall craft for large groups (I bet you could make ten pumpkins per pool noodle), and even for the least crafty people around.  They are SO easy to make!

Pool Noodle Pumpkins Supplies

These are the supplies I used to create this fun fall craft or Halloween craft!

  • Foam pool noodle
  • Fabric (this buffalo check fabric is similar to the fabric I used)
  • Dollar Tree Tumbling Tower game block pieces
  • Raffia (twine or other ribbon would work, too)
  • Scissors
  • Knife

How to Make Pool Noodle Pumpkin Crafts


The first step is to cut the pool noodle into pieces.  I used a serrated knife, and the noodle cut very easily. 

If children will be making this craft, please make sure to cut the pool noodle ahead of time; do not give the children knives! 

Cut a foam pool noodle to make pool noodle pumpkin crafts!

Next, lay the pool noodle piece on top of a piece of fabric.  Cut the fabric so that there is enough fabric on all sides to wrap around the pool noodle and tuck into the hole. 

Cut fabric to wrap around a pool noodle to create a cute fall pumpkin craft.

Once the fabric is cut, begin pulling the fabric upwards toward the pool noodle hole, and then tucking the end of the fabric into the hole. 

Wrap fabric around the pool noodle to begin creating the pool noodle pumpkin.

Continue wrapping, pulling, and tucking fabric until the pool noodle is completely covered with fabric.

Then, take the wood block from the Jenga game and stick it into the hole where the fabric is tucked.  The wood block will hold the fabric in place, but if you want a more secure hold, you could hot glue the block into the hole, too. 

Use a Dollar Tree Jenga block as the pumpkin stem.

Finally, tie some raffia around the wood block “stem” to create the look of a vine on the pumpkin.  Wired twine that’s curled around the ends would be adorable with this, too!

Tie raffia around the wood block pumpkin stem.

And that is all it takes to make the cutest pool noodle pumpkins in the patch! 

Transform foam pool noodles into adorable pumpkin crafts! This blog post shows you how. It's easy!

This craft was perfect for me right now since I can’t really decorate or work on large projects due to our move.  And, pumpkin crafts are my favorite!  (Check out this Dollar Tree Pumpkin Sign and this Dollar Tree Pumpkin Picture Frame craft, too!). 

Cute! Grab your kids' pool noodles and turn them into darling pumpkins! This fall craft could not be easier! Love this pumpkin craft and pool noodle upcycle.

Let me know what you think about this project! And, sign up for my email list to get DIY delivered! Happy crafting!


Filed Under: Dollar Tree, Fall and Halloween

Halloween Skull Decoration: Make a Mini Halloween Cloche!

September 30, 2019 by Bre 2 Comments

blank

The spookiest time of year is almost here again!  Get ready to pull out those Halloween decorations and deck the halls for trick-or-treaters.  And of course, don’t forget to make time for some Halloween crafting!  This year, Halloween skull decorations are all the rage, and I’m going to show you how to make a mini Halloween cloche with Dollar Tree plastic skulls.  It’s a piece of Halloween decor that’s cute and creepy all at the same time!

Skull decorations are so hot for Halloween! Use Dollar Tree mini skulls to make these cute and creepy Halloween cloches!  

This Halloween skull decoration is pint sized, which makes it totally perfect for any little spot in your home or office that needs a tiny dash of Halloween.  Think shelves, entryway tables, window sills, and more!

I need small and discreet Halloween decorations this year so I can easily stash them away for house showings.  (We’re moving!  Read up on our unexpected life change here.)  This is just right!

Also, because this Halloween cloche is miniature (well, mini as compared to a regular-sized cloche, but not fairy garden mini!), you can make the whole thing in about 20 minutes.  Not bad!  Use Dollar Tree mini skulls to make adorable Halloween cloches for Halloween this year!

Supplies Needed to Make a Mini Skull Halloween Cloche

This post contains affiliate links.  To read my full disclosure policy, please click here.

  • Unfinished wood candle holder
  • Empty baby food jar or 4 oz. small mason jar
  • Acrylic craft paint in black and silver
  • Paint brush
  • Spanish moss (from Dollar Tree)
  • Mini skulls (from Dollar Tree)
  • High-temperature hot glue gun OR E6000 glue
  • Optional: small unfinished wood furniture buttons

How to Make a Mini Skull Cloche For Halloween Decor

Begin by getting your paints and paint brush ready!  Paint the unfinished wood candle holder, the mason jar rim (or baby food jar lid), and the unfinished wood furniture button with the black acrylic paint.  

Learn how to make a skull decoration with cheap craft supplies.

Chances are that the black paint won’t cover the rim of the mason jar very well (even with multiple coats), but that is OK!  Let some of that silver color underneath show through – it adds to the look!

Once the black paint dries on all of those pieces, lightly dab some silver metallic craft paint or acrylic paint onto the wooden pieces.  You can also add some silver paint to the mason jar lid if it needs it.  Mine did not.

Paint a wooden candle holder.

Let the silver paint dry and then use hot glue (only with a high temperature hot glue gun) or use a glue made for plastic and wood (like E6000), to attach the mason jar lid to the wood candle holder.  

Turn a candle holder and mason jar into a cute Halloween cloche with skulls!

Place a little Spanish moss inside the lid, and be careful not to put too much in.  You can hot glue the moss to the lid if you like, or leave it loose.  (You might like to see how I used this same Spanish moss to make my fake fiddle leaf fig tree look real!)  

Spanish moss adds a spooky touch to a Halloween cloche craft project.

Then pop a miniature skull on top of the moss.  You can also hot glue the skull onto the moss if you want a more stable skull.  🙂  (That sounds so funny.) 

Use Dollar Tree mini skulls to make adorable Halloween cloches for your decor this Halloween.

Now, screw the mason jar onto the lid and trim off any Spanish moss that sticks out the sides.  If you choose to add the little wooden button to the top, go ahead and glue that on now.  

So adorable! Use mini skulls to make tiny Halloween cloche decorations.

Once that glue is hardened or set, your adorable mini Halloween cloche is complete!  

Make a Halloween cloche with skulls to add some creepy and cute to your Halloween decor this year.

This is one Halloween skull decoration that you definitely want to add to your haunted house this year!  

This Halloween skull decoration is creepy and cute at the same time! Make a Halloween cloche with miniature skulls in under 20 minutes!

-Bre

Filed Under: Dollar Tree, Fall and Halloween

20 Unique Pumpkin Crafts

September 5, 2019 by Bre Leave a Comment

blank

Pumpkins are a fall decorating staple, and rightfully so!  They come in a multitude of colors, shapes, and sizes, and they are seasonally appropriate for several months (meaning less work in changing out decor).  Because of that, pumpkin crafts are always popular, and I’ve rounded up twenty unique pumpkin crafts that you’ll want to make this season.

Get your fall crafting in overdrive with this awesome roundup of twenty unique pumpkin crafts you'll definitely want to make this fall. These great pumpkin projects are so cute!

Now trust me, these pumpkin crafts are not your typical “decorate a fake pumpkin” crafts!  (Not that there’s anything wrong with those!)  These are all unique pumpkin projects that feature pumpkins made out of anything BUT pumpkins (real or fake)!

To get full project instructions for any of these, just click the project title and you’ll go right to the site where the pumpkin craft tutorial lives.  

Pool Noodle Pumpkins by Average But Inspired

Let’s kick things off with one of my unique pumpkin crafts!  Can you believe you can transform foam pool noodles into adorable pumpkins?  It’s true!  This is one of the easiest crafts around, and it makes some of the cutest pumpkins in the patch.  blank

Tin Can Pumpkins by Ann’s Entitled Life

Does it get much easier (or cuter) than this?  Who doesn’t have tin cans easily accessible at all times?  Find out how Ann made hers into adorable pumpkins!  

Ann's Entitled Life shows you how to make this unique pumpkin craft: tin can pumpkins!

Fabric Pumpkin Plaque by Our Home Made Easy

This simple fabric pumpkin project will add punch to any shelf or bookcase that needs some fall sprucing.  It is also a great way to use up fabric scraps!  

Our Home Made Easy shows you how to make this unique pumpkin craft: fabric pumpkin plaque!

Book Page Pumpkin by Creations by Kara

Grab an old book and some scissors and get to work!  Kara shows you how to craft a book page pumpkin in this easy-to-follow tutorial!

Creations by Kara shows you how to make a book page pumpkin. This is just one of the unique pumpkin crafts featured in this post.

DIY Wine Cork Pumpkin by Decor by the Seashore

Save up your wine corks or buy a bag at the craft store, and then get to work making this cute DIY wine cork pumpkin!  How sweet of a gift would this be for your girlfriends or book club members (come on, every book club involves wine!)?  Get the step-by-step instructions right in the post.  

Use wine corks to create a darling wine cork pumpkin that's perfect for fall!

15 Minute Sock Pumpkins by Heathered Nest

How great would these sock pumpkin crafts be for a school Halloween party?  Quick, easy, and cute – they’re bound to be a hit with any grade!  

Heathered Nest shows you how to make pumpkins with socks! This is a fun fall craft for class Halloween parties.

Pallet Pumpkins by Sugar Bee Crafts

I just love these pallet pumpkins for your outdoor fall decor!  These are definitely unique – don’t you think they’d look cute in a pretty fall floral display?  

Sugar Bee Crafts shows you how to make this unique pumpkin project: pallet pumpkins for outdoor display!

Mason Jar Pumpkin Craft by A Cultivated Nest

Grab that mason jar stash (or pick up some cheap mason jars at Dollar Tree), and make these adorable mason jar pumpkins!  How cute would these be filled with candy and presented to a neighbor, teacher, or co-worker this fall?  

A Cultivated Nest shows you how to make this unique pumpkin craft: mason jar pumpkins!

Trim Corner Block Pumpkins by Average But Inspired

Hey, hey – it’s one of my pumpkin craft projects in here!  I had so much fun making these trim corner block pumpkins, and they’re still one of my favorite fall decor pieces today!  You can find these trim corner blocks at any large home improvement store, and then check out my tutorial to learn how to make these sweet pumpkins!

Average But Inspired shows you how to transform wood trim block corners into adorable pumpkins!

Fabric Pumpkins from Old Shirts by Our Crafty Mom

Before you toss those old clothes in the donate pile, think about if you can reuse them to make adorable fabric pumpkins!  This great upcycle from Michelle at Our Crafty Mom can be put together in no time, and for hardly any expense at all!

Our Crafty Mom shows you how to make this unique pumpkin project: t-shirt pumpkins!

Dryer Vent Pumpkins by Practically Functional

How creative is this pumpkin craft???  While you’re at Lowe’s or Home Depot getting trim corner blocks to make the pumpkins pictured above, pick up some dryer vents, too!  Then make Jessi’s cute dryer vent pumpkins and let everyone marvel at this creative pumpkin craft!  

Practically Functional shows you how to make this unique pumpkin project: dryer vent pumpkins!

Loom Knit Pumpkin by Rootsy

I don’t know the first thing about knitting, but I’m willing to bet that some of you do!  Because of that, I thought this knitted pumpkin craft was a great one to share!  Plus, the tutorial is very detailed and good for beginners.  

Rootsy shows you how to make this adorable pumpkin craft: a loom knit pumpkin.

Button Pumpkin Craft by Adventure in a Box

Sweet and simple is the name of the game for this adorable button pumpkin craft!

Adventure in a Box shows you how to make this unique pumpkin craft: a button pumpkin!

Felted Dryer Ball Pumpkins by Hearth & Vine

Oh my word – these little dryer ball pumpkins are too cute for words!  Patti shows you how to make them (even if you’ve never needle felted before), and the result is darling!  

Hearth & Vine shows you how to make this unique pumpkin craft: felted dryer ball pumpkins.

Bandana Pumpkins by Sadie Seasongoods

These sweet bandana pumpkins add a dash of vintage charm to your fall decor!  Check out Sadie Seasongoods’ detailed tutorial on how to make these cute pumpkins.  Sadie Seasongoods shows you how to make this unique pumpkin project: bandana pumpkins!


Bundt Cake Pan Pumpkins by Average But Inspired

Oh yeah, I’ve got another one of my pumpkin crafts in here!  These little bundt cake pan pumpkins are the cutest!  I love to display them in my kitchen every fall.  See how to make them in my post!

Average But Inspired shows you how to transform bundt pans into pumpkins!  

Paper Pumpkin Craft by Ann’s Entitled Life

Don’t you love checking out the scrapbook paper aisle to see what fun prints are in stock?  (I can’t be the only one!)  Get some pretty paper and make yourself a whole patch of these paper pumpkins!  

Ann's Entitled Life shows you how to turn scrapbook paper into a cute pumpkin craft.

Ruffled Felt Pumpkin by Where The Smiles Have Been

Felt is one of my favorite craft supplies to work with because it lends such a homemade feel to any craft.  This ruffled candy corn felt pumpkin is no exception!  This just screams fall cuteness!  

Where the Smiles Have Been shows you how to turn felt into a beautiful ruffled pumpkin.

Scrap Wood Pumpkin by Making it in the mountains

Gather that scrap wood hiding out in your garage or basement and get to work crafting a farmhouse-inspired scrap wood pumpkin!  Leave it neutral, stain it, or paint it – this pumpkin can be customized however you like!

Making it in the mountains shows you how to turn scrap wood into a farmhouse pumpkin for fall.

Paper Bag Pumpkins by This Ole Mom

This is another great pumpkin craft that would work well for a halloween party craft!  It’s easy and inexpensive and such a fun project!  

This Ole Mom shows you how to turn a paper bag into a pumpkin.

Natural Birch Bark Pumpkin Art by Little House of Four

For all of my neutral-loving friends out there, this pumpkin project is the one for you!  Katie shows you how to create a piece of beautiful and natural pumpkin decor with birch bark.  

Little House of Four shows you how to create a birch bark pumpkin.

So there you have it – 20 fabulously unique pumpkin crafts you can make this fall!  Which one is your favorite?  Let me know which of these you’ll be making in the comments below!  And, don’t forget to pin this image to Pinterest!  

Are you looking for the perfect fall craft? Look no further! These twenty unique pumpkin crafts are sure to inspire you. These are easy pumpkin projects that add a dash of charm to any space!

Filed Under: Fall and Halloween, Holiday

Make a Dollar Store Toolbox Planter

August 29, 2019 by Bre 2 Comments

blank

The kids are back in school and the temps are cooling off: my mind is definitely shifting gears toward fall!  Because of that, last week I shared a cute DIY Dollar Tree Pumpkin Sign project that will cozy up your home decor, and this week I’m sharing another fun fall project!  This dollar store toolbox planter is perfect for your your porch or an entryway table!  So cute!! Transform a Dollar Tree toolbox into a pretty planter filled with flowers for fall! Learn how to replicate this look for any season - it's so easy!

Isn’t it pretty?!?  And friends, it is SO darn cheap to put together.  EVERYTHING except the spray paint is from Dollar Tree!

Okay well enough oooooh’ing and aaaaah’ing over this dollar store fall decor – let’s get down to business!

Supplies Needed to Make a Dollar Tree Toolbox Planter

Like I said, pretty much everything for this project is from Dollar Tree!  If it’s not from the D.T., I will let you know next to the supply name.  Also, some of the links may be affiliate links.  You can read my full disclosure policy here.

  • Toolbox
  • Floral foam brick
  • Faux flowers of your choice (I used a bunch of sunflowers leftover from my Dollar Tree Sunflower Wreath, mums, and a beige flower of some sort)
  • Faux pumpkin clips (they come in a three pack)
  • Plaid wired ribbon
  • Harvest metal word (they come in a three pack of Harvest, Thankful, and Welcome)
  • Spray paint (I used this brand and color of spray paint) (not Dollar Tree)
  • Black acrylic paint to add some faux age to the toolbox (not Dollar Tree)
  • Gold acrylic paint for the metal word (not Dollar Tree)
  • E6000 glue (not Dollar Tree)

How to Make a Dollar Tree Toolbox Planter

Start by spray painting the toolbox in whatever color you like.  I really liked this matte burgundy/purple color because it was bold and moody – perfect for fall!  Spray paint a Dollar Tree toolbox a fun color and use it as a planter!

Once the spray paint dried, I lightly added a bit of black paint all over the toolbox to make it look older and less “flat” – if that makes any sense. 

Next, I popped a block of floral foam inside the toolbox.  The rectangular floral foam from Dollar Tree is the perfect fit for the toolbox.  Dollar Tree floral form is the perfect base for this toolbox planter.

Next, I got to work cutting faux florals and placing them into the floral foam.  

Fall faux flowers will be beautiful in the toolbox planter.

I had a stem of faux leaves set aside to use, but decided that the colors didn’t look right with the flowers I was using, so I ultimately ditched them.  Press faux flowers into floral foam.

Once I had the flowers in place, I worked in some of the Dollar Tree wired ribbon, and then added several of the faux pumpkin clips.  Those clips are great because they just attached right to the flowers, exactly where I wanted them!  Faux flowers and pumpkins from Dollar Tree make a beautiful fall arrangement.

Finally, and not pictured here because I forgot to photograph this step, I dabbed a little gold acrylic paint on the metal word “Harvest” and let it dry.  Then I glued it to the inside of the toolbox for a little extra flair.

It all came together super cute and much prettier than the toolbox in its original form.  🙂  This is so pretty! Learn how to upcycle a toolbox into a planter! This fall arrangement is gorgeous and made entirely with Dollar Tree florals.

I can’t stop making Dollar Tree crafts – I hope you’re not sick of them!  Love this pretty fall flower arrangement! See how she transformed a Dollar Tree toolbox and made it a beautiful fall planter!

This entire toolbox planter cost $7 in Dollar Tree Supplies and $4 in paint.  I had the rest of the supplies already, so there was no cost there.  That is not bad at all!  Faux pumpkins, plaid ribbon, and faux florals make a beautiful fall floral arrangement.

So what do you think – will you be transforming a toolbox into a pretty planter for your home?  Let me know!

-Bre


Filed Under: Dollar Tree, Fall and Halloween

The Perfect Pumpkin Sign (A Fall Dollar Tree DIY!)

August 20, 2019 by Bre Leave a Comment

blank

Dollar Tree has always been my favorite, but this season they have seriously stepped up their crafting and DIY game!  If you haven’t stocked up on fall and Halloween crafting supplies yet, you need to get over there pronto.  (And if you haven’t read my post on The Best Craft Supplies to Buy at Dollar Tree – do it!)  I picked up a few of their new fall items and make the perfect pumpkin sign for my fall decor – and it only took about 20 minutes!  Make the perfect pumpkin sign with this fun Dollar Tree DIY project! This dollar store fall craft is so cute!             

This cute pumpkin sign will stay out all fall – even through Halloween – because of the color scheme I used.  The great thing is that it can be customized however you want, so make this in any color to suit your taste or decor!

Supplies Used for This Dollar Tree Pumpkin Decor

Here’s what I used to make this fall sign:

  • Dollar Tree canvas artwork (any pattern or design will work!)
  • Dollar Tree “create your own ornament” wood pumpkin shapes
  • Dollar Tree DIY pumpkin craft stickers
  • Dollar Tree Jenga game (those are the wood blocks shown in the project)
  • Scrapbook paper
  • Scissors
  • Spray Adhesive
  • Acrylic craft paint in orange, white, and black
  • Paintbrush
  • Hot glue and hot glue gun
  • Letter stamps
  • Black stamp pad

Dollar Tree's fall craft items are adorable! Use them to create a cute fall sign that you'll have out all season.

How to Make a Fall Pumpkin Sign

First I painted the edges of the Dollar Tree canvas artwork black.  I used two coats of paint for this step.  Remember, you can use any color paint you like!  Transform a Dollar Tree canvas artwork into a cute pumpkin sign for fall.

Once the paint dried, I traced the shape of the canvas onto the back of a piece of scrapbook paper.  I cut that out and then sprayed the canvas and the back of the paper with spray adhesive.  I quickly pressed the scrapbook paper into place on the front of the canvas and trimmed any parts that stuck up over the edges of the canvas.  Use spray adhesive to fasten scrapbook paper to a canvas to create a pumpkin sign for fall.

Then I got to work painting the pumpkins!  I mixed up a few shades of orange by simply mixing basic orange and white acrylic paint.  I painted one of the Dollar Tree pumpkin ornaments and two of the DIY craft stickers.  Paint plain Dollar Tree pumpkin ornaments to create a cute pumpkin sign for fall.

After those pumpkins dried, I used one of the pieces of twine from the ornaments package and tied it around each of the pumpkins’ stems.  Then I used the hot glue gun to fasten them to the canvas.  I even hot glued the stickers because the adhesive wasn’t super strong and I didn’t want those pumpkins going anywhere!  Create a cute pumpkin sign for fall.

Next, I stamped the word “pumpkin” onto two of the Dollar Tree Jenga game blocks.  They’re the perfect little wood blocks for all kinds of projects!  If you don’t have letter stamps and/or a stamp pad, you could use the tiny letter stickers at Dollar Tree for this step!

Use stamps on Dollar Tree Jenga pieces to create a cute pumpkin sign for fall.

Finally, I hot glued the “pumpkins” piece into place and added a little black paint around the edges of both the word piece and the entire sign.  This gave a distressed look that I like!  Create a unique pumpkin sign for fall.

And that’s all it took to transform a canvas into an adorable piece of fall decor!  Make the perfect pumpkin sign with this fun Dollar Tree DIY project! This dollar store fall craft is so cute!

I’d love for you to share this pumpkin sign project with your friends, or pin it to Pinterest to help others find it!  

And, if you love fall crafting, check out some of my other great fall craft ideas in my holidays gallery!

-Bre

Filed Under: Crafts, Dollar Tree, Fall and Halloween, Holiday

Dollar Tree Easter Craft: DIY Bunny Planters

April 1, 2019 by Bre 2 Comments

blank

This adorable Dollar Tree Easter craft is easy to make! Display this DIY bunny planter all spring long.

Sometimes life gets in the way of creative time, and that has definitely been the case for me recently!  I finally made it a priority over the weekend, and just LOVE this Dollar Tree Easter craft I whipped up: these darling DIY Bunny Planters!

These cute DIY Bunny Planters are made with dollar store supplies! Get the project tutorial for this cute Dollar Tree Easter craft in this blog post.

They are a speedy project, which is great when you don’t have a lot of leisure time.  Plus, they add a cute touch to your spring and Easter decor.

Supplies Needed to Make DIY Bunny Planters

This post contains affiliate links.  Please read my disclosure policy for more information.

  • Small white planters (originally purchased at Dollar Tree, but they don’t have them currently. You could also purchase terracotta pots and paint them white.)
  • Hot Pink multi-surface acrylic paint
  • Gray multi-surface acrylic paint
  • Small paint brush
  • Floral moss
  • Faux succulents
  • White felt
  • Pink felt
  • Fabric scissors
  • Multi-surface glue, like E6000 brand
  • Clothespins or craft clamps
  • Optional: bunny ear templates that you draw onto paper or card stock

Dollar Tree Easter Craft How-To: Instructions for Making DIY Bunny Planters

I started with the cutest little white planters that I got at Dollar Tree.  I just love them with their facets and iridescent shimmer!  They came in other colors, too, like pink and turquoise, but I think white is best for this project.  (Update: I don’t think Dollar Tree carries these anymore, but you could paint a flower pot white to make this craft or use a small white planter like this!)

Step One: Paint a Nose and Whiskers

I used a small paint brush to paint a pink nose and gray whiskers onto the planter.  I used multi-surface acrylic paint to make sure it adheres well!

Transform a plain dollar store planter into an adorable bunny planter! It's a great Easter craft. Get the project tutorial in this post.

If you don’t want the mess of paint and a paint brush, you could also use oil-based Sharpie markers. I love those things!

Step Two: Make a Bunny Ears Template

Next, I drew bunny ear templates onto scrap cardstock and cut those out.  I drew a large ear and a smaller ear. 

Love Dollar Tree spring crafts? Check out this adorable Dollar Tree Easter wreath!

Step Three: Create the Bunny Ears

Then, I used the larger ear template to cut out two white felt ears. 

I used the smaller template to cut out two pink felt ears. 

I didn’t draw on the felt – I just held the templates in place and carefully cut around them.

Cut out felt ears to make a cute DIY Dollar Store Bunny Planter that's perfect for Easter or spring.

Then, I glued one pink felt ear onto each white felt ear. 

These felt ears will become bunny ears in this darling DIY Dollar Store Bunny Planter project.

Step Four: Attach the Ears to the Planter

Next, I placed a thin line of multi-surface E6000 glue around the inner rim of the planter. 

I pressed the ears onto the glue, and held them in place temporarily with clothespins.  Once the glue hardened, I removed the clothespins. 

Clothespins hold the bunny ears in place while the glue is drying on these DIY Bunny Planters.

Step Five: Fill the Planter

I filled the planter with craft moss to help hold the faux succulent in place.  This stuff makes a mess, so have your broom or dust buster ready!  😉

Fill the DIY Bunny Planter with craft moss prior to adding the faux succulent.

And for the final touch, I placed a faux succulent into the planter. 

Learn how to make a darling DIY Bunny Planter for Easter or Spring in this blog post!

These little bunny planters make me so happy; I think they’re just darling!  They are a great spring or Easter craft project, and make for a sweet Easter hostess gift or addition to your spring decor!  

If you wouldn’t mind, I’d love for you to pin this Dollar Tree Easter craft project to Pinterest and help spread the love! 

So cute! Make these Dollar Store DIY Bunny Planters for Easter or spring! They're easy to make and such a cute spring craft!

Filed Under: Crafts, Dollar Tree, Easter, Holiday

  • « Go to Previous Page
  • Page 1
  • Interim pages omitted …
  • Page 3
  • Page 4
  • Page 5
  • Page 6
  • Page 7
  • Interim pages omitted …
  • Page 17
  • Go to Next Page »

Primary Sidebar

Let’s Connect!

Hi, I’m Bre! Thanks for visiting Average But Inspired, where I show you how to work with what you’ve got to create a home you love.

Bre of Average But Inspired - a DIY and craft blog

Love DIY? Subscribe to Get Posts E-mailed!

How Can I Help You?

blank

7 Tips for Hosting a Party on a Budget

blank

How to Paint Over Tile

blank

How to Paint a Door to Look Like Wood (It’s Easier Than You Think!)

blank

How to Paint a Countertop to Look Like Marble!

Looking for Something?

Copyright © 2013-2022, Bre Eggert (Average But Inspired). All rights reserved.
  • Home
  • DIY
  • Crafts
  • Home Decor
  • Privacy Policy and Copyright Policy
  • Disclosures
  • Contact Me