• Skip to primary navigation
  • Skip to main content
  • Skip to primary sidebar
Average But Inspired logo - DIY and craft

Average But Inspired

Craft a home you love. DIY and craft tutorials.

  • About
    • Contact Me
    • Disclosures
    • Privacy Policy and Copyright Policy
  • DIY
    • Furniture
  • Crafts
    • Dollar Store Crafts
    • Seasonal
      • Patriotic & Summer
      • Valentine’s Day
      • Easter & Spring
      • Fall & Halloween
      • Christmas & Winter
  • Home Decor
    • Organization
  • Shop
    • DIY Swag
    • DIY Guides
  • Home

Dollar Tree

Dollar Store-ganization: Binder Ring Organization Ideas

October 30, 2015 by Bre 4 Comments

You’ll love these smart binder ring organization ideas! Get your daily life in order with these genius binder ring uses.

Welcome to Part 3 of my series, Dollar Store-ganization, where I share tips and tricks for getting organized with products from the dollar store.  

The goal of this series is to show that you don’t have to spend a fortune to get your life (or stuff!), in order!  

Binder rings are awesome little tools for organization and are so CHEAP! This post has great ideas on how to use them to organize everyday items.

This post contains affiliate links. Please read my disclosure policy for more information.

In case you missed it, Part One of this series was all about mesh laundry bag organizing ideas.

And, Part 2 focused on utility closet organization with dollar store items.

This post is all about the mighty binder ring (aka looseleaf ring or book ring) – the often overlooked but oh-so-valuable binder ring.  Seriously.  

Binder rings are awesome little tools for organization and are so CHEAP! This post has great ideas on how to use them to organize everyday items.

I’m sure you’re thinking that the binder ring can’t really be that useful, but it is!  And because you get six book rings for $1.25 at Dollar Tree, you’re about to fall in love!  

Binder rings are awesome little tools for organization and are so CHEAP! This post has great ideas on how to use them to organize everyday items.

Here are some of my favorite ways to use these babies!  

Binder Ring Greeting Card Organization

If you save cards that you receive, they can quickly accumulate and become difficult to contain.  I used to keep mine loose in a box in my closet.  And it would fall on my head all.of.the.time, sending cards flying everywhere.  SO ANNOYING!

Binder rings are awesome little tools for organization and are so CHEAP! This post has great ideas on how to use them to organize everyday items.

Now I pop them onto binder rings, which keeps them together and makes them easy to look back at.  

I put mine on different rings depending on the occasion and/or sender.  Now if the box falls on my head, at least the cards do not fly everywhere!  

P.S. this is a perfect way to organize Christmas cards you receive! At the end of the holiday season, punch holes in each card and slide them onto a binder ring. You’ll have a fun card keepsake.

Organize Paint Chips with Binder Rings

Binder rings are the PERFECT place to corral paint chips!  

Put the colors you already have in your house on one, and the colors you may want to use in the future on another!  This makes it easy to pop them into your purse and match with home accessories on the go!  

Binder rings are awesome little tools for organization and are so CHEAP! This post has great ideas on how to use them to organize everyday items.

Plus, having them in one spot means you’ll be less likely to forget what color your living room is painted (ahem, ahem . . . not that I’d know anything about that).

This would work equally well for fabric swatches!

Corral Ponytail Holders with Binder Rings

Life changing, this one is.  Keep all of those ponytail holders in one spot on a binder ring!  

Binder rings are awesome little tools for organization and are so CHEAP! This post has great ideas on how to use them to organize everyday items.

This is the best way to have ponytail holders on the go (like in your purse or car), or even at home (like in your makeup bag).  

You’ll never be hunting for ponytail holders in random places again if you put them on a binder ring!  (I was a chronic “I bet I can find one in my jeans pocket!” girl before I started this method of keeping them together!)

Takeout Menu Organization

If you order delivery or takeout a lot, then you probably have lots of restaurant menus at home.  

Binder rings are awesome little tools for organization and are so CHEAP! This post has great ideas on how to use them to organize everyday items.

Putting menus onto a binder ring will keep your junk drawer organized and make your pizza delivery order stress-free since you’l never be missing your menus again!  

Organize Scarves with Binder Rings

Clip binder rings through a hanger and then weave your scarves through them for an instant scarf organizer!  

Binder rings are awesome little tools for organization and are so CHEAP! This post has great ideas on how to use them to organize everyday items.

You’ll be able to see your scarf collection clearly and avoid having them fall all over the floor!  

I’m sure there are tons of other ways to use binder rings to get organized – let me know if you have any ideas to add to this list!


Filed Under: Dollar Tree, Organization

Dollar Store Magnetic Chip Clip Holder

April 8, 2015 by Bre 26 Comments

Create a DIY magnetic chip clip holder with Dollar Tree supplies.

There’s nothing worse than craving a salty, crunchy chip, and opening the package to find they’ve gone stale.  (You know I’m right!)

To prevent such a catastrophe, you must make this DIY Dollar Store Magnetic Chip Clip Holder!

This is such a great idea! Quickly update a dollar store burner cover into a magnetic chip clip holder. Never be without a chip clip in your pantry again!

Not only will you have lots of chip clips to help keep those salty snacks fresh and tasty, but you’ll also have a fantastic way to organize those chip clips! 

Alright, so people, I’m telling you that if you’re not a regular Dollar Tree shopper, you need to become one, stat.

It is my absolute favorite place for cheap party supplies (read my post on the best Dollar Tree party supplies), and cheap craft supplies (read my post on 10 craft supplies to buy at Dollar Tree, and the follow up with ten more).

This is such a great idea! Quickly update a dollar store burner cover into a magnetic chip clip holder. Never be without a chip clip in your pantry again!

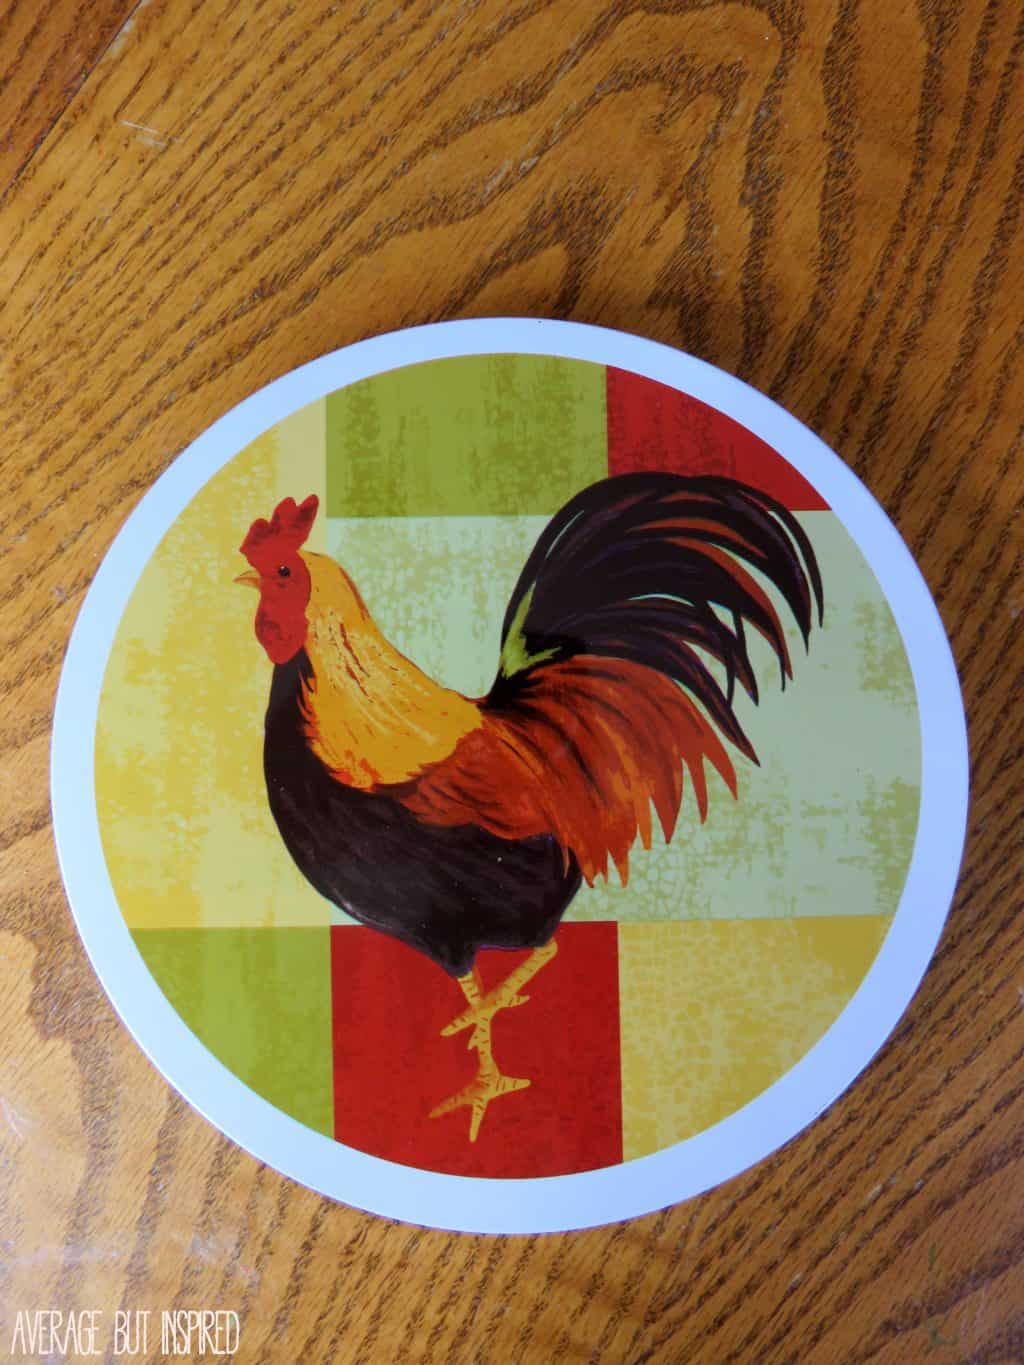
Oh, I also love it for strange stove burner covers with roosters plastered all over them.  At the risk of sounding like an idiot, I really have no idea what you do with a burner cover. I’m guessing it’s something for an electric stove. . . ?  I’ve never had one of those so I don’t really know.  

Yeah, so anyway, I bought a set of two of these burner covers for, well, $1 (now $1.25), never planning to use them for their intended purpose.  Instead, I always planned to use them for something “magnety” (made up word referring to something that can be used with magnets.).

Anyway, these bad boys hid out in my china cabinet for about six months until a wonderful moment of inspiration hit.  You see, I was giving my children their 78th snack of the day when I got super annoyed that I couldn’t find any more binder clips (my makeshift chip clips), in my junk drawer.  

At that moment I knew that my world would become a better place if I always had easy access to chip clips so that my children’s snacks could be easily resealed and not spill all over the pantry as they usually do.  Out of hiding came the rooster covers.

DIY Chip Clip Holder Supplies

This post contains affiliate links.  To learn more, please read my full disclosure policy.

  • Metal burner covers 
  • 12″ x 12″ scrapbook paper in pattern of your choice
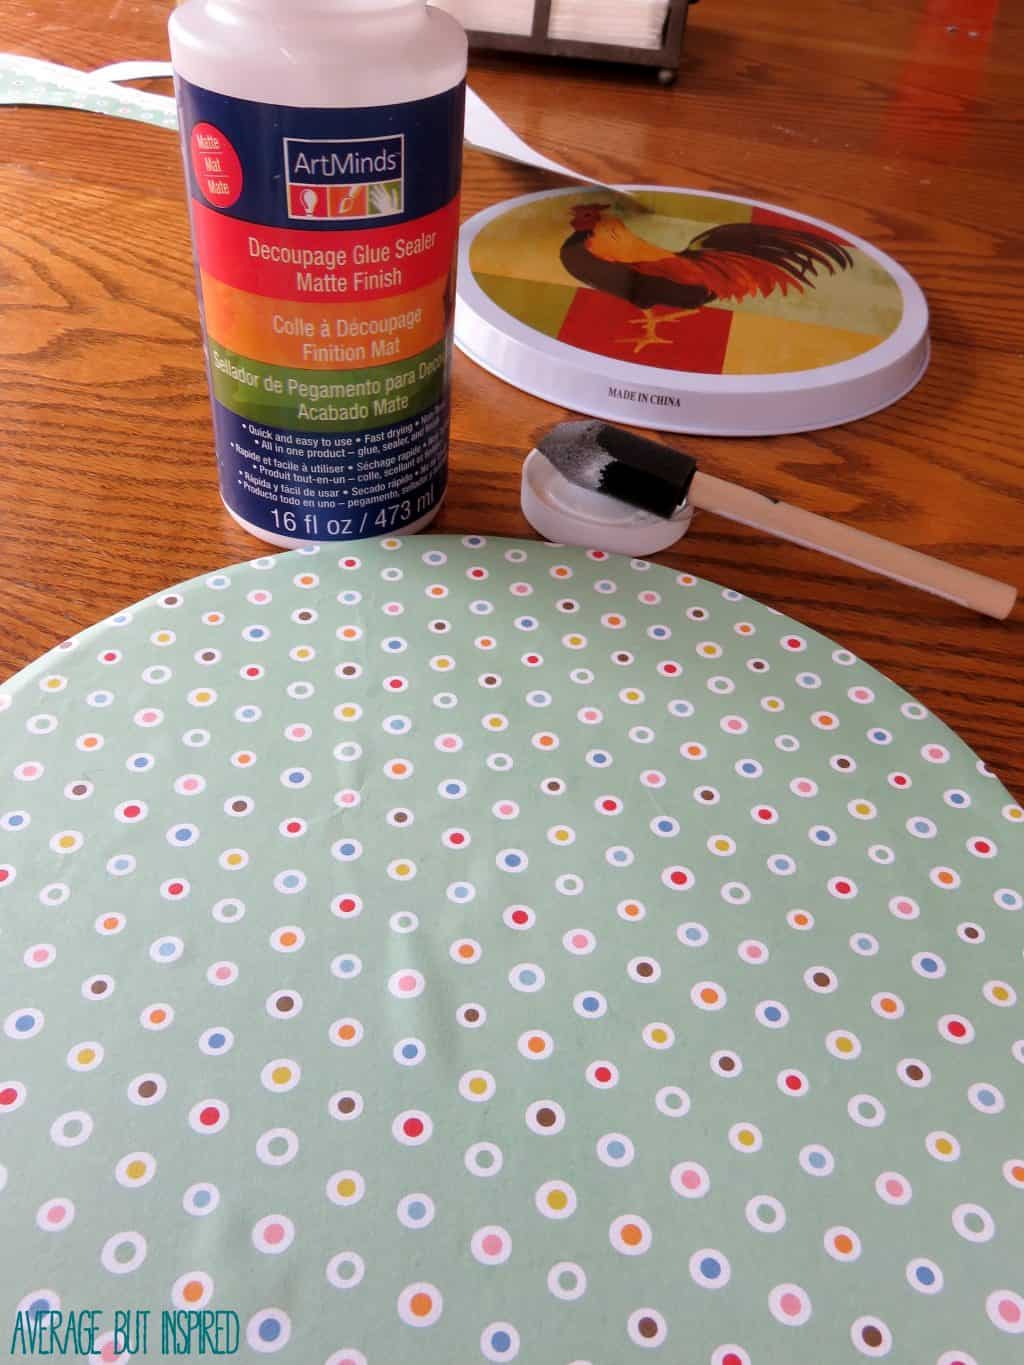
  • Mod Podge (decoupage glue)
  • Foam brush
  • Ribbon
  • Clothespins
  • Acrylic paint
  • Tiny magnets
  • Scissors

How to Make a Magnetic Chip Clip Holder

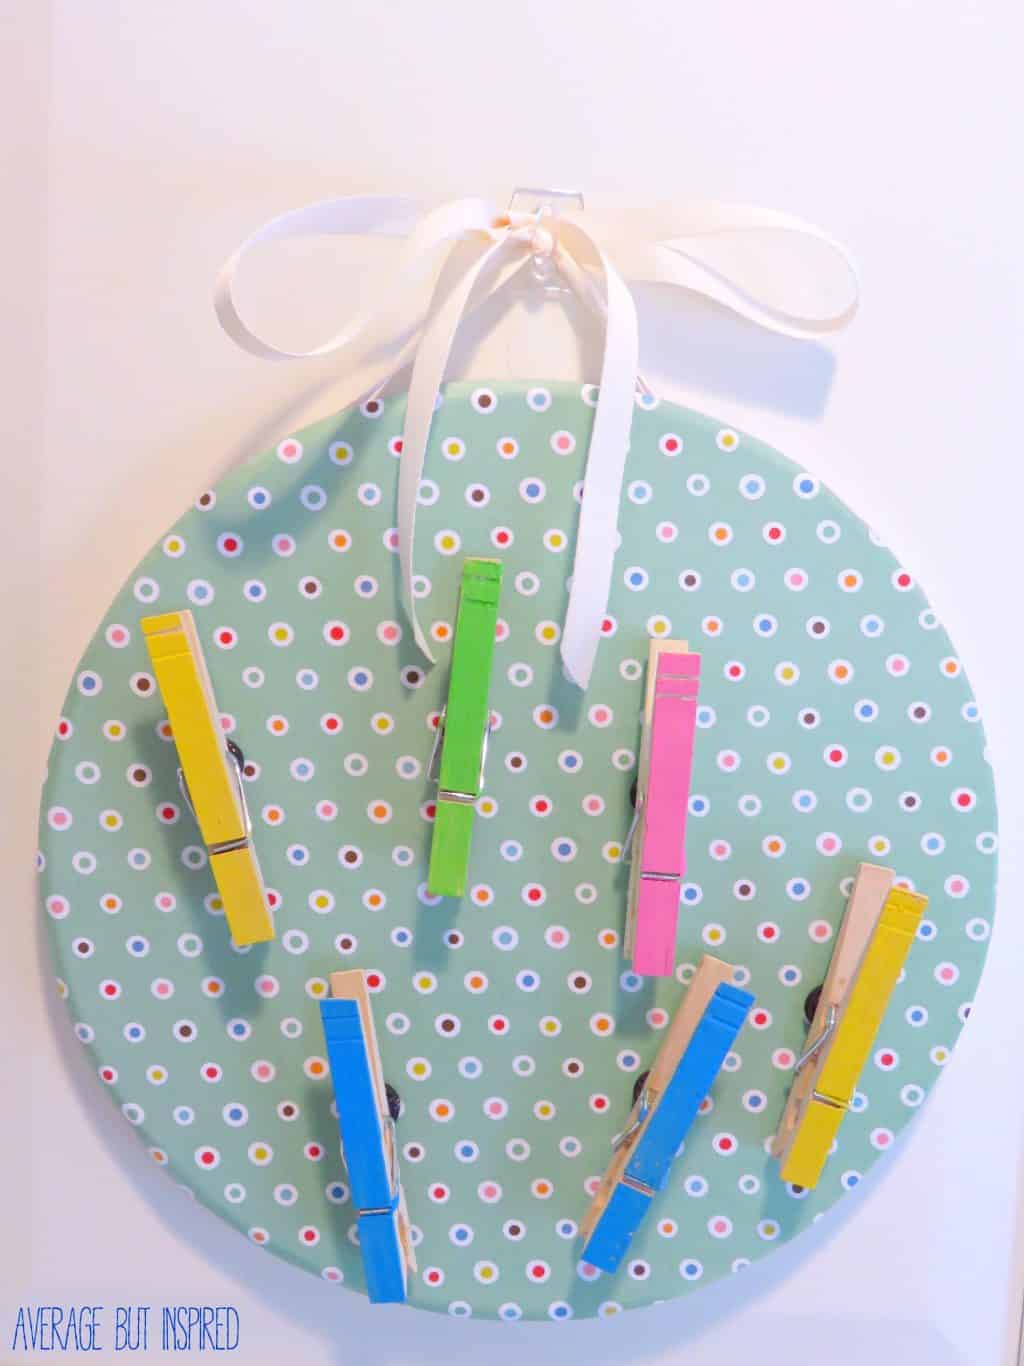
Since roosters aren’t my favorite animal in the world, I decided to cover this bad boy up, pronto.  I traced around the burner cover on a piece of 12 x 12 scrapbook paper, and then cut it out.

This is such a great idea! Quickly update a dollar store burner cover into a magnetic chip clip holder. Never be without a chip clip in your pantry again!

Next up, I applied a thin layer of ModPodge (decoupage glue) to the top of the burner cover and put my scrapbook paper on top.  Bye bye, rooster!  

This is such a great idea! Quickly update a dollar store burner cover into a magnetic chip clip holder. Never be without a chip clip in your pantry again!

I smoothed out the wrinkles, and after it seemed dry, I put another thin layer of decoupage glue on top.  

This is such a great idea! Quickly update a dollar store burner cover into a magnetic chip clip holder. Never be without a chip clip in your pantry again!

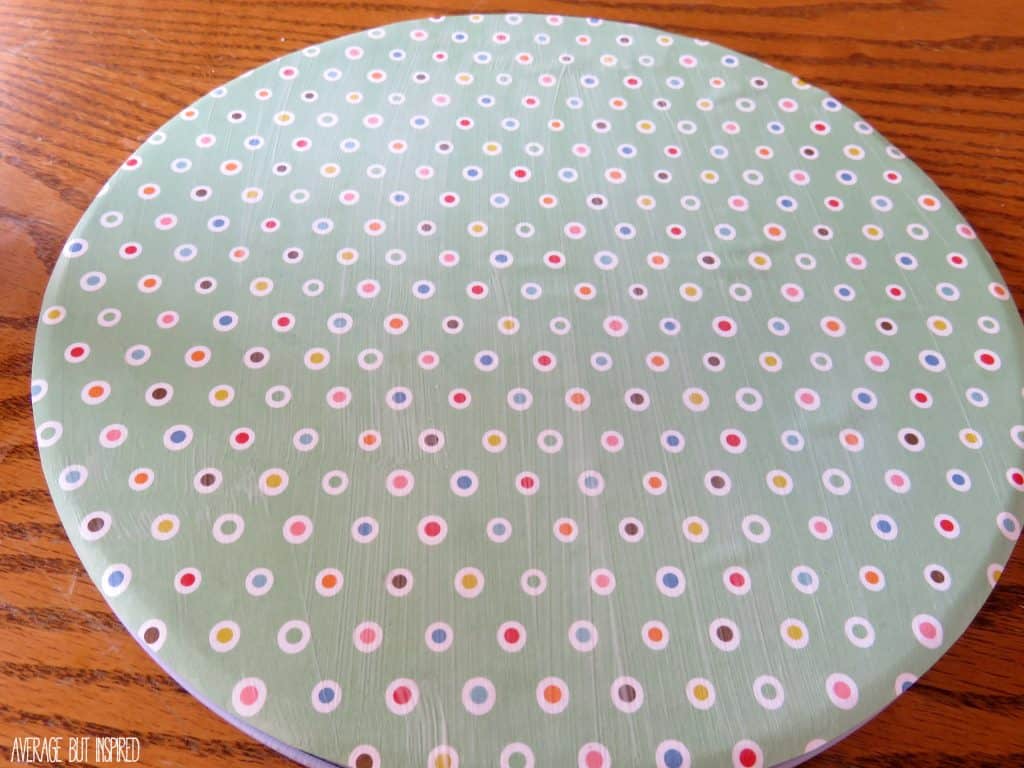
Once everything was dry, I hot glued a ribbon around the entire edge of the burner cover.  

This is such a great idea! Quickly update a dollar store burner cover into a magnetic chip clip holder. Never be without a chip clip in your pantry again!

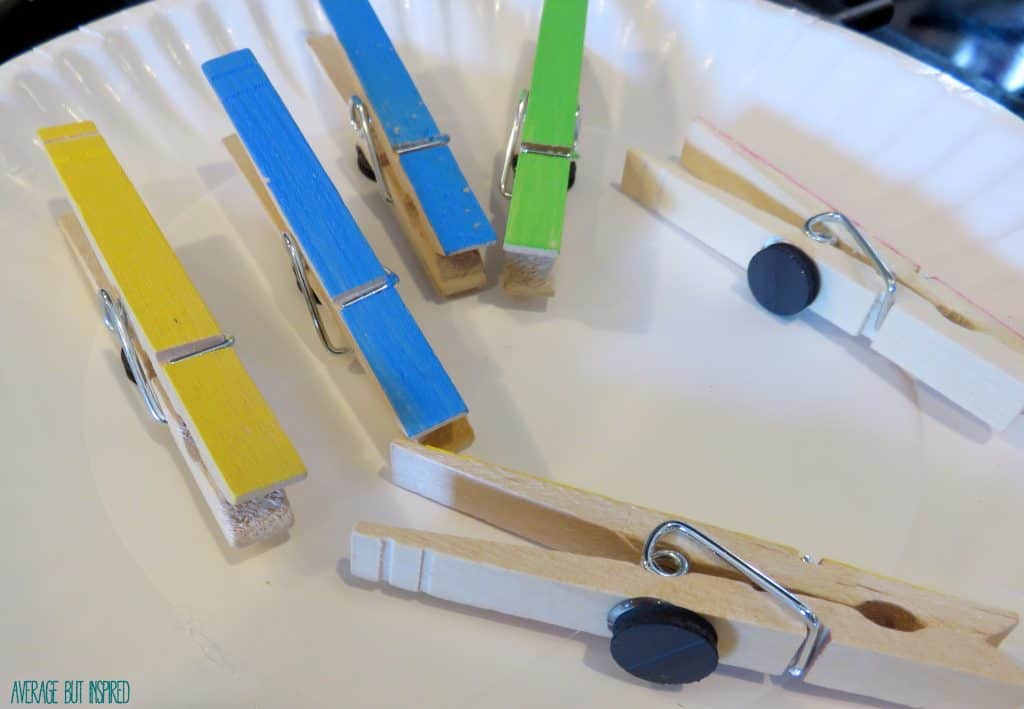
Then I painted some clothespins with acrylic paint and hot glued tiny magnets to the back of each one.  Super duper easy!  

This is such a great idea! Quickly update a dollar store burner cover into a magnetic chip clip holder. Never be without a chip clip in your pantry again!

And you guys, for real, this has been a total game changer in the world of proper snack sealing and storage.

This is such a great idea! Quickly update a dollar store burner cover into a magnetic chip clip holder. Never be without a chip clip in your pantry again!

I love a good Dollar Store craft and organization combo project (kind of like my Dollar Tree pizza pan memo board)!

Magnetic Chip Clips & Holder

Filed Under: Dollar Tree

DIY Earring Organizer Made from a Kitchen Gadget

September 12, 2014 by Bre 29 Comments

blank

Hi, friends-

If you’ve been following my blog for any amount of time at all, you know that I have a deep love for Dollar Tree.  I find the BEST things there, and of course they’re always things that I never knew I needed before.

Things like this splatter screen that I found in the kitchen section.

Dollar Tree splatter screen to earring organizer. {Average But Inspired}
What in the world do you do with this thing in the kitchen?  It has a mesh screen, so I don’t really understand how it’s supposed to prevent splattering, but whatever – I didn’t buy it for the kitchen anyway.
Nope.  From the second I laid eyes on it, I thought EARRING ORGANIZER!
See, I have a collection of some awesome dangle earrings that I used to wear on nights out.  Since my nights out now usually consist of “Kids Eat Free Night” at [insert local brewpub name here], I don’t wear my fun earrings all that much anymore.  They sit in my jewelry box and tangle themselves up with my more practical earrings, which is super annoying.
So, I decided they need to be segregated and I made this special place for them – all from my Dollar Tree splatter screen!
Dollar Tree splatter screen to earring organizer. {Average But Inspired}
Easiest project EVER.  I know I’ve said it before, but this time it is the truth.  All you need is:
  • splatter screen
  • spray paint
  • ribbon
Step One
Spray paint your splatter screen.  (Learn from my mistake – make sure the screen part isn’t touching whatever you’re painting on, as the paint may pool and form smudges on your screen.)
Step Two
Add some ribbon to the top of the splatter screen for a cute touch.
Step Three

Put your earrings through the mesh and hang up your new earring organizer.

Dollar Tree splatter screen to earring organizer. {Average But Inspired}
SEE?  I told you it was the easiest project ever.
Dollar Tree splatter screen to earring organizer. {Average But Inspired}
– Bre

Filed Under: Crafts, Dollar Tree, Organization

Dollar Store Easter Bunny Decor

March 27, 2014 by Bre 33 Comments

blank

Since the beginning of time, I have been a sucker for a good makeover.

All of my Barbies got makeovers when I was little.  Some of my favorite TV shows have involved makeovers (think What Not To Wear and Extreme Makeover: Home Edition (DON’T JUDGE – they always got me when they moved that bus!)).  And I love a good makeover for myself at the Bobbi Brown counter every once in awhile.

So how excited do you think I was when I spotted an ugly cardboard bunny decoration at Dollar Tree that I knew could be made adorably happy and springy with a little TLC?  Goodbye weird bunny displaying an image of another bunny holding an egg almost as large as itself, as well as the lie that “[s]pring is here . . . ” (it is not here.  In fact, it may never be coming to Chicago.  LIES!).  Hello cuteness!

Turn a dollar store Easter decoration into an adorable piece of decor for your spring home! Get the full tutorial at averageinspired.com.
Loved this makeover!  It was super easy and super inexpensive.  And it adds a dose of happiness to my back door.  Hippity Hoppity!
Turn a dollar store Easter decoration into an adorable piece of decor for your spring home! Get the full tutorial at averageinspired.com.
 Supplies Needed for Dollar Store Easter Bunny Decor
  • Cardboard bunny from Dollar Tree
  • Small piece of cardboard for your carrot (I used part of a shipping box rescued from the recycling bin)
  • 2 pieces of 12″ x 12″ scrapbook paper (1 for the body of the bunny; 1 for the carrot)
  • Spray adhesive
  • Wood shims
  • Wood glue
  • Acrylic paint (two colors – one for wood background; one for text), and brush
  • Ribbon
  • Hot glue
  • Scissors or x-acto knife
  • Optional: Green felt (for carrot top); Twine or ribbon (for a bow at bunny’s neck); Cotton ball or pom pom (for bunny’s tail); Paint tips (for easy text painting)
Now, here’s how I did this!
STEP ONE

Spray your bunny and the scrapbook paper with spray adhesive.  Adhere the bunny to the paper and press down all over to ensure a good bond.

blank
STEP TWO

Cut around the bunny with your x-acto knife or scissors.

blank
STEP THREE
Draw a carrot shape on your cardboard.  (Fix it over and over again until it doesn’t look totally deformed, as shown in the photo below.)  Repeat steps two and three to decorate your carrot.
blank
STEP FOUR
Take two of the wood shims and place them parallel to one another, vertically on your table.  Place some wood glue at the bottom and begin to affix your other shims perpendicular to those lying on the table.  Glue shims all the way to the top.
blank
STEP FIVE
Once your wood shim backdrop has dried (it might take a couple of hours), paint it however you like.  I used watered-down acrylic paint for a more unfinished look.
blank
STEP SIX
Once the paint has dried, determine the placement of your bunny and carrot (but don’t glue them yet).  Then, write your text in pencil, wherever you like.
blank
STEP SEVEN
Now, paint over your text with acrylic paint.  I used acrylic paint bottle tips, which made painting the text really easy.  Then I went over that painted writing with a small paintbrush to give it a flatter and broader look.
blank
blank
STEP EIGHT
Affix your bunny and carrot to your wood background.  Add any decorative elements you like (for example, a ribbon at the bunny’s neck and a cotton ball or pom pom at the tail).  Glue your ribbon at the top of the wood background for hanging.
Turn a dollar store Easter decoration into an adorable piece of decor for your spring home! Get the full tutorial at averageinspired.com.
Cute, right?
blank
I feel like this makeover would get Clinton and Stacy’s stamp of approval.  What do you think?  Turn a dollar store Easter decoration into an adorable piece of decor for your spring home! Get the full tutorial at averageinspired.com.
– Bre

Filed Under: Dollar Tree, Easter, Holiday

Easy DIY Kids Playroom Art

February 17, 2014 by Bre 62 Comments

blank

Make this easy Kids Playroom Art with inexpensive dollar store supplies.

After dealing with sick kids all last week, this week just has to be better!  Fingers crossed that my kids will spend less time in front of the TV and more time in their playroom having fun! 

Speaking of their playroom, I’m so excited to show you this DIY kids playroom art I recently made to help liven the place up a bit.  

Do you want to liven up the walls of your kids' playroom? Try this easy dollar store DIY Kids' Playroom Art! Get creative with the supplies you use, or follow this tutorial!

It uses leftover canvases, scrapbook paper I had on hand, and materials from Dollar Tree, and spells out the word “PLAY” in a very creative way!

It was easy and inexpensive, which are necessary attributes of any project of mine!

DIY Kids Playroom Art Supplies

This post contains affiliate links. Please read my disclosure policy for more information.

  • Artist Canvases (11×14)
  • Black cardstock, yellow cardstock
  • Toy cars
  • Crayons
  • Puzzle
  • Pipe cleaners
  • Pom Poms
  • Craft paint
  • Paint brush
  • Hot glue and glue gun
  • Mod Podge

How to Make PLAY Artwork

This DIY artwork is so easy to make!

Start by painting each of the four canvases with acrylic craft paint. Let them dry and gather your other supplies while you wait.

Make the Letter P

I made the letter “P” with black and yellow cardstock paper that I Mod Podged to the canvas.  

I then hot glued some toy cars to the “P” to make it look like a road.

Make cute and colorful kids playroom art with fun supplies from the dollar store.

I Think You’ll Like These Other Creative Ideas for Kids, Too!

DIY Art Creation Station

Art Supply Caddy

Make the Letter L

Next, I made the letter “L” by hot gluing crayons to the canvas.

I alternated the direction of each crayon and did not trim or cut any of them.  That probably would have led to a nicer looking letter, but I didn’t have the time or patience for that.

Make your own kids playroom art with fun supplies like crayons!

Make the Letter A

For the letter “A,” I purchased a 500 piece puzzle from Dollar Tree and whipped out the hot glue gun.  I drew an “A” on the canvas with pencil and glued all the pieces within the letter outline.

The pieces were really small so this was pretty tedious.  It also led to a lot of hot glued fingers.  I think it was worth it in the end, however.

Make your own kids playroom art with fun supplies like puzzle pieces!

Make the Letter Y

Finally, I made the “Y” by outlining the letter in pencil on my canvas, and then hot gluing metallic pipe cleaners and pom poms within the outline.  This is my least favorite of all the letters, but it will do.

Make your own DIY wall art for the playroom with fun supplies like pom poms and pipe cleaners!

My daughter was really excited to see this art go up in the playroom, so that made me happy.  

It's so easy to make DIY kids playroom art with supplies from the dollar store! Get the project tutorial in this post.

And my son has finally stopped trying to scale the toy shelves to get the cars off of the letter “P,” so that has also made me happy.

PLAY art is easy to make using toys and craft supplies from a dollar store!

I love that this was an inexpensive and easy way to fill a blank space in the playroom!

PLAY art is easy to make using toys and craft supplies from a dollar store!

Tell me what you think of it in the comments below!

Filed Under: Crafts, Dollar Tree

  • « Go to Previous Page
  • Page 1
  • Interim pages omitted …
  • Page 6
  • Page 7
  • Page 8

Primary Sidebar

Let’s Connect!

Hi, I’m Bre! Thanks for visiting Average But Inspired, where I show you how to work with what you’ve got to create a home you love.

Bre of Average But Inspired - a DIY and craft blog

Love DIY? Subscribe to Get Posts E-mailed!

How Can I Help You?

blank

How to Create a Faux Antique Brass Finish with Paint

blank

My DIY Kitchen Makeover Reveal!

blank

How to Paint a Door to Look Like Wood (It’s Easier Than You Think!)

blank

How to Paint Over Tile

Looking for Something?

Copyright © 2013-2022, Bre Eggert (Average But Inspired). All rights reserved.
  • Home
  • DIY
  • Crafts
  • Home Decor
  • Privacy Policy and Copyright Policy
  • Disclosures
  • Contact Me