• Skip to primary navigation
  • Skip to main content
  • Skip to primary sidebar
Average But Inspired logo - DIY and craft

Average But Inspired

Craft a home you love. DIY and craft tutorials.

  • About
    • Contact Me
    • Disclosures
    • Privacy Policy and Copyright Policy
  • DIY
    • Furniture
  • Crafts
    • Dollar Store Crafts
    • Seasonal
      • Patriotic & Summer
      • Valentine’s Day
      • Easter & Spring
      • Fall & Halloween
      • Christmas & Winter
  • Home Decor
    • Organization
  • Shop
    • DIY Guides
  • Home

Dollar Tree

How to Make a Dollar Store Christmas Cloche

November 15, 2017 by Bre 2 Comments

Make a charming DIY Christmas Cloche with Dollar Tree supplies!

I hope you all will forgive me for posting about Christmas before Thanksgiving, but listen . . . if you’re going to do any Christmas crafts, now’s the time to get started! 

So here we go – my first Christmas-related post of the season . . . and it’s a cute one!  Run over to Dollar Tree to pick up the essential supplies for this project and get to work making a beautiful Dollar Store Christmas Cloche for your Christmas decor!  

Christmas cloches filled with holiday miniatures have been a Pinterest staple for years, but this simple version is probably the most budget-friendly one around!

Transform a dollar store ornament and other supplies into a pretty Christmas Cloche for your DIY Christmas decor! #dollarstore #dollartree #Christmasdecor

Supplies Needed to Make a Dollar Store Christmas Cloche

Some of these are affiliate links.  Please read my disclosure policy for more information.

  • Dollar Tree cylinder vase
  • Dollar Tree foam discs
  • Dollar Tree miniature church, building, etc.
  • Woodgrain shelf liner
  • Fake snow
  • Spray adhesive
  • Hot glue and hot glue gun
  • Scissors

How to Make a Dollar Tree Christmas Cloche

Guys, this project will take you all of ten minutes to make.  TEN MINUTES!  I promise. 

I whipped this up right before I had to go volunteer at my kids’ school library (I’m getting real friendly with the Dewey Decimal System, friends!) – easiest project ever!

Transform a dollar store ornament and other supplies into a pretty Christmas Cloche for your DIY Christmas decor! #dollarstore #dollartree #Christmasdecor

Begin by spraying one side of the foam disc with spray adhesive.  

Transform a dollar store ornament and other supplies into a pretty Christmas Cloche for your DIY Christmas decor! #dollarstore #dollartree #Christmasdecor

Then press some fake snow onto that disc.  

Transform a dollar store ornament and other supplies into a pretty Christmas Cloche for your DIY Christmas decor! #dollarstore #dollartree #Christmasdecor

Next, cut two strips of 12″ woodgrain scrapbook paper or the woodgrain shelf liner available at Dollar Tree to be a little wider than the edge of your disc. 

(If you happen to have woodgrain paper that is longer than traditional 12″ scrapbook paper, you may only need to cut one strip of paper.)  

Transform a dollar store ornament and other supplies into a pretty Christmas Cloche for your DIY Christmas decor! #dollarstore #dollartree #Christmasdecor

Fire up that hot glue gun and wrap the woodgrain paper around the edge of the foam disc.  Make the top edge of the paper flush with the edge of the foam disc that has the fake snow on it. 

Here Are Other Dollar Tree Christmas DIY Projects You’ll Enjoy!

  • Candy Cane Wreath
  • Large Gift Tag Decor

Then flip the disc over and trim the excess scrapbook paper from around the bottom edge of the foam disc.

(If you used the woodgrain adhesive shelf liner, you won’t need to use the hot glue gun. You could just stick the shelf liner to the foam disc.)

Transform a dollar store ornament and other supplies into a pretty Christmas Cloche for your DIY Christmas decor! #dollarstore #dollartree #Christmasdecor

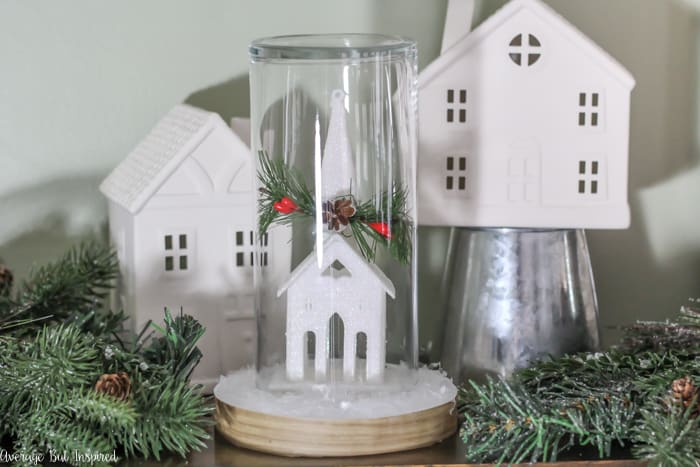
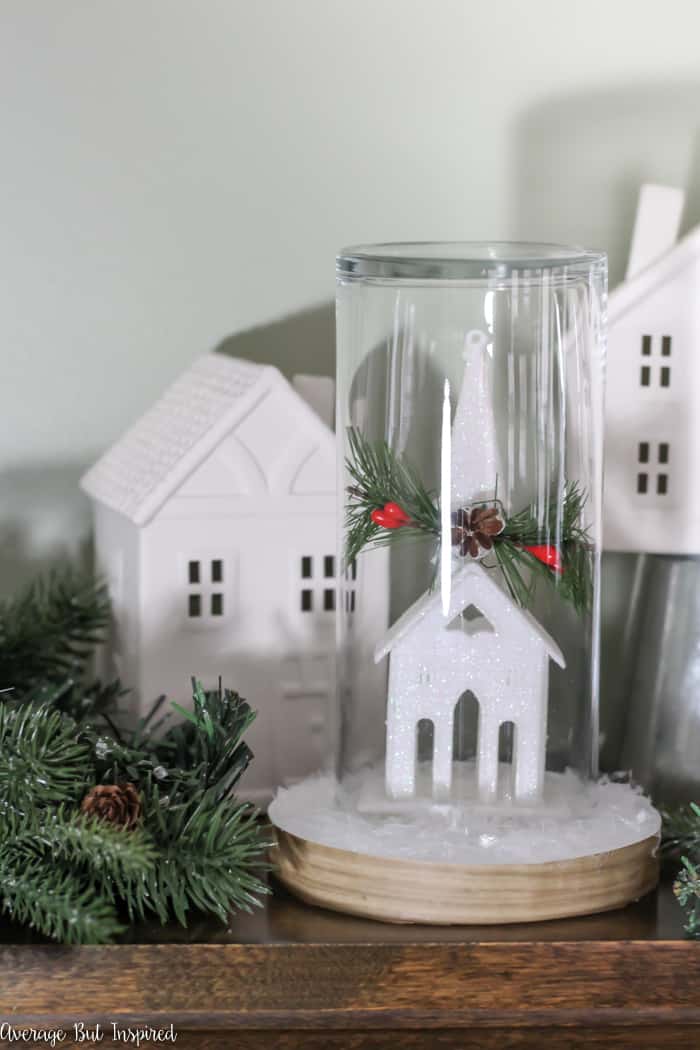
Hot glue the ornament or miniature building to the foam disc (snowy side), and place the cylinder vase on top. 

That’s all you need to make a cute Christmas Cloche for your holiday decor!  

Transform a dollar store ornament and other supplies into a pretty Christmas Cloche for your DIY Christmas decor! #dollarstore #dollartree #Christmasdecor

I paired my cloche with adorable white ceramic houses.

Transform a dollar store ornament and other supplies into a pretty Christmas Cloche for your DIY Christmas decor! #dollarstore #dollartree #Christmasdecor

I just love the simplicity of these little houses.  (My kids asked me 89348 times if they could paint them.  NO.  No, you may not paint my little white houses!)

Transform a dollar store ornament and other supplies into a pretty Christmas Cloche for your DIY Christmas decor! #dollarstore #dollartree #Christmasdecor

This simple look is perfect for Christmas decor, or to be left out all winter.  Make sure to “pin it” so you’ll remember to make this for your seasonal decor!

Transform a dollar store ornament and other supplies into a pretty Christmas Cloche for your DIY Christmas decor! #dollarstore #dollartree #Christmasdecor

Filed Under: Christmas, Crafts, Dollar Tree, Holiday

Dollar Tree Silver Tray Wreath

September 19, 2017 by Bre 6 Comments

blank

Over the years I’ve made quite a few pieces of door decor or wreaths from Dollar Tree supplies.  (Take my Fourth of July Tinsel Wreath or my Egg Tray Wreath for Easter, for example.)  I just can’t help myself!  Every time I go to Dollar Tree I find cute new supplies that call out to me, and I am forced to create.  It’s a real problem, friends (the creating and the fact that products at Dollar Tree talk to me.  HA!)!  On a recent trip, I bought supplies to make an atypical fall wreath for my backdoor – and today I’m going to show you how to transform a Dollar Tree silver tray from the party supply section into a beautiful Silver Tray Wreath!  Transform a silver tray into a wreath! Learn how to make a Dollar Tree silver tray sparkle as a beautiful fall wreath in this post.

Supplies Needed to Make a Silver Tray Wreath

Some of these links are affiliate links.  Please read my full disclosure policy here.

  • Silver tray (I purchased a nickel plated metal serving tray at Dollar Tree)
  • Chalkboard paint
  • Paintbrush
  • Light gray and dark gray acrylic paint
  • Sponge
  • Chalk
  • Faux fall leaves (I also purchased them at Dollar Tree, but here’s an alternative)
  • Hot glue gun and hot glue
  • Mini 3M Command Hooks
  • Ribbon

How to Make a Silver Tray Wreath for Fall

I started with this plain silver tray from the party supply section at Dollar Tree.  These are actually really sturdy and they come in three shapes/sizes.  They’re great for crafting and entertaining!  Transform a silver tray into a wreath! Learn how to make a Dollar Tree silver tray sparkle as a beautiful fall wreath in this post.

Next, I turned the center of the silver tray into a chalkboard with my favorite chalkboard paint.  I used two coats of chalkboard paint to make sure there was good coverage!  Transform a silver tray into a wreath! Learn how to make a Dollar Tree silver tray sparkle as a beautiful fall wreath in this post.

Once the chalkboard paint was dry, I worked to take the shine down on the silver tray, and to make it look like it is aged or antique.  I began by lightly sponging on acrylic paint in a light gray color.  I gently dabbed the light gray paint all around the edge of the tray.Transform a silver tray into a wreath! Learn how to make a Dollar Tree silver tray sparkle as a beautiful fall wreath in this post.

When that light gray paint dried, I then used by sponge to rub dark gray acrylic paint along the raised portions of the silver tray.  Unlike with the light gray paint where I dabbed the color on, this time I rubbed the color on in order to accent those raised portions of the tray.  Transform a silver tray into a wreath! Learn how to make a Dollar Tree silver tray sparkle as a beautiful fall wreath in this post.

This painting technique went a long way toward giving my Dollar Tree silver tray an aged look!  Transform a silver tray into a wreath! Learn how to make a Dollar Tree silver tray sparkle as a beautiful fall wreath in this post.

Once that paint dried, I cut leaves off of my Dollar Tree fall leaf garland and began to hot glue them around the bottom 1/3 to 1/2 of the silver tray.  I layered them and angled them in different ways, rather than lying them flat and in a row.Transform a silver tray into a wreath! Learn how to make a Dollar Tree silver tray sparkle as a beautiful fall wreath in this post.

Transform a silver tray into a wreath! Learn how to make a Dollar Tree silver tray sparkle as a beautiful fall wreath in this post.

Next, I flipped the tray over and attached two 3M Mini Command Hooks to the back, upside down.  These things are my go-to for just about everything that needs a hook.  I love them!  I then ran a ribbon through the hooks and tied it at the top.  Transform a silver tray into a wreath! Learn how to make a Dollar Tree silver tray sparkle as a beautiful fall wreath in this post.

Then I flipped the tray over and gently ran a piece of chalk all over the chalkboard portion of the tray to season it.  Next, I tried to write “Hello” in fancy script on the front.  (Note: need to practice chalkboard lettering!)  Transform a silver tray into a wreath! Learn how to make a Dollar Tree silver tray sparkle as a beautiful fall wreath in this post.

Before I hung up my Silver tray wreath, I bent my ribbon streamers and hot glued them to the edges of the tray.  Then my silver tray wreath was ready to be displayed on my backdoor!  Transform a silver tray into a wreath! Learn how to make a Dollar Tree silver tray sparkle as a beautiful fall wreath in this post.

I love the pretty touch it adds to the door, and it was such an affordable way to bring some charm to the back porch!  Transform a silver tray into a wreath! Learn how to make a Dollar Tree silver tray sparkle as a beautiful fall wreath in this post.

Can you see why I love to go to Dollar Tree so much?  What’s your favorite thing to buy there?  Also, if you enjoyed this project, I would appreciate it if you would PIN it to share the love!  Transform a silver tray into a wreath! Learn how to make a Dollar Tree silver tray sparkle as a beautiful fall wreath in this post.

-Bre

You Might Also Like This Dollar Tree Project!

DIY Fork, Spoon, and Knife Kitchen Plates Decor

blank

Filed Under: Crafts, Dollar Tree, Fall and Halloween, Holiday

Dollar Tree Pizza Pan Craft: Pretty Memo Board

August 9, 2017 by Bre 4 Comments

blank

Pizza pans from Dollar Tree are the new “hot” crafting item.  People have so many creative ways to use them, and I’m going to add another Dollar Tree pizza pan craft idea with this pretty memo board project!

It's so easy and fun to make a pizza pan magnet board! This inexpensive project will help you get organized in a stylish way.

This is a great project because it is really fast to make and the supplies used are inexpensive!

Supplies Needed to Make a Dollar Tree Pizza Pan Memo Board

Some of these links are affiliate links, which means I earn a small commission at no added cost to you if you purchase through them. To read my full disclosure policy, please click here.

  • Pizza pan (they’re $1 at Dollar Tree – don’t buy anywhere else!)
  • Scrapbook paper
  • Spray adhesive (permanent)
  • Elmer’s ProBond Adhesive
  • Pencil
  • Scissors
  • Multi-surface acrylic paint or chalky finish paint in the color of your choice (I used this paint)
  • Small paintbrush
  • Natural Rope (1/4″ thick)
  • Ribbon
  • Small 3M Command Hooks

It's so easy and fun to make a pizza pan magnet board! This inexpensive project will help you get organized in a stylish way.

Dollar Tree Pizza Pan Craft Instructions

This pizza pan craft project is fun to make!

Step One: Paint the Pizza Pan

To begin, flip the pizza pan so its upside down, and paint around the outer edge.  This will ensure that if your scrapbook paper circle isn’t perfectly shaped (mine definitely was not!), it will still look nice and not as much like a pizza pan!  

It's so easy and fun to make a pizza pan magnet board! This inexpensive project will help you get organized in a stylish way.

What kind of paint do you use on a pizza pan?

Make sure to use a paint that has good adhesion properties!  I used chalk paint because it sticks to just about anything.  You could also paint a Dollar Tree pizza pan with a multi-surface acrylic paint.  Two coats of acrylic paint will likely be needed, whereas you can probably get away with just one coat of chalk paint.

Step Two: Cut Scrapbook Paper to Fit the Pizza Pan

Once the paint has dried, trace the pizza pan onto the scrapbook paper.  

Then cut about 1/4″ smaller than the circle you traced.  

It's so easy and fun to make a pizza pan magnet board! This inexpensive project will help you get organized in a stylish way.

Step Three: Spray the Pizza Pan and Scrapbook Paper with Spray Adhesive

Next, spray the pizza pan and the scrapbook paper with spray adhesive, and carefully place the scrapbook paper onto the pizza pan.  It will be hard, if not impossible, to move the paper once it’s made contact with the pizza pan, so be very careful in your placement.  

It's so easy and fun to make a pizza pan magnet board! This inexpensive project will help you get organized in a stylish way.

If there is a significant amount of scrapbook paper sticking over one side or the other, you can carefully trim the excess with the scissors.  

Step Four: Add Rope to the Edge

Next, cut a piece of rope long enough to wrap around the pizza pan.  

It's so easy and fun to make a pizza pan magnet board! This inexpensive project will help you get organized in a stylish way.

Glue the rope around the edge of the pizza pan and weigh it down with heavy objects or craft clamps to get it to lie in place and form a strong bond with the pizza pan.  

It's so easy and fun to make a pizza pan magnet board! This inexpensive project will help you get organized in a stylish way.

It's so easy and fun to make a pizza pan magnet board! This inexpensive project will help you get organized in a stylish way.

Step Five: Get the Pizza Pan Memo Board Ready to Hang

When everything has dried, flip the pizza pan over and press two 3M Command hooks to the back of the pizza pan, upside down. 

It's so easy and fun to make a pizza pan magnet board! This inexpensive project will help you get organized in a stylish way.

Run a ribbon through the hooks and tie a bow at the top, and then you’re ready to hang your Dollar Tree pizza pan memo board!  

It's so easy and fun to make a pizza pan magnet board! This inexpensive project will help you get organized in a stylish way.

It is just that easy to upgrade a pizza pan to a stylish and functional magnet board!  

This Dollar Tree pizza pan craft idea is so cute! See how she turned a pizza pan into a cute memo board that's stylish and functional.

Two important things on this to-do list: (1) call mom; (2) buy wine.  (That’s my to-do list; not my daughter’s.)

It's so easy and fun to make a pizza pan magnet board! This inexpensive project will help you get organized in a stylish way.

And I just have to show you these adorable magnets my daughter picked out for her magnet board – they’re animals and pretty glass gems!

It's so easy and fun to make a pizza pan magnet board! This inexpensive project will help you get organized in a stylish way.

I might have to borrow those animal heads for my own workspace!  🙂

If you enjoyed this project, would you please pin it so others can find it, too?  It's so easy and fun to make a pizza pan magnet board! This inexpensive project will help you get organized in a stylish way.

Now that we have a cute magnet board for my daughter’s room, let’s hope that it will help control some of the clutter she manages to keep in there!

-Bre

Filed Under: Crafts, Dollar Tree, Organization

DIY Burlap Basket from a Laundry Basket

July 12, 2017 by Bre 14 Comments

blank

Looking for a Dollar Tree laundry basket idea? Why not turn one into a pretty basket! This is a great, low-cost makeover for any home!

Baskets are an organization and decor staple; you can never have enough!  They’re a perfect spot to plop your pillows and blankets, stick a potted plant, or hide some junk when you need to do a quick house pick up before guests arrive.

Because there is no such thing as too many baskets, I decided to add another to my collection with this upcycle of a Dollar Tree laundry hamper to a pretty decorative basket for my office space!

It's easy to transform a dollar store laundry basket into a pretty burlap basket! What a great Dollar Tree craft project!

Now, let me show you how to upgrade a plain laundry basket into a stylish burlap basket for your home!

Supplies Needed to Make a DIY Basket from a Laundy Basket

This post contains affiliate links.  Please read my disclosure policy for more information.

  • 5 inches wide x 10 yards roll burlap ribbon
  • Dollar Tree laundry hamper
  • Scissors
  • Plastic spray paint in the color of your choice
  • Small wooden tag
  • Paint pen
  • Yarn pom poms

How to Make a Burlap Basket from a Laundry Hamper

Before I give you instructions, I have to show you the plain old laundry basket that I bought at Dollar Tree.  So simple, right?  

It's easy to transform a dollar store laundry basket into a pretty burlap basket! What a great Dollar Tree craft project!

Step One: Spray Paint the Laundry Basket

I started by spray painting the laundry basket with spray paint that adheres to plastic.  My favorite type of plastic spray paint is Rustoleum 2x, but I had to use a different kind from Target for my project. 

The Target spray paint worked just fine in case you were wondering.  

It's easy to transform a dollar store laundry basket into a pretty burlap basket! What a great Dollar Tree craft project!

After I spray painted, I let the basket dry for a looooong time to make sure it really stuck to the plastic hamper, and I plotted the best way to transform it from a laundry basket to a pretty basket.

It's easy to transform a dollar store laundry basket into a pretty burlap basket! What a great burlap craft project!

Love Dollar Tree DIY? I Think You’ll Like These Projects, Too!

  • DIY Picture Frame Flower Box
  • Sea Glass Jars
  • DIY Vase Fillers

Step Two: Cut Burlap Ribbon Into Strips

Once it dried, I grabbed some soft burlap ribbon that is extra wide at 5″ across, and that has sewn edges to reduce fraying.  This burlap ribbon comes in an 11 yard roll, which is the perfect size for this project!  

To begin, I cut a piece that measured 1.5 times longer than the circumference of the laundry hamper base.  (How do you like me throwing around those math terms from second grade?)

It's easy to transform a dollar store laundry basket into a pretty burlap basket! What a great burlap craft project!

Step Three: Weave the Burlap Ribbon

Then I began weaving the burlap ribbon in and out of the slots in the bottom row of the laundry hamper.  

It's easy to transform a dollar store laundry basket into a pretty burlap basket! What a great Dollar Tree craft project!

Step Four: Cut the Excess Burlap

When I got all the way around the base of the basket, I tied off the ends on the inside of the basket and cut off the excess burlap ribbon.  

It's easy to transform a dollar store laundry basket into a pretty burlap basket! What a great Dollar Tree craft project!

Step Five: Repeat the Process

Next, I cut another piece of burlap ribbon and moved up to the next row of slats on the basket; repeating the steps above and making sure to start my weaving one column of slats to the right in order to offset the weaving pattern.  

It's easy to transform a dollar store laundry basket into a pretty burlap basket! What a great burlap craft.

I did this until all of the basket was woven with burlap ribbon!  

In all, I probably used about 8 yards of the burlap ribbon, so I’m glad this spool came in such a long length!  

To finish off this burlap basket, I added a little hang tag that reads “Cozy Things,” and some pom poms.  Pom poms are my fave.

It's easy to transform a dollar store laundry basket into a pretty burlap basket! What a great Dollar Tree craft project!

Can you believe how easy it was to transform a plain Dollar Tree laundry hamper into a pretty basket?  

It's easy to transform a dollar store laundry basket into a pretty burlap basket! What a great Dollar Tree craft project!

Jasper couldn’t resist posing for this photo shoot.  He’s a big fan of this DIY burlap basket. 🙂  

It's easy to transform a dollar store laundry basket into a pretty burlap basket! What a great burlap craft idea!

Next time you see one of those small laundry baskets at the store, make sure to pick one up and transform it into a cute piece of functional decor for your home!  

It's easy to transform a dollar store laundry basket into a pretty burlap basket! What a great Dollar Tree craft project!

And please make sure to pin this post to share the love!  

Filed Under: Dollar Tree

DIY Fourth of July Wreath Made with Dollar Tree Supplies

June 11, 2017 by Bre Leave a Comment

blank

Make a patriotic Dollar Tree craft to celebrate Memorial Day and the Fourth of July!

I can’t believe it’s that time of year again where patriotic decor is lining the shelves.  The Fourth of July will be here before we know it!  

Last week my daughter begged me to take her to Dollar Tree so she could buy her daddy a Father’s Day present (so sweet), and while we were there I picked up some supplies to make a fun Fourth of July Wreath that took ten minutes TOTAL to make.  I promise!  

Make a DIY Fourth of July Wreath with supplies from Dollar Tree! This wreath cost $5 total to make! The tinsel garland adds a festive and sparkly touch for the Fourth of July.

This patriotic wreath is so sparkly and fun for the Fourth!  It reminds me of fireworks.

I made a tinsel garland wreath for Christmas long before I was blogging, so I was excited to have a new holiday to make one for!  

Anyway, RUN to Dollar Tree and get what you need to make this adorable tinsel garland wreath for the Fourth of July.

DIY Dollar Tree Patriotic Wreath Supplies

This post contains affiliate links. Please read my disclosure policy for more information.

  • Wire wreath form
  • Patriotic tinsel garland (buy two strands to be safe)
  • Patriotic headband with glitter stars
  • Chalkboard Star (no longer sold at Dollar Tree, so I recommend getting a wood star cutout and painting it black for the chalkboard look)
  • Hot glue gun and hot glue
  • Scissors
Make a DIY Fourth of July Wreath with supplies from Dollar Tree! This wreath cost $5 total to make! The tinsel garland adds a festive and sparkly touch for the Fourth of July.

How to Make a Dollar Tree DIY Patriotic Wreath

To learn how to make your own tinsel garland wreath for the Fourth of July, watch this fun video I made showing you just how to do it!  

The only thing to mention is that I cut the sparkly stars off of the headband (not shown in the video) to glue onto the chalkboard star.

If you enjoyed this project, please pin this post to Pinterest or share it on Facebook to share the love!  I’d really appreciate it!

Make a DIY Fourth of July Wreath with supplies from Dollar Tree! This wreath cost $5 total to make! The tinsel garland adds a festive and sparkly touch for the Fourth of July.

Filed Under: Crafts, Dollar Tree, Holiday, Patriotic Tagged With: Dollar Tree, Summer, Wreath

Dollar Store Planter Stakes Makeover

March 29, 2017 by Bre 8 Comments

blank

If you haven’t been to Dollar Tree recently, GET OVER THERE!  They have so much cute stuff for spring and Easter!  It’s one of the best times of year to stock up on craft supplies.  Last week I showed you the cute wreath I made with an unexpected Dollar Tree supply, and this week I’m showing you how to upgrade some Dollar Tree plastic bunny planter stakes with a faux finish makeover!  This dollar store planter stakes makeover is so quick and easy, and totally adorable!  Give plastic dollar store planter stakes a beautiful makeover with a faux metal finish! Learn how to easily upgrade the look of these cute spring garden decorations in this post.

Supplies Needed for a Dollar Store Planter Stakes Makeover

Some of these links are affiliate links, which means that I earn a small commission at no added cost to you if you purchase through them.  To read my full disclosure policy, please click here.

  • Plastic bunny garden stakes (from Dollar Tree)
  • Silver spray paint
  • Acrylic paint in dark gray, off white, and brown
  • Stencil brush
  • Paper towel
  • Decorative ribbon

How to Give Dollar Store Planter Stakes a Metal Makeover

I started with these cute bunny planter stakes.  They come in two colors (pink and purple), and are pretty cute on their own!  I just wanted a slightly different look for my planter stakes – one that looked like metal.  The criss-cross pattern on these little guys reminded me of chain link fencing, so I went with a weathered metal finish!Give plastic dollar store planter stakes a beautiful makeover with a faux metal finish! Learn how to easily upgrade the look of these cute spring decorations in this post.

I gave each planter stake a coat of silver spray paint that works on plastic.  I didn’t photograph this step because it was freezing outside.  But, the stakes were very shiny and space-age like!  Give plastic dollar store planter stakes a beautiful makeover with a faux metal finish! Learn how to easily upgrade the look of these cute spring decorations in this post.

I wanted to bring the high shine look down a bit, so I used a dense stencil brush (sometimes called a pouncer), to brush on dark gray acrylic paint all over the bunnies.  I made sure to let some of the shiny silver spray paint show through though.Give plastic dollar store planter stakes a beautiful makeover with a faux metal finish! Learn how to easily upgrade the look of these cute spring decorations in this post.

After this coat of paint dried, I dabbed some white acrylic paint onto certain parts of the bunnies.  I then removed most of it with the paper towel.  Give plastic dollar store planter stakes a beautiful makeover with a faux metal finish! Learn how to easily upgrade the look of these cute spring decorations in this post.

Finally, I dabbed some brown acrylic paint on spots in order to give a slightly rusty look.  I wanted my bunnies to look like junky bunnies – bunnies you’d find at a flea market.Give plastic dollar store planter stakes a beautiful makeover with a faux metal finish! Learn how to easily upgrade the look of these cute spring decorations in this post.

Once everything was dry, I tied some ribbon into one of the bunnies’ hair, and a ribbon around the other’s neck.  I wanted to give these bunnies a little style.Give plastic dollar store planter stakes a beautiful makeover with a faux metal finish! Learn how to easily upgrade the look of these cute spring decorations in this post.

Then I took my bunnies outside and plopped them into the planters that flank my garage.  Give plastic dollar store planter stakes a beautiful makeover with a faux metal finish! Learn how to easily upgrade the look of these cute spring decorations in this post.

Do you want to know a secret about the plants that are in my planter?

Promise not to tell?

They’re FAKE!  Yep!  I ordered them on Amazon.  They’re amazing and withstood the entire Chicago winter and are in perfect condition!  I love that I have a little pop of green by the door all year round.

Give plastic dollar store planter stakes a beautiful makeover with a faux metal finish! Learn how to easily upgrade the look of these cute spring decorations in this post.

Give plastic dollar store planter stakes a beautiful makeover with a faux metal finish! Learn how to easily upgrade the look of these cute spring decorations in this post.

Give plastic dollar store planter stakes a beautiful makeover with a faux metal finish! Learn how to easily upgrade the look of these cute spring decorations in this post.

And I think these bunnies are the perfect spring addition to my fake plants.  (Am I super tacky?  Maybe.  But hey, these things are the PERFECT solution for someone with a black thumb and bad weather.)

Give plastic dollar store planter stakes a beautiful makeover with a faux metal finish! Learn how to easily upgrade the look of these cute spring decorations in this post.

Jasper likes them, too (the bunnies and the fake plants).  Side note: I swear he has eyes.  He just needs a haircut.

Give plastic dollar store planter stakes a beautiful makeover with a faux metal finish! Learn how to easily upgrade the look of these cute spring decorations in this post.

Every time I look out the window and see my fake metal bunny garden stakes I smile.  They’re such a cute way to welcome spring!  Go grab some of these at Dollar Tree before they’re gone.

-Bre

You May Also Like These DIY Solar Light Planters

blank

Filed Under: Dollar Tree, Easter, Holiday

  • « Go to Previous Page
  • Page 1
  • Interim pages omitted …
  • Page 4
  • Page 5
  • Page 6
  • Page 7
  • Page 8
  • Go to Next Page »

Primary Sidebar

Let’s Connect!

Hi, I’m Bre! Thanks for visiting Average But Inspired, where I show you how to work with what you’ve got to create a home you love.

Bre of Average But Inspired - a DIY and craft blog

Love DIY? Subscribe to Get Posts E-mailed!

How Can I Help You?

blank

How to Create a Faux Antique Brass Finish with Paint

blank

My DIY Kitchen Makeover Reveal!

blank

7 Tips for Hosting a Party on a Budget

blank

Limewash Stone Fireplace Makeover: Bye Bye Orange Stone Fireplace, Hello Neutral Stone Beauty!

Looking for Something?

Copyright © 2013-2022, Bre Eggert (Average But Inspired). All rights reserved.
  • Home
  • DIY
  • Crafts
  • Home Decor
  • Privacy Policy and Copyright Policy
  • Disclosures
  • Contact Me