Learn how to update a dresser or other furniture easily and affordably with DecoArt Satin Enamels Paint.
Over the past several months I’ve been making over and decorating my primary bedroom.
It started with the wood slat fireplace makeover, and then the IKEA Rast dressers/nightstands project.
With the shift in design direction happening in that room, my early-2000’s espresso-finish dresser was not playing well in the space.

This post contains affiliate links. Please read my disclosure policy for more information.
It was a little too traditional, but, as it is in wonderful condition, I felt it would be wasteful to swap it for new furniture.
Because of that, I decided to transform the dresser with paint and new hardware. This was a MUCH less expensive solution, and now I get to show you how to paint a dresser, too. A win win!
What paint should you use to paint a dresser?
Before I jump into the dresser painting tutorial, let me answer a question I get all the time: what paint should I use to paint my furniture?
Of course the answer varies depending on the precise application, but I highly recommend using an enamel paint (as opposed to chalk paint or a latex paint). Enamel paints have great coverage, dry very hard (perfect for furniture), and oftentimes don’t require a topcoat (saving you time).
Over the years I’ve painted tons of surfaces, and one paint I keep coming back to is Satin Enamels Paint by DecoArt. This paint comes in small 8 oz. jars and is priced at just around $10 per container.

Here are some of the reasons I love this paint (no, this post is not sponsored and I have no affiliation with DecoArt):
- Satin Enamels paint is odorless
- It is very durable: it dries incredibly hard
- You don’t need to prime or topcoat Satin Enamels paint (note that in some circumstances you will want to prime though!)
- It is affordable
- It dries with a nice sheen – it’s not too shiny and it’s not too dull
One drawback of Satin Enamels paint, however, is that it’s not available in a lot of colors. More on that later!
For a piece of furniture, this is my go-to paint.
Here are some other projects where I used DecoArt’s Satin Enamels Paint
How to Paint a Dresser with Satin Enamels Paint
Alright now that I’ve publicly professed my love for Satin Enamels Paint, let’s get into the nitty gritty of how easy it is to paint a dresser with it!
Step One: Clean the Dresser
Before doing any painting, you need to clean the dresser very well.
I start by dusting it off (sidenote: why does dust seem to love dressers so much?). Then, I clean it with my favorite pre-paint cleaner, Krud Kutter.
Once that’s done, remove the dresser hardware and store it in a safe place.
Step Two: Gently Sand the Furniture
I know, I know – you don’t want to sand before painting. I hear you! But just do it. It doesn’t take that long and it’s really good for paint adhesion!
I used 220-grit sandpaper and just scuffed up the dresser. If you have peeling paint or deep gouges, you’ll want to use a lower grit and maybe even an electric sander to help.
Vacuum up the loose sanding dust, and then wipe down the dresser with a damp cloth. Make sure all of the dust is gone.
Step Three: Prime the Dresser (MAYBE)
OK – you don’t always have to prime before painting with Satin Enamels paint. I recommend it in three instances:
- You’re painting over a slick surface like laminate, tile, marble, etc.; or
- You’re painting a light color over a much darker color; or
- You’re painting over natural wood that could cause tannins or staining to bleed through and ruin the paint finish.
If none of these things apply to your dresser, you can skip the primer!
Step Four: Apply Two Coats of Satin Enamels Paint
Now you’re ready to paint!
As I mentioned above, there aren’t a lot of color choices when it comes to Satin Enamels paint. The good news is you can get creative and mix colors to create your own!
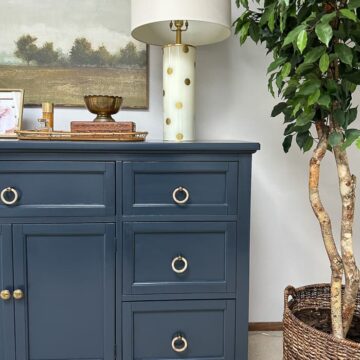
Here I used one jar of Satin Enamels Classic Black and about three tablespoons of Satin Enamels Smoke Grey to create a custom color. The most important thing is to stir and mix constantly throughout the painting process.
To paint this dresser, I alternated between a 2.5″ angled trim brush and a trim roller with a 1/4″ nap roller cover. The roller was great for large, flat surfaces like the dresser top and sides. The angled brush helped get the paint in the detailed spots and on flat areas where the roller didn’t fit.
After the first coat of paint, it looked a little streaky.
But after letting the paint dry for several hours, I applied a second coat of Satin Enamels Paint and it covered everything up nicely.
Step Five: Put the Hardware Back On
After letting the second coat of paint dry, it was time to put the hardware back on.
Instead of putting the same hardware on, I purchased new rattan hoop drawer knobs and installed those instead. I felt like this style of drawer knob or pull helped bring down the traditional styling factor of this dresser a little bit.
The Painted Dresser Makeover Reveal
And with just a few hours of work and some new hardware, I got a brand-new, old dresser!
And a great thing to note is that I only got one tiny little bit of paint on the carpeting. Ha!
Next up in this primary bedroom makeover: the primary bathroom! Construction is scheduled to begin in May 2023, and I can’t wait to bring you along on that journey!
Until that time, I will be enjoying my painted dresser and trying to keep piles of laundry from overtaking it. Wish me luck.