• Skip to primary navigation
  • Skip to main content
  • Skip to primary sidebar
Average But Inspired logo - DIY and craft

Average But Inspired

Craft a home you love. DIY and craft tutorials.

  • About
    • Contact Me
    • Disclosures
    • Privacy Policy and Copyright Policy
  • DIY
    • Furniture
  • Crafts
    • Dollar Store Crafts
    • Seasonal
      • Patriotic & Summer
      • Valentine’s Day
      • Easter & Spring
      • Fall & Halloween
      • Christmas & Winter
  • Home Decor
    • Organization
  • Shop
    • DIY Guides
  • Home

Furniture

Denim Faux Finish Furniture Painting Technique {A Lingerie Chest of Drawers Makeover}

September 5, 2018 by Bre 6 Comments

Several years ago I refinished my childhood dresser for use in my son’s bedroom.  I recently got the matching lingerie chest of drawers back from my sister, and I couldn’t wait to give it a makeover, too!  My son’s room has enough furniture already, so I decided to make over this piece for my husband (as, like most men, he needs all the storage and organization help he can get!).  I tried a new denim faux finish furniture painting technique on it and I’m so excited to show you how to replicate the look on your own projects!  Before we get to the good stuff, however, take a look at the dated “before” of this chest of drawers!  So pretty! Learn to create a denim faux finish for furniture with this furniture painting technique post! Layered chalk paint and dark wax create this moody blue denim faux finish look.

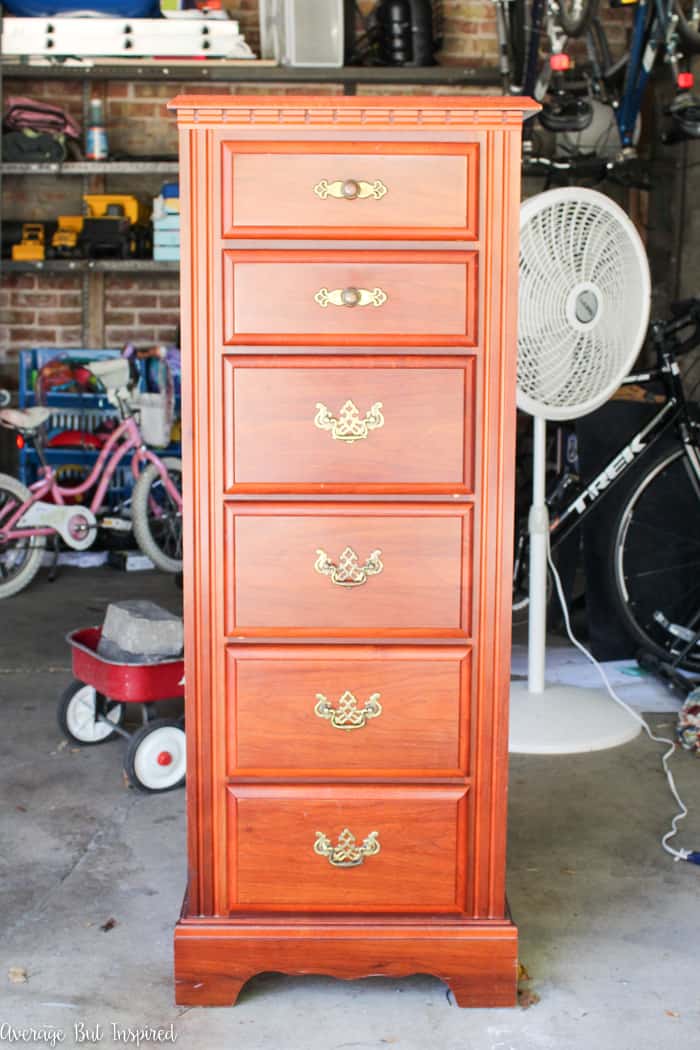
It’s hard to see in this photo, but the chest had a lot of dings and scratches.  The orangey red cherry finish was not my favorite, either!  Because of that, I hatched a plan to make this piece extra manly with a denim inspired paint job.

Supplies Needed for a Denim Faux Finish for Furniture

This post contains affiliate links.  To read my full disclosure policy, please click here.

  • Dark blue chalk paint (I used this paint)
  • Light blue chalk paint (I used this paint)
  • Sage green chalk paint (I used this paint)
  • Clear finishing wax (this is my all time favorite!)
  • Black wax
  • Disposable chip brushes
  • 1″ paint brush
  • Large wax brush
  • Stencil brush
  • Spray bottle filled with water
  • Lint-free rags

How to Create a Denim Faux Finish for Furniture

For this piece, I began by removing the hardware and wiping it down to clean off the dirt and grime.  Once it was clean, I used a cheap chip brush to paint on chalk paint in a sage green color.  Some areas got a heavier application than others.So pretty! Learn to create a denim faux finish for furniture with this furniture painting technique post! Layered chalk paint and dark wax create this moody blue denim faux finish look.

Once that paint dried, I did the same thing with the bluish gray chalk paint.  At this point the chest of drawers looked CRAZY, and I cringed with embarrassment every time the garage door opened.  I’m sure my neighbors thought I was working on the ugliest furniture piece in history!So pretty! Learn to create a denim faux finish for furniture with this furniture painting technique post! Layered chalk paint and dark wax create this moody blue denim faux finish look.

I made sure to leave some of the green paint showing, as well as some of the original cherry finish.  As with the green paint, some areas of the light blue paint went on thicker than others.

After this second coat of paint dried, I switched brushes to a real paint brush (from the cheap chip brushes, which give a streakier look), and began applying the dark blue chalk paint in sections.  I brushed the paint on, let it sit for a minute or two, and then sprayed it with a mist of water from the spray bottle.  So pretty! Learn to create a denim faux finish for furniture with this furniture painting technique post! Layered chalk paint and dark wax create this moody blue denim faux finish look.

I then went over that area with the same paint brush and worked to blend the paint and water throughout that section.  Using the spray bottle allowed more of the colors underneath the dark blue paint to show through, and created a blended paint look.  So pretty! Learn to create a denim faux finish for furniture with this furniture painting technique post! Layered chalk paint and dark wax create this moody blue denim faux finish look.

I worked in sections until I covered the whole chest of drawers with the paint / spray bottle technique.  So pretty! Learn to create a denim faux finish for furniture with this furniture painting technique post! Layered chalk paint and dark wax create this moody blue denim faux finish look.

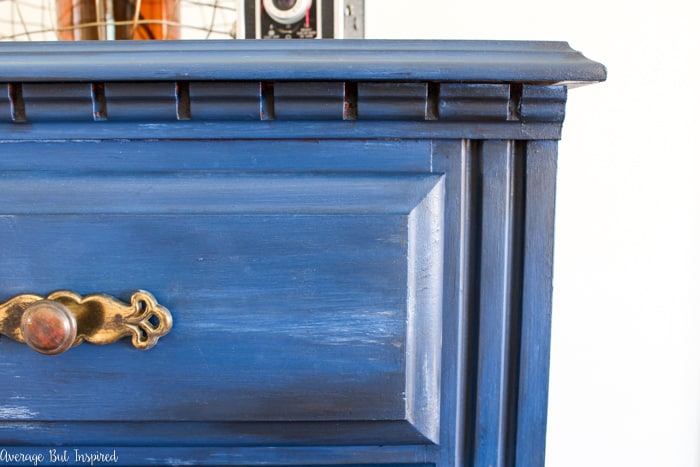
I let the chest of drawers sit overnight to be sure it was completely dry, and the next day I got to work sealing it with my favorite clear finishing wax.  Once the entire piece was sealed, the final step in creating a denim faux finish on this piece began.  I applied black wax with a stencil brush to the raised portions of the chest, and then I used a clean rag to rub it in.  So pretty! Learn to create a denim faux finish for furniture with this furniture painting technique post! Layered chalk paint and dark wax create this moody blue denim faux finish look.

For the drawers, I applied black wax along the outer edges and then rubbed it inward so that the outer portions were darker than the middle portions of the drawers.  (I don’t normally wear a dress to paint furniture, but it was 92 degrees that day and this was one of the coolest things I had to wear!  My husband snapped this picture while he was sitting there “supervising.”  ;-))So pretty! Learn to create a denim faux finish for furniture with this furniture painting technique post! Layered chalk paint and dark wax create this moody blue denim faux finish look.

The black wax is the KEY to giving the furniture a moody and worn denim feel!  So are you ready to see the finished piece?  So pretty! Learn to create a denim faux finish for furniture with this furniture painting technique post! Layered chalk paint and dark wax create this moody blue denim faux finish look.

It’s so masculine, don’t you think?  So pretty! Learn to create a denim faux finish for furniture with this furniture painting technique post! Layered chalk paint and dark wax create this moody blue denim faux finish look.

So pretty! Learn to create a denim faux finish for furniture with this furniture painting technique post! Layered chalk paint and dark wax create this moody blue denim faux finish look.

The black wax adds so much depth to the finish!  I really think it makes the piece special and is what makes it feel like an old pair of jeans instead of the new, stiff ones you just picked up at the Gap.  So pretty! Learn to create a denim faux finish for furniture with this furniture painting technique post! Layered chalk paint and dark wax create this moody blue denim faux finish look.The blended layers of paint and moody colors make this chest of drawers perfect for my husband!  Now I just have to make sure he keeps the contents within tidy!  (Easier said than done.)

I would really appreciate it if you’d share this post with anyone you think would enjoy it!  Pin it or share it on Facebook to show how easy it is to make a dramatic statement with paint!  So pretty! Learn to create a denim faux finish for furniture with this furniture painting technique post! Layered chalk paint and dark wax create this moody blue denim faux finish look.

-Bre

Filed Under: Furniture

Chalk Painted Drop Leaf Table Makeover

August 7, 2018 by Bre 14 Comments

blank

This painted drop leaf table makeover is a true trash to treasure gem! You won’t believe the before and after.

Several weeks ago my kids and I were driving when I spotted a table in the alley behind our church.  Like the dedicated furniture hoarder that I am, I immediately threw the car into reverse and backed into the alley to check it out. 

It was an old drop leaf table that hadn’t sold at the church’s annual rummage sale, and it had been put out (along with a lot of other random stuff), just waiting for me to come along and scoop it up!  

This chalk painted drop leaf table makeover is one not to miss! See how this alley find was transformed with chalk paint and given a whole new life.

Divine furniture intervention?  I think so.

I struggled to get it into the hatch and sort of got it to fit.  Being unable to close the hatch door, I enlisted the help of my children, and pleaded with them to hold onto the table so it wouldn’t fall out as I drove us the four blocks home. 

They told me I am crazy, and I told them I’m giving them memories to laugh about someday when they’re grown.

Having already dealt with my children’s judgment, I next had to face the laughter of my husband and his friend, who had no faith in my ability to tighten the table’s legs and make it pretty again.  I got to work and showed them.

Supplies Used for This Painted Drop Leaf Table Makeover

This post contains affiliate links.  To read my full disclosure policy, please click here.

  • Spray shellac
  • ArtMinds Chalk Paint in Smoked Pearl
  • Fat Paint paint in Parchment (a similar is ArtMinds Chalk Paint in Porcelain)
  • Electric sander and sandpaper (120 grit)
  • Paint brushes
  • Clear wax
  • Wax brush
  • Bone inlay stencil
  • Stencil brush

Drop Leaf Table Makeover How-To

With a little prep work and lots of paint, this drop leaf table got a new lease on life.

Table Makeover Prep Work

Because this drop leaf table had been out in the rain, I sanded it down and sprayed it with two coats of Zinsser Shellac. 

Shellac is a very smelly but very amazing tool.  It seals the wood so that any stains, tannins, or damage on the wood does not bleed through to the paint.

Painting the Table Top

Then I painted the table top with two coats of ArtMinds chalk paint in Smoked Pearl.  I’ve used this paint a couple of times now (like on my Mirror Makeover) and I like it and its low price!

This chalk painted drop leaf table makeover is one not to miss! See how this alley find was transformed with chalk paint and given a whole new life.

Painting the Table Legs

Once the top was finished, I painted the table base and legs with FAT Paint in Parchment. 

I had this color left over from the Console Table Makeover I did last year and was happy to put it to good use because it’s great paint with great coverage!  

This chalk painted drop leaf table makeover is one not to miss! See how this alley find was transformed with chalk paint and given a whole new life.

Adding a Bone Inlay Stencil Detail to the Table Top

I decided to add a stencil detail to the table top because, for better or worse, I have a hard time leaving things “plain.” 

I used a bone inlay stencil (the one I used is no longer sold, but this bone inlay stencil is similar), and carefully dabbed on the same color paint used on the table legs (Parchment by FAT Paint Co.).  

This chalk painted drop leaf table makeover is one not to miss! See how this alley find was transformed with chalk paint and given a whole new life.

Finishing the Drop Leaf Table

Once the paint was totally dry, I used a fine grit sandpaper to lightly distress the legs and edges of the table top. 

Then I used the same fine grit sandpaper on my sander to lightly distress the table top and to remove some of the paint left by the stencil.  I was going for a somewhat aged look, but not overly beat up. 

Then I sealed it with a coat of clear wax and buffed to a subtle sheen.

The Finished Drop Leaf Table Makeover

How do you think my painted drop leaf table turned out?

This chalk painted drop leaf table makeover is one not to miss! See how this alley find was transformed with chalk paint and given a whole new life.

Not too bad for an alley find, right?  

This chalk painted drop leaf table makeover is one not to miss! See how this alley find was transformed with chalk paint and given a whole new life.

This chalk painted drop leaf table makeover is one not to miss! See how this alley find was transformed with chalk paint and given a whole new life.

This chalk painted drop leaf table makeover is one not to miss! See how this alley find was transformed with chalk paint and given a whole new life.

I think the stencil was a good touch; not too much detail and just enough to make this table have a little more personality.  

This chalk painted drop leaf table makeover is one not to miss! See how this alley find was transformed with chalk paint and given a whole new life.

Plus, how fun is it that you can adjust the levers underneath the table and make it larger when you need it?  

This chalk painted drop leaf table makeover is one not to miss! See how this alley find was transformed with chalk paint and given a whole new life.

I think this little alley cat is giving my other alley table makeover a run for it’s money! 

If you agree, I’d love for you to pin this post to Pinterest to share the inspiration (thank you)!  

This chalk painted drop leaf table makeover is one not to miss! See how this alley find was transformed with chalk paint and given a whole new life.

What’s the best thing you have found in an alley or on the side of the road?  Let me know in the comments!

Filed Under: Furniture

A Rifle Paper Co. Inspired Furniture Makeover

June 12, 2018 by Bre 6 Comments

blank

Two things I love love love are Rifle Paper Co. and furniture makeovers.  If you’re not familiar with Rifle Paper Co, check out their website.  Their floral and whimsical patterns are right up my alley.  I’ve used their patterned papers on several projects, including this Console Table Makeover, my grandma’s Side Table Makeover, and most recently, on books flanking my Spring Mantel.  I’m definitely a fan girl.

When I scored this little bench or side table at Goodwill for $4, incorporating Rifle Paper’s beautiful patterns was not part of the makeover plan.  This Rifle Paper Co. inspired furniture makeover is so cute! Freehand painted flowers adorn the top of this chalk painted stool to give it a charming new look.

I was just going to sand it down and paint it.  This Rifle Paper Co. inspired furniture makeover is so cute! Freehand painted flowers adorn the top of this chalk painted stool to give it a charming new look.

But once I began working on it, the plan changed . . . as it almost always does.

I re-stained the top portion of the bench/table and painted the legs with a beautiful mossy green chalk paint.  This Rifle Paper Co. inspired furniture makeover is so cute! Freehand painted flowers adorn the top of this chalk painted stool to give it a charming new look.

It looked a lot better but was a little too plain for my liking, so I decided to decoupage some leftover Rifle Paper Co. paper on the top.  I cut the piece to fit the entire top portion of the bench/table (or so I thought), and found it was totally wrong.  The curvature of the top of the bench/table really messed me up.  I ruined a perfectly good sheet of decorative paper.

Not one to give up easily, I cut out a small part of the paper and then drew the pattern from that portion onto the top of the bench/table.  This Rifle Paper Co. inspired furniture makeover is so cute! Freehand painted flowers adorn the top of this chalk painted stool to give it a charming new look.

I filled it all in with a mix of chalky finish paints and acrylic paints that I had in my craft stash, and then sealed the entire piece with wax.  This Rifle Paper Co. inspired furniture makeover is so cute! Freehand painted flowers adorn the top of this chalk painted stool to give it a charming new look.

And just like that, the little bench/table got some personality!  This Rifle Paper Co. inspired furniture makeover is so cute! Freehand painted flowers adorn the top of this chalk painted stool to give it a charming new look.

This Rifle Paper Co. inspired furniture makeover is so cute! Freehand painted flowers adorn the top of this chalk painted stool to give it a charming new look.

I love her sweet curved legs and arched top – she’s just the cutest little piece of furniture!  This Rifle Paper Co. inspired furniture makeover is so cute! Freehand painted flowers adorn the top of this chalk painted stool to give it a charming new look.

This Rifle Paper Co. inspired furniture makeover is so cute! Freehand painted flowers adorn the top of this chalk painted stool to give it a charming new look.

I think she’d make an adorable plant stand sitting on someone’s covered porch or next to a fireplace.  Where do you think this piece of furniture would fit best?

-Bre

YOU MAY ALSO LIKE THIS FURNITURE MAKEOVER  

blank

Filed Under: Furniture

A Dated Powder Room Gets a Bold Makeover!

May 22, 2018 by Bre 12 Comments

blank

I absolutely love doing room makeovers.  And you know what I’ve discovered?  It’s even better when I’m spending someone else’s money to do them!  HA!  I had the opportunity to do just that over Mother’s Day weekend when I gave my mom’s dated powder room a bold makeover with an olive green bathroom vanity paint job and lots of new accessories.

Here’s what the powder room looked like before it got a new look (sorry the before pics are so small – she snapped them with her cell phone (also in need of an upgrade ;-)):  

As you can see, the powder room consisted of a dated oak vanity and hardware, nondescript art and accessories, and a blah mirror.  (No offense, mom!) 

A 1990s powder room got a pretty makeover with a painted olive green bathroom vanity!

Thank you to DecoArt for providing the Americana Decor Satin Enamels paint used in this post.  The project and opinions are all my own!  Also, this post contains affiliate links.  To read my full disclosure policy, please click here.

We changed all of that in under 18 hours (seriously!), and the new look couldn’t be better.

Are you ready?  

A painted olive green bathroom vanity adds a bold touch to a small powder room. See how this 1990s powder room was transformed in a day!

Can you believe it’s the same powder room?!?

This completely budget-friendly makeover started with my mom’s handyman changing out her faucet and light fixture. 

Once he finished his work, I got painted the vanity with my FAVORITE bathroom vanity paint – Americana Decor Satin Enamels.  I used this paint in my master bathroom makeover (see it here) last year, so I knew it would be perfect for my mom’s powder room makeover, too. 

She selected the Woodland Green shade (which is now, unfortunately, discontinued).  It’s so vibrant – it’s a wonderful olive green bathroom vanity color.   

A dated powder room gets a colorful and modern makeover with a green painted vanity and fresh accessories! Brass and oil rubbed bronze fixtures blend together to create a modern look.

In just two coats, the vanity was completely painted and had a whole new look!  We added some new hardware (knob and drawer pulls) to match the brass finish on the new mirror, while we changed all of the other hardware (faucet, towel bar, toilet paper roll, and light fixture) to oil rubbed bronze so as not to overdo the brass finishes in the room! 

The new rug picks up the olive green shades from the vanity and brings in some teal, too.  We had planned on using a different rug with adorable tassels, but the tassels were in the way of the door, so we had to return it.  This rug was the next best thing!

A dated powder room gets a colorful and modern makeover with a green painted vanity and fresh accessories! Brass and oil rubbed bronze fixtures blend together to create a modern look.

We got this mirror from Target’s Opalhouse line, but unfortunately it’s now out of stock.  

A dated powder room gets a colorful and modern makeover with a green painted vanity and fresh accessories! Brass and oil rubbed bronze fixtures blend together to create a modern look.

That wall art you see reflected in the mirror is also from Target.  It is SO pretty and even has added texture to make it look like an authentic piece of art instead of a mass-produced piece from a big box store.  Yay!  

A dated powder room gets a colorful and modern makeover with a green painted vanity and fresh accessories! Brass and oil rubbed bronze fixtures blend together to create a modern look.

More wall art and a pretty new hand towel bring even more teal into the space, perfectly complementing the olive green bathroom vanity.

A dated powder room gets a colorful and modern makeover with a green painted vanity and fresh accessories! Brass and oil rubbed bronze fixtures blend together to create a modern look.

A dated powder room gets a colorful and modern makeover with a green painted vanity and fresh accessories! Brass and oil rubbed bronze fixtures blend together to create a modern look.

The whole powder room came together so nicely and so quickly!  I just love it when that happens!

A dated powder room gets a colorful and modern makeover with a green painted vanity and fresh accessories! Brass and oil rubbed bronze fixtures blend together to create a modern look.

It’s amazing to me that in less than a day, we were able to make a dated space so modern and fresh – and it didn’t even cost a fortune!  

A dated powder room gets a colorful and modern makeover with a green painted vanity and fresh accessories! Brass and oil rubbed bronze fixtures blend together to create a modern look.

This was definitely the most fun Mother’s Day I can remember!

If you enjoyed this makeover, I’d appreciate it if you’d pin this post to Pinterest or share it with your friends!  Show them how easy it is to update a space with paint and accessories!
A dated powder room gets a colorful and modern makeover with a green painted vanity and fresh accessories! Brass and oil rubbed bronze fixtures blend together to create a modern look.

-Bre

Filed Under: Furniture, home decor

How to Paint a Mirror Frame Without Removing the Mirror

April 4, 2018 by Bre 13 Comments

blank

Last week was spring break for my kids and we had a lot of fun with little adventures and taking it easy at home!  Being on more of a relaxed schedule gave me some extra time to get little projects done around the house, like repainting the mirror that hangs in my foyer.  Here’s what it looked like, pre-paint job.Give an old mirror new life with a paint job! Learn how to paint a mirror frame without removing the mirror with this surprising trick!

I purchased that mirror right before my daughter (first child) was born – thinking that once she arrived I would never again have time to go to a store in my life.  So I rushed into the purchase and bought the first thing I found to fill the wall.  Needless to say, the faux silver finish wasn’t really doing it for me anymore (ever, really!), and with our foyer freshly repainted and new brass ceiling light on the way, I needed to give the mirror some pep!

The problem was that I couldn’t get the mirror out of the mirror frame!  I tried really hard but it just would not budge.  Whoever made it did a great job with the glue.  Having spent a lot of time trying to get the mirror out, I was invested at this point and ready to paint!  So I figured out a SUPER EASY way to paint a mirror frame without removing the mirror, and I didn’t even damage the mirror in the process!

You won’t believe this trick.  I rubbed Aquaphor all along the edges where the mirror met the mirror frame.

Give an old mirror new life with a paint job! Learn how to paint a mirror frame without removing the mirror with this surprising trick!

The reason I used Aquaphor is because it’s what I had on hand.  You could absolutely use Vaseline or petroleum jelly, which is cheaper than Aquaphor!  (Funny note about Aquaphor: I became addicted to it in college when I went on Accutane for my major acne problem.  It saved my lips and my skin from burning to a crisp!  Now I always have it at home, and I use it for everything!)  Give an old mirror new life with a paint job! Learn how to paint a mirror frame without removing the mirror with this surprising trick!

See that nice line of Aquaphor all around the mirror?  It saved me during this mirror painting project!

Now that you know the trick of how to paint a mirror frame without removing the mirror, let me show you how I repainted my mirror and another fun way I used Aquaphor in this project!  I started by painting the mirror with a red chalk paint.  Notice that I got some paint on the mirror, but on the parts where the Aquaphor covered the glass.Give an old mirror new life with a paint job! Learn how to paint a mirror frame without removing the mirror with this surprising trick!

After that paint dried, I used Aquaphor to help create a distressed finish on the mirror frame.  Watch this video to see just how easy it is to distress painted furniture with Aquaphor or Vaseline!


Although the section I distressed in the video isn’t very dramatic, you can definitely use Aquaphor or Vaseline to make the distressed areas more prominent, like on other parts of this mirror.

Give an old mirror new life with a paint job! Learn how to paint a mirror frame without removing the mirror with this surprising trick!

After all the paint dried, I used a flat head screwdriver to gently remove any paint that made its way onto the mirror.  It came up instantly because of the Aquaphor!  I just wiped it up with a paper towel and then used glass cleaner to remove any residue.Give an old mirror new life with a paint job! Learn how to paint a mirror frame without removing the mirror with this surprising trick!

It was so easy to remove the metallic finish on this mirror and give it a new look.  But hey, guess what?  I’m not sure I like the new look so I may repaint again!    Give an old mirror new life with a paint job! Learn how to paint a mirror frame without removing the mirror with this surprising trick!

Give an old mirror new life with a paint job! Learn how to paint a mirror frame without removing the mirror with this surprising trick!

Even though I’m undecided on the actual paint job, I can’t believe how easy it is to paint a mirror frame without removing the mirror!  So, I’m not all that worried about repainting it if I still don’t love it after a month or so.Give an old mirror new life with a paint job! Learn how to paint a mirror frame without removing the mirror with this surprising trick!

What do you think?  Do you like the two-tone distressed finish, or do you think it would look better as a solid color?  Give an old mirror new life with a paint job! Learn how to paint a mirror frame without removing the mirror with this surprising trick!

Let me know what you think in the comments below!

Give an old mirror new life with a paint job! Learn how to paint a mirror frame without removing the mirror with this surprising trick!

-Bre

Filed Under: DIY, Furniture

5 Furniture Makeover Mistakes to Avoid {Lessons From a Failed Furniture Flip}

January 3, 2018 by Bre 34 Comments

blank

One hot summer night I sat in front of the TV, watching reruns of an intellectually stimulating show (most likely Real Housewives of Dallas or some other random city), while mindlessly scrolling through Facebook.  Suddenly, a post showed up in my newsfeed of someone selling a gorgeous and antique roll top desk in my local resale group . . . for $40.

I had to have it!

Without hesitation, I commented “SOLD” and committed to purchase this stunning* desk that gave me butterflies!  (*Stunning in pictures only.  Keep reading.)

Furniture makeovers don't always go as planned! Here are five things to consider before tackling a furniture makeover.

I didn’t need a desk and I certainly didn’t know how I was going to get it to my house, but I was thrilled to have “won” it!

Reality set in the next day when I had to send my poor husband to retrieve it (by that I mean make two trips to the seller’s house, dismantle the desk, and bring it home to me), and I realized it was way too large to use in my own home.  At that point I decided I would give it a makeover and re-sell it.  I assured my husband I would be able to sell it for way more than I paid, and that his efforts in bringing it home for me would be worth it.

But, as I’m sure you can guess from the title of this post, things did not go according to plan. 

Instead, this furniture makeover was a TOTAL DISASTER; destined for failure from the beginning.  But, my friends, I learned some valuable lessons from it, which I am happy to pass along to you in hopes that you learn from my mistakes (or at least find satisfaction in knowing you’re much smarter than me because you wouldn’t have been so dumb)!  Don't make these mistakes when refinishing furniture! These five furniture makeover mistakes to avoid will save you time and money! #furniturepainting

5 Furniture Makeover Mistakes to Avoid

No. 1: Don’t buy furniture without inspecting it in person first.

This probably seems super obvious.  It really should be, but sometimes emotions can get the best of us.  I got caught up in the immediacy of this desk being available on Facebook.  Because I didn’t want to lose my chance to get it, I commented SOLD before I even saw the piece in person!

If I would have looked at it before buying, I would have seen that it was not an antique (it had a big stamp on the back that said “Made in Mexico 1992”), that it was not solid wood (there were several cheap-looking plastic wood veneer parts), and that one of the bottom drawers was broken and not functional.

The desk looked beautiful in the photo posted on Facebook, but when my husband got it home for me, I immediately knew that it wasn’t as nice as I’d thought!  Looks can be deceiving.

No. 2:  Make sure you have space for the furniture you’re refinishing.

Normally I refinish furniture in my laundry room inside my house.  (You can see my successful furniture makeovers in my Furniture Makeover Gallery!)  This desk was too large for that, so I had to keep it in my garage (which meant that I couldn’t park my car in there for months . . . well into the winter.)

The hassle of parking outside aside, keeping this piece in my garage was a terrible idea because the garage was not a safe place for it.  After I’d begun repainting it, my husband put a giant scratch in it accidentally, and, unbeknownst to me, water from the garage door was dripping on it, ruining a part I’d refinished.  

Before you make over a piece of furniture, read this post! Here are five mistakes to avoid when doing furniture makeovers.

It also turned cold really early in the season, which made it very difficult to work on the desk.  Paint and wax do not cure properly in cold temperatures, and working outside in the cold is no fun!

Never again will I commit to a piece that I cannot refinish inside or in a location that’s safe from the elements and the hazards of daily life!

No. 3:  Paint colors from different containers are not always the same.

After the painted portions of my desk sustained the scratch and water damage, I tried to fix them with a fresh coat of paint or two.  The problem was that my original jar of paint had frozen, thanks to our early cold spell and me leaving it in the garage.  I purchased another container of the same paint and touched up the affected areas, only to find that the paint in the second jar was a slightly different shade than the paint in the first jar!  

blank

In order to get a cohesive look, I was going to have to remove the hutch portion of the desk to re-refinish the desk top, but I was not strong enough to disassemble it and remove it!  Plus, the freezing weather had set in, and I wasn’t able to repaint and re-seal the entire thing.  At this point, I decided to throw in the towel.  My antique impostor desk was becoming too much of a hassle and I wanted my garage parking space back.

No. 4:  Furniture can be harder to get rid of than you might think!

Because I was fed up with this desk, I hopped online and scheduled a Salvation Army pickup for the earliest date possible, which was about three weeks out.  A few days before pickup day, the truck coordinator called me to get the desk’s measurements.  When I told him what they were, he said the desk was probably too large for pickup, but he’d put the order in anyway and leave it up to the driver to take it or leave it.

On the day the Salvation Army truck pulled into my driveway, I was a nervous wreck.  I showed the driver the desk and he laughed, saying that there’s no way they’d take the desk because “nobody wants old looking stuff like that.”  (A. I didn’t think that would be the problem!; and B. I guess he doesn’t read blogs like mine.  I love “old stuff!”)

I begged him to take it, so he took some pictures of it and sent them to his supervisor.  His supervisor initially said “no,” but friends, I was praying SO HARD that he would change his mind, and then, miraculously, he did!  So, the guys loaded this beast of a desk onto their truck, and then drove off with lots of snacks and all of the cash money that I could give to thank them for taking this desk out of my life.  (People really love snacks!)

blank

For days after that, every time I heard a truck come down the street, I was worried it was the Salvation Army bringing the desk back!  Post-traumatic stress, I think.

So, let that be a lesson that it’s not always as easy to get rid of furniture as you might think!

No. 5:  Even if you fail, don’t let it defeat you.  Enjoy the creative process and learn from it!

I totally blew this furniture makeover.  No question.  I had to apologize to my husband about ten gazillion times and I still probably owe him a six-pack or something (the Salvation Army guys said I need to go buy him the “good stuff” (yes, they heard this whole story)), and I spent a whole lotta time and money on a project that went nowhere.

BUT . . .

I learned SO MUCH from this failed furniture makeover!

On top of all of the lessons I’ve already shared in this post, I tried a cerusing finish (basically, using white wax on natural oak woodgrain), on the parts I didn’t paint, which was really fun and something I’d never done before.  I found out that I really like using white wax as a subtle way of taking down the orange in an oak finish.  It’s definitely something I’ll try again.

Use white wax to remove the orange from oak. This is a ceruse finish.

Although this most recent furniture makeover of mine was a failure, it won’t be my last.  I enjoy refinishing furniture and this mishap taught me some valuable lessons that I’ll use going forward.

I hope that my mistakes will inspire you to keep forging ahead with your creative endeavors (furniture makeovers or anything else!), despite bumps in the road that will occur from time to time.  We can’t all be perfect all of the time (just most of the time – HA!).  Now please excuse me while I go park my car in the garage.

-Bre


Filed Under: Furniture

  • « Go to Previous Page
  • Page 1
  • Page 2
  • Page 3
  • Page 4
  • Page 5
  • Page 6
  • Interim pages omitted …
  • Page 8
  • Go to Next Page »

Primary Sidebar

Let’s Connect!

Hi, I’m Bre! Thanks for visiting Average But Inspired, where I show you how to work with what you’ve got to create a home you love.

Bre of Average But Inspired - a DIY and craft blog

Love DIY? Subscribe to Get Posts E-mailed!

How Can I Help You?

blank

Limewash Stone Fireplace Makeover: Bye Bye Orange Stone Fireplace, Hello Neutral Stone Beauty!

blank

How to Paint Over Tile

blank

How to Create a Faux Antique Brass Finish with Paint

blank

How to Paint a Countertop to Look Like Marble!

Looking for Something?

Copyright © 2013-2022, Bre Eggert (Average But Inspired). All rights reserved.
  • Home
  • DIY
  • Crafts
  • Home Decor
  • Privacy Policy and Copyright Policy
  • Disclosures
  • Contact Me