So the other day I was aimlessly wandering the aisles of Home Depot, looking for nothing in particular. (Do you ever do that? They have some cool stuff there!) I happened upon these little wood trim corner blocks that people typically use to fancy up their doorways. I snagged a few of them in various sizes and knew they’d make the perfect pumpkins! Have you ever seen wood trim corner block pumpkins before? [Read more…] about Wood Trim Corner Block Pumpkins
Holiday
Early Fall Door Decor (That Easily Changes With the Seasons!)
Ugh. I’m sort of hating myself right now. You see, I promised myself that I absolutely would not post anything fall-related until mid-September at the earliest.
But then I made this early fall door decor. And I caved and decided to post it now anyway. Because the truth is that I am so far behind schedule on all of my other projects that I really had nothing else to write about now.
I hope you’ll forgive me. And I hope you like it. (And I hope you “Pin It.” Ha!)
[Read more…] about Early Fall Door Decor (That Easily Changes With the Seasons!)
Patriotic Embroidery Hoop Wreath
Whew. It’s been so long since I’ve posted that I honestly could not even remember the web address for the site I use to write these posts. Or my username and password, for that matter. Thank goodness I had that written down in one of the gazillion lists I keep. (There is a method to my madness!)
Anyway, as some of you reading this post know, I took a blogging break for the past month to be in Wisconsin with my family because my father was extremely ill and battling brain cancer.
Sadly, he passed away on June 5.
I will forever be grateful that I got to spend so much time with him during his last few days, and that upon his passing he was surrounded by some of the people who loved him most. I know he’s in a better place now — no longer suffering from the effects of the wretched disease that took so much from him — but I can’t help but feel sad because I know I can’t call him for a quick chat anymore or see him whenever I want. I hope the weight of that feeling will lessen with time.
Upon my dad’s passing, I debated whether or not to return to blogging. Writing about craft projects and home decor seemed so inconsequential and, in a way, foolish. But, after some time and introspection, I realized that I truly missed it. And in not blogging, I felt like I was missing a part of myself. So I decided to give it a try again and see what happens.
My dad always loved celebrating any of the holidays, so I feel like this patriotic embroidery hoop wreath that I created for DecoArt is a good project to get my blogging wheels turning again.
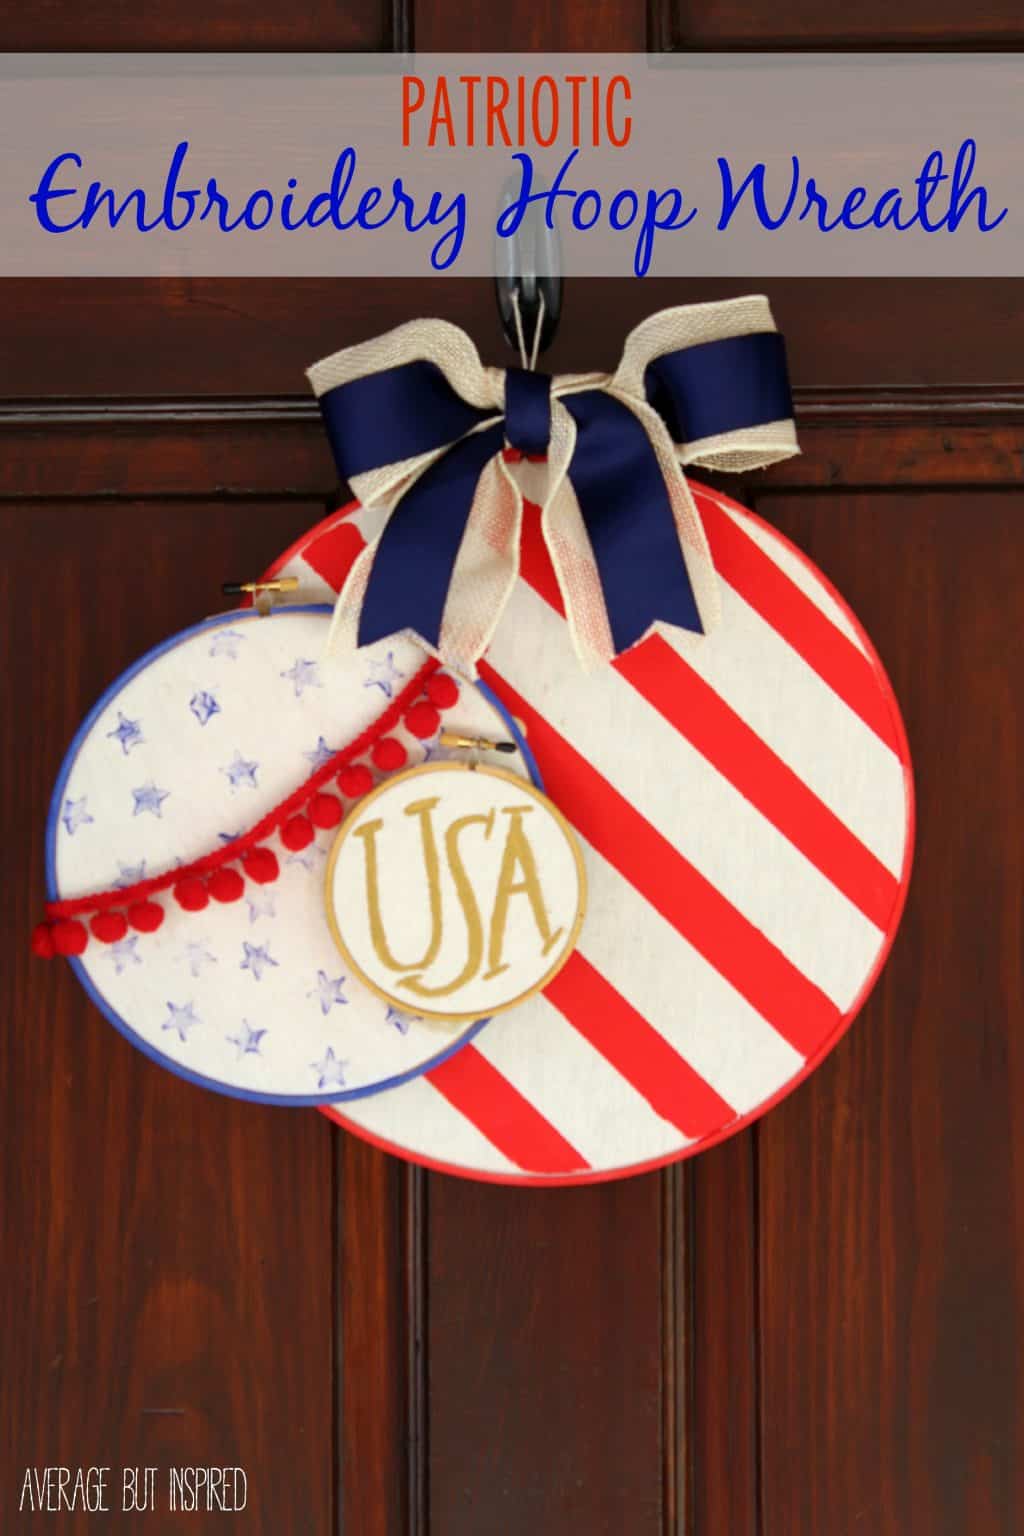
It’s happy and festive, which I know my dad would want me to be again, too.
You can find the step-by-step instructions and photos on how to put this patriotic embroidery hoop wreath together right here on DecoArt’s website.
I wrote the tutorial, so if you have any questions you can leave them right in the comment box of this post!
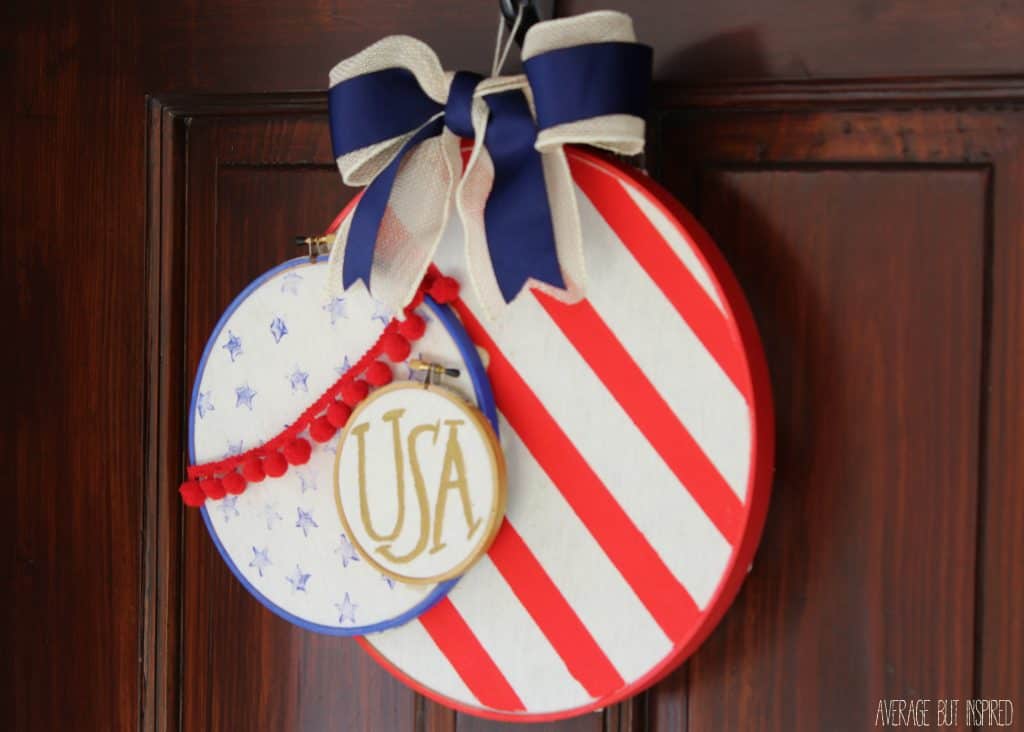
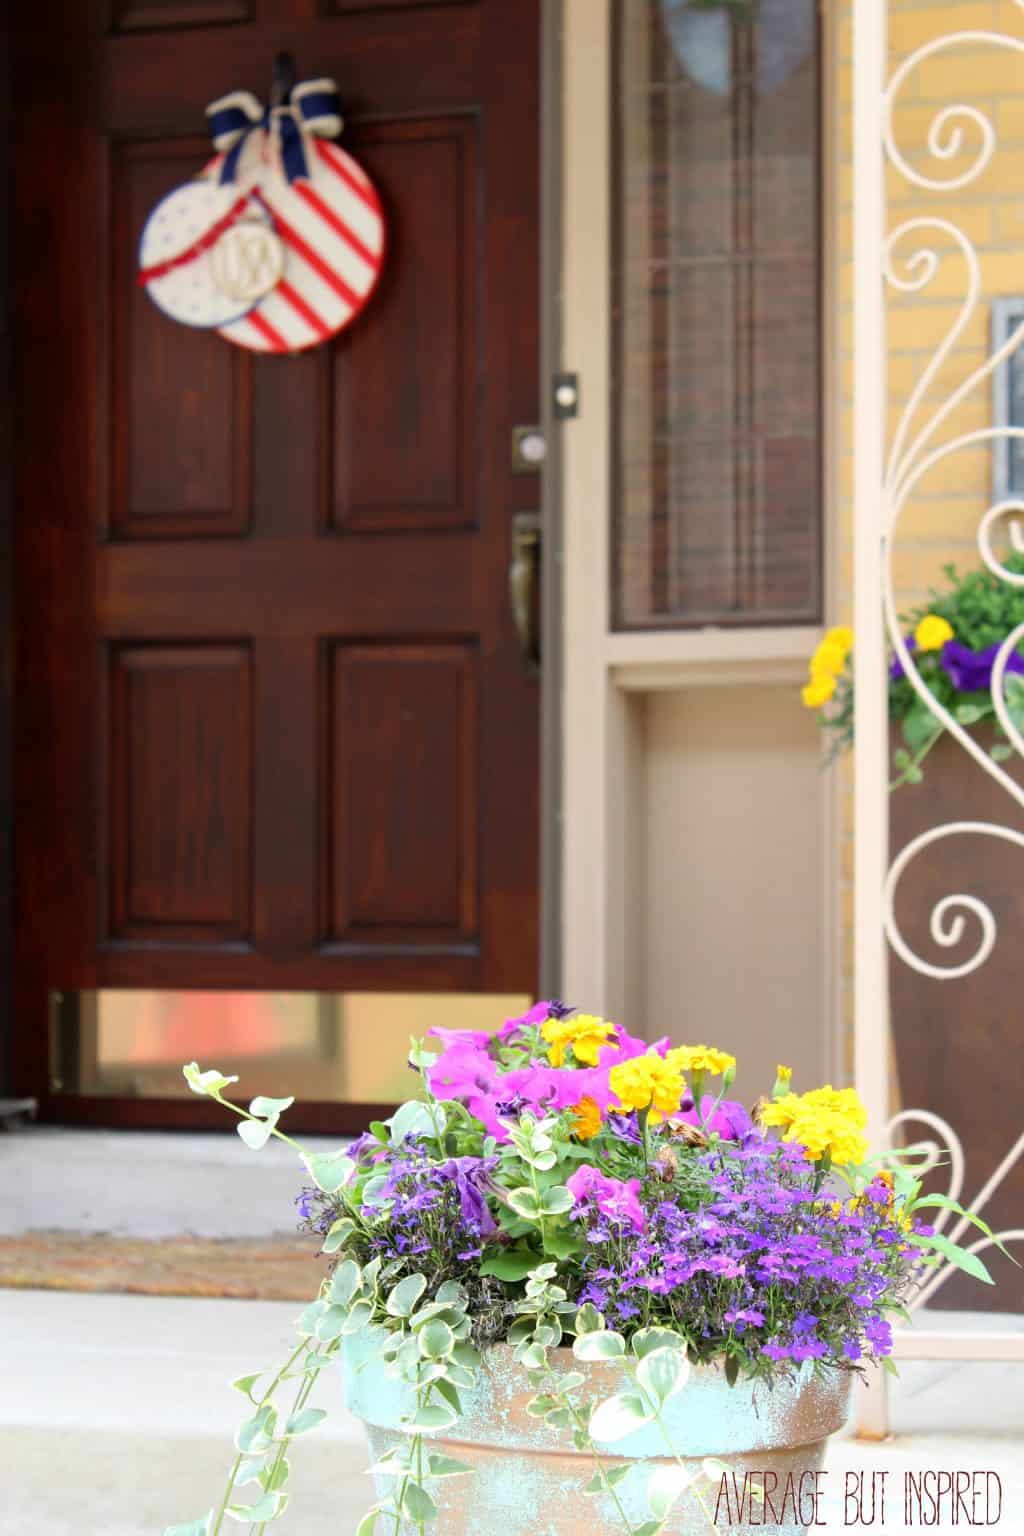
It’s a fun project that will give you a unique piece of decor for your front porch!
This is probably the most decorating I’ll do for the Fourth of July, so I’m glad it’s at least a cute and original piece! Do you decorate for the Fourth?
A Fingerprint Tea Towel for the Mom Who Bakes {A Mother’s Day Craft and Gift}
The day when we honor some of the most important women in our lives – Mother’s Day – is coming up soon! This year my kids and I made the cutest Mother’s Day craft and gift, which we are sending to my mother-in-law as part of her gift.
Although we don’t get to see her that often, she loves to bake with my kids every time we get together. It is one of their favorite things to do with Grandma, so naturally we wanted to incorporate their special activity into their gift to her. With a little help from me, my kids made this Mother’s Day fingerprint tea towel, using their thumbprints to make cookies all over it.
This project was really fun, inexpensive, and I think it will make a great keepsake that any mother or grandmother who likes to bake would appreciate.
Supplies Used to Make a Mother’s Day Fingerprint Tea Towel
Here are the supplies we used to make our fingerprint tea towel. (Products marked with an asterisk are affiliate links, which means that I receive a small commission at no added cost to you if you purchase through them. You can read my full disclosure policy here.)
- Thin flour sack tea towels* (I got mine at Target)
- Sharpie fabric markers*
- Light brown fabric paint* or multi-surface acrylic paint
How To Make Your Own Fingerprint Tea Towel
First, I found a cute quote that I wanted on our tea towel. I typed it up and printed it out. If you would like a copy, I’m happy to share and you can download it HERE and print it out for yourself. (NOTE: Change the year if you’d like to add that part, or just don’t trace it onto the tea towel.)
Next, I ironed the flour sack towel and figured out where I wanted the quote to go. I placed the printed quote underneath the towel and traced the text with my Sharpie fabric markers. It was really easy to see the text underneath and get some good penmanship on there. I was pretty proud of myself for thinking of that. (Hey, if I don’t pat myself on the back, who will?)
Now came the fun part . . . allowing my kids to put paint on their hands and get messy. Awesome. But it actually wasn’t too messy because I just put it on their tiny little thumbs and had them stamp around the quote. Of course they loved it.
Finally, I added some black dots to their dried thumbprints to make them look like chocolate chip cookies. So cute!
Here’s another great DIY Mother’s Day Gift Idea!
Of course this baking tea towel would make a great gift on its own, but we added some cute baking accessories and tied them all together with baker’s twine to complete the gift. I just know my mother-in-law is going to love it as much as we loved making it.
This is a special DIY Mother’s Day gift that any baker would love to receive.
– Bre
20 Minute Easter Grass “Egg Hunt” Sign
Last week when I shared my Mr. & Mrs. Moss Bunny Topiaries, I mentioned that I’d gone on somewhat of a spring crafting binge. So you’ll have to forgive me, but you’ll be seeing quite a few “springy” projects around here over the next few weeks! Today is no exception; it doesn’t get much springier than plastic Easter grass and sparkly eggs, in my opinion! So I combined the two and made this fun Easter grass “egg hunt” sign! [Read more…] about 20 Minute Easter Grass “Egg Hunt” Sign
DIY Mr. & Mrs. Moss Bunny Topiaries
Make a set of adorable DIY Bunny Topiaries for your spring and easter decor! This post shows you the step-by-step instructions for making them.
When you think of spring, I bet you think of bunnies and greenery, don’t you? This craft combines those things into total cuteness: a DIY bunny topiary that’s SO easy to make, and even cuter when displayed as a pair of Mr. and Mrs. Moss Bunny Topiaries!

Topiaries are a staple in traditional decor styles, so why not mix it up and make some ultra-cute ones for your spring decor?
DIY Bunny Topiary Supplies
This post contains affiliate links. Please read my disclosure policy for more information.
- Foam egg
- Floral foam
- Foam core board
- Acrylic paint (colors: green, blue, pink, and whatever color you want for your pots)
- Terracotta flower pots
- Wooden dowel
- Toothpicks
- Craft moss
- Hot glue & glue gun
- Twine
- Ribbon
- Pencil
- Craft knife / utility knife
How to Make DIY Bunny Topiaries
No need to hunt down a premade bunny form – we’re going to make our own to create these adorable bunny topiaries!
Make the Bunny Ears
First, draw bunny ears onto the foam core board. Then use a craft knife or utility knife to cut them out.
(The ears don’t have to be perfectly shaped because any imperfections will be hidden by the moss. So . . . don’t stress about this!)
Next, paint the bunny ears green. This will help mask any bare spots you have once you’ve glued on your moss.
Go ahead and paint the foam egg, too, while you’ve got the green paint out.

Make the Base of the Bunny Topiary
Once dry, gently push a toothpick into the bottom of each foam board ear.

Then push each ear into the foam egg.

Already looking a little bunny-ish, don’t you think?
Apply Moss to the Bunny Form
Now you’re ready to apply your moss! To do this, hot glue the heck out of the egg and stick moss EVERYWHERE!
Since I used loose moss, I made a GIGANTIC mess. Be prepared for a fun clean up. Ha!

I also added twine around my bunnies for a rustic look and to help keep some of the moss in place.
Push Dowels Into the Base of the Bunnies
After everything is “mossed,” push one dowel into the bottom of each foam egg. You could leave the dowels natural color, or paint them like I did!
Then, push the other end of each dowel into floral foam in the bottom of terracotta pots.
I painted the flower pots in a cute yellow and white gingham pattern, but you could paint them however you like or leave them plain.

Finally, fill the flower pots with leftover moss.
With that, your DIY bunny topiary is complete!
Since I’m “extra,” I made a two bows for my bunny topiaries; a hair bow for the Mrs. and a bow tie for the Mr. (Notice how the boy bunny is shorter than the girl bunny? I did that on purpose. Girl Power – ha!)

I couldn’t be happier with these little moss bunny topiaries hanging out on my mantel.
They are so cute up there, especially paired with Spring Bunny Gumball Machine decor.
