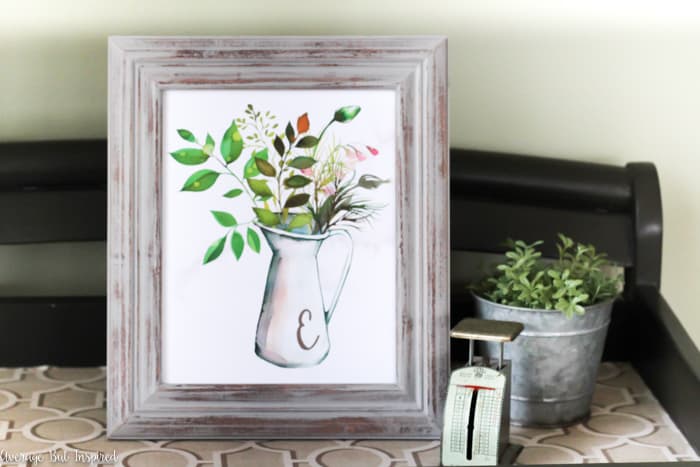
• Skip to primary navigation
  • Skip to main content
  • Skip to primary sidebar
Average But Inspired logo - DIY and craft

Average But Inspired

Craft a home you love. DIY and craft tutorials.

  • About
    • Contact Me
    • Disclosures
    • Privacy Policy and Copyright Policy
  • DIY
    • Furniture
  • Crafts
    • Dollar Store Crafts
    • Seasonal
      • Patriotic & Summer
      • Valentine’s Day
      • Easter & Spring
      • Fall & Halloween
      • Christmas & Winter
  • Home Decor
    • Organization
  • Shop
    • DIY Swag
    • DIY Guides
  • Home

home decor

Easy DIY Canvas Art

October 25, 2017 by Bre 4 Comments

Raise your hand if you’re guilty of hanging art on your walls that is too small.  Or not hanging any art at all.  (Hand raised.  Head hung in shame.)  Until recently, I had two prints hanging in my master bedroom that I knew were totally the WRONG size for the wall, but I was too lazy to do anything about it.  That all changed when I got a dash of inspiration and created this easy DIY canvas art with my secret decorating and DIY weapon – luxe wrapping paper!

Upgrade bare walls with DIY Canvas Art that you can make with wrapping paper and paint! Learn how to make gorgeous DIY wall art with this tutorial. No artistic talent needed! #canvas #wallart #diydecor

I’ve used wrapping paper on other projects (like these Upgraded IKEA Bookshelves and this Trash to Treasure Table), and its versatility never ceases to amaze me!

This time I turned it into pretty canvas wall art, and I’m convinced that anyone (yes, anyone!) can make DIY wall art for their homes with this trick!

Supplies Needed to Make Easy DIY Canvas Art

This post contains affiliate links.  To read my full disclosure policy, please click here.

  • Canvas panels (I used 12″ x 24″ panels)
  • Luxe wrapping paper (this is the print I used.  Make sure to use a heavyweight wrapping paper for less chance of wrinkling and tearing)
  • Mod Podge in finish of your choice (I used matte)
  • Foam brushes
  • Optional: brayer
  • Scissors
  • Acrylic paints in colors of your choice (I used this color, this color, and this color)
  • Liquid gold leaf
  • Artist’s paint brushes
  • Double-sided permanent tape
  • Optional – For Wooden Frames (follow this tutorial, which requires 1″x2″ pieces of lumber, hand saw, brad nailer, 3/4″ corner braces, and wood stain)Upgrade bare walls with DIY Canvas Art that you can make with wrapping paper and paint! Learn how to make gorgeous DIY wall art with this tutorial. No artistic talent needed! #canvas #wallart #diydecor

How to Make Easy DIY Canvas Art

Aaaah I’m so excited to show you how to make your own large-scale canvas art!  You’ll feel like an artist when all is said and done – I just know it!

Step One: Cover the Canvas with Wrapping Paper

I began by cutting my wrapping paper slightly larger than the portion of the canvas that I was covering.

Then I applied a thin layer of Mod Podge to the canvas, and pressed the wrapping paper onto the canvas – removing air bubbles as I went.  I used a brayer to help with this part, but if you don’t have one, it’s not totally necessary (just helpful!).

Upgrade bare walls with DIY Canvas Art that you can make with wrapping paper and paint! Learn how to make gorgeous DIY wall art with this tutorial. No artistic talent needed! #canvas #wallart #diydecor

Step Two: Paint the Canvas

While the Mod Podge was drying, I painted the empty part of the canvas in this color, which is a pretty navy blue.  I left a little gap between the wrapping paper portion of the canvas and the blue paint because I knew I’d be painting that part of the canvas gold.Upgrade bare walls with DIY Canvas Art that you can make with wrapping paper and paint! Learn how to make gorgeous DIY wall art with this tutorial. No artistic talent needed! #canvas #wallart #diydecor

Once the paint dried, I used gold acrylic paint to add a border between the navy paint and the wrapping paper.

Upgrade bare walls with DIY Canvas Art that you can make with wrapping paper and paint! Learn how to make gorgeous DIY wall art with this tutorial. No artistic talent needed! #canvas #wallart #diydecor

I bet you’ll enjoy this post on 7 Ways to Decorate with Wrapping Paper, too!

Step Three: Fasten the Wrapping Paper to the Back of the Canvas

Once the paint was dry, I flipped the canvas over and attached the wrapping paper to the sides and back with double-sided permanent tape.

Upgrade bare walls with DIY Canvas Art that you can make with wrapping paper and paint! Learn how to make gorgeous DIY wall art with this tutorial. No artistic talent needed! #canvas #wallart #diydecor

Step Four: Topcoat with Mod Podge

Then I flipped the canvas over and put a thin layer of Mod Podge on top of the wrapping paper for extra adhesion and protection.  You probably don’t have to do this – especially if you like the texture of the wrapping paper as-is – but I wanted to make sure these pieces of art are durable!

Upgrade bare walls with DIY Canvas Art that you can make with wrapping paper and paint! Learn how to make gorgeous DIY wall art with this tutorial. No artistic talent needed! #canvas #wallart #diydecor

Step Five: Get Artsy with the Paint and Gold Leaf

After about 20 minutes when the Mod Podge was dry, I added random brushstrokes of a different shade of navy blue paint to the top of the canvas.

Then I added gold leaf streaks to the gold painted portion of the canvas.  These little touches added some dimension and made things look less flat!

Upgrade bare walls with DIY Canvas Art that you can make with wrapping paper and paint! Learn how to make gorgeous DIY wall art with this tutorial. No artistic talent needed! #canvas #wallart #diydecor

Upgrade bare walls with DIY Canvas Art that you can make with wrapping paper and paint! Learn how to make gorgeous DIY wall art with this tutorial. No artistic talent needed! #canvas #wallart #diydecor

Upgrade bare walls with DIY Canvas Art that you can make with wrapping paper and paint! Learn how to make gorgeous DIY wall art with this tutorial. No artistic talent needed! #canvas #wallart #diydecor

Step Six: Build a Canvas Frame

Once everything dried, I built canvas frames by following this tutorial.  These frames went together really easily and gave my easy DIY canvas art a finished look!

Upgrade bare walls with DIY Canvas Art that you can make with wrapping paper and paint! Learn how to make gorgeous DIY wall art with this tutorial. No artistic talent needed! #canvas #wallart #diydecor

Upgrade bare walls with DIY Canvas Art that you can make with wrapping paper and paint! Learn how to make gorgeous DIY wall art with this tutorial. No artistic talent needed! #canvas #wallart #diydecor

Can you believe how easy it is to make your own art with wrapping paper?

Upgrade bare walls with DIY Canvas Art that you can make with wrapping paper and paint! Learn how to make gorgeous DIY wall art with this tutorial. No artistic talent needed! #canvas #wallart #diydecor

There’s really no reason NOT to have pretty walls with art this easy and inexpensive!  (I’m typing that so I remember it – trust me, I have some walls that need help!)

Upgrade bare walls with DIY Canvas Art that you can make with wrapping paper and paint! Learn how to make gorgeous DIY wall art with this tutorial. No artistic talent needed! #canvas #wallart #diydecor

If you agree and like this idea, I’d appreciate it if you’d pin this post to help others find it!

Upgrade bare walls with DIY Canvas Art that you can make with wrapping paper and paint! Learn how to make gorgeous DIY wall art with this tutorial. No artistic talent needed! #canvas #wallart #diydecor

So what do you think?  Will you try making art for your home with wrapping paper?

-Bre

Filed Under: DIY, home decor

It’s Not Me, It’s You: A Breakup Letter to HGTV

October 12, 2017 by Bre 77 Comments

blank

Dear HGTV:

I realize that what I’m about to say is putting my chance* of becoming your next home décor and DIY tv superstar at risk.   (*A .0001% chance that has now been decreased to .00000000000000001%.) But I’m breaking up with you. And it’s not me, it’s you.  Dear HGTV: It's not me, it's you. A breakup letter with the network I once loved.

The time has come for me to lay it all out there. You see (though you might not know it), our love affair began years ago when I, on maternity leave, found myself spending hours on the couch nursing and rocking my newborn baby girl. In my half-alive state at that time, you took me off of that couch (in my spit-up covered shirt, messy ponytail hair, and makeup-less face), and put me in the middle of a world that was colorful, engaging, and exciting.

You put on your finest clothes and wooed me with shows like Curb Appeal, Selling New York, Bang for Your Buck, Design on a Dime, and Sarah’s House. Your hosts’ sparkling personalities and shows’ interesting topics made my long days and nights so much more bearable. The way John Gidding could turn the ugliest front yards into works of art on Curb Appeal was captivating! Suddenly I wanted to re-do my yard, too! And don’t even get me started with the adorable Sarah Richardson and her innate ability to mix pattern and color on Sarah’s House. (Plus, her sidekick, Tommy Smythe, was so cute I could pinch his cheeks.) Those two inspired me to start decorating my new/old home with quirky accents and things I loved.

In those days, you and your shows worked hard to fill me with hope and a desire to make the spaces around me more beautiful, but in an affordable and realistic way. Your programming was diverse and unique, and I was a self-proclaimed HGTV junkie.   I’m sure you even had something to do with me starting this little blog.

But time has a way of changing things, and our relationship has soured. HGTV, you’ve let yourself go. You have lost yourself (or, at the very least, the “G” in HGTV – do you even have a show about gardens or landscaping anymore?). With yesterday’s announcement that you’ve added yet another house flipping show to your lineup (Windy City Flip, with the painfully bland host, Alison Victoria (does she not have a last name?)), I realized you have cheated on me and your other loyal viewers with the devil of cheap and formulaic programming.

By my count, you now have at least NINE house flipping shows that all follow the exact same formula: man and woman buy godforsaken home, gut it, find x amount of “awful problems,” install some cheap finishes, and then sell it two weeks later.  Do you really have that many viewers who are out flipping houses?  I don’t think so!

And don’t get me started on the FOURTEEN versions of House Hunters.  At least with those you’ve tried to fool me into thinking you’re still interesting by giving some of them different names (like Beachfront Bargain Hunt, Caribbean Life, Island Hunters, Mexico Life, and Lakefront Bargain Hunt), and forsaking the trademark doorbell ringing sound in the opening credits.

Now that Chip & JoJo have jumped ship, you have nothing left to offer me. HGTV you are boring and unimaginative, and this is the end. It was good while it lasted, but now you can pack your boxes and exit stage left.  Me – I’ll be fine sitting here on my couch with my messy ponytail and makeup-less face (the babies are grown so no spit-up anymore), watching another network.

-Bre

P.S. to any readers who feel the same way, please share this post on Facebook or Pin it!  Maybe HGTV will see it and get it together!  🙂

Dear HGTV: we are breaking up with you. Here's why.

Filed Under: home decor

How to Decorate for Fall Entertaining with Color, Texture, and Pattern

August 31, 2017 by Bre 8 Comments

blank

Thank you to Cost Plus World Market for sponsoring this post.  The fall decor and entertaining ideas you’ll see are all my own.  This post contains affiliate links, and to read my full disclosure policy you can click here.

The kids are back in school and the weather here in Chicago is getting more crisp with each passing day.  My favorite season is almost here, and I cannot wait to share my love of all-things-fall with my family and friends!  Intimate gatherings with comforting foods and cozy decor (like at the Beer Tasting Party I hosted last fall), are right around the corner, and I’m getting ready for fall entertaining by creating a dining room that’s filled with gorgeous color, texture, and pattern.  After one visit to my local Cost Plus World Market store in the South Loop, I think I’m all set!  Fall decor made simple! This post gives three tips for fall decorating using color, texture, and pattern to create a fall dining room that shines.

Back in the day my fall decor was a little more, shall we say, obvious.  At one point I remember declaring that my house would look as though a pumpkin patch had exploded inside of it.  While I still love pumpkins, fall leaves, and scarecrows as much as the next pumpkin spice latte loving lady, my taste has matured a bit, and now I’m decorating for fall in a more subtle way.  Fall decor made simple! This post gives three tips for fall decorating using color, texture, and pattern to create a fall dining room that shines.

Working with colors, textures, and patterns that embody the changing season, I’ve created a lovely fall dining room that’s perfect for entertaining!  This year I think my first get together will be a fondue party.  (Except for the lactose intolerant, who doesn’t love a party that centers on cheese?  Am I right?)Fall decor made simple! This post gives three tips for fall decorating using color, texture, and pattern to create a fall dining room that shines.

I bet your friends and family would enjoy a nice evening at your home this fall, so let me give you my tips on how to decorate for fall entertaining with color, texture, and pattern!

Pick an Inspiration Object for Color

It was so easy to pull together a look that works for the changing season because I started with these salad plates as my inspiration.  I love the fall oranges, reds, and yellows, and the fact that these plates have such an interesting design.  Fall decor made simple! This post gives three tips for fall decorating using color, texture, and pattern to create a fall dining room that shines.

These plates served as the jumping off point for all of the other items that adorn my entertaining space this fall.  I think that’s a great way to decorate a room: find an interesting object you like and allow it to guide your subsequent decor choices.  Even if you think you have no idea how to decorate, using an inspiration item’s colors to inform your other choices will help you make good decisions.

For example, I chose these golden yellow buffet napkins because that color is in the plate.  I guarantee you I never would have purchased anything this color if I would have seen it in isolation.  But with the plates, it works!  Fall decor made simple! This post gives three tips for fall decorating using color, texture, and pattern to create a fall dining room that shines.

The same is true for the gorgeous blue pressed glass goblets.  Sure they’re pretty on their own, but look how gorgeous they are with the contrasting gold napkins!  Thank you, salad plates, for putting these colors together for me.Fall decor made simple! This post gives three tips for fall decorating using color, texture, and pattern to create a fall dining room that shines.

Add Some Texture

Once you’ve followed your inspiration object’s color lead, it’s great to add in some items with texture.  Because I had a lot of color already happening in this entertaining space, I decided to add texture with neutral elements so as not to go overboard.  Fall decor made simple! This post gives three tips for fall decorating using color, texture, and pattern to create a fall dining room that shines.

These placemats woven from natural materials are my new favorite thing.  They will work for any single occasion, holiday, event . . . you name it!  And they’re not boring.  Their woven pattern and thickness makes them assets to the table instead of something that’s commonly overlooked.

Fall decor made simple! This post gives three tips for fall decorating using color, texture, and pattern to create a fall dining room that shines.

And don’t even get me started on these fabulous wood handled utensils (forks, knives, and spoons).  To me, wood is a perfect decor element for fall because it’s just so “nature-y.”  (My inner outdoorsman is coming out there with that “word.”)  You cannot help but pick up these utensils.
Fall decor made simple! This post gives three tips for fall decorating using color, texture, and pattern to create a fall dining room that shines.

And finally, this pretty puff ball wreath on the mirror opposite the dining table is 100% texture.  A fall wreath on a mirror is a pretty fall decorating idea to use in the dining room. See more fall decor ideas in this post.

Fall decor made simple! This post gives three tips for fall decorating using color, texture, and pattern to create a fall dining room that shines.

Play with Pattern

Because the salad plates that inspired this fall entertaining space already have a lot of pattern, I worked with simpler patterns on other things in an effort to layer the look in a way that is not overwhelming.  Fall decor made simple! This post gives three tips for fall decorating using color, texture, and pattern to create a fall dining room that shines.

This striped table runner, for example, grounds the entire table.  It uses the same shades seen elsewhere on the table, but has a simple pattern that makes it interesting and not overpowering.  Fall decor made simple! This post gives three tips for fall decorating using color, texture, and pattern to create a fall dining room that shines.

And using pattern in a different way, by creating small groupings of similar objects, is another way to get a sophisticated look.  Fall decor made simple! This post gives three tips for fall decorating using color, texture, and pattern to create a fall dining room that shines.

Here I used three mini faux kale pots to perk up the butler tray stand in the corner of the room.  Fall decor made simple! This post gives three tips for fall decorating using color, texture, and pattern to create a fall dining room that shines.

Metallic candles and white pumpkins grouped throughout the table also create understated patterns, which make an impact on the dining table.  Fall decor made simple! This post gives three tips for fall decorating using color, texture, and pattern to create a fall dining room that shines.

Fall decor made simple! This post gives three tips for fall decorating using color, texture, and pattern to create a fall dining room that shines.

And there you have it; my fall dining room ready to shine!  All of the colors, textures, and patterns brought in through gorgeous products have created a beautiful setting for entertaining friends and family this fall!  I can hardly wait to invite someone over.  (What are you doing this weekend?  ;-))

Love the Look?  Shop This Post!

If you found my tips for fall decorating helpful, the good news is that Cost Plus World Market’s Fall Gathering Event has begun! Now through September 10, 2017, you can save 50% on all dining furniture, 20% on all bar carts, 30% on all open stock dinnerware, flatware and wine glasses, and 30% on all open stock table linens. Head into your local store (find it here!), and check out all the amazing deals for yourself or shop online…no coupon code needed!  Just scroll through and click on any of these images to shop this post!

blank

Happy fall decorating and entertaining!

-Bre

Filed Under: Fall and Halloween, home decor

Small Foyer Decor Updates

August 16, 2017 by Bre 7 Comments

blank

“It all started with a trip to the thrift store.”

That’s how any good story (or makeover) begins, right?  🙂

Last week the kids and I were visiting my mom in Wisconsin, and of course I made some time to check out her Goodwill stores (she has THREE within a one mile radius.  No fair.).  I didn’t find much, but I was pumped to come home with a staircase basket.  For some reason I have wanted one of those for years but never bought one!  Here is what my treasure looked like when I bought it for $6.99.  You can’t really tell, but it was faded in spots and in need of some spiffing up.  Plus it was the same color as the stair treads . . . This dated staircase basket from the thrift store got a brand new look!

A coat of spray paint, some ribbon, and a cute chalkboard tag later and this basket had a whole new look!  (Happy to report it’s already overflowing with the kids’ junk.)A dated staircase basket from the thrift store got a fresh new look with spray paint, ribbon, and a chalkboard tag.

A dated staircase basket from the thrift store got a fresh new look with spray paint, ribbon, and a chalkboard tag.

Well anyway, one thing led to another, and after I’d painted my new staircase basket, I started playing around with the decor in my foyer and trying to freshen that up, too!  My foyer looked exactly the same as it did in this post from last year, where I showed you how to create a mudroom-type space even where you don’t have a mudroom.  I was tired of too many gold accents and the bland lamp that was on the table.  It was time for them to go.  (I’m actually getting a little tired of the red on the table (my first ever chalk paint project!), too, so that might be getting a facelift soon.)

I put the lamp in a closet, bought a new fake plant (is it an aloe?  Is it a cactus?  I don’t know.), and “shopped” my home decor Rubbermaid bin in the basement, and came up with a fresh, new look!  (Yes, I keep decor that I *might* want again someday in a Rubbermaid bin.  It works out great for times like these when I want a new look but don’t want to spend any money!)

Love this small foyer decor! A pretty table, potted plant, and decorative accessories make it a functional and stylish space.

Love this small foyer decor! A pretty table, potted plant, and decorative accessories make it a functional and stylish space.

This vintage postal scale is PERFECT on this table, since that little brown door next to the table is my mailbox.  I got the scale at the Brocante Vintage Market in Florida almost two years ago now!  And the sentiments on my clip frame are spot on.  That’s going to be my go-to line for my kids now!  (And hey, also for anybody who is thinking about leaving me a mean comment on my blog!  HA!)

Love this small foyer decor! A pretty table, potted plant, and decorative accessories make it a functional and stylish space.

Love this small foyer decor! A pretty table, potted plant, and decorative accessories make it a functional and stylish space.

Mr. Unidentified Plant here looks a little bit plastic, but I feel like plastic is better than dead.  I’m going with it.

Love this small foyer decor! A pretty table, potted plant, and decorative accessories make it a functional and stylish space.

On the opposite wall, I repainted the gold frames on my Pottery Barn Inspired Chalkboard Hooks (holy moly – I cannot believe how AWFUL the photos are in that blog post.)  Love this small foyer decor! A pretty table, potted plant, and decorative accessories make it a functional and stylish space. The bench and wall hooks add to the functionality of this small entryway!

I like them better now, and they look better with the bench underneath.  Love this small foyer decor! A pretty table, potted plant, and decorative accessories make it a functional and stylish space. The bench and wall hooks add to the functionality of this small entryway!

So yeah . . . thanks to that staircase basket from Goodwill, my whole foyer got a new look.  I kind of love when one new decor piece prompts other changes.  And I especially love when it hardly costs a thing!

What changes have you made to your home decor recently?

-Bre

Filed Under: home decor

Five Tips for Styling a Dresser on the Cheap

June 22, 2017 by Bre 3 Comments

blank

A couple of weeks ago my son and I went to Goodwill to do some treasure hunting.  It had been months since we’d been there last and I was ready to find all the good things!  Thankfully the trip did not disappoint – I found these amazingly cool vintage lamps that I picked up for $4.99 a piece.  With marble bases, brass accents, and white hobnail middles, they were too good to pass up (even though they didn’t work)!  A pair of vintage lamps from the thrift store got an update as part of a stylish dresser makeover.

This post contains affiliate links.  To read my full disclosure policy, please click here.

After cleaning up the lamps, my husband rewired them for me with these lamp rewiring kits.  (Guys – I didn’t even ask him to do that!  He just did it one Saturday out of the blue.  ALL THE HEART EYES!)  Anyway, I was so excited about my new WORKING lamps that it prompted me to redecorate my entire bedroom dresser.  (By redecorate, I mean clear off the piles of junk that had been accumulating for Lord knows how long and actually make it look nice.)  I completely blanked on taking a picture of my dresser in its messy state, but please trust me that it was a disaster.  But here, let me show you my new and improved dresser with my thrift store lamps!  Take your dresser from junk repository to a pretty space with these five tips for styling a dresser on the cheap! A well styled dresser that functions how you need it to is easy and inexpensive to achieve.

After I redecorated my dresser, I realized that it was one of the easiest things I have ever done and I wondered why I hadn’t done it sooner.  (Then I realized its because the master bedroom usually gets the short end of the stick – since nobody else ever really sees it, it’s the easiest to neglect.)  I also realized that having it look nice like that made my entire master bedroom look nicer and made me like the room more!

If you’re like (the old) me and your bedroom dresser serves as more of a dumping ground than a pretty focal point of your bedroom, please know that you’re not alone (ha!), and that you, too, can make a change for the better!  Here are the five tips for styling a dresser on the cheap that I came up with while changing out the look of my dresser.

Tip 1:  Add Lighting

Before I bought my thrift store lamps, I had no lighting on my dresser.  Adding lamps instantly brightened the room and gave some height to the dresser.  You don’t have to use two matching lamps; one is fine, too!  Just balance it out on the other side with something tall.Take your dresser from junk repository to a pretty space with these five tips for styling a dresser on the cheap! A well styled dresser that functions how you need it to is easy and inexpensive to achieve.

Tip 2: Add Some Art and Personal Photos

Bring some color and style to your dresser by adding art.  It doesn’t have to be sophisticated; I framed one of my seven-year-old’s paintings from art class!
Take your dresser from junk repository to a pretty space with these five tips for styling a dresser on the cheap! A well styled dresser that functions how you need it to is easy and inexpensive to achieve.

Also, your dresser is the perfect place to display some personal photos.  It is your dresser after all!  This picture of my mom, sister, and me on the beach at my best friend’s Florida inn always makes me smile.  Plus, it’s adorable on my DIY Wood Plaque Photo Frame.

Tip 3: Make it Functional

The truth about a dresser is that it has to work for you as well as look good!  So make it functional with a stylish tray and little bowls to stash jewelry, lip balm, ear plugs (Women Against Snoring Husbands Unite!), etc.  Take your dresser from junk repository to a pretty space with these five tips for styling a dresser on the cheap! A well styled dresser that functions how you need it to is easy and inexpensive to achieve.

I bought both this hammered gold tray and the little bowl (similar one here) in the kitchen section at Target!  Take your dresser from junk repository to a pretty space with these five tips for styling a dresser on the cheap! A well styled dresser that functions how you need it to is easy and inexpensive to achieve.

Tip 4:  Add Books or Boxes

Books or boxes will add height and color on top of your dresser.  I wrapped some books I found in the basement with leftover fabric scraps (including leftover shower curtain fabric from my Master Bathroom Makeover)!  This was a free way to put some more color on the dresser!  (Plus, if I am suffering from insomnia one night, I’ll have a book right there to keep me entertained.)  Take your dresser from junk repository to a pretty space with these five tips for styling a dresser on the cheap! A well styled dresser that functions how you need it to is easy and inexpensive to achieve.

If you need more storage space for your jewelry or other things, swap out the books for decorative boxes or a jewelry box!

Tip 5: Add Something Natural

Fresh flowers or greenery immediately adds life to any space, and it’s my favorite thing to put just about everywhere!  If you have a black thumb like me, get some realistic faux boxwood to use on your dresser.  I have tons of these mini boxwood that I use all over my house!  Pop them into a pretty planter for added color and interest.

Take your dresser from junk repository to a pretty space with these five tips for styling a dresser on the cheap! A well styled dresser that functions how you need it to is easy and inexpensive to achieve.

So there you have it.  There are a reformed dresser neglector’s tips for styling a dresser on the cheap!  I hope they’ve inspired you to whip your own dresser into shape.  If you’d pin this post to get others on the pretty dresser bandwagon, I would really appreciate it!

Take your dresser from junk repository to a pretty space with these five tips for styling a dresser on the cheap! A well styled dresser that functions how you need it to is easy and inexpensive to achieve.

-Bre

Filed Under: home decor

Summer Mantel Decorating Ideas

May 23, 2017 by Bre 26 Comments

blank

Memorial Day is this weekend, friends!  I am shocked.  Mainly shocked because my kids are almost finished with school and I’m getting a little nervous about how we’re all going to handle so much “together time!”  (Don’t act like you don’t know what I’m talking about!)

Well anyway, because Memorial Day is the unofficial start to summer, I thought it would be fun to join in on a Summer Mantel Decorating Ideas Blog Hop hosted by my friend Amy at My Life From Home.

For my summer mantel, I went with an understated approach.

Instead of using decor pieces that scream summer, I chose to use elements inspired by summertime nature – summery plants, galvanized buckets you find in the garden, and a collection of mismatched glass vases – with my new-to-you $24 clearance mirror as a backdrop.

Check out this post to see beautiful summer mantel decorating ideas in shades of green and pulling elements from nature. Botanical prints, galvanized metal buckets, and a glass vase collection are some of the elements included.

I’ll keep this post light on the narration and let the pictures speak for themselves.  (“But pictures can’t speak, Bre.”)

Check out this post to see beautiful summer mantel decorating ideas in shades of green and pulling elements from nature. Botanical prints, galvanized metal buckets, and a glass vase collection are some of the elements included.

I found this framed print at Hobby Lobby and fell in love the second I saw it.

Check out this post to see beautiful summer mantel decorating ideas in shades of green and pulling elements from nature. Botanical prints, galvanized metal buckets, and a glass vase collection are some of the elements included.

It has a nice vintage look to it, and it set the tone for the whole mantel theme.  This was the only thing that I bought for my summer mantel; everything else I already had!  Check out this post to see beautiful summer mantel decorating ideas in shades of green and pulling elements from nature. Botanical prints, galvanized metal buckets, and a glass vase collection are some of the elements included.

The galvanized buckets were Goodwill finds from a couple of years ago.  Total scores!

Check out this post to see beautiful summer mantel decorating ideas in shades of green and pulling elements from nature. Botanical prints, galvanized metal buckets, and a glass vase collection are some of the elements included.

Check out this post to see beautiful summer mantel decorating ideas in shades of green and pulling elements from nature. Botanical prints, galvanized metal buckets, and a glass vase collection are some of the elements included.

You might remember this wooden box from my Spring Mantel Decorating Ideas post.  I kept it up for the summer but swapped out its contents for my collection of small glass vases.

I may add some fresh flowers throughout the season, but for now I like them empty.  They’re interesting but understated and don’t add a lot of weight to the vignette.

Check out this post to see beautiful summer mantel decorating ideas in shades of green and pulling elements from nature. Botanical prints, galvanized metal buckets, and a glass vase collection are some of the elements included.

Check out this post to see beautiful summer mantel decorating ideas in shades of green and pulling elements from nature. Botanical prints, galvanized metal buckets, and a glass vase collection are some of the elements included.

Everything came together so quickly for my summertime mantel, which never happens for me!  Check out this post to see beautiful summer mantel decorating ideas in shades of green and pulling elements from nature. Botanical prints, galvanized metal buckets, and a glass vase collection are some of the elements included.

I’m really pleased with how it is updated for the season, but blends with the rest of my living room decor. Check out this post to see beautiful summer mantel decorating ideas in shades of green and pulling elements from nature. Botanical prints, galvanized metal buckets, and a glass vase collection are some of the elements included.

Check out this post to see beautiful summer mantel decorating ideas in shades of green and pulling elements from nature. Botanical prints, galvanized metal buckets, and a glass vase collection are some of the elements included.

I hope you enjoyed seeing how I transitioned from my spring mantel to summer!  By using some of the same basic pieces and updating a few other key items, I have a whole new look!

Filed Under: home decor

  • « Go to Previous Page
  • Page 1
  • Interim pages omitted …
  • Page 5
  • Page 6
  • Page 7
  • Page 8
  • Page 9
  • Interim pages omitted …
  • Page 12
  • Go to Next Page »

Primary Sidebar

Let’s Connect!

Hi, I’m Bre! Thanks for visiting Average But Inspired, where I show you how to work with what you’ve got to create a home you love.

Bre of Average But Inspired - a DIY and craft blog

Love DIY? Subscribe to Get Posts E-mailed!

How Can I Help You?

blank

Limewash Stone Fireplace Makeover: Bye Bye Orange Stone Fireplace, Hello Neutral Stone Beauty!

blank

How to Create a Faux Antique Brass Finish with Paint

blank

How to Paint Over Tile

blank

How to Paint a Countertop to Look Like Marble!

Looking for Something?

Copyright © 2013-2022, Bre Eggert (Average But Inspired). All rights reserved.
  • Home
  • DIY
  • Crafts
  • Home Decor
  • Privacy Policy and Copyright Policy
  • Disclosures
  • Contact Me