• Skip to primary navigation
  • Skip to main content
  • Skip to primary sidebar
Average But Inspired logo - DIY and craft

Average But Inspired

Craft a home you love. DIY and craft tutorials.

  • About
    • Contact Me
    • Disclosures
    • Privacy Policy and Copyright Policy
  • DIY
    • Furniture
  • Crafts
    • Dollar Store Crafts
    • Seasonal
      • Patriotic & Summer
      • Valentine’s Day
      • Easter & Spring
      • Fall & Halloween
      • Christmas & Winter
  • Home Decor
    • Organization
  • Shop
    • DIY Guides
  • Home

Crafts

Fabric Tape Bangle Bracelets – A Fun and Fashionable DIY

June 14, 2016 by Bre Leave a Comment

This post contains affiliate links for your convenience.  To read my full disclosure policy, please click here.

About a month ago I was in Paper Source picking up some end-of-year teacher gifts.  And of course I couldn’t only buy what I went in there for.  That never happens.  Any time I step foot in that store I end up spending way more money than intended.  It has the same hold over me as Target.

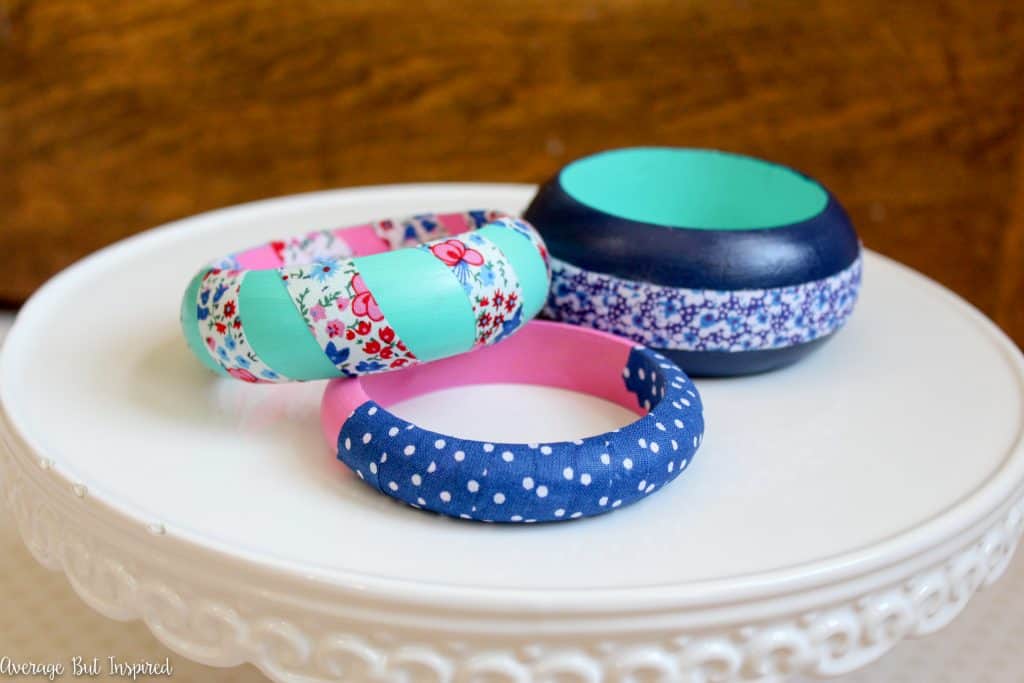
One of the unplanned purchases that day was a set of three plain wooden bangle bracelets.  They were calling to me: “Buy us.  Make us pretty.”  Never one to turn a cold shoulder to those in need, I brought those plain bracelets home with me that day.  And then, some time later, I polished them up and created these super cute and super easy fabric tape bangle bracelets.  Customize plain wooden bangles with paint and fabric tape for a quick and easy DIY bracelet! Get the full supply list and tutorial in this post.

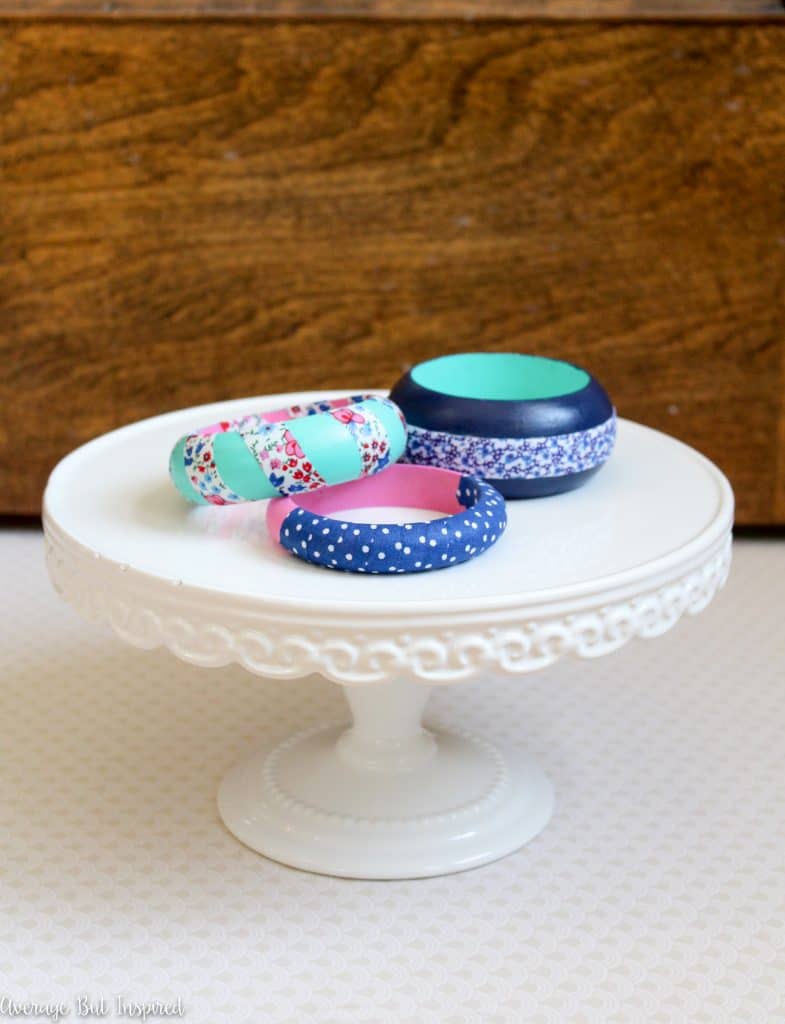
This project was pretty quick and I think it would make an awesome girls’ night activity, or even a birthday party craft for older girls.  Customize plain wooden bangles with paint and fabric tape for a quick and easy DIY bracelet! Get the full supply list and tutorial in this post.

Here are the supplies you need:

  • Wooden bangle bracelets
  • Acrylic paint in colors of your choice (I used navy, pink, and turquoise)
  • Foam brush
  • Fabric washi tape  (I got the exact rolls pictured below at Michaels)
  • Scissors

Customize plain wooden bangles with paint and fabric tape for a quick and easy DIY bracelet! Get the full supply list and tutorial in this post.

Begin by painting your wooden bangles in whatever colors or combination of colors you like.  I looked at the fabric tapes I had and decided which ones I wanted to use on each bracelet prior to painting.  That way I was able to make sure that the colors would be just right on each bracelet!  Customize plain wooden bangles with paint and fabric tape for a quick and easy DIY bracelet! Get the full supply list and tutorial in this post.

Once the paint dries, gently apply the fabric tape to the bracelets in varying patterns and methods.  The great thing about fabric washi tape is that it stretches and flattens as you work with it, so it is easy to use on the rounded bracelet surfaces.  Customize plain wooden bangles with paint and fabric tape for a quick and easy DIY bracelet! Get the full supply list and tutorial in this post.

Get creative with how you apply the tape.  (And if you really want to live on the edge, put a few different tape patterns onto one bracelet.  I wasn’t that risky.)  Customize plain wooden bangles with paint and fabric tape for a quick and easy DIY bracelet! Get the full supply list and tutorial in this post.

That’s all it takes to make some fun and fashionable fabric tape bangle bracelets!  Customize plain wooden bangles with paint and fabric tape for a quick and easy DIY bracelet! Get the full supply list and tutorial in this post.

Customize plain wooden bangles with paint and fabric tape for a quick and easy DIY bracelet! Get the full supply list and tutorial in this post.

They’re cute, right?  I can’t wait to start wearing them!  If you liked this post and want to make some fabric tape bangle bracelets of your own, make sure to pin this post for later!Customize plain wooden bangles with paint and fabric tape for a quick and easy DIY bracelet! Get the full supply list and tutorial in this post.

Bre

You May Also Enjoy This Fun Pom Pom Craft Ideas Post!  

SO fun! Pom Poms are ridiculously easy to make and so adorable! Check out this post for lots of ideas on easy to make pom pom crafts!

Filed Under: Crafts

Beach in a Bottle {A DIY Vacation Souvenir}

June 3, 2016 by Bre 5 Comments

blank

This beach craft idea is a perfect souvenir from any beach day! It’s a fun beachy craft for kids and adults alike.

Last week I was on vacation in Seabrook Island, South Carolina.  It was AMAZING!  

My family and I have been going there every year for the past several years, and it’s starting to feel like our home away from home.  

It’s really quiet there with no commercial development on the island, so it’s the perfect place to feel like you’re actually getting away.  

Seabrook Island, South Carolina beach scenery.

This post contains affiliate links. Please read my disclosure policy for more information.

You never have to fight for a spot on the beach and there’s always some good nature to be seen.  For “city folks” who consider mice and squirrels to be wildlife, that’s pretty exciting stuff.  

Because we treasure our time at the beach, we decided to bring a little of it home with us in this Beach in a Bottle DIY Vacation Souvenir craft.  

Is a beach vacation in your future? If the answer is yes, bring the beach home with you with this fun Beach in a Bottle DIY Vacation Souvenir! Click through for the tutorial. This beach craft for kids is adorable and fun to make.

This is a fantastic way to bring some sand and shells home in your suitcase.  All you need is a pack of mini glass bottles and some time on the beach!

Is a beach vacation in your future? If the answer is yes, bring the beach home with you with this fun Beach in a Bottle DIY Vacation Souvenir! Click through for the tutorial.

Simply fill the glass bottles maybe halfway with sand (dry sand is best).  My kids LOVED filling up their bottles!  

blank

Then, hunt for some tiny shells and other beach treasures like reeds or small pieces of driftwood.  

Here Are Some Other Beach Crafts You Might Like!

DIY Straw Tote Bag

Kids Painted Beach Bags Craft

This was a really great beach activity for kids and toddlers.

blank

Stick all of your beach finds into the bottles and you have a perfect DIY beach vacation souvenir!  

Is a beach vacation in your future? If the answer is yes, bring the beach home with you with this fun Beach in a Bottle DIY Vacation Souvenir! Click through for the tutorial.

These tiny bottles have already found places of honor in my kids’ bedrooms.  They’re such a great memory of our favorite vacation spot.  

Is a beach vacation in your future? If the answer is yes, bring the beach home with you with this fun Beach in a Bottle DIY Vacation Souvenir! Click through for the tutorial.

If you have a beach trip coming up, make sure to pin this post so you’ll remember to get some mini glass bottles before your trip!  

Is a beach vacation in your future? If the answer is yes, bring the beach home with you with this fun Beach in a Bottle DIY Vacation Souvenir! Click through for the tutorial.

Happy beach day!

-Bre

Filed Under: Crafts Tagged With: Summer

How to Get a Sea Glass Look with Paint

May 24, 2016 by Bre Leave a Comment

blank

DIY Sea Glass Bottles are a beautiful addition to coastal decor!

Before we know it, summer will be here!  I, for one, cannot wait for warmer weather and lots of sunshine!  The coming change of season also has me thinking of summer-inspired decor, like accents with a coastal touch.

One of my favorite coastal looks is sea glass.  But because I live nowhere near an ocean (and would likely only find garbage in the rivers and lakes nearby), there’s no naturally-made sea glass available for me to find and use in my home.  Womp womp.  

Undeterred by my lack of sea glass sources, however, I decided to make my own sea glass bottles. You can use this sea glass paint technique on any glass surface! 

Sea Glass is so beautiful, so why not recreate the look on any glass object with this tutorial on how to get a sea glass look with paint. It's easy!

This post contains affiliate links. Learn more by reading my disclosure policy.

It’s obviously not the real thing, but these cheap glass jars from Dollar Tree look pretty coastal to me since they got their sea glass makeover.  They’ll do!

DIY Sea Glass Bottles Supplies

These are the supplies I used to create a faux sea glass finish.

  • Dollar Tree glass candy jars with lids
  • Multi-surface acrylic paint (paint colors like Soft Jade, Turquoise Waters, and Sky Blue are what I used)
  • Finishing wax in a pearlescent finish (I used Country Chic Paint Pearl Wax. You could also use this white frost wax for a similar effect.)
  • Twine
  • Sea glass inspired beads
  • Chip brush
  • Lint-free cloth

How to Make DIY Sea Glass Bottles

First off, find some glass jars or glass objects that you want to try this on.  I bought these glass jars at Dollar Tree.  

I love the texture each of these jars has!

Sea Glass is so beautiful, so why not recreate the look on any glass object with this tutorial on how to get a sea glass look with paint. It's easy!

Wash the glass and dry thoroughly.  

Then, paint the outside of the jars or other glass objects.  I used a really thin coat of multi-surface acrylic paint, and left some of the glass underneath showing. You could definitely do a solid coat if you like that look better!  

Sea Glass is so beautiful, so why not recreate the look on any glass object with this tutorial on how to get a sea glass look with paint. It's easy!

After the paint is totally dry, wipe on the Pearl Wax with a lint-free cloth.  I let the wax dry for about 25 minutes and then buffed each of the jars.

Sea Glass is so beautiful, so why not recreate the look on any glass object with this tutorial on how to get a sea glass look with paint. It's easy!

The Pearl Wax gives the glass a gorgeous and subtle iridescence.  I just LOVE it!  

(Sidenote: check out how I used Pearl Wax on a child’s rocking chair makeover. It’s adorable!)

Sea Glass is so beautiful, so why not recreate the look on any glass object with this tutorial on how to get a sea glass look with paint. It's easy!

To make my jars look even more coastal, I tied twine around each of them and added some sea glass looking beads around the fronts.

Sea Glass is so beautiful, so why not recreate the look on any glass object with this tutorial on how to get a sea glass look with paint. It's easy!

Even my husband noticed these cute little jars (and he usually never notices my projects – unless they’re big ones).  

Love Coastal Crafts? You Might Also Like These Projects!

  • Sandy Shapes Art
  • DIY Custom Straw Tote Bag
  • Beach in a Bottle Souvenir
Sea Glass is so beautiful, so why not recreate the look on any glass object with this tutorial on how to get a sea glass look with paint. It's easy!

Since the paint is on the outside of the jars, they can still be used to hold things like flowers or food.  

Sea Glass is so beautiful, so why not recreate the look on any glass object with this tutorial on how to get a sea glass look with paint. It's easy!

I’ve painted jars before but always painted the insides, which made them not as useable as these.  Bonus!

Sea Glass is so beautiful, so why not recreate the look on any glass object with this tutorial on how to get a sea glass look with paint. It's easy!

See how easy it is to get a sea glass look with paint?  If you liked this project, please “Pin It” so you will remember to make your own sea glass bottles later on!

Sea Glass is so beautiful, so why not recreate the look on any glass object with this tutorial on how to get a sea glass look with paint. It's easy!

Well, that’s it for now.  “Sea” ya later!  (Ha!  Hilarious, right?)

Filed Under: Crafts, Dollar Tree

DIY Solar Light Planters

May 20, 2016 by Bre 8 Comments

blank

Create these pretty tiered solar light planters for your front porch, patio, or deck! A great addition to your outdoor decor.

I really, really don’t want to jinx it, but it seems like some type of spring weather may have arrived here in Chicago.  Finally!  

This nice weather may depart as quickly as it arrived, however, so I’m not holding my breath.  But . . . since we’ve had a few days of sun and warmth, thoughts of flowers and gardening have crept into my mind.  

Thoughts that include these DIY solar light planters, which are a unique way to add some height and light to your flower pots!  

Add some height and light to your planters with these easy DIY Solar Light Planters. Get the full tutorial in this post.

Supplies Needed to Make Solar Light Planters

This post contains affiliate links.  To read my full disclosure policy, please click here.

  • 10″ or larger terracotta flower pot with a hole in the bottom
  • 8″ or smaller terracotta flower pot with a hole in the bottom
  • Multi-surface acrylic paint
  • Chip brush
  • Foam brush
  • Artist’s brush (if you want to paint details, like your house number)
  • Painter’s tape
  • Solar light with long stake at the bottom
  • Potting soil and flowers

How to Make Solar Light Planters or Tiered Flower Planters

First, paint your terracotta pots however you like.  I painted street numbers on one set, and went for a weathered paint look on the other set.  

To achieve the weathered paint look, I used a chip brush with hardly any paint on it to sporadically apply acrylic paint to the flower pot, and then I dragged the brush across.  

Add some height and light to your planters with these easy DIY Solar Light Planters. Get the full tutorial in this post.

Once that dried, I taped off around the rim of the pot, and painted the upper part of the pot a solid color with a foam brush.  

For the set of pots with house numbers, I glued metal ribbon around the rim.

Add some height and light to your planters with these easy DIY Solar Light Planters. Get the full tutorial in this post.

After everything dried, I filled the larger pot with potting soil.  Then I stuck the solar light through the hole in the smaller pot, and set the smaller pot and solar light stake into the larger pot.  

Add some height and light to your planters with these easy DIY Solar Light Planters. Get the full tutorial in this post.

I filled the top, smaller pot with soil and then added my spring flowers!  

Add some height and light to your planters with these easy DIY Solar Light Planters. Get the full tutorial in this post.

These solar light planters get light all day and then turn on at night and help illuminate my front porch!  

They’d be great on any patio, too, for a little ambiance at night. I also have a tutorial for easy DIY Modern Planters that would look great with these!

This is such a cute spring craft project. Turn terracotta pots into adorable tiered flower planters for your porch! Plus, adding a solar light to each tiered pot gives these planters a little something extra that helps to light the night! #springcrafts #terracottapots #diyplanter #planters

So, the question is, will you be making these tiered planters for your summertime porch or patio?  

If you might want to, I’d love for you to “Pin It” so you’ll remember to come back to this tutorial later on!

Add some height and light to your planters with these easy DIY Solar Light Planters. Get the full tutorial in this post.

-Bre

Filed Under: Crafts Tagged With: Outdoor Decor

DIY Peace Sign Wreath

May 17, 2016 by Bre 4 Comments

blank

As I get older I feel like I’m becoming more of the crunchy granola type.  Let’s just get along and sing “Kumbaya” around a campfire, okay?  Now I’m not one to slather on patchouli or forego shaving, so I thought a cute DIY peace sign wreath for my door would be the next best way to make a statement that love and kindness dwell here.  

A DIY Peace Sign Wreath is a great way to greet visitors to your home! Get the full tutorial in this post.

And oh yeah, baby, this thing is groovy.  And adorable.  Just how I like my craft projects.  

A DIY Peace Sign Wreath is a great way to greet visitors to your home! Get the full tutorial in this post.

Supplies Needed for a DIY Peace Sign Wreath

Some of these links are affiliate links.  To read my full disclosure policy, please click here.

  • Wooden peace sign
  • Wooden heart
  • Leather cording
  • Wooden beads
  • Stapler
  • Chalky finish paint in this color, this color, this color, and this color
  • Chip brush
  • Floral stencil or laser cut paper
  • Thumbtacks
  • Hammer

How to Make a DIY Peace Sign Wreath

You can make your own version of this DIY peace sign wreath so easily!  

Step One: Hammer Thumbtacks to the Peace Sign

First, I gently hammered thumbtacks all the way around the unfinished wood peace sign.  I did this to give the peace sign a little bit of dimension.

It looks funny like this, but it will look much better!

A DIY Peace Sign Wreath is a great way to greet visitors to your home! Get the full tutorial in this post.

Step Two: Paint the Wooden Peace Sign

Next, I painted the entire peace sign with a coat of this dark gray paint. 

A DIY Peace Sign Wreath is a great way to greet visitors to your home! Get the full tutorial in this post.

Step Three: Dry Brush Contrasting Paint Over the Dark Paint

Once the gray paint dried, I lightly brushed some of this paint on top.  

Then, I painted the wooden heart this color.

A DIY Peace Sign Wreath is a great way to greet visitors to your home! Get the full tutorial in this post.

Step Four: Stencil a Pattern on the Wooden Heart

Next, I stenciled a floral pattern onto the heart using this color of paint.  

Once it dried, I fastened it to the peace sign with leather cording.  

A DIY Peace Sign Wreath is a great way to greet visitors to your home! Get the full tutorial in this post.

Step Five: Create a Wreath Hanger

Then I strung some wooden beads to the leftover leather cording, and stapled that to the top of the peace sign, on the back, to create a hanger for my wreath.  Notice the poor stapling job . . . it took quite a few tries to get that to actually work.

A DIY Peace Sign Wreath is a great way to greet visitors to your home! Get the full tutorial in this post.

And that was all it took to make this cute DIY peace sign wreath!  I really love how this project turned out; it might be one of my favorites!  

A DIY Peace Sign Wreath is a great way to greet visitors to your home! Get the full tutorial in this post.

A DIY Peace Sign Wreath is a great way to greet visitors to your home! Get the full tutorial in this post.

A DIY Peace Sign Wreath is a great way to greet visitors to your home! Get the full tutorial in this post.

The best part was that after I’d hung it up and stood there admiring it, my little guy said to me, “Mama, I really like that steering wheel you put on the door.”  

He is definitely my biggest fan.  🙂

A DIY Peace Sign Wreath is a great way to greet visitors to your home! Get the full tutorial in this post.

Peace out.

-Bre

Filed Under: Crafts

Air Dry Clay Keychains

May 11, 2016 by Bre 33 Comments

blank

Air dry clay (basically, PlayDoh for grownups), is one of my favorite craft supplies!  It’s inexpensive and you can do so much with it!  Take these air dry clay keychains, for example.  They’re super cute and fun to make! 

Air dry clay keychains are a super fun and easy project! Get the full supply list and tutorial in this post!

This post contains affiliate links.  Please read my disclosure policy for more information.

Before we get down to the nitty-gritty of this project, let me fill you in on one of my favorite craft supplies!

What Is Air Dry Clay?

Air dry clay is EXACTLY what it says it is- clay that dries when left out in the air!  You don’t need a kiln, and you do not bake it in the oven (unless the package tells you to do so).   Some air dry clays even warn you NOT to bake in the oven – so pay attention to that!

Traditional air dry clay lets you create the project and let it sit out for several hours to several days to dry fully.

What Is the Best Air Dry Clay Brand?

Coincidentally, some time after I wrote this blog post, I got a job working for a company that sells air dry clay! 

I loved that job and learned so much about this craft supply.  One major lesson was that there are lots of brands of air dry clay on the market, and some are REALLY bad! 

My personal favorite air dry clay brands are Supreme air dry clay (it is inexpensive, dries extremely tough, and comes in great colors like natural, terracotta, and black), and Hearty Clay air dry clay (it is so lightweight – almost like a marshmallow – and has an ultra-white color).  I really think these are the best air dry clay brands around!  

What Supplies Do You Need to Make Air Dry Clay Keychains?

To make these clay keychains as shown in this post, you’ll need the following supplies:

  • Air dry clay
  • Clay lettering set
  • Small-shaped clay cutters
  • Clay texture sheets
  • Needle or some other object capable of poking a hole through the clay
  • Large jump rings
  • Key rings
  • Optional: tassels, charms, or other embellishments
  • Acrylic paint
  • Metallic wax (I used this gold wax and this rose gold wax)
  • Small paintbrushes
  • Small pliers
  • Rolling pin or clay roller kit

How to Make Air Dry Clay Keychains

I did this project with my kids one afternoon, and they were SO excited to be using some of my craft supplies.  This would be an awesome project to make with older kids as a camp or scouting activity. 

(If you’re interested, another great project to make with kids is these Air Dry Clay Pressed Flower Plaques or Air Dry Clay Garden Markers.)

Step One: Roll Out the Air Dry Clay

So first, I took a chunk of clay and rolled it flat and about 1/4″ thick.  Use a rolling pin or a clay roller kit (which is great if you work with clay a lot!).

Air dry clay keychains are a super fun and easy project! Get the full supply list and tutorial in this post!

Step Two: Cut Out Shapes in the Clay

I used the clay shape cutters to cut out several shapes and sizes.  

Air dry clay keychains are a super fun and easy project! Get the full supply list and tutorial in this post!

Step Three: Emboss Letters and Textures in the Clay

Next, I had fun using the clay letter embossing tool and the textured pattern pieces to make all different kinds of designs on my shapes.  

Air dry clay keychains are a super fun and easy project! Get the full supply list and tutorial in this post!

Air dry clay keychains are a super fun and easy project! Get the full supply list and tutorial in this post!

Step Four: Poke Holes in the Clay

Once I finished embellishing all of my shapes just the way I wanted them, I found a random tool in a drawer and used it to poke holes near the top of each shape.  (Any idea what that thing is?)  

TIP: when you do this, make sure you poke the holes near the top of the clay, otherwise it will be very hard to fit jump rings through the holes once the clay has dried.  Some of mine were a little too far down, and they were unusable as a result.  Womp womp.  

Air dry clay keychains are a super fun and easy project! Get the full supply list and tutorial in this post!

Step Five: Wait for the Clay to Dry

Next came the hard part.  I had to wait just about two days for my creations to dry!  That felt like an eternity.  For a person who has real issues with patience, this was a test.  

Air dry clay keychains are a super fun and easy project! Get the full supply list and tutorial in this post!

Step Six: Paint

Luckily, I survived the two-day clay-hardening period and lived to paint my clay creations with all the different colors of acrylic paint.  

Once the paint dried, I applied metallic wax to some of them for some added shimmer and shine!  

Air dry clay keychains are a super fun and easy project! Get the full supply list and tutorial in this post!

Step Seven: Add a Jump Ring and Key Ring to the Clay Keychain

Finally, I added a jump ring through the holes in each piece of clay and then attached the key rings to each.  

Small pliers will be really helpful to get these pieces on the keychains.

Air dry clay keychains are a super fun and easy project! Get the full supply list and tutorial in this post!

On some of the key rings, I added some cute tassels, too!  I kinda love them and want to put tassels on everything.  

Air dry clay keychains are a super fun and easy project! Get the full supply list and tutorial in this post!

Air dry clay keychains are a super fun and easy project! Get the full supply list and tutorial in this post!

So easy and so fun.  If you can get past the waiting 48 hours for the clay to dry, you’re golden.

Air dry clay keychains are a super fun and easy project! Get the full supply list and tutorial in this post!

I really enjoy using air dry clay, and I think you will, too!  If you liked this project, too, I’d love for you to pin it so you can find the directions later!  

Air dry clay keychains are a super fun and easy project! Get the full supply list and tutorial in this post!


Filed Under: Crafts

  • « Go to Previous Page
  • Page 1
  • Interim pages omitted …
  • Page 12
  • Page 13
  • Page 14
  • Page 15
  • Page 16
  • Interim pages omitted …
  • Page 21
  • Go to Next Page »

Primary Sidebar

Let’s Connect!

Hi, I’m Bre! Thanks for visiting Average But Inspired, where I show you how to work with what you’ve got to create a home you love.

Bre of Average But Inspired - a DIY and craft blog

Love DIY? Subscribe to Get Posts E-mailed!

How Can I Help You?

blank

7 Tips for Hosting a Party on a Budget

blank

How to Create a Faux Antique Brass Finish with Paint

blank

Limewash Stone Fireplace Makeover: Bye Bye Orange Stone Fireplace, Hello Neutral Stone Beauty!

blank

How to Paint a Door to Look Like Wood (It’s Easier Than You Think!)

Looking for Something?

Copyright © 2013-2022, Bre Eggert (Average But Inspired). All rights reserved.
  • Home
  • DIY
  • Crafts
  • Home Decor
  • Privacy Policy and Copyright Policy
  • Disclosures
  • Contact Me