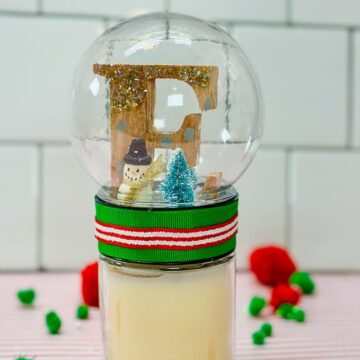
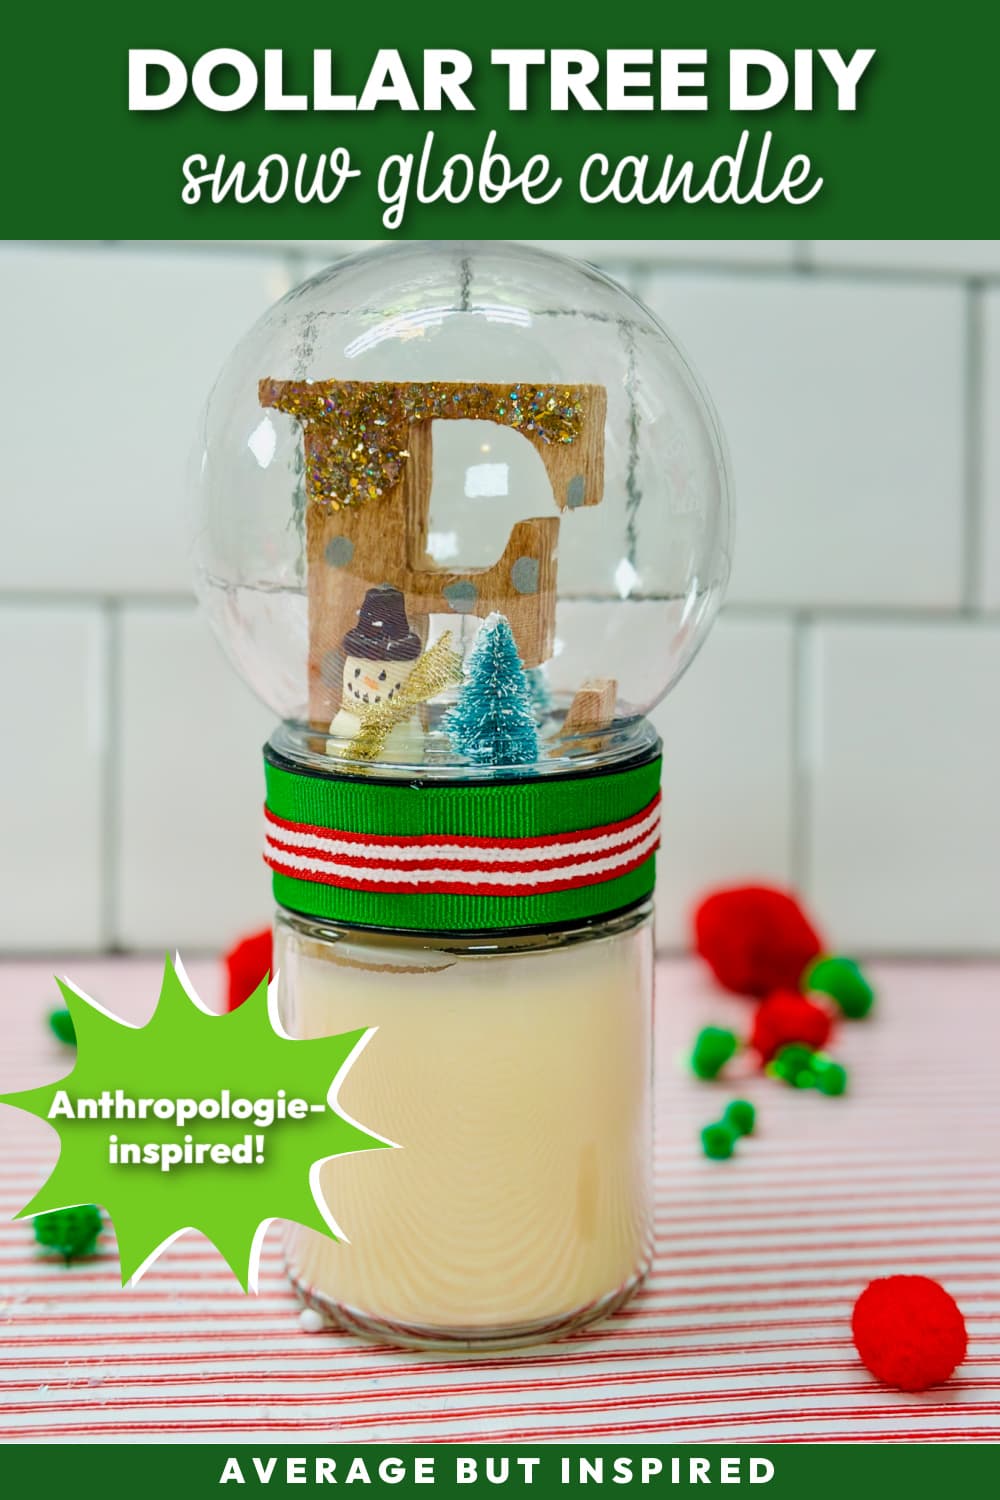
Average But Inspired

Inspiring creativity with crafts, DIY, and home decor projects.

  • About Bre
  • Contact Me
  • Disclosures
  • Policies
  • Home
  • Shop
  • DIY
  • Crafts
    • Dollar Store Crafts
  • Seasonal
    • Patriotic & Summer
    • Valentine’s Day
    • Easter & Spring
    • Fall & Halloween
    • Christmas & Winter
  • Home Decor
  • Furniture
  • Organization

October 31, 2019 by Bre

How to Make a Jingle Bell Wood Bead Garland for Christmas

In my humble opinion, Christmas decor feels even more special when it’s handmade.  The time and care that goes into making the decor elevates it to a new level.  One of the simplest and most festive pieces of handmade Christmas decor you can make is a garland, and this Jingle Bell Wood Bead Garland is a versatile piece that can be used anywhere!  This is so pretty and easy to make! This DIY jingle bell wood bead garland is just perfect for Christmas decor! Get all the instructions in this post.

Wood bead garlands are a decor staple these days, but the addition of jingle bells and festive holiday ribbon to a regular garland makes this wood bead garland extra special for Christmas! 

Plus, it is oh-so-easy to put together, and it’s a great project to get your children to help with.  It’s really that simple!

Materials Needed for a Wood Bead Jingle Bell Garland

This post contains affiliate links.  To read my full disclosure policy, please click here.  

  • Multipack of wood beads in varying sizes
  • Jingle bells in varying sizes
  • Bakers twine
  • Needle with large eye
  • Christmas ribbon
  • Scissors

With these simple supplies - jingle bells, wood beads, and bakers twine - you can make a gorgeous Christmas garland!

How to Make a Wood Bead Jingle Bell Garland

Begin folding a long piece of bakers twine in half and threading it through a needle with a large eye.  (You want to fold the bakers twine in half to give it more strength once you start stringing the wood beads and jingle bells.)  I chose red and white bakers twine because it is so Christmasy!  Use a needle with a large eye to thread bakers twine through the beads.

Once the needle is threaded, tie a knot at the opposite end of the twine to hold the pieces together.

Next, begin stringing wooden beads onto the twine.  I chose to use a mix of sizes of wood beads, and I alternated them.  Use a needle with a large eye to thread the bakers twine through the wood beads.

Using a needle was essential for getting the twine through the beads.  I don’t honestly think you could make a wood bead garland without a needle!

Then, I also added in different sizes of jingle bells to the garland.  For my garland I strung four wood beads, then a bell, and alternated that pattern all the way down the length of the twine.  Add jingle bells to the garland to make it perfect for Christmas.

When I got to the end of the twine, I tied off that end.  Then I got to work making ribbon tassels to add to the ends of the wood bead garland.

Making the ribbon tassels was so easy!  Just cut four pieces of ribbon, stack them on top of one another, fold in half, and tie a piece of bakers twine around them near the top to secure and form a tassel.  It's so easy to make a ribbon tassel!

Once the tassels are made, loop the ends of the bakers twine through the loops in the tassels, and tie to secure. 

  Add pretty decorative tassels to the wood bead garland.

After that, the garland is complete!  

Depending on how long you make it, it would look beautiful on a Christmas tree or Christmas mantel!  If you opt for a shorter version, you could put it around a vase, on a tiered tray decorated for Christmas, or simply laid on a table as part of a Christmas vignette.  Make a pretty wood bead and jingle bell garland for Christmas! This DIY wood bead garland is so easy to make - click to view the tutorial on how to make your own!

The wood bead garland I made has 40 wood beads, 10 bells, and measures 34″ excluding the tassels.  Those figures might help you calculate how many of each supply you need to make a shorter or longer wood bead garland.

This is a beautiful Christmas craft! Make a wood bead garland with jingle bells and Christmas ribbon tassels for a beautiful decorative touch. It's such an easy craft!

So what are you waiting for?  Grab the supplies you need and get to stringing!  And make sure you pin this image on Pinterest so you can easily find this tutorial again when you need it.  

LOVE this DIY Christmas decor! Learn how to make a jingle bell wood bead garland to add a homemade touch to your Christmas decor this year. This easy Christmas craft is a pretty way to use simple supplies for a stunning decorative touch.

You May Also Like These Upcycled Tile Christmas Ornaments

blank

October 24, 2019 by Bre

DIY Decor Tags {A Versatile Christmas Decor Craft}

Before you get mad and tell me it’s not even Halloween yet, let me explain why I’m sharing a Christmas craft in October.  I am moving (you can read more about that here), and as a result, a lot of my craft supplies are boxed up AND I can’t decorate my house for fall or Halloween because of showings, etc. 

Because of that, I’m limited in what creative muscles I can flex right now, and this easy Christmas craft was just right!  It’s a transformation of Dollar Tree printed chipboard tag ornaments into darling buffalo check decor tags that add a special touch to Christmas decorations!

Add a dash of charm to your Christmas decor with these dollar store DIY decor tags! Using only dollar store supplies, you can make these large tags to add to wreaths, vases, to use as ornaments, to put in tiered trays, or to hang from a doorknob! The possibilities are endless, and these are such a cute Christmas craft!

Large scale decor tags have been popping up all over the stores, and this project gave me a chance to put my own twist on the trend.  Everything I used can be purchased at Dollar Tree, so you know it’s also extremely budget-friendly! 

Where To Use Large Decor Tags

Before I give you all the details on how to make your own decor tags, you might be wondering WHY you’d make these tags.  What do you use decor tags for?  The answer is – just about anything!  They’re actually really versatile and add a pop of interest anywhere you put them.  Some favorite uses for decor tags are:

  • added to wreaths for a seasonal touch
  • in a tiered tray (these are all the rage over on Instagram and Pinterest. I might be the only person who doesn’t have a tiered tray to decorate.)
  • hanging on a doorknob
  • hanging from a vase or planter
  • tied together as standalone door decor
  • grouped in a basket as part of a larger vignette

Hopefully those ideas spark an idea for you of where you could use similar decor tags in your own home!

Add a dash of charm to your Christmas decor with these dollar store DIY decor tags! The buffalo check wrapping paper makes these tags on trend for Christmas this year! Using only dollar store supplies, you can make these large tags to add to wreaths, vases, to use as ornaments, to put in tiered trays, or to hang from a doorknob! The possibilities are endless, and these are such a cute Christmas craft!

Supplies Used to Make Large Decor Tags

Now, let’s get down to business!  Here’s what you need to make these cute Christmas decor tags.

This post contains affiliate links.  To read my full disclosure policy, please click here.

  • Decorative chipboard tag ornaments (not currently available online, but the large size chipboard tags are available online)
  • Buffalo check wrapping paper (not currently available online)
  • Matte Mod Podge
  • Scissors
  • Paint brush
  • Poster sticker letters
  • Red truck mini ornaments (4 pack) (not currently available online)
  • Jingle bells
  • Twine
  • Black and silver acrylic paint
  • Fine grain sandpaper

How to Make Christmas Tags for Decor

To help you find in store the exact tags I used for this project, here they are!

Use these Dollar Tree tag ornaments to make adorable decor tags for your Christmas decorations this year.

Flip them over to the flat backside (the fronts have some raised glitter on them), and cut wrapping paper to be slightly larger than the tags.  Then, trace the tags onto the back of the wrapping paper.

Use Christmas wrapping paper to add a festive touch to these decorative tags.

Cut out the tag shapes from the wrapping paper.  Then, place a thin coat of Mod Podge over the entire chipboard tag.

Mod Podge is the perfect decoupage medium to attach wrapping paper to these decorative tags.

Carefully place the wrapping paper that you cut to the shape of a tag on top of the Mod Podge chipboard tag.

Buffalo plaid wrapping paper adds a festive touch to this Christmas craft.

Carefully smooth out any wrinkles and make sure that the wrapping paper is flattened all over.  Set the tag aside to dry.  This will take about 20 minutes.

Once the tag seems dry, gently rub the edges of the wrapping paper with sandpaper.  This will remove any wrapping paper that’s sticking over the edge of the chipboard tag.  

Use sandpaper to remove excess paper from the tags.

Next, apply a thin layer of Mod Podge over the top of the wrapping paper.  This will help seal the wrapping paper onto the tag, and it will remove the shiny finish of the wrapping paper.  

Add a layer of Mod Podge to the top of the tag.

Set it aside to dry.  As it dries, you will notice that the hazy finish disappears.  Yay!  

Once it’s dry, gently brush a bit of black paint around the edges of the tag to give it an aged look.  Adding black paint around the edges of the tag will help add an aged look.

Then, apply the poster stickers to write out words that fit on the tags.  I think four letters are the max that will fit with these poster stickers on these tags.  Dollar Tree poster stickers are an easy way to add lettering to these decor tags.

Use a pencil to poke a hole through the wrapping paper at the top, and then, for an added touch of authenticity, paint a silver circle around the hole.  Use silver paint to add a faux metal circle to the tags.

String twine through the hole, and add decorative elements to the twine.  I used the cutest little red truck ornaments from Dollar Tree and silver jingle bells.  But, you could get creative and add whatever embellishments you like!

These darling decorative tags were created with Dollar Tree craft supplies!

See how easy it is to upgrade the look of these Dollar Tree tags with just a few simple tweaks?  You get a totally adorable look for hardly any money at all.  I just love when decor works out that way!

-Bre

Here’s Another Great Dollar Tree Christmas Craft! Check Out This Dollar Tree Christmas Cloche! 

blank

October 14, 2019 by Bre

Pool Noodle Pumpkins: A Fun Fall Craft!

While cleaning out my husband’s car this weekend, I found a pool noodle left behind after a trip to our local swimming pool this summer.  A jolt of inspiration hit and I grabbed the pool noodle, ran inside, and got to work making some adorable Pool Noodle Pumpkins for my fall decor!  Cute! These DIY POOL NOODLE PUMPKINS are super easy to make and oh-so-adorable! This is a great fall craft for groups because it's so cheap to make!

I wasn’t totally sure if pool noodles transformed into pumpkins would be cute, but I gave it a try anyway.  And thankfully, they’re darling!  Pool noodle pumpkins are the cutest craft in the patch!

Pool noodle pumpkins are also extremely easy to make and very, very cheap.  These would be a perfect fall craft for large groups (I bet you could make ten pumpkins per pool noodle), and even for the least crafty people around.  They are SO easy to make!

Pool Noodle Pumpkins Supplies

  • Foam pool noodle
  • Fabric (I used a Halloween scarf from Dollar Tree)
  • Wood blocks (I used pieces from a Dollar Tree Jenga game)
  • Raffia or other ribbon
  • Scissors
  • Knife

How to Make Pool Noodle Pumpkin Crafts


The first step is to cut the pool noodle into pieces.  I used a serrated knife and the noodle cut very easily.  If children will be making this craft, please make sure to cut the pool noodle ahead of time; do not give the children knives!  Cut a foam pool noodle to make pool noodle pumpkin crafts!

Next, lay the pool noodle piece on top of a piece of fabric.  Cut the fabric so that there is enough fabric on all sides to wrap around the pool noodle and tuck into the hole.  Cut fabric to wrap around a pool noodle to create a cute fall pumpkin craft.

Once the fabric is cut, begin pulling the fabric upwards toward the pool noodle hole, and then tucking the end of the fabric into the hole.  Wrap fabric around the pool noodle to begin creating the pool noodle pumpkin.

Continue wrapping, pulling, and tucking until the pool noodle is completely covered with fabric.

Then, take the wood block and stick it into the hole where the fabric is tucked.  The wood block will hold the fabric in place, but if you want a more secure hold, you could hot glue the block into the hole, too.  Use a Dollar Tree Jenga block as the pumpkin stem.

Finally, tie some raffia around the wood block “stem” to create the look of a vine on the pumpkin.  Tie raffia around the wood block pumpkin stem.

And that is all it takes to make the cutest pool noodle pumpkins in the patch!  Transform foam pool noodles into adorable pumpkin crafts! This blog post shows you how. It's easy!

This craft was perfect for me right now since I can’t really decorate or work on large projects due to our move.  I love how quickly it came together and how cute these pumpkins turned out!  Cute! Grab your kids' pool noodles and turn them into darling pumpkins! This fall craft could not be easier! Love this pumpkin craft and pool noodle upcycle.


September 30, 2019 by Bre

Halloween Skull Decoration: Make a Mini Halloween Cloche!

The spookiest time of year is almost here again!  Get ready to pull out those Halloween decorations and deck the halls for trick-or-treaters.  And of course, don’t forget to make time for some Halloween crafting!  This year, Halloween skull decorations are all the rage, and I’m going to show you how to make a mini Halloween cloche with Dollar Tree plastic skulls.  It’s a piece of Halloween decor that’s cute and creepy all at the same time!

Skull decorations are so hot for Halloween! Use Dollar Tree mini skulls to make these cute and creepy Halloween cloches!  

This Halloween skull decoration is pint sized, which makes it totally perfect for any little spot in your home or office that needs a tiny dash of Halloween.  Think shelves, entryway tables, window sills, and more!

I need small and discreet Halloween decorations this year so I can easily stash them away for house showings.  (We’re moving!  Read up on our unexpected life change here.)  This is just right!

Also, because this Halloween cloche is miniature (well, mini as compared to a regular-sized cloche, but not fairy garden mini!), you can make the whole thing in about 20 minutes.  Not bad!  Use Dollar Tree mini skulls to make adorable Halloween cloches for Halloween this year!

Supplies Needed to Make a Mini Skull Halloween Cloche

This post contains affiliate links.  To read my full disclosure policy, please click here.

  • Unfinished wood candle holder
  • Empty baby food jar or 4 oz. small mason jar
  • Acrylic craft paint in black and silver
  • Paint brush
  • Spanish moss (from Dollar Tree)
  • Mini skulls (from Dollar Tree)
  • High-temperature hot glue gun OR E6000 glue
  • Optional: small unfinished wood furniture buttons

How to Make a Mini Skull Cloche For Halloween Decor

Begin by getting your paints and paint brush ready!  Paint the unfinished wood candle holder, the mason jar rim (or baby food jar lid), and the unfinished wood furniture button with the black acrylic paint.  

Learn how to make a skull decoration with cheap craft supplies.

Chances are that the black paint won’t cover the rim of the mason jar very well (even with multiple coats), but that is OK!  Let some of that silver color underneath show through – it adds to the look!

Once the black paint dries on all of those pieces, lightly dab some silver metallic craft paint or acrylic paint onto the wooden pieces.  You can also add some silver paint to the mason jar lid if it needs it.  Mine did not.

Paint a wooden candle holder.

Let the silver paint dry and then use hot glue (only with a high temperature hot glue gun) or use a glue made for plastic and wood (like E6000), to attach the mason jar lid to the wood candle holder.  

Turn a candle holder and mason jar into a cute Halloween cloche with skulls!

Place a little Spanish moss inside the lid, and be careful not to put too much in.  You can hot glue the moss to the lid if you like, or leave it loose.  (You might like to see how I used this same Spanish moss to make my fake fiddle leaf fig tree look real!)  

Spanish moss adds a spooky touch to a Halloween cloche craft project.

Then pop a miniature skull on top of the moss.  You can also hot glue the skull onto the moss if you want a more stable skull.  🙂  (That sounds so funny.) 

Use Dollar Tree mini skulls to make adorable Halloween cloches for your decor this Halloween.

Now, screw the mason jar onto the lid and trim off any Spanish moss that sticks out the sides.  If you choose to add the little wooden button to the top, go ahead and glue that on now.  

So adorable! Use mini skulls to make tiny Halloween cloche decorations.

Once that glue is hardened or set, your adorable mini Halloween cloche is complete!  

Make a Halloween cloche with skulls to add some creepy and cute to your Halloween decor this year.

This is one Halloween skull decoration that you definitely want to add to your haunted house this year!  

This Halloween skull decoration is creepy and cute at the same time! Make a Halloween cloche with miniature skulls in under 20 minutes!

-Bre

September 5, 2019 by Bre

20 Unique Pumpkin Crafts

Pumpkins are a fall decorating staple, and rightfully so!  They come in a multitude of colors, shapes, and sizes, and they are seasonally appropriate for several months (meaning less work in changing out decor).  Because of that, pumpkin crafts are always popular, and I’ve rounded up twenty unique pumpkin crafts that you’ll want to make this season.

Get your fall crafting in overdrive with this awesome roundup of twenty unique pumpkin crafts you'll definitely want to make this fall. These great pumpkin projects are so cute!

Now trust me, these pumpkin crafts are not your typical “decorate a fake pumpkin” crafts!  (Not that there’s anything wrong with those!)  These are all unique pumpkin projects that feature pumpkins made out of anything BUT pumpkins (real or fake)!

To get full project instructions for any of these, just click the project title and you’ll go right to the site where the pumpkin craft tutorial lives.  

Pool Noodle Pumpkins by Average But Inspired

Let’s kick things off with one of my unique pumpkin crafts!  Can you believe you can transform foam pool noodles into adorable pumpkins?  It’s true!  This is one of the easiest crafts around, and it makes some of the cutest pumpkins in the patch.  blank

Tin Can Pumpkins by Ann’s Entitled Life

Does it get much easier (or cuter) than this?  Who doesn’t have tin cans easily accessible at all times?  Find out how Ann made hers into adorable pumpkins!  

Ann's Entitled Life shows you how to make this unique pumpkin craft: tin can pumpkins!

Fabric Pumpkin Plaque by Our Home Made Easy

This simple fabric pumpkin project will add punch to any shelf or bookcase that needs some fall sprucing.  It is also a great way to use up fabric scraps!  

Our Home Made Easy shows you how to make this unique pumpkin craft: fabric pumpkin plaque!

Book Page Pumpkin by Creations by Kara

Grab an old book and some scissors and get to work!  Kara shows you how to craft a book page pumpkin in this easy-to-follow tutorial!

Creations by Kara shows you how to make a book page pumpkin. This is just one of the unique pumpkin crafts featured in this post.

DIY Wine Cork Pumpkin by Decor by the Seashore

Save up your wine corks or buy a bag at the craft store, and then get to work making this cute DIY wine cork pumpkin!  How sweet of a gift would this be for your girlfriends or book club members (come on, every book club involves wine!)?  Get the step-by-step instructions right in the post.  

Use wine corks to create a darling wine cork pumpkin that's perfect for fall!

15 Minute Sock Pumpkins by Heathered Nest

How great would these sock pumpkin crafts be for a school Halloween party?  Quick, easy, and cute – they’re bound to be a hit with any grade!  

Heathered Nest shows you how to make pumpkins with socks! This is a fun fall craft for class Halloween parties.

Pallet Pumpkins by Sugar Bee Crafts

I just love these pallet pumpkins for your outdoor fall decor!  These are definitely unique – don’t you think they’d look cute in a pretty fall floral display?  

Sugar Bee Crafts shows you how to make this unique pumpkin project: pallet pumpkins for outdoor display!

Mason Jar Pumpkin Craft by A Cultivated Nest

Grab that mason jar stash (or pick up some cheap mason jars at Dollar Tree), and make these adorable mason jar pumpkins!  How cute would these be filled with candy and presented to a neighbor, teacher, or co-worker this fall?  

A Cultivated Nest shows you how to make this unique pumpkin craft: mason jar pumpkins!

Trim Corner Block Pumpkins by Average But Inspired

Hey, hey – it’s one of my pumpkin craft projects in here!  I had so much fun making these trim corner block pumpkins, and they’re still one of my favorite fall decor pieces today!  You can find these trim corner blocks at any large home improvement store, and then check out my tutorial to learn how to make these sweet pumpkins!

Average But Inspired shows you how to transform wood trim block corners into adorable pumpkins!

Fabric Pumpkins from Old Shirts by Our Crafty Mom

Before you toss those old clothes in the donate pile, think about if you can reuse them to make adorable fabric pumpkins!  This great upcycle from Michelle at Our Crafty Mom can be put together in no time, and for hardly any expense at all!

Our Crafty Mom shows you how to make this unique pumpkin project: t-shirt pumpkins!

Dryer Vent Pumpkins by Practically Functional

How creative is this pumpkin craft???  While you’re at Lowe’s or Home Depot getting trim corner blocks to make the pumpkins pictured above, pick up some dryer vents, too!  Then make Jessi’s cute dryer vent pumpkins and let everyone marvel at this creative pumpkin craft!  

Practically Functional shows you how to make this unique pumpkin project: dryer vent pumpkins!

Loom Knit Pumpkin by Rootsy

I don’t know the first thing about knitting, but I’m willing to bet that some of you do!  Because of that, I thought this knitted pumpkin craft was a great one to share!  Plus, the tutorial is very detailed and good for beginners.  

Rootsy shows you how to make this adorable pumpkin craft: a loom knit pumpkin.

Button Pumpkin Craft by Adventure in a Box

Sweet and simple is the name of the game for this adorable button pumpkin craft!

Adventure in a Box shows you how to make this unique pumpkin craft: a button pumpkin!

Felted Dryer Ball Pumpkins by Hearth & Vine

Oh my word – these little dryer ball pumpkins are too cute for words!  Patti shows you how to make them (even if you’ve never needle felted before), and the result is darling!  

Hearth & Vine shows you how to make this unique pumpkin craft: felted dryer ball pumpkins.

Bandana Pumpkins by Sadie Seasongoods

These sweet bandana pumpkins add a dash of vintage charm to your fall decor!  Check out Sadie Seasongoods’ detailed tutorial on how to make these cute pumpkins.  Sadie Seasongoods shows you how to make this unique pumpkin project: bandana pumpkins!


Bundt Cake Pan Pumpkins by Average But Inspired

Oh yeah, I’ve got another one of my pumpkin crafts in here!  These little bundt cake pan pumpkins are the cutest!  I love to display them in my kitchen every fall.  See how to make them in my post!

Average But Inspired shows you how to transform bundt pans into pumpkins!  

Paper Pumpkin Craft by Ann’s Entitled Life

Don’t you love checking out the scrapbook paper aisle to see what fun prints are in stock?  (I can’t be the only one!)  Get some pretty paper and make yourself a whole patch of these paper pumpkins!  

Ann's Entitled Life shows you how to turn scrapbook paper into a cute pumpkin craft.

Ruffled Felt Pumpkin by Where The Smiles Have Been

Felt is one of my favorite craft supplies to work with because it lends such a homemade feel to any craft.  This ruffled candy corn felt pumpkin is no exception!  This just screams fall cuteness!  

Where the Smiles Have Been shows you how to turn felt into a beautiful ruffled pumpkin.

Scrap Wood Pumpkin by Making it in the mountains

Gather that scrap wood hiding out in your garage or basement and get to work crafting a farmhouse-inspired scrap wood pumpkin!  Leave it neutral, stain it, or paint it – this pumpkin can be customized however you like!

Making it in the mountains shows you how to turn scrap wood into a farmhouse pumpkin for fall.

Paper Bag Pumpkins by This Ole Mom

This is another great pumpkin craft that would work well for a halloween party craft!  It’s easy and inexpensive and such a fun project!  

This Ole Mom shows you how to turn a paper bag into a pumpkin.

Natural Birch Bark Pumpkin Art by Little House of Four

For all of my neutral-loving friends out there, this pumpkin project is the one for you!  Katie shows you how to create a piece of beautiful and natural pumpkin decor with birch bark.  

Little House of Four shows you how to create a birch bark pumpkin.

So there you have it – 20 fabulously unique pumpkin crafts you can make this fall!  Which one is your favorite?  Let me know which of these you’ll be making in the comments below!  And, don’t forget to pin this image to Pinterest!  

Are you looking for the perfect fall craft? Look no further! These twenty unique pumpkin crafts are sure to inspire you. These are easy pumpkin projects that add a dash of charm to any space!

  • « Previous Page
  • 1
  • 2
  • 3
  • 4
  • …
  • 22
  • Next Page »

Let’s Connect!

  • Facebook
  • Instagram
  • Pinterest
  • Twitter
  • YouTube
Bre of Average But Inspired

Hi, I'm Bre! Thanks for visiting my blog. I hope you'll find ideas to inspire your creativity and beautify your home here.

Love DIY & Decor? Join the Fun!

    How Can I Help You?

    blank

    How to Build a Backyard Fire Pit

    blank

    10 Craft Supplies You Should Buy at Dollar Tree

    blank

    How to Create a Faux Antique Brass Finish with Paint

    blank

    7 Tips for Hosting a Party on a Budget

    Looking for Something?

    blank

    The Easiest DIY Under Cabinet Lighting

    As I’ve been talking about non-stop, I painted my oak kitchen cabinets and freshened up the space! Part of the kitchen makeover was enhancing the lighting, and I’m pumped to show you the EASIEST DIY under cabinet lighting that absolutely anybody can add to his or her kitchen for a little mood lighting and general […]

    blank

    How to Make Fake Snowballs for Decor

    With Christmas decorations packed away the house can feel stark!  Because of that, it’s fun to add some winter-themed decor to the mix.  One great way to do that is to make fake snowballs for decor.  They’re easy to make, inexpensive, and look great in vases, jars, bowls – anywhere really!  They’re a beautiful winter […]

    blank

    My Craigslist Chairs Makeover, Take 1- Splotchy, Yellowed and Boring

    Last month I purchased some chairs on Craigslist, and envisioned an effortless makeover using homemade chalk paint and fabulous fabric. I was delusional.  Here’s what the chairs look like now (they look much better in photos than in person, which hardly anybody ever says.  Read on to find out why this did not go the […]

    blank

    Modern Vintage Dining Room Makeover

    It took me almost three months, but I’ve finally finished putting together the dining room in our new house!  It is no longer being used as our virtual learning classroom (thank goodness!), but instead is a beautiful modern vintage dining room that we love! This post contains affiliate links.  To read my full disclosure policy, […]

    Copyright © 2013-2021, Bre Eggert (Average But Inspired). All rights reserved.

    Pretty Chic Theme By: Pretty Darn Cute Design