• Skip to primary navigation
  • Skip to main content
  • Skip to primary sidebar
Average But Inspired logo - DIY and craft

Average But Inspired

Craft a home you love. DIY and craft tutorials.

  • About
    • Contact Me
    • Disclosures
    • Privacy Policy and Copyright Policy
  • DIY
    • Furniture
  • Crafts
    • Dollar Store Crafts
    • Seasonal
      • Patriotic & Summer
      • Valentine’s Day
      • Easter & Spring
      • Fall & Halloween
      • Christmas & Winter
  • Home Decor
    • Organization
  • Shop
    • DIY Swag
    • DIY Guides
  • Home

Holiday

Dollar Tree DIY Fourth of July Decor: Firecracker Decorations

May 19, 2022 by Bre 1 Comment

Have you seen a cuter Dollar Tree DIY Fourth of July Decor project? Make these DIY firecrackers to light up your holiday display!

Put your patriotic spirit on display with this Dollar Tree DIY Fourth of July Decor project. These DIY firecracker decorations will put the sparkle in your celebrations!
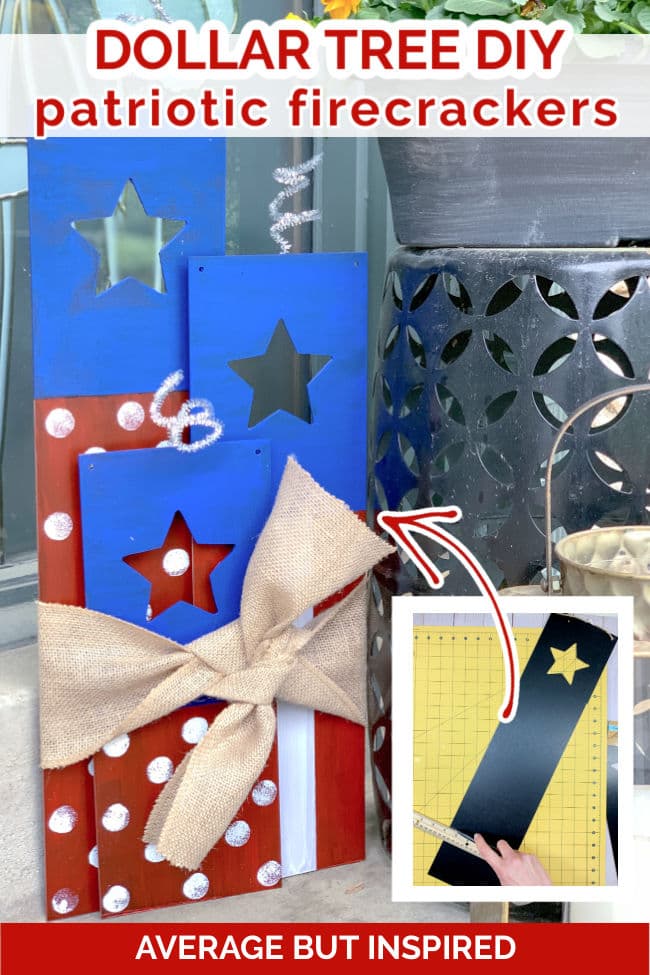
Make these DIY firecracker decorations for your Fourth of July decor! This is an easy Dollar Tree DIY Fourth of July decor idea.

This post contains affiliate links. Please read my disclosure policy for more information.

As soon as I saw some adorable vertical signs with star cutouts at Dollar Tree, I knew I had to turn them into firecracker decorations for my Fourth of July decor. I could see them looking perfect with my Dollar Tree DIY Fourth of July Wreath!

The signs are sturdy and well-made, so they’re the perfect base for a lasting holiday decor piece.

Let me show you how to make your own patriotic firecracker decor with Dollar Tree supplies – you’re going to love this!

DIY Firecracker Decor Supplies

These are the supplies I used to make the firecrackers as shown in this post. Feel free to substitute items to personalize this project however you like!

  • The star cutout vertical signs I used are no longer sold, but you can use these Dollar Tree wood planks and stencil on a star or glue on a star.
  • Six thin wood pieces, like the Dollar Tree Tumbling Tower game pieces
  • Masking tape
  • Craft paint – red, white, and blue
  • Silver pipe cleaners or chenille stems
  • Burlap ribbon
  • Craft knife and ruler
  • Hot glue gun
  • Paint brushes – 1″ craft brush and foam dauber
  • Recommended: wood filler

Dollar Tree DIY Fourth of July Decor Instructions

First things first, if you make this I recommend doing something I did not do: fill the holes at the top of the signs once you remove the twine hangers. I should have done that!

Once the wood filler is dry, use a craft knife and a ruler to cut two of the vertical signs at the base. You’ll want to have each of the signs be a different height.

Dollar Tree vertical signs with star cutouts are the perfect base to make DIY firecracker decorations for the Fourth of July.

Next, paint these bad boys.

I taped them off so that I could paint the tops blue and the bottoms red.

Once that paint dried, I added polka dot detailing to the bottoms of two of the firecrackers with a foam dauber. I taped off the center of the other firecracker so that I could paint a stripe.

Dollar Tree star cutout signs are the perfect base for DIY firecracker decor.

To add dimension to this firecracker display, I hot glued game pieces from Dollar Tree’s version of Jenga along the edge of two of the firecrackers, and then glued the firecrackers on top of one another.

Use Dollar Tree Jenga wood blocks to make space between the firecrackers.

This helped separate the firecrackers from one another and gave the decor more of a 3D look.

I wrapped silver pipe cleaners around my fingers and glued those to the top of each firecracker, because obviously these needed wicks!

Pipe cleaners serve as wicks on these festive Fourth of July firecracker decorations.

And finally, I tied them all together in a cute little firecracker bundle with some extra-wide burlap ribbon. (Don’t worry – I made sure to bush off all of the pipe cleaner and ribbon debris you see in this picture!)

Tie the firecrackers together with burlap ribbon to create a cute Fourth of July decoration.

The Finished DIY Firecracker Decorations

And with that, these patriotic firecracker decorations were ready to go on display! First I tried them outdoors . . .

Make these DIY firecracker decorations for your Fourth of July decor! This is an easy Dollar Tree DIY Fourth of July decor idea.

and then I moved them inside next to the limewashed stone fireplace.

Make these DIY firecracker decorations for your Fourth of July decor! This is an easy Dollar Tree DIY Fourth of July decor idea.

I can’t decide where I like them better! Maybe they’ll just keep moving around, or maybe you’ll leave me a comment below and let me know where you think they look best!

Filed Under: Dollar Tree, Patriotic Tagged With: Dollar Tree, Summer

DIY Valentine’s Backdrop: Love Letter Photo Background

February 8, 2022 by Bre Leave a Comment

blank

Valentine’s Day isn’t the biggest holiday, but it sure is one of the cutest! My family celebrates with a chocolate fondue Valentine’s Day party (and everything you can imagine to dip, dunk, and drizzle). This year I decided to be “extra” and make a fun DIY Valentine’s Backdrop or photo booth to go with our celebration!

Make an adorable DIY Valentine photo backdrop for your Valentine's Day celebration! This is the cutest love note inspired photo backdrop, and you can make it with dollar store supplies!

The idea for this Love Letter Photo Background or Valentine’s photo backdrop came to me in the middle of the night. (I guess I have to thank my husband for stealing the sheets so I’d wake up freezing and have this idea pop into my head!)

I’ve been all about Valentine’s love letter crafts this year (check out my video for a DIY Love Note Door Hanger), so this was the natural progression, I suppose.

Valentine’s Backdrop Supplies

I made this totally with items from Dollar Tree, so it just goes to show you that you can be cute and frugal! (Curious about the best craft supplies to buy at Dollar Tree? Read that post!)

Here are the exact Valentine’s backdrop products I used (please note that some of these links are affiliate links. Read my disclosure policy for more information.)

  • Poster Board (x2)
  • Markers
  • Heart-Shaped Balloons
  • Metallic “Love” balloon
  • Heart cutout or glitter cardstock
  • Poster Putty
  • Masking Tape

DIY Valentine’s Photo Backdrop Instructions

This Valentine’s Day decor goes together so easily! I’ll show you how to make it here, and you can also get printable directions at the bottom of this post!

Step One: Make a Large Envelope with Poster Board, Wrapping Paper, or Construction Paper

Cut one of the poster boards into a “V” shape along one of the widest sides.

Then, tape that poster board to the other poster board. Apply the tape along the back of the poster boards so that there is no tape showing on the front of the “envelope.” Also apply tape along the left and right edges.

Next, decorate the poster board envelope with markers and a heart.

Such a fun Valentine's Day decor idea! Make a giant envelope from poster board, and create a cute Valentine photo backdrop wall!

Step Two: Attach the Envelope to the Wall

Using the poster putty, attach the envelope to a wall. This is where you begin to construct your adorable Valentine photo booth!

Step Three: Fasten Heart Balloons to the Valentine Backdrop

Finally, blow up the heart-shaped balloons and the “love” word balloon, and attach them to the wall. You may find that it is easier to attach the balloons to the wall with masking tape instead of poster putty.

Attach heart-shaped balloons to a wall to create a fun Valentine photo wall! Use it in a photo booth or at a Valentine's Day party!

I made it look as though the balloons were spilling out of the giant love note / envelope.

Make a super cute love note DIY Valentine's Backdrop for your Valentine's Day party! This easy DIY photo backdrop comes together quickly and is so cute!

My whole family had fun posing in front of our Valentine’s Day photo wall. Yes, even Jasper the dog.

And, as promised, here are the printable step-by-step instructions for how to make your own DIY Valentine’s Backdrop. Let me know what you think of this fun Valentine’s Day party idea!

DIY Valentine's Day Photo Backdrop

DIY Valentine's Day Photo Backdrop

Yield: 1
Prep Time: 5 minutes
Active Time: 20 minutes
Estimated Cost: $4

Make the cutest DIY Valentine's Backdrop for your Valentine's Day party or Valentine decor! This easy and affordable photo backdrop features balloons and poster board, and comes together easily.

Materials

  • Poster board - 2 sheets
  • Heart-shaped balloons - 1 package / 12 balloons
  • "LOVE" foil balloon - 1 count
  • Markers
  • Construction paper / scrapbook paper

Tools

  • Ruler
  • Pencil
  • Scissors
  • Masking tape
  • Poster putty

Instructions

  1. With the poster board set so the widest side is toward you, cut the top into an inverted "V" shape, or to a point.
  2. Tape that cut poster board to the other poster board along the back. This means there is no tape on the front of the poster board yet.
  3. Next, tape along the top left and right edges where the two poster boards meet. This secures those edges, but leaves the long seam open.
  4. Decorate the poster boards with markers to make them look like a large envelope. I drew a dashed line along the edge where the two boards meet (to look like a folded edge), and a solid line along the rest of the envelope. I also drew an inverted "V" at the bottom of the poster board to look like the fold at the bottom of the envelope.
  5. If desired, cut a heart out of scrapbook paper and attach it to the envelope. Or, draw one. I also wrote "XOXOXO" along the bottom of the envelope.
  6. Use poster putty to attach the giant envelope to the wall.
  7. Next, blow up heart-shaped balloons in varying sizes. Attach the balloons to the wall with masking tape to make them look like they're falling out of the envelope.
  8. Finally, blow up the foil "LOVE" balloon and attach that to the wall the same way.
  9. Take pictures in front of your DIY Valentine Backdrop, and enjoy the memories of your fun day!

Notes

  1. I purchased all supplies for this DIY Photo Backdrop from Dollar Tree. Unfortunately, none of the products I used are available online at Dollar Tree's website. I have linked similar products that are available on Amazon in case this helps.
  2. I found that the balloons stuck to the wall better if I applied the tape to the wall, and then pressed the balloon onto the tape. I think this allowed the "flattest" part of the balloon to make contact with the wall, which helps the balloons stay put.

    Recommended Products

    As an Amazon Associate and member of other affiliate programs, I earn from qualifying purchases.

    • 42 Inch Red LOVE Foil Balloons for Valentines Day Decor, 4Pcs Reusable Large Love Mylar Letter Valentines Day Balloons, for Engagement Anniversary Wedding Bridal Shower Valentines Day Decorations
      42 Inch Red LOVE Foil Balloons for Valentines Day Decor, 4Pcs Reusable Large Love Mylar Letter Valentines Day Balloons, for Engagement Anniversary Wedding Bridal Shower Valentines Day Decorations
    • 100Pack Heart Shaped Balloons, White Light Pink Red Heart Balloons Premium Helium Love Latex Balloons For Wedding Valentine's Day Decorations(With Pink & White Ribbon)
      100Pack Heart Shaped Balloons, White Light Pink Red Heart Balloons Premium Helium Love Latex Balloons For Wedding Valentine's Day Decorations(With Pink & White Ribbon)
    • 5 pack - Poster Boards
      5 pack - Poster Boards
    • Scotch General Purpose Masking Tape
      Scotch General Purpose Masking Tape
    © Bre
    Project Type: Crafts / Category: Valentine's Day
    blank

    Filed Under: Valentine's Day

    How to Make Fake Pumpkins Look Real

    September 7, 2021 by Bre 21 Comments

    blank

    Squirrels: my arch enemies.  In the past, they’d eat the beautiful pumpkins my family selected at the pumpkin patch – mangling them before we’d even had a chance to enjoy them in our planters or carve them.

    But as soon as I figured out how to make fake pumpkins look real, that all changed.

    Squirrels do not like faux pumpkins.  Therefore, I love fake pumpkins.  The problem is that they sort of look like plastic blobs when you get them fresh from the craft store: bright orange, super shiny, not realistic.  

    But with just a little bit of paint, it’s so easy to make fake pumpkins look real!  And, you can even put these painted faux pumpkins outside!

    Learn how to make fake pumpkins look real with paint! It's an easy technique to make faux pumpkins look authentic. Use these fake pumpkins indoors or outdoors.

    Before we begin, let’s have a quick look at what a fake pumpkin from the craft store looks like. It’s like a bright orange ball with some grooves in it. Not very realistic at all.

    Love this! Make fake pumpkins look real with a little bit of paint! Use them year after year and keep the squirrels away!

    The good news is that it doesn’t take many supplies or very long to get fake pumpkins looking more realistic.

    Supplies Needed to Make Fake Pumpkins Look Real

    This post contains affiliate links.  Please feel free to read my full disclosure policy for more information.

    • Artist’s paintbrush
    • Brown acrylic paint
    • Green acrylic paint
    • White or cream acrylic paint
    • Paper towel
    • Sponge
    • Spray sealer

    How to Make Faux Pumpkins Look Real

    Making fake pumpkins look real is definitely more of an art than a science.  It will be helpful to read through these instructions before painting, and to watch the video in this post to show you more of the technique.

    First, use a thin paintbrush to add brown acrylic paint to some of the faux pumpkin’s grooves.

    Love this! Make fake pumpkins look real with a little bit of paint! Use them year after year and keep the squirrels away!

    Let the paint sit for a few minutes (but not long enough to fully dry), and then use a paper towel or sponge (or both) to smudge the paint.  It’s good if it smears outside of the grooves, too.

    Once you’ve finished smearing a section, move to another section of the pumpkin and repeat the line painting/paint smearing process.

    Learn how to make faux pumpkins look real with this easy tutorial.

    Once you’ve finished that part and the paint has dried, dot some more brown paint on spots that still look too “fresh.” Pumpkins are dirty, people! Give these fake pumpkins what they want – fake dirt!  Smear this paint just as you did the painted lines – using a paper towel or sponge.

    Love this! Make fake pumpkins look real with a little bit of paint! Use them year after year and keep the squirrels away!

    Finally, dot some green and cream acrylic paint around the top and bottom sides of the pumpkin. Remember, pumpkins are not solid orange. They have a lot of color variation, so this step helps make fake pumpkins look even more realistic!

    Let the paint sit for a couple of minutes and smear it around and blend it in, just as you did with the brown paint.

    Love this! Make fake pumpkins look real with a little bit of paint! Use them year after year and keep the squirrels away!

    With that, your fake pumpkins look real!  At least much more realistic than all of the other faux pumpkins at the craft store.

    If you used good quality acrylic paint, your pumpkin paint should stay on with no issues.  If you’re concerned about longevity of use outside, you could definitely spray the fake pumpkins with a spray sealer.  A matte finish would be best.

    Can you believe these realistic faux pumpkins? Learn how to make fake pumpkins from the craft store look real! All it takes is paint.

    How to Keep Fake Pumpkins From Blowing Away

    If you’re using the realistic faux pumpkins outside, I have a great trick for you to keep the pumpkins from blowing away and in place! 

    Cut a small slit in the bottom of each pumpkin and stick a wood shim into the slit. Then stick the shim and pumpkin into the dirt. It works like a charm! The fake pumpkins stay in place and don’t blow away – even when it’s really windy!

    Another option is to cut a small section out of the bottom of the faux pumpkin and add a handful of rocks inside the pumpkin.  Press the cut out piece back into place, and secure with tape, if necessary.  This is a great way to keep fake pumpkins from blowing away on porches or other flat surfaces.

    Love this! Make fake pumpkins look real with a little bit of paint! Use them year after year and keep the squirrels away!

    So what do you think? Will you be outsmarting the squirrels this year?

    -Bre

    Filed Under: Fall and Halloween, Holiday

    DIY Dollar Tree Easter Carrot Decor

    March 9, 2021 by Bre Leave a Comment

    blank

    I’ve made a lot of Easter crafts over the years, and they’ve all tended to focus on bunnies and eggs.  Now I’m in an Easter carrot decor phase.  (It’s a real thing.)

    Last year’s Easter craft post was this Carrot Door Hanger, and this year it’s all about the carrots, too.

    You’d think that I love to eat carrots.  They’re okay, but not my fave.

    This post contains affiliate links.  Click to read my full disclosure policy.

    Anyway . . . what I I do love is Dollar Tree jute carrots.  Dollar Tree has had these 6-packs of cute twine-wrapped carrots the past couple of years, and I don’t see them going away anytime soon.

    I used them, along with other items I picked up at Dollar Tree, to make some Easter carrot decor – a cute U-Pick Carrot Patch Pot!

    Use Dollar Tree jute carrots to make this cute Easter Carrot Decor! It's such a cute dollar store craft that's perfect for spring or Easter! Use it as spring tiered tray decor, styled on a shelf, or as an Easter centerpiece.

    This little carrot Easter craft is perfect to display on a mantel, on styled shelves, or on a tiered tray.  There are so many ways to use it!

    Before I jump in to the tutorial on how to make this Dollar Tree Easter carrot craft, you should know that I sponge painted the terracotta pot to give it an aged finish with paint.

    I think that adds to the charm of this project, but you don’t have to age your flower pot.  If you do want to make it look old, just click that link to get my tutorial on how to age flower pots with paint.

    DIY Easter Carrot Decor Supplies

    These are the supplies I used to make this Easter carrot craft.  Feel free to modify these items to personalize this project!

    Please note that while I purchased all of these items at Dollar Tree, I have linked to some items from other retailers, as Dollar Tree’s minimum order quantities do not make sense for linking! (For example, you do not need 36 packages of 500 count toothpicks to make this project!)

    • Dollar Tree jute carrots
    • Toothpicks
    • Terracotta flower pot
    • Floral foam
    • Floral moss
    • Hot glue and glue gun
    • Popsicle sticks
    • Marker
    • Optional: paints (to age the terracotta pot, if desired)

    How to Make This Carrot Easter Craft

    I’m putting all of the step-by-step instructions for this craft into a handy printable instruction sheet.  Let me know what you think of this format for blog posts!  I hope you like it.

    DIY Easter Carrot Decor

    DIY Easter Carrot Decor

    Yield: 1
    Prep Time: 5 minutes
    Active Time: 15 minutes
    Additional Time: 10 minutes
    Total Time: 30 minutes
    Difficulty: Easy

    Make this darling DIY Easter Carrot Decor craft project, and add a sweet touch to your spring home decor look! This project uses Dollar Tree craft supplies to make the cutest carrot patch around.

    Materials

    • Terracotta pot
    • Dollar Tree Jute Carrots
    • Floral foam
    • Toothpicks
    • Moss
    • Hot glue and glue gun
    • Popsicle sticks
    • Marker
    • Optional: paint

    Instructions

    1. If you'd like the terracotta pot to look old as mine does, begin by sponge painting the terracotta pot as I show in the linked tutorial. If you do not wish to age the terracotta pot, proceed to the next step.
    2. Fill the flower pot with floral foam. blank
    3. Next, insert toothpicks into the bottoms of each of the jute carrots. blank
    4. Then insert the carrots into the floral foam, which is already in the terracotta pot. blank
    5. Now, cut the ends off of one or two popsicle sticks. blank
    6. Using a marker, write a word on the non-rounded pieces of popsicle stick. I wrote "U-Pick" on one, and "10 cents ea." on the other. Use a black marker to add highlighting, if desired. blank
    7. Next, hot glue those popsicle stick pieces to another, full popsicle stick. I glued mine together slightly askew on purpose; I wanted it to look like a farmstand sign you'd see at a cute country store. blank
    8. Press the popsicle stick sign into the floral foam, with the carrots.
    9. For the finishing touch, hot glue craft moss all over the floral foam. blank
    10. With that, your Dollar Tree Easter Carrot Decor craft is complete! blank

    Notes

    Links to the products used in this project are included within the body of the blog post.

    © Bre Eggert
    Project Type: Home Decor / Category: Easter
    blank

    Filed Under: Dollar Tree, Easter

    Dollar Tree House Valentine’s Day DIY

    January 19, 2021 by Bre Leave a Comment

    blank

    If you follow any Dollar Tree crafters on Instagram or YouTube, you know that the Dollar Tree house is one of the most popular crafting items around!

    blank

    Only available in-store and online once in awhile, these cute wooden houses are the perfect craft blanks to update for any style of decor or season!  I gave my Dollar Tree house an adorable new look for Valentine’s Day and turned it into a Love Shack!

    I’ve had the Love Shack song stuck in my head for weeks now – ha!

    Dollar Tree House “Love Shack” Supplies

    This post contains affiliate links.  To read my full disclosure policy, please click here.

    These are the supplies I used to create this project.  Feel free to modify anything you like to create a custom look of your own!

    • Dollar Tree wooden house
    • Scrapbook paper in patterns and colors of your choice
    • Hot glue gun (and glue)
    • Letter stickers
    • Colored baker’s twine

    How to Make a Dollar Tree Wood House Into a Valentine’s Day Love Shack

    This process is so easy, and I’ve also put together a video to show you the basic process!

    Step One: Line the House 

    First things first, upgrade the Dollar Tree house’s printed backing!  While it is cute, adding scrapbook paper in a pattern of your choice makes it even cuter and more personal!

    Simply trace the outline of the house onto scrapbook paper, and then cut and trim to fit inside the wooden house.  This will likely take you several times of trimming to get it just right – don’t get discouraged!

    Once cut, press it into the house.  You can secure it with double-sided tape if necessary.

    Line a Dollar Tree house with scrapbook paper.

    Step Two: Wrap the House with Bakers Twine

    Next, place a small dot of hot glue on the back of the house, and press the end of a long piece of baker’s twine onto that hot glue.

    Wrap the twine around the base of the house multiple times – criss-crossing the twine as you go.

    Wrap baker's twine around the Dollar Tree house.

    Glue the end of the baker’s twine down with another dot of hot glue.  Careful not to burn your fingers!

    Step Three: Cut out Paper Hearts

    Now, transport yourself back to preschool when you learned to cut symmetrical paper hearts by folding a piece of paper in half and cutting one side of the heart so that the fold is in the center.

    Cut paper hearts from scrapbook paper in different shapes, sizes, and colors.

    Cut many hearts in varying shapes, sizes, colors, and patterns.  This will give you a more interesting Love Shack when finished!

    Step Four: Glue the Hearts to the Twine

    Lay out the paper hearts in an interesting arrangement, and then hot glue them to the baker’s twine on the wooden house.

    Hot glue paper hearts to the baker's twine to create the Love Shack Valentine's Day decoration.

    Step Five:  Make a Placard with Stickers and Scrapbook Paper

    Now, cut and layer scrapbook paper rectangles, and write a word or phrase with letter stickers.  

    Fasten letter stickers to scrapbook paper to create a little sign for the Valentine's Day decor.

    If you have a Cricut machine, you could cut vinyl letters instead!  (I LOVE my Cricut Joy, which is the smallest electronic cutting machine.)

    Then, hot glue that placard to the Dollar Tree house.

    Hot glue scrapbook paper with letter stickers onto the Dollar Tree house.

    The Finished Dollar Tree House Valentine’s Day Love Shack

    In just about fifteen minutes you have created the cutest little DIY Valentine’s Day decor!

    Transform a Dollar Tree wooden house into a cute Valentine's Day decoration.

    This little Love Shack makes me happy every time I look at it.  What does not make me happy is that I cannot stop hearing the B-52’s in my head all day!

    If you like this project, too, I’d be grateful if you would “pin” this post to help others find it!

    This is so cute! Turn a Dollar Tree house into the cutest little Love Shack for Valentine's Day! This Dollar Tree DIY for Valentine's Day is great for tiered trays, shelf styling, and more!

    -Bre


    Filed Under: Dollar Tree, Valentine's Day

    How to Make Fake Snowballs for Decor

    January 2, 2021 by Bre 8 Comments

    blank

    Learn to make your own fake snowballs for adorable winter decor!

    With Christmas decorations packed away the house can feel stark!  Because of that, it’s fun to add some winter-themed decor to the mix. 

    One great way to do that is to make fake snowballs for decor.  They’re easy to make, inexpensive, and look great in vases, jars, bowls – anywhere really!  They’re a beautiful winter vase filler.

    This is so cute for winter decor! Learn to make fake snowballs - they look great as winter vase fillers, popped in a bowl, or displayed with some greenery for a seasonal touch.

    Supplies Needed to Make Fake Snowballs

    This post contains affiliate links.  To read my full disclosure policy, please click here.

    To make DIY fake snowballs, you really only need three main supplies!  Many of the items can be purchased at the dollar store, or you can get them through the links I’m sharing here.

    • White floral foam balls in various sizes (I used three sizes)
    • Epsom salt
    • Mod Podge (any finish will work)
    • Mixing container and stir stick
    • Optional: latex gloves or rubber gloves
    White floral foam balls form the base of DIY snowballs.

    How to Make Fake Snowballs for Decor

    Before you get started crafting up some beautiful snowballs, I highly recommend that you put on a pair of gloves!  This project is really messy, and I think you will not be happy if you’re not wearing gloves. 

    I keep a large package of latex gloves on hand all the time (get it – ha!), because they’re invaluable when it comes to crafts & DIY!

    Now that my warning is complete, let me show you how to do this!

    Begin by mixing epsom salt and Mod Podge in some type of mixing container.  You can eyeball the amount – I probably did a little less epsom salt than Mod Podge.

    Learn how to make fake snowballs for decor and crafts! With simple supplies you can make many of them very quickly!

    Once those ingredients are mixed together, you need to work quickly because the epsom salt will start to absorb the Mod Podge!

    Start rolling a foam ball into the epsom salt and Mod Podge mixture, coating the ball with the mixture.

    As the mixture thickens, you will start pressing it onto the foam ball more so than rolling the ball in the mixture.  This will create lumps and texture, and that’s perfect!  

    It's easy and fun to make fake snowballs. These snow balls can be used for winter decorations and more!

    A snowball is not perfectly round, so you want this variation in texture and coverage.

    When you have a good amount of mixture distributed around the foam ball, set it aside to dry, and repeat with the other foam balls.  

    These should be dry and ready to display in a few hours, depending on the amount of Mod Podge you used and the humidity in the room.

    Need some winter decor inspiration? Check out my Simple Winter Decor Ideas post!

    Something important to note is that it is unlikely your entire foam ball will be covered with the epsom salt / Mod Podge mixture. There will be parts of foam ball still visible.  That is OK! 

    Learn how to make fake snowballs for decor or crafts. It's very easy and makes for a wonderful winter decor accessory for any space!

    Because the floral foam is white, it still gives the appearance of snow – especially when combined with the other parts that have the epsom salt / Mod Podge mixture.

    blank

    So what do you think?  Will you try making some fake snowballs for your winter decor this year?


    Filed Under: Christmas, Crafts

    • « Go to Previous Page
    • Page 1
    • Page 2
    • Page 3
    • Page 4
    • Page 5
    • Interim pages omitted …
    • Page 17
    • Go to Next Page »

    Primary Sidebar

    Let’s Connect!

    Hi, I’m Bre! Thanks for visiting Average But Inspired, where I show you how to work with what you’ve got to create a home you love.

    Bre of Average But Inspired - a DIY and craft blog

    Love DIY? Subscribe to Get Posts E-mailed!

    How Can I Help You?

    blank

    How to Create a Faux Antique Brass Finish with Paint

    blank

    My DIY Kitchen Makeover Reveal!

    blank

    How to Paint Over Tile

    blank

    Limewash Stone Fireplace Makeover: Bye Bye Orange Stone Fireplace, Hello Neutral Stone Beauty!

    Looking for Something?

    Copyright © 2013-2022, Bre Eggert (Average But Inspired). All rights reserved.
    • Home
    • DIY
    • Crafts
    • Home Decor
    • Privacy Policy and Copyright Policy
    • Disclosures
    • Contact Me