• Skip to primary navigation
  • Skip to main content
  • Skip to primary sidebar
Average But Inspired logo - DIY and craft

Average But Inspired

Craft a home you love. DIY and craft tutorials.

  • About
    • Contact Me
    • Disclosures
    • Privacy Policy and Copyright Policy
  • DIY
    • Furniture
  • Crafts
    • Dollar Store Crafts
    • Seasonal
      • Patriotic & Summer
      • Valentine’s Day
      • Easter & Spring
      • Fall & Halloween
      • Christmas & Winter
  • Home Decor
    • Organization
  • Shop
    • DIY Swag
    • DIY Guides
  • Home

Holiday

How to Make a Paper Heart Garland: Valentine Garland DIY

February 1, 2017 by Bre 2 Comments

Valentine’s Day is one of the most adorable holidays. It’s a fact. And making a DIY Valentine’s decoration, like a paper heart garland, is an easy way to get in the Valentine’s spirit.

The Valentine’s garland I’m going to show you how to make is one of those easy DIY projects that’s great for all ages: kids and adults alike.

And, because it’s a paper craft, it’s very inexpensive to make. Because of that, it could be a great ladies’ night craft project, too!

In just ten minutes you can make an adorable Paper Heart Garland that's a perfect Valentine's Day craft or party decor! Watch the video and learn how to make your own in no time!

This post contains affiliate links. Please read my disclosure policy for more information.

Valentine Heart Garland Supplies

Here are the supplies you’ll want to make the lovely garland shown in this post. Feel free to modify the materials used to suit your own preferences!

  • Card stock or scrapbook paper (be careful not to choose card stock that is too thick)
  • Paper cutter (or scissors, a ruler, and a pencil)
  • Glue Dots (or hot glue and hot glue gun. *See note about difference between hearts made with Glue Dots and those made with the hot glue gun.)
  • Twine, ribbon, string, or yarn
  • Optional: pom poms or pom pom trim, tape, heart stickers or Valentine’s Day stickers
Learn how to make a cute Valentine garland in this post. Paper hearts form an adorable DIY decorations.

How to Make a Paper Heart Valentine’s Day Garland

Before I jump in to showing you how to make this Valentine garland, please note that I have linked a video tutorial and a printable version of these project instructions at the end of this post.

Start by cutting card stock or scrapbook paper into strips. I recommend paper strips that are 1″ – 1.5″ wide, and between 11″ – 12″ long.

A paper cutter makes it much easier to cut the paper to the desired length and width, but you can also do this with a ruler, pencil, and scissors if necessary!

Once you have the paper strips cut, take one and fold it in half.

Folding scrapbook paper into heart shapes.

Unfold that paper, and then place a Glue Dot at the end of the paper strip (on the front of the paper strip). Fold the other end inward toward that Glue Dot, and connect the strip so that it becomes a heart.

Note: Glue Dots are lightweight and allow the paper hearts to look lovely just like this. If you use hot glue instead, the weight of the glue will distort the heart shapes. You will need to place a line of glue in the inner fold, and connect the upper part of the heart into that fold.

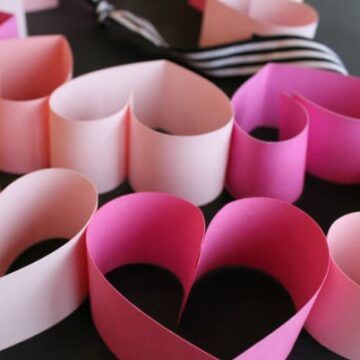
Paper hearts made from cardstock and scrapbook paper.

Make as many of these paper heart shapes as you’d like to fill out your Valentine garland. Once you have enough hearts, glue them together – side by side – with either Glue Dots or hot glue.

Glue the paper hearts together to create a DIY Valentine garland.

Then, attach ribbon, twine, or yarn to the ends as a way to hang the heart garland. (And hey, why not also make this adorable DIY Valentine’s Backdrop, hang up your new garland, and have an impromptu friends or family photo shoot?)

DIY Valentine’s Garland Video and Printable Tutorial

It may be easier to understand the exact steps for making this heart garland if you watch a video on how to do it.

Please know that this is one of the very first videos I made – years ago! It is not nearly as good as videos I make now, BUT it will show you exactly what I’m describing in the steps above.

Also, you can print the instructions in this card!

How to Make a Paper Heart Garland

How to Make a Paper Heart Garland

Yield: 1
Prep Time: 5 minutes
Active Time: 10 minutes

This DIY Valentine's Day decoration is great for all ages. Make a paper heart garland and hang it for a festive touch.

Materials

  • Card stock or scrapbook paper
  • Paper cutter (or scissors, ruler, and pencil)
  • Glue Dots (or hot glue)
  • Ribbon, twine, or yarn

Instructions

  1. Cut paper into strips of desired length and width. I recommend strips that measure 1" or 1.5" wide by 11" or 12" long.
  2. Fold a strip in half.
  3. Unfold the paper strip. Place a Glue Dot or hot glue at the end, and fold the other end over to meet it. This creates a paper heart shape.
  4. If you used hot glue, the weight of the glue may distort the heart. Run a line of hot glue in the inner fold, and bring that top fold down to connect at the bottom.
  5. Attach all of the paper hearts with Glue Dots or hot glue.
  6. Add twine, ribbon, or yard to the ends of the garland so that you can hang it.
© Bre
Project Type: Paper Crafts / Category: Crafts
blank

I hope you found this easy Valentine’s garland tutorial enjoyable! Thanks for reading and happy Valentine’s Day!

Filed Under: Crafts, Holiday, Valentine's Day

DIY Vintage-Look Paper Mache Heart Boxes

January 25, 2017 by Bre 2 Comments

blank

Give paper mache heart boxes a vintage look with this project tutorial! Such a cute Valentine’s Day craft!

Paper mache boxes are a craft store staple.  I see them all the time yet I never buy them – mainly because I never know what to do with them.  

But last week my kids and I took a field trip to Hobby Lobby (it was a field trip because it was SO FAR AWAY), and three paper mache heart boxes found their way into my shopping cart (thanks, kids).  

Give paper mache boxes a vintage look with this project tutorial! Such a cute Valentine's Day craft!

They’re pretty cute so I decided to embellish them a bit and make them look a little more festive for Valentine’s Day.  

With some hot glue, paint, and scrapbook paper, I gave them a total facelift!  And I’ll show you how to, too!

Give paper mache boxes a vintage look with this project tutorial! Such a cute Valentine's Day craft!

Now they’re cute little containers perfect for giving to anyone sweet!

Supplies Needed to Make Vintage Paper Mache Heart Boxes

This post contains affiliate links. Please read my disclosure policy for more information.

  • Paper mache heart box
  • Hot glue and glue gun
  • Acrylic paint in colors of your choice
  • Dark brown acrylic paint or wax
  • Metallic creme wax in rose gold
  • Patterned scrapbook paper
  • Paper towel
  • Scissors
  • Paintbrush
  • Pencil

How to Make Vintage Paper Mache Heart Boxes

These paper mache boxes are so simple to make!  

I started by drawing designs on the box tops with a pencil.  

Give paper mache boxes a vintage look with this project tutorial! Such a cute Valentine's Day craft!

Next, I fired up the trusty old glue gun and covered those designs in glue.  

This was a little tricky because, as you know, hot glue gets all stringy.  It was a difficult to get the designs not to look like one big connected heap of hot glue, but by working slowly it went okay.  

Give paper mache boxes a vintage look with this project tutorial! Such a cute Valentine's Day craft!

After the hot glue completely hardened, I painted each of the boxes with chalky finish paint.  Acrylic craft paint will work just fine, too!

Give paper mache boxes a vintage look with this project tutorial! Such a cute Valentine's Day craft!

They looked pretty basic though, and the designs did not really show up all that well, so I took some dark brown wax and brushed it all over.  

I made sure to brush it on roughly and really focus on the hot glue designs to add some dimension to the boxes.  This also muted the colors, which I was happy about!

Looking for Valentine’s Day Ideas? How About These?

Scrap Wood Valentines

Easy Paper Heart Garland

Brown wax can be tough to find or expensive, so you could also water down some dark brown acrylic paint and put hardly any on the brush. Then, you can go over those raised areas and deposit the smallest amount of paint. It will give a similar effect to the wax.

Give paper mache boxes a vintage look with this project tutorial! Such a cute Valentine's Day craft!

Finally, I decided to really make the hot glue designs pop by highlighting them with metallic wax!  

I rubbed a little on a paper towel and passed over the designs.  This really helped them stand out!  

Give paper mache boxes a vintage look with this project tutorial! Such a cute Valentine's Day craft!

Finally, I traced the bottom of each heart onto some cute scrapbook paper.  I cut the paper hearts out and laid them inside of each box.  

This way there’s a cute little surprise inside each box when it’s opened.  

Give paper mache boxes a vintage look with this project tutorial! Such a cute Valentine's Day craft!

Fill these babies with some candy and you’ve got a cute little gift for someone special!  

Give paper mache boxes a vintage look with this project tutorial! Such a cute Valentine's Day craft!

I saw some paper mache heart boxes just like these at Dollar Tree, too, so keep your eyes out for them!  

Give paper mache boxes a vintage look with this project tutorial! Such a cute Valentine's Day craft!

The possibilities are endless for how to decorate these, but I do really like the vintage look mine have!  

Give paper mache boxes a vintage look with this project tutorial! Such a cute Valentine's Day craft!

Well now I need to go eat some of these candy hearts from the photos.  It’s the right thing to do . . . I wouldn’t want my kids’ teeth to rot from eating them.

Give paper mache boxes a vintage look with this project tutorial! Such a cute Valentine's Day craft!

Filed Under: Holiday, Valentine's Day

DIY Valentine’s Day Chalkboard

January 11, 2017 by Bre 10 Comments

blank

 Looking for a cute DIY Valentine’s Day decoration you can make in no time? Check out this DIY Valentine’s Day Chalkboard!  It’s a super cute way to leave little love notes for anyone who might see your chalkboard!

Turn an unfinished wood heart into an adorable DIY Valentine's Day Chalkboard for a sweet addition to your Valentine's Day decor! This is an easy Valentine's Day craft idea that anybody can make!

Supplies Needed for a DIY Valentine’s Day Chalkboard

This post contains affiliate links, which means that I earn a small commission at no added cost to you if you purchase through them.  To read my full disclosure policy, please click here.

  • Craft wood heart cutout
  • Red acrylic paint
  • White paint pen
  • Clear chalkboard coating
  • Foam brushes
  • Chalk
  • Optional: white paint marker, scrapbook paper, scissors, and twine

How to Make a DIY Valentine’s Day Chalkboard

Turn an unfinished wood heart into an adorable DIY Valentine's Day Chalkboard for a sweet addition to your Valentine's Day decor! This is an easy Valentine's Day craft idea that anybody can make!

In just a short amount of time, you can turn pretty much ANY surface into ANY color chalkboard – just like this fun red Valentine’s Day chalkboard I made for my home!  

First you’ll paint your wooden heart with acrylic paint.  Once it’s dry, add any painted embellishments with a paint pen.  I used a white paint pen to make little dashes around the outer edge of the heart.

Turn an unfinished wood heart into an adorable DIY Valentine's Day Chalkboard for a sweet addition to your Valentine's Day decor! This is an easy Valentine's Day craft idea that anybody can make!

After everything was fully dried, I painted on two coats of clear chalkboard coating, making sure to follow the directions on the bottle for dry time, etc.  

This stuff is awesome because you can turn pretty much any painted surface into a chalkboard, without having to buy all different colors of chalkboard paint!

Turn an unfinished wood heart into an adorable DIY Valentine's Day Chalkboard for a sweet addition to your Valentine's Day decor! This is an easy Valentine's Day craft idea that anybody can make!

I let the chalkboard coating dry for several days, and then I “seasoned” my new chalkboard.  Seasoning a chalkboard is basically just rubbing a piece of chalk all over it and making a mess, which you promptly wipe off.  You do this to make sure the surface is ready to use and to prevent words/art from showing on the chalkboard even once they’ve been erased.

Turn an unfinished wood heart into an adorable DIY Valentine's Day Chalkboard for a sweet addition to your Valentine's Day decor! This is an easy Valentine's Day craft idea that anybody can make!

Next, I cut out a scrapbook paper “X” and “O,” and attached them to the top of my new chalkboard with twine.  Then I wrote a sweet little something on my chalkboard, tossed some chalk hearts on there, and washed my hands.  I actually despise chalk.  🙂  

Turn an unfinished wood heart into an adorable DIY Valentine's Day Chalkboard for a sweet addition to your Valentine's Day decor! This is an easy Valentine's Day craft idea that anybody can make!

So yeah, I might not be changing my chalkboard’s message anytime soon, but if I do, I’ll just wipe it off like a regular chalkboard!  The clear chalkboard coating really works.  

Turn an unfinished wood heart into an adorable DIY Valentine's Day Chalkboard for a sweet addition to your Valentine's Day decor! This is an easy Valentine's Day craft idea that anybody can make!

Filed Under: Holiday, Valentine's Day

How to Transform a Coca-Cola Bottle Into a Christmas Ornament {and Free Printable Gift Tags!}

December 16, 2016 by Bre 2 Comments

blank

This is a sponsored post written by me on behalf of Coca-Cola® and Dollar General.  All opinions are 100% mine.

If you’ve visited my blog before, chances are that you know I have a deep, deep love for Coca-Cola® and Diet Coke®.  In fact, I refer to Diet Coke® as the nectar of the Gods.  It’s pretty much my favorite.

In addition to loving that delicious, bubbly beverage, I also love decorating my Christmas tree with ornaments that have some meaning or special connection to me and/or my family members.  No generic ornaments for our tree!  So when I heard that Dollar General has a special Bottle Cap Topper that turns the Coca-Cola® limited edition holiday bottle into an actual ornament, I knew it would be a great addition for this Diet Coke® lover’s Christmas tree!  And the best part (in my opinion), is that the Bottle Cap Topper and the limited edition holiday Coca-Cola® bottle are FREE with any purchase of two 20 oz. Sprite products at Dollar General!  Learn how to transform a Coca-Cola bottle into an ornament for your Christmas tree! Plus, download free printable gift tags in this post!

Friends, it could NOT be easier to turn this adorable bottle into an ornament!  Literally all you do is press the Bottle Cap Topper onto the bottle cap!  (If you don’t believe me, visit Dollar General’s website to see a video on how to use the Bottle Cap Topper!)Learn how to transform a Coca-Cola bottle into an ornament for your Christmas tree! Plus, download free printable gift tags in this post!

That is super cute on its own . . . but . . . well, you know me.  I kind of like to do things up a bit.  So while I was roaming the aisles of Dollar General, I picked up some extra Christmas decorations to add a little flair to my Coca-Cola® bottle ornaments.  Tinsel ribbon, jingle bells, and sparkly snowflakes . . . perfection.Learn how to transform a Coca-Cola bottle into an ornament for your Christmas tree! Plus, download free printable gift tags in this post!

And then these totally cheesy (but perfectly appropriate for these ornaments) sayings started popping into my head, and I decided to make some cute tags to hang on the ornaments as well.  Learn how to transform a Coca-Cola bottle into an ornament for your Christmas tree! Plus, download free printable gift tags in this post!

These little gift tags are super cute on the Coca-Cola® bottle ornaments if you’re giving them as a gift!  If you’d like a set for yourself, you can download them for free RIGHT HERE!

Once I had all of my supplies ready, I decked out my Coca-Cola® bottle ornaments!  I added tinsel ribbon, a jingle bell, and a gift tag to one, and tinsel ribbon, a snowflake, and a gift tag to the other.  Learn how to transform a Coca-Cola bottle into an ornament for your Christmas tree! Plus, download free printable gift tags in this post!

Learn how to transform a Coca-Cola bottle into an ornament for your Christmas tree! Plus, download free printable gift tags in this post!

They’re so cute!  Learn how to transform a Coca-Cola bottle into an ornament for your Christmas tree! Plus, download free printable gift tags in this post!

And they’re even cuter on the tree!  Learn how to transform a Coca-Cola bottle into an ornament for your Christmas tree! Plus, download free printable gift tags in this post!

This Coca-Cola® lover is happy to have one of her favorite things hanging on the tree – right there for all to see.  Learn how to transform a Coca-Cola bottle into an ornament for your Christmas tree! Plus, download free printable gift tags in this post!

Think about picking some of these up during your next trip to Dollar General.  How cute would they be as part of a teacher’s gift or a neighbor gift?  Any Coca-Cola® connoisseur would appreciate one!  And please “pin” this post to help share this idea!Learn how to transform a Coca-Cola bottle into an ornament for your Christmas tree! Plus, download free printable gift tags in this post!

Wishing you all a Christmas that’s “soda-lightful!”

-Bre

Visit Sponsors Site

Filed Under: Christmas, Holiday

DIY Memorial Ornaments to Remember Loved Ones at Christmas

November 30, 2016 by Bre 43 Comments

blank

Make meaningful Christmas ornaments for departed loved ones using old shirts and a sample of their handwriting.

Usually posts are easy for me to write.  The words flow out of my mind and into the computer with no problem.  But this is not one of those posts.  

This is a hard post.  A sad post.  A missing my dad post.

Learn how to make DIY Memorial Ornaments to help honor and remember loved ones who have passed. This project uses a loved one's old clothes and handwriting to create a Christmas ornament that will be cherished by anyone who is missing their loved one.

Last year my dad passed away after a long battle with brain cancer.  I miss him every single day.  

When I had to help my mom and sister clean out his closet earlier this year, I couldn’t bear to give away all of his things.  So I packed up some of his favorite shirts and brought them home with me.  

I didn’t know exactly what I was going to do with them, but I knew I’d think of something.  And a few months later, in the middle of the night, I did.  

I decided to use some of my dad’s old shirts and his handwriting to make Christmas memorial ornaments for myself and my family.  

I didn’t think that I’d share this project on my blog, but when I saw how much these ornaments meant to my family members, I decided to post the project.  

I know there are others of you out there, just like me, who are missing loved ones every day and especially at the holidays.  So I wanted to share my idea of how you can honor them and remember them with special DIY Memorial Ornaments that you will cherish for the rest of your life.

Supplies Needed to Make DIY Memorial Ornaments

This post contains affiliate links.  Please read my disclosure policy for more information.

  • Clear glass ornaments or clear plastic ornaments
  • Fabric scissors (regular fabric shears or pinking shears)
  • Card stock
  • Scanner or copier
  • Hole punch
  • Metallic tinsel cord

How to Make Memorial Ornaments

First, gather your loved one’s shirts.  You’ll have a good cry at this point.  I guarantee it.  

Once you’ve calmed down and wiped away your tears, cut the shirts into strips.  I cut my dad’s shirts into strips about 1″ wide and about 4 or 5″ long.  

Learn how to make DIY Memorial Ornaments to help honor and remember loved ones who have passed. This project uses a loved one's old clothes and handwriting to create a Christmas ornament that will be cherished by anyone who is missing their loved one.

Next, put the strips of fabric into a clear glass or plastic ornament.  Alternate the patterns or colors as you place them inside so that you get a good variety once the ornament is complete.  

Learn how to make DIY Memorial Ornaments to help honor and remember loved ones who have passed. This project uses a loved one's old clothes and handwriting to create a Christmas ornament that will be cherished by anyone who is missing their loved one.

Now, if you have a card or note from your loved one, this step will help make the ornament even more special.  

I had a note from my dad that he wrote right before he went into surgery.  (I cherish this note!)  

Scan the note or take a picture of it. Then, crop the photo in photo editing software (like the photo software pre-installed on your computer or phone, or the online service PicMonkey), to be the person’s signature, and then save that signature as a new photo.  

Once you have that new photo, print it onto card stock.

Learn how to make DIY Memorial Ornaments to help honor and remember loved ones who have passed. This project uses a loved one's old clothes and handwriting to create a Christmas ornament that will be cherished by anyone who is missing their loved one.

Cut out your loved one’s note, punch a hole in it, and tie it onto the ornament with pretty ribbon or string.  

Learn how to make DIY Memorial Ornaments to help honor and remember loved ones who have passed. This project uses a loved one's old clothes and handwriting to create a Christmas ornament that will be cherished by anyone who is missing their loved one.

And with that, you’ll have a beautiful and personalized ornament to honor your loved one at Christmas and always.  

Learn how to make DIY Memorial Ornaments to help honor and remember loved ones who have passed. This project uses a loved one's old clothes and handwriting to create a Christmas ornament that will be cherished by anyone who is missing their loved one.

If you don’t have a note from your loved one to include their handwriting on the tag, you could make a tag of your own with their name or something else that is meaningful to them and you.  

Learn how to make DIY Memorial Ornaments to help honor and remember loved ones who have passed. This project uses a loved one's old clothes and handwriting to create a Christmas ornament that will be cherished by anyone who is missing their loved one.

I would give anything to have my dad back with me for another Christmas, but at least I have a little something of his with me this holiday.  

Christmas was always so special with my dad, because every year he was the one who turned on the Christmas music for present opening, handed out the gifts, and maintained the all-important gift wrap trash bag.  

He was the best.  (Here he is with my family on Christmas 1994 or so.). And OK – at least we can all have a good laugh at the clothes and decor now – ohmygosh.

family-christmas-picture-1992

So for those reasons, and countless others, I can tell you that this ornament hangs in a place of honor on my Christmas tree.  It is front and center, and that’s where it always will be.  

Learn how to make DIY Memorial Ornaments to help honor and remember loved ones who have passed. This project uses a loved one's old clothes and handwriting to create a Christmas ornament that will be cherished by anyone who is missing their loved one.

I hope that you’re not missing anyone special this Christmas, but if you are, I hope you know that you’re not alone.  You will get through it.  Peace and love to you at Christmas and always.

Filed Under: Christmas, Holiday

How to Make a Reversible Christmas to Winter Painted Wood Sign

November 22, 2016 by Bre Leave a Comment

blank

One of my favorite things is finding a way to make seasonal decor items multi-season or multi-purpose.  My house doesn’t have a lot of storage space, so I like to try and get as much use out of seasonal decor as I can.  That’s why this painted wood sign that I made, which reverses from Christmas to winter, is so great!  Display the “BELIEVE” side at Christmas . . . It only takes one piece of wood to make two adorable painted wood signs! Learn how to make a DIY reversible Christmas to winter sign with this tutorial.

and then reverse to “LET IT SNOW” come January!  It only takes one piece of wood to make two adorable painted wood signs! Learn how to make a DIY reversible Christmas to winter sign with this tutorial.

You can make one for your own home with any scrap wood you have in your stash, or with a piece of precut plywood from the home improvement or craft store.  Easy!

Supplies Needed to Make a Reversible Painted Wood Sign

Some of the links in this post are affiliate links, which means that I earn a small commission at no added cost to you if you purchase through them.  To read my full disclosure policy, please click here.  Thank you to DecoArt for giving me the paint I used in this project.

  • Wood scrap or unfinished wood sign
  • Americana Decor Chalky Finish Paint in Carbon, Everlasting, Inheritance, Legacy, and Rouge
  • Americana Decor Creme Waxes in Clear and Dark Brown
  • Ruler
  • Pencil
  • Foam Roller
  • Small artist paintbrushes
  • Electronic cutting machine* (If you don’t have a cutting machine, you could use stencils or large letter stickers to achieve this look)
  • Adhesive vinyl* (If you are using the cutting machine you need this)
  • Plastic snowflakes (I got them at Dollar Tree)
  • Hot glue and glue gun

How to Make a Reversible Painted Wood Sign

Using a foam roller, paint a large rectangle in white paint in the middle of the wooden board.  It only takes one piece of wood to make two adorable painted wood signs! Learn how to make a DIY reversible Christmas to winter sign with this tutorial.

Next, use the electronic cutting machine to cut the word “BELIEVE” in a font of your choice. Affix the vinyl stencil to the portion of the painted wooden board and press down firmly along the edges.  If you don’t have a cutting machine, you could use large letter stickers from the craft store for this step, or you could use a stencil.  It only takes one piece of wood to make two adorable painted wood signs! Learn how to make a DIY reversible Christmas to winter sign with this tutorial.

Paint over the entire surface with two coats of red paint and let the sign dry.  Once it is totally dry, remove the vinyl letters (or stickers) to reveal the word BELIEVE.It only takes one piece of wood to make two adorable painted wood signs! Learn how to make a DIY reversible Christmas to winter sign with this tutorial.

Using a pencil, lightly freehand a belt buckle in the middle of the letter “I” and a Santa hat on top of the same letter.  It only takes one piece of wood to make two adorable painted wood signs! Learn how to make a DIY reversible Christmas to winter sign with this tutorial.

Fill in the belt buckle and hat with black, white, and yellow paint.  It only takes one piece of wood to make two adorable painted wood signs! Learn how to make a DIY reversible Christmas to winter sign with this tutorial.

Once dry, flip the wooden board over and paint the entire surface with two coats of blue paint.  It only takes one piece of wood to make two adorable painted wood signs! Learn how to make a DIY reversible Christmas to winter sign with this tutorial.

Using the electronic cutting machine, cut out the phrase “Let it Snow.”  Affix to the wooden board and press down firmly along the edges.  Alternatively, place large letter stickers on the sign to write the phrase.  It only takes one piece of wood to make two adorable painted wood signs! Learn how to make a DIY reversible Christmas to winter sign with this tutorial.

Cover the entire surface in white paint, allowing some of the blue paint underneath to show through. Let dry. Once dry, remove the vinyl to reveal the phrase.  It only takes one piece of wood to make two adorable painted wood signs! Learn how to make a DIY reversible Christmas to winter sign with this tutorial.

Seal both sides of the sign with Creme Wax.  It only takes one piece of wood to make two adorable painted wood signs! Learn how to make a DIY reversible Christmas to winter sign with this tutorial.

Create a faux distressed finish with Creme Wax in Dark brown, if desired.  You can also use the sandpaper to further distress the finish, if desired.It only takes one piece of wood to make two adorable painted wood signs! Learn how to make a DIY reversible Christmas to winter sign with this tutorial.

Once dry, hot glue the snowflakes to the “Let it Snow” side of the sign.  It only takes one piece of wood to make two adorable painted wood signs! Learn how to make a DIY reversible Christmas to winter sign with this tutorial.

This project is really easy but takes a little longer than my typical projects, simply because of the drying time involved!  If you’re short on time, you could always use a hairdryer to speed up the process.  It only takes one piece of wood to make two adorable painted wood signs! Learn how to make a DIY reversible Christmas to winter sign with this tutorial.

It only takes one piece of wood to make two adorable painted wood signs! Learn how to make a DIY reversible Christmas to winter sign with this tutorial.

It’s worth it to spend a little extra time to get some longevity out of this project though!

If you agree and like this sign, I’d love for you to PIN IT!  Thanks!

It only takes one piece of wood to make two adorable painted wood signs! Learn how to make a DIY reversible Christmas to winter sign with this tutorial.

Happy holiday decorating!

-Bre

You May Also Like This DIY Reindeer Specimen Art  DIY Reindeer Specimen Art is an adorable Christmas decor project!

Filed Under: Christmas, Holiday

  • « Go to Previous Page
  • Page 1
  • Interim pages omitted …
  • Page 8
  • Page 9
  • Page 10
  • Page 11
  • Page 12
  • Interim pages omitted …
  • Page 17
  • Go to Next Page »

Primary Sidebar

Let’s Connect!

Hi, I’m Bre! Thanks for visiting Average But Inspired, where I show you how to work with what you’ve got to create a home you love.

Bre of Average But Inspired - a DIY and craft blog

Love DIY? Subscribe to Get Posts E-mailed!

How Can I Help You?

blank

7 Tips for Hosting a Party on a Budget

blank

My DIY Kitchen Makeover Reveal!

blank

How to Paint a Countertop to Look Like Marble!

blank

How to Paint Over Tile

Looking for Something?

Copyright © 2013-2022, Bre Eggert (Average But Inspired). All rights reserved.
  • Home
  • DIY
  • Crafts
  • Home Decor
  • Privacy Policy and Copyright Policy
  • Disclosures
  • Contact Me