• Skip to primary navigation
  • Skip to main content
  • Skip to primary sidebar
Average But Inspired logo - DIY and craft

Average But Inspired

Craft a home you love. DIY and craft tutorials.

  • About
    • Contact Me
    • Disclosures
    • Privacy Policy and Copyright Policy
  • DIY
    • Furniture
  • Crafts
    • Dollar Store Crafts
    • Seasonal
      • Patriotic & Summer
      • Valentine’s Day
      • Easter & Spring
      • Fall & Halloween
      • Christmas & Winter
  • Home Decor
    • Organization
  • Shop
    • DIY Swag
    • DIY Guides
  • Home

Holiday

Dollar Tree Silver Tray Wreath

September 19, 2017 by Bre 6 Comments

Over the years I’ve made quite a few pieces of door decor or wreaths from Dollar Tree supplies.  (Take my Fourth of July Tinsel Wreath or my Egg Tray Wreath for Easter, for example.)  I just can’t help myself!  Every time I go to Dollar Tree I find cute new supplies that call out to me, and I am forced to create.  It’s a real problem, friends (the creating and the fact that products at Dollar Tree talk to me.  HA!)!  On a recent trip, I bought supplies to make an atypical fall wreath for my backdoor – and today I’m going to show you how to transform a Dollar Tree silver tray from the party supply section into a beautiful Silver Tray Wreath!  Transform a silver tray into a wreath! Learn how to make a Dollar Tree silver tray sparkle as a beautiful fall wreath in this post.

Supplies Needed to Make a Silver Tray Wreath

Some of these links are affiliate links.  Please read my full disclosure policy here.

  • Silver tray (I purchased a nickel plated metal serving tray at Dollar Tree)
  • Chalkboard paint
  • Paintbrush
  • Light gray and dark gray acrylic paint
  • Sponge
  • Chalk
  • Faux fall leaves (I also purchased them at Dollar Tree, but here’s an alternative)
  • Hot glue gun and hot glue
  • Mini 3M Command Hooks
  • Ribbon

How to Make a Silver Tray Wreath for Fall

I started with this plain silver tray from the party supply section at Dollar Tree.  These are actually really sturdy and they come in three shapes/sizes.  They’re great for crafting and entertaining!  Transform a silver tray into a wreath! Learn how to make a Dollar Tree silver tray sparkle as a beautiful fall wreath in this post.

Next, I turned the center of the silver tray into a chalkboard with my favorite chalkboard paint.  I used two coats of chalkboard paint to make sure there was good coverage!  Transform a silver tray into a wreath! Learn how to make a Dollar Tree silver tray sparkle as a beautiful fall wreath in this post.

Once the chalkboard paint was dry, I worked to take the shine down on the silver tray, and to make it look like it is aged or antique.  I began by lightly sponging on acrylic paint in a light gray color.  I gently dabbed the light gray paint all around the edge of the tray.Transform a silver tray into a wreath! Learn how to make a Dollar Tree silver tray sparkle as a beautiful fall wreath in this post.

When that light gray paint dried, I then used by sponge to rub dark gray acrylic paint along the raised portions of the silver tray.  Unlike with the light gray paint where I dabbed the color on, this time I rubbed the color on in order to accent those raised portions of the tray.  Transform a silver tray into a wreath! Learn how to make a Dollar Tree silver tray sparkle as a beautiful fall wreath in this post.

This painting technique went a long way toward giving my Dollar Tree silver tray an aged look!  Transform a silver tray into a wreath! Learn how to make a Dollar Tree silver tray sparkle as a beautiful fall wreath in this post.

Once that paint dried, I cut leaves off of my Dollar Tree fall leaf garland and began to hot glue them around the bottom 1/3 to 1/2 of the silver tray.  I layered them and angled them in different ways, rather than lying them flat and in a row.Transform a silver tray into a wreath! Learn how to make a Dollar Tree silver tray sparkle as a beautiful fall wreath in this post.

Transform a silver tray into a wreath! Learn how to make a Dollar Tree silver tray sparkle as a beautiful fall wreath in this post.

Next, I flipped the tray over and attached two 3M Mini Command Hooks to the back, upside down.  These things are my go-to for just about everything that needs a hook.  I love them!  I then ran a ribbon through the hooks and tied it at the top.  Transform a silver tray into a wreath! Learn how to make a Dollar Tree silver tray sparkle as a beautiful fall wreath in this post.

Then I flipped the tray over and gently ran a piece of chalk all over the chalkboard portion of the tray to season it.  Next, I tried to write “Hello” in fancy script on the front.  (Note: need to practice chalkboard lettering!)  Transform a silver tray into a wreath! Learn how to make a Dollar Tree silver tray sparkle as a beautiful fall wreath in this post.

Before I hung up my Silver tray wreath, I bent my ribbon streamers and hot glued them to the edges of the tray.  Then my silver tray wreath was ready to be displayed on my backdoor!  Transform a silver tray into a wreath! Learn how to make a Dollar Tree silver tray sparkle as a beautiful fall wreath in this post.

I love the pretty touch it adds to the door, and it was such an affordable way to bring some charm to the back porch!  Transform a silver tray into a wreath! Learn how to make a Dollar Tree silver tray sparkle as a beautiful fall wreath in this post.

Can you see why I love to go to Dollar Tree so much?  What’s your favorite thing to buy there?  Also, if you enjoyed this project, I would appreciate it if you would PIN it to share the love!  Transform a silver tray into a wreath! Learn how to make a Dollar Tree silver tray sparkle as a beautiful fall wreath in this post.

-Bre

You Might Also Like This Dollar Tree Project!

DIY Fork, Spoon, and Knife Kitchen Plates Decor

blank

Filed Under: Crafts, Dollar Tree, Fall and Halloween, Holiday

How to Decorate for Fall Entertaining with Color, Texture, and Pattern

August 31, 2017 by Bre 8 Comments

blank

Thank you to Cost Plus World Market for sponsoring this post.  The fall decor and entertaining ideas you’ll see are all my own.  This post contains affiliate links, and to read my full disclosure policy you can click here.

The kids are back in school and the weather here in Chicago is getting more crisp with each passing day.  My favorite season is almost here, and I cannot wait to share my love of all-things-fall with my family and friends!  Intimate gatherings with comforting foods and cozy decor (like at the Beer Tasting Party I hosted last fall), are right around the corner, and I’m getting ready for fall entertaining by creating a dining room that’s filled with gorgeous color, texture, and pattern.  After one visit to my local Cost Plus World Market store in the South Loop, I think I’m all set!  Fall decor made simple! This post gives three tips for fall decorating using color, texture, and pattern to create a fall dining room that shines.

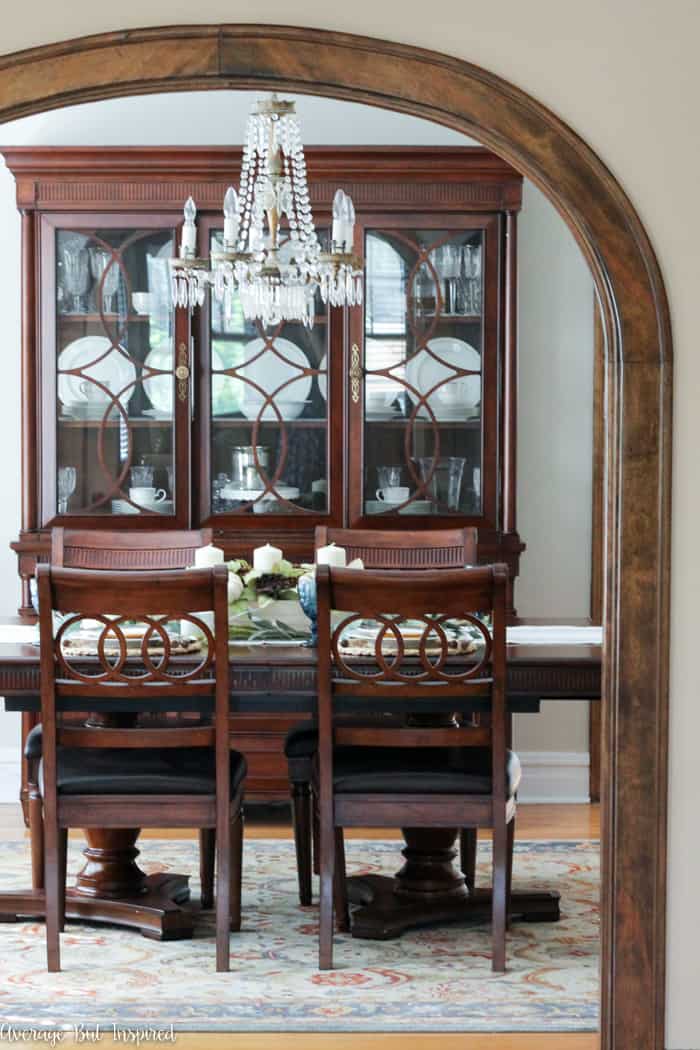
Back in the day my fall decor was a little more, shall we say, obvious.  At one point I remember declaring that my house would look as though a pumpkin patch had exploded inside of it.  While I still love pumpkins, fall leaves, and scarecrows as much as the next pumpkin spice latte loving lady, my taste has matured a bit, and now I’m decorating for fall in a more subtle way.  Fall decor made simple! This post gives three tips for fall decorating using color, texture, and pattern to create a fall dining room that shines.

Working with colors, textures, and patterns that embody the changing season, I’ve created a lovely fall dining room that’s perfect for entertaining!  This year I think my first get together will be a fondue party.  (Except for the lactose intolerant, who doesn’t love a party that centers on cheese?  Am I right?)Fall decor made simple! This post gives three tips for fall decorating using color, texture, and pattern to create a fall dining room that shines.

I bet your friends and family would enjoy a nice evening at your home this fall, so let me give you my tips on how to decorate for fall entertaining with color, texture, and pattern!

Pick an Inspiration Object for Color

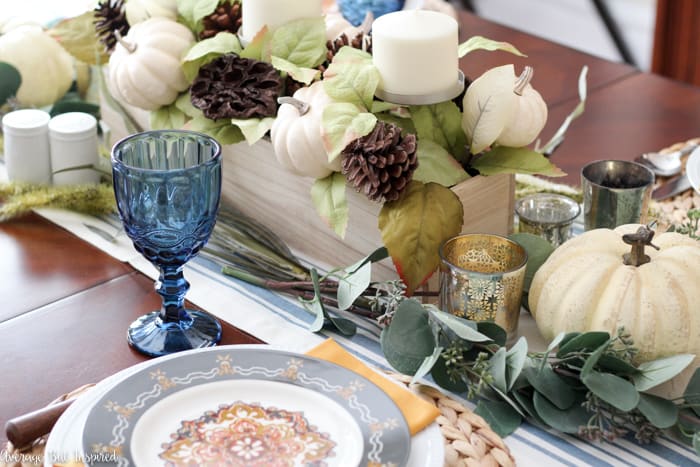
It was so easy to pull together a look that works for the changing season because I started with these salad plates as my inspiration.  I love the fall oranges, reds, and yellows, and the fact that these plates have such an interesting design.  Fall decor made simple! This post gives three tips for fall decorating using color, texture, and pattern to create a fall dining room that shines.

These plates served as the jumping off point for all of the other items that adorn my entertaining space this fall.  I think that’s a great way to decorate a room: find an interesting object you like and allow it to guide your subsequent decor choices.  Even if you think you have no idea how to decorate, using an inspiration item’s colors to inform your other choices will help you make good decisions.

For example, I chose these golden yellow buffet napkins because that color is in the plate.  I guarantee you I never would have purchased anything this color if I would have seen it in isolation.  But with the plates, it works!  Fall decor made simple! This post gives three tips for fall decorating using color, texture, and pattern to create a fall dining room that shines.

The same is true for the gorgeous blue pressed glass goblets.  Sure they’re pretty on their own, but look how gorgeous they are with the contrasting gold napkins!  Thank you, salad plates, for putting these colors together for me.Fall decor made simple! This post gives three tips for fall decorating using color, texture, and pattern to create a fall dining room that shines.

Add Some Texture

Once you’ve followed your inspiration object’s color lead, it’s great to add in some items with texture.  Because I had a lot of color already happening in this entertaining space, I decided to add texture with neutral elements so as not to go overboard.  Fall decor made simple! This post gives three tips for fall decorating using color, texture, and pattern to create a fall dining room that shines.

These placemats woven from natural materials are my new favorite thing.  They will work for any single occasion, holiday, event . . . you name it!  And they’re not boring.  Their woven pattern and thickness makes them assets to the table instead of something that’s commonly overlooked.

Fall decor made simple! This post gives three tips for fall decorating using color, texture, and pattern to create a fall dining room that shines.

And don’t even get me started on these fabulous wood handled utensils (forks, knives, and spoons).  To me, wood is a perfect decor element for fall because it’s just so “nature-y.”  (My inner outdoorsman is coming out there with that “word.”)  You cannot help but pick up these utensils.
Fall decor made simple! This post gives three tips for fall decorating using color, texture, and pattern to create a fall dining room that shines.

And finally, this pretty puff ball wreath on the mirror opposite the dining table is 100% texture.  A fall wreath on a mirror is a pretty fall decorating idea to use in the dining room. See more fall decor ideas in this post.

Fall decor made simple! This post gives three tips for fall decorating using color, texture, and pattern to create a fall dining room that shines.

Play with Pattern

Because the salad plates that inspired this fall entertaining space already have a lot of pattern, I worked with simpler patterns on other things in an effort to layer the look in a way that is not overwhelming.  Fall decor made simple! This post gives three tips for fall decorating using color, texture, and pattern to create a fall dining room that shines.

This striped table runner, for example, grounds the entire table.  It uses the same shades seen elsewhere on the table, but has a simple pattern that makes it interesting and not overpowering.  Fall decor made simple! This post gives three tips for fall decorating using color, texture, and pattern to create a fall dining room that shines.

And using pattern in a different way, by creating small groupings of similar objects, is another way to get a sophisticated look.  Fall decor made simple! This post gives three tips for fall decorating using color, texture, and pattern to create a fall dining room that shines.

Here I used three mini faux kale pots to perk up the butler tray stand in the corner of the room.  Fall decor made simple! This post gives three tips for fall decorating using color, texture, and pattern to create a fall dining room that shines.

Metallic candles and white pumpkins grouped throughout the table also create understated patterns, which make an impact on the dining table.  Fall decor made simple! This post gives three tips for fall decorating using color, texture, and pattern to create a fall dining room that shines.

Fall decor made simple! This post gives three tips for fall decorating using color, texture, and pattern to create a fall dining room that shines.

And there you have it; my fall dining room ready to shine!  All of the colors, textures, and patterns brought in through gorgeous products have created a beautiful setting for entertaining friends and family this fall!  I can hardly wait to invite someone over.  (What are you doing this weekend?  ;-))

Love the Look?  Shop This Post!

If you found my tips for fall decorating helpful, the good news is that Cost Plus World Market’s Fall Gathering Event has begun! Now through September 10, 2017, you can save 50% on all dining furniture, 20% on all bar carts, 30% on all open stock dinnerware, flatware and wine glasses, and 30% on all open stock table linens. Head into your local store (find it here!), and check out all the amazing deals for yourself or shop online…no coupon code needed!  Just scroll through and click on any of these images to shop this post!

blank

Happy fall decorating and entertaining!

-Bre

Filed Under: Fall and Halloween, home decor

DIY Fourth of July Wreath Made with Dollar Tree Supplies

June 11, 2017 by Bre Leave a Comment

blank

Make a patriotic Dollar Tree craft to celebrate Memorial Day and the Fourth of July!

I can’t believe it’s that time of year again where patriotic decor is lining the shelves.  The Fourth of July will be here before we know it!  

Last week my daughter begged me to take her to Dollar Tree so she could buy her daddy a Father’s Day present (so sweet), and while we were there I picked up some supplies to make a fun Fourth of July Wreath that took ten minutes TOTAL to make.  I promise!  

Make a DIY Fourth of July Wreath with supplies from Dollar Tree! This wreath cost $5 total to make! The tinsel garland adds a festive and sparkly touch for the Fourth of July.

This patriotic wreath is so sparkly and fun for the Fourth!  It reminds me of fireworks.

I made a tinsel garland wreath for Christmas long before I was blogging, so I was excited to have a new holiday to make one for!  

Anyway, RUN to Dollar Tree and get what you need to make this adorable tinsel garland wreath for the Fourth of July.

DIY Dollar Tree Patriotic Wreath Supplies

This post contains affiliate links. Please read my disclosure policy for more information.

  • Wire wreath form
  • Patriotic tinsel garland (buy two strands to be safe)
  • Patriotic headband with glitter stars
  • Chalkboard Star (no longer sold at Dollar Tree, so I recommend getting a wood star cutout and painting it black for the chalkboard look)
  • Hot glue gun and hot glue
  • Scissors
Make a DIY Fourth of July Wreath with supplies from Dollar Tree! This wreath cost $5 total to make! The tinsel garland adds a festive and sparkly touch for the Fourth of July.

How to Make a Dollar Tree DIY Patriotic Wreath

To learn how to make your own tinsel garland wreath for the Fourth of July, watch this fun video I made showing you just how to do it!  

The only thing to mention is that I cut the sparkly stars off of the headband (not shown in the video) to glue onto the chalkboard star.

If you enjoyed this project, please pin this post to Pinterest or share it on Facebook to share the love!  I’d really appreciate it!

Make a DIY Fourth of July Wreath with supplies from Dollar Tree! This wreath cost $5 total to make! The tinsel garland adds a festive and sparkly touch for the Fourth of July.

Filed Under: Crafts, Dollar Tree, Holiday, Patriotic Tagged With: Dollar Tree, Summer, Wreath

Dollar Store Planter Stakes Makeover

March 29, 2017 by Bre 8 Comments

blank

If you haven’t been to Dollar Tree recently, GET OVER THERE!  They have so much cute stuff for spring and Easter!  It’s one of the best times of year to stock up on craft supplies.  Last week I showed you the cute wreath I made with an unexpected Dollar Tree supply, and this week I’m showing you how to upgrade some Dollar Tree plastic bunny planter stakes with a faux finish makeover!  This dollar store planter stakes makeover is so quick and easy, and totally adorable!  Give plastic dollar store planter stakes a beautiful makeover with a faux metal finish! Learn how to easily upgrade the look of these cute spring garden decorations in this post.

Supplies Needed for a Dollar Store Planter Stakes Makeover

Some of these links are affiliate links, which means that I earn a small commission at no added cost to you if you purchase through them.  To read my full disclosure policy, please click here.

  • Plastic bunny garden stakes (from Dollar Tree)
  • Silver spray paint
  • Acrylic paint in dark gray, off white, and brown
  • Stencil brush
  • Paper towel
  • Decorative ribbon

How to Give Dollar Store Planter Stakes a Metal Makeover

I started with these cute bunny planter stakes.  They come in two colors (pink and purple), and are pretty cute on their own!  I just wanted a slightly different look for my planter stakes – one that looked like metal.  The criss-cross pattern on these little guys reminded me of chain link fencing, so I went with a weathered metal finish!Give plastic dollar store planter stakes a beautiful makeover with a faux metal finish! Learn how to easily upgrade the look of these cute spring decorations in this post.

I gave each planter stake a coat of silver spray paint that works on plastic.  I didn’t photograph this step because it was freezing outside.  But, the stakes were very shiny and space-age like!  Give plastic dollar store planter stakes a beautiful makeover with a faux metal finish! Learn how to easily upgrade the look of these cute spring decorations in this post.

I wanted to bring the high shine look down a bit, so I used a dense stencil brush (sometimes called a pouncer), to brush on dark gray acrylic paint all over the bunnies.  I made sure to let some of the shiny silver spray paint show through though.Give plastic dollar store planter stakes a beautiful makeover with a faux metal finish! Learn how to easily upgrade the look of these cute spring decorations in this post.

After this coat of paint dried, I dabbed some white acrylic paint onto certain parts of the bunnies.  I then removed most of it with the paper towel.  Give plastic dollar store planter stakes a beautiful makeover with a faux metal finish! Learn how to easily upgrade the look of these cute spring decorations in this post.

Finally, I dabbed some brown acrylic paint on spots in order to give a slightly rusty look.  I wanted my bunnies to look like junky bunnies – bunnies you’d find at a flea market.Give plastic dollar store planter stakes a beautiful makeover with a faux metal finish! Learn how to easily upgrade the look of these cute spring decorations in this post.

Once everything was dry, I tied some ribbon into one of the bunnies’ hair, and a ribbon around the other’s neck.  I wanted to give these bunnies a little style.Give plastic dollar store planter stakes a beautiful makeover with a faux metal finish! Learn how to easily upgrade the look of these cute spring decorations in this post.

Then I took my bunnies outside and plopped them into the planters that flank my garage.  Give plastic dollar store planter stakes a beautiful makeover with a faux metal finish! Learn how to easily upgrade the look of these cute spring decorations in this post.

Do you want to know a secret about the plants that are in my planter?

Promise not to tell?

They’re FAKE!  Yep!  I ordered them on Amazon.  They’re amazing and withstood the entire Chicago winter and are in perfect condition!  I love that I have a little pop of green by the door all year round.

Give plastic dollar store planter stakes a beautiful makeover with a faux metal finish! Learn how to easily upgrade the look of these cute spring decorations in this post.

Give plastic dollar store planter stakes a beautiful makeover with a faux metal finish! Learn how to easily upgrade the look of these cute spring decorations in this post.

Give plastic dollar store planter stakes a beautiful makeover with a faux metal finish! Learn how to easily upgrade the look of these cute spring decorations in this post.

And I think these bunnies are the perfect spring addition to my fake plants.  (Am I super tacky?  Maybe.  But hey, these things are the PERFECT solution for someone with a black thumb and bad weather.)

Give plastic dollar store planter stakes a beautiful makeover with a faux metal finish! Learn how to easily upgrade the look of these cute spring decorations in this post.

Jasper likes them, too (the bunnies and the fake plants).  Side note: I swear he has eyes.  He just needs a haircut.

Give plastic dollar store planter stakes a beautiful makeover with a faux metal finish! Learn how to easily upgrade the look of these cute spring decorations in this post.

Every time I look out the window and see my fake metal bunny garden stakes I smile.  They’re such a cute way to welcome spring!  Go grab some of these at Dollar Tree before they’re gone.

-Bre

You May Also Like These DIY Solar Light Planters

blank

Filed Under: Dollar Tree, Easter, Holiday

DIY Dollar Tree Easter Wreath

March 22, 2017 by Bre 10 Comments

blank

There’s just something about springtime and Dollar Tree crafts – for me they seem to go hand in hand.  I’ve made quite a few Easter crafts with things I’ve purchased at Dollar Tree, like my Spring Bunny Gumball Machines.  

I’m not sure I can replicate the popularity of that project, but I tried with this Dollar Tree Easter Wreath that I made with a deviled egg tray of all things!

SO CUTE! Turn a plastic deviled egg tray into an adorable Easter wreath or Spring wreath! Get the full tutorial for this Dollar Tree Easter Wreath in this post!

Dollar Tree Easter Wreath Supplies

Some of these links are affiliate links, which means I earn a small commission if you purchase through them.  To read my full disclosure policy, please click here.

  • Plastic egg tray
  • Faux eggs (I used foam eggs when I created this project, but it seems that Dollar Tree no longer sells those. The linked eggs are a great substitute!)
  • Craft moss
  • Ribbon
  • Spray paint
  • Hot glue and glue gun
  • Command hooks, mini size
  • Foam bunny floral pick
  • Twine
  • Washi Tape in patterns of your choice
SO CUTE! Turn a plastic deviled egg tray from Dollar Tree into an adorable Easter wreath or Spring wreath! Get the full tutorial in this post!

How to Make a Dollar Tree Egg Tray Wreath

This Easter wreath or spring wreath is unique and really fun to put together!  (And hey, you might like this other unique Dollar Tree DIY spring wreath tutorial, too!)

Step One: Paint the Deviled Egg Tray

Begin by spray painting the back side of the deviled egg tray.  Be careful not to overspray (like I did), because spray paint will run over the edge of the tray and onto the front.  

This will leave splotchy paint marks around the edges.  They’re not too noticeable, but they’re annoying.  🙂

SO CUTE! Turn a plastic deviled egg tray from Dollar Tree into an adorable Easter wreath or Spring wreath! Get the full tutorial in this post!

Step Two: Prepare The Decorative Eggs

While the deviled egg tray is drying, pull all of the foam eggs off of their wooden sticks, if that’s the type of faux eggs you’re using.

Tap your fingers and grow increasingly impatient as you wait for your spray paint to dry.  (I detest waiting for paint to dry!)

SO CUTE! Turn a plastic deviled egg tray from Dollar Tree into an adorable Easter wreath or Spring wreath! Get the full tutorial in this post!

Step Three: Attach the Eggs to the Tray

Once the paint has dried, fire up the glue gun and get to work attaching the faux eggs into their little spots on the egg tray.

SO CUTE! Turn a plastic deviled egg tray from Dollar Tree into an adorable Easter wreath or Spring wreath! Get the full tutorial in this post!

Step Four: Decorate the Center of the Tray

Next, fill up the center part of the egg tray.  Glue some moss at the bottom part of it, and then glue a foam bunny in there, too.

If you’re feeling ambitious, cut a piece of twine or string and attach it at the top of the center part of the tray.  Then wrap some washi tape around it to look like little bunting pieces.  So cute!

SO CUTE! Turn a plastic deviled egg tray from Dollar Tree into an adorable Easter wreath or Spring wreath! Get the full tutorial in this post!

Step Five: Create a Wreath Hanger

Once everything is in place and fully dried, flip it over carefully and attach two mini Command hooks upside down to the back.  Then you can run your ribbon through the hooks and tie it up for hanging!

SO CUTE! Turn a plastic deviled egg tray from Dollar Tree into an adorable Easter wreath or Spring wreath! Get the full tutorial in this post!

And that is how you make an adorable Egg Tray Easter Wreath with Dollar Tree supplies!

SO CUTE! Turn a plastic deviled egg tray from Dollar Tree into an adorable Easter wreath or Spring wreath! Get the full tutorial in this post!

It could not be easier (or much less expensive)!

SO CUTE! Turn a plastic deviled egg tray from Dollar Tree into an adorable Easter wreath or Spring wreath! Get the full tutorial in this post!

Filed Under: Dollar Tree, Easter, Holiday

All You Need is Love (And Target) – Free Printable

February 10, 2017 by Bre 2 Comments

blank

Hey friends- Thanks for your love on my DIY American Girl Doll Bed that I made for the Monthly DIY Challenge earlier this week.  I had so much fun with my first “real” building project and I’m glad you liked it, too!  Now, since Valentine’s Day is just around the corner, I wanted to share my version of a Valentine with YOU; it’s a free printable that’s available in two color combos, and honestly, I think you could display it all year!
Download this free "All You Need is Love" printable for Valentine's Day or as a gift for your girlfriends. It comes in two color combos!

I got the idea for this print the other day when I picked up my son from preschool.  His teacher said to me, “I saw you walking into Target the other day and you had the biggest smile on your face.  I could tell you were going to your happy place.”  HA!  It’s totally the truth.  I looooooove Target and regularly find excuses to go there.  (On that particular day, my son needed a new set of Pokemon cards (I made him pay for them himself, by the way), so we really needed to get over there.)

And let’s be honest, I am not the only one who feels this way about Target.  Most women I know share this affection for the big box retailer in red.  I bet you’re one of them.  So download a copy of this All You Need is Love 8×10 printable in the color combo of your choice, print it at home or at your local print shop, pop in a frame and enjoy!Download this free "All You Need is Love" printable for Valentine's Day or as a gift for your girlfriends. It comes in two color combos!

This would be a fun gift to give your girlfriends for Valentine’s Day, too!  Just click here to download:

Love and Target Black & White Print

Love and Target Pink & Red Print

These prints are for personal use only, please!  I hope you enjoy them!  Please “pin” to share the love!

Download this free "All You Need is Love" printable for Valentine's Day or as a gift for your girlfriends. It comes in two color combos!

Love and Target; what more could a girl need?

Happy Valentine’s Day, friends!

Bre

Filed Under: Holiday, Valentine's Day

  • « Go to Previous Page
  • Page 1
  • Interim pages omitted …
  • Page 7
  • Page 8
  • Page 9
  • Page 10
  • Page 11
  • Interim pages omitted …
  • Page 17
  • Go to Next Page »

Primary Sidebar

Let’s Connect!

Hi, I’m Bre! Thanks for visiting Average But Inspired, where I show you how to work with what you’ve got to create a home you love.

Bre of Average But Inspired - a DIY and craft blog

Love DIY? Subscribe to Get Posts E-mailed!

How Can I Help You?

blank

How to Paint a Countertop to Look Like Marble!

blank

How to Paint a Door to Look Like Wood (It’s Easier Than You Think!)

blank

My DIY Kitchen Makeover Reveal!

blank

How to Create a Faux Antique Brass Finish with Paint

Looking for Something?

Copyright © 2013-2022, Bre Eggert (Average But Inspired). All rights reserved.
  • Home
  • DIY
  • Crafts
  • Home Decor
  • Privacy Policy and Copyright Policy
  • Disclosures
  • Contact Me