
As desperate as we were for a house back in November, when the one we bought came on the market, my husband didn’t even want to go look at it. He really disliked the 1970s look and the all-brown exterior.
I promised him the first thing we’d do in the summer is update it, and I kept my promise! I’m excited to share the completed first part of our 1970s house exterior makeover!
A lot went into getting the house to look how it does today, and I will give you all the details!
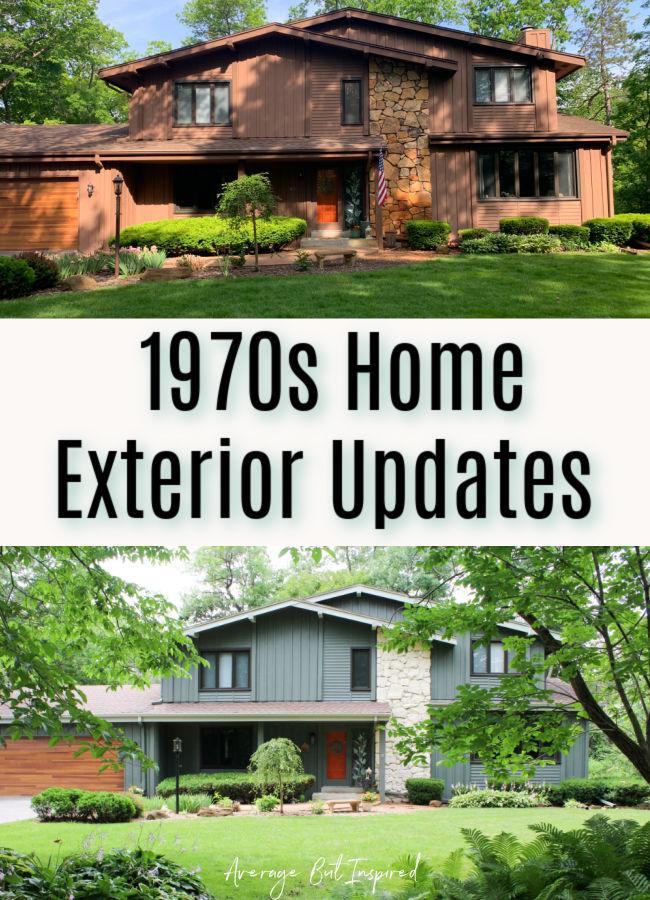
The first part of the exterior makeover was my DIY limewash stone column project that I shared a couple of weeks ago. That transformed the bright orange rock column to a more neutral beige color that helped remove some of the 1970’s vibe of the house.

After that, we had to pick our paint colors. We purchased several samples of paint and I’m so glad we did!
The paint looked much different on the house than it did online. Always get paint samples! The colors we thought we might use based on our internet mockups were not good once we put them up.
We ended up choosing Sherwin-Williams Pewter Green for the main body of the house, and Sherwin-Williams Escape Gray for the trim. Of course we were a little nervous about our color selection (because who isn’t?!?), but as soon as the painters started work, we were in love!
What we especially love about this color scheme of Pewter Green and Escape Gray is that these greens are different than any of the greens in our yard. There’s always a concern with green exteriors that the house is going to fade away into the landscaping, but these greens do not allow that to happen.
This post contains affiliate links. To read my full disclosure policy, please click here.
As part of our Phase 1 Exterior Updates, we also swapped the light fixtures. We chose fixtures from the Kichler Barrington lighting collection, because we liked the wood-look accents to mimic our garage door.
There was even a Barrington post lamp light available, so we were able to coordinate our two lamp posts with the fixtures by the garage and front door.
One thing I did after posting this entry is paint the door to look like wood! It’s a wood door that the previous owners painted orange. I used a faux finish technique to make it look like wood again, so that it ties in with the garage door. You can see the wood look technique in the linked blog post!
Oh, and to see how I made that DIY Address Number Plaque, find the tutorial on my Instagram!
After painting the door, the next part of the makeover MAY be adding some stained cedar wraps to the bottom halves of the porch columns (again, to tie in with the garage door and lighting), and painting a stenciled tile pattern on the front porch concrete. Will it all happen this summer? I don’t know.
And then someday we will replace landscaping near the porch and the lily-patterned sidelight next to the door. (Update: we did this! Come see how we ripped out the bushes and installed a beautiful front yard patio in this area!)
For now, we are so happy that our 1970s home has taken a huge step into the present.
I hope you like the new look as much as we do!