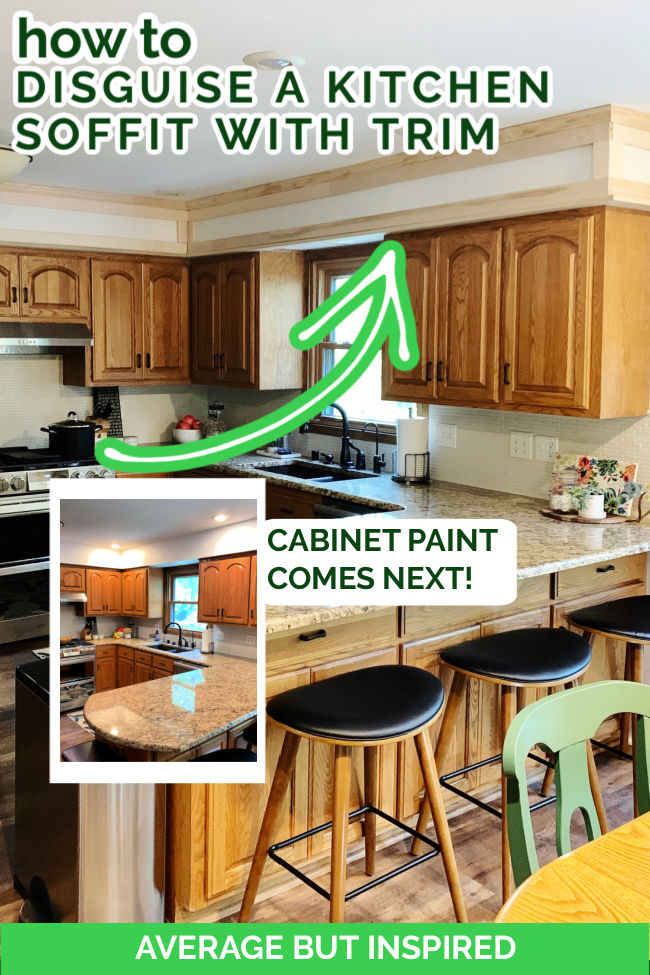
After I painted my kitchen tile backsplash, my husband and I started Part 2 of our kitchen revamp: our DIY kitchen soffit makeover. Our goal was to disguise the kitchen soffit (the part of the ceiling over the cabinets; sometimes called a ‘bulkhead’ or a ‘fur down’) and make it look more like it is part of the cabinets and less like wasted space.
I am painting the kitchen cabinets and the soffit the same color to make them blend together (you can see the finished painted cabinets in this post and the totally finished DIY Kitchen Makeover here), but this post is intended to show you how this kitchen soffit makeover made our kitchen look better, and how you can do the same!
Supplies Used for This Kitchen Soffit Makeover
This post contains affiliate links. Please read my disclosure policy for more information.
These are the materials we used to trim out our soffits. Pro tip: save time by ordering your materials online for free in-store pickup or even curbside loading.
Tools Used:
Wood Used:
Supplies Used:
- Caulk
- Wood Filler
- Pencil
How to Disguise a Kitchen Soffit
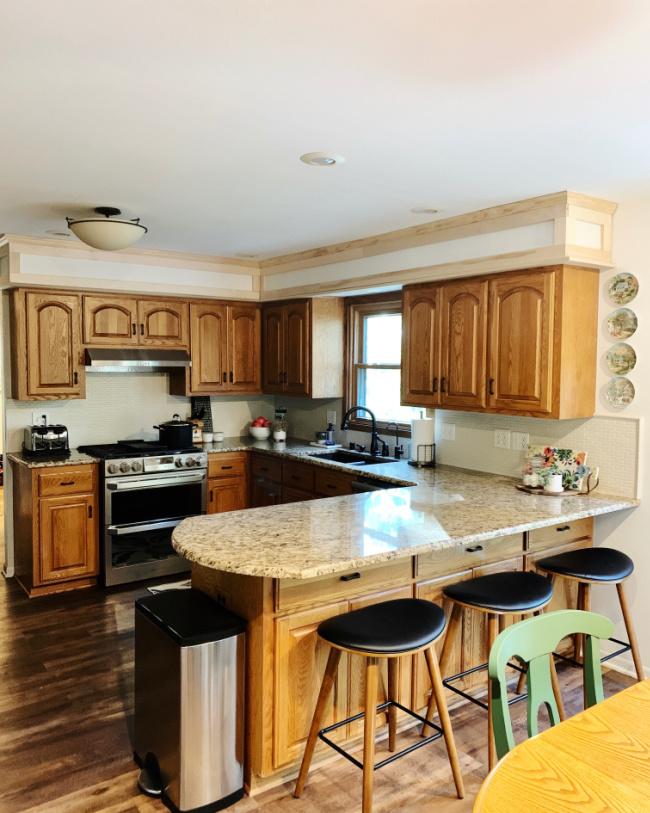
Before I jump in to give you all the details on this project, let me show you the “BEFORE” photo of the kitchen. This shows the backsplash tile has already been painted, but we hadn’t yet begun making over the soffit.

Over the course of a couple of weekend days we transformed the soffits, using multiple sizes of boards and molding. Here is the step-by-step!
Step 1: Attach Crown Molding to Top of Soffit
For the first part of our soffit makeover, we installed 2.25″ crown molding at the top of the soffit – connecting the soffit and the ceiling – with the brad nailer.
Because of the steps that came later in this process, we first attached small pieces of 1×2″ wood to the back of each crown molding section. We did this so that the crown molding would sit flush with the boards we attached to the soffit later in the project.
This means that the crown molding was sitting out farther than the soffit – and that is just what we needed for the next step to look right.
Step 2: Attach 1×3″ Horizontal Boards to Soffit
Next, we cut 1×3″ boards with the miter saw, and attached them directly below the crown molding installed in Step 1, and also on the lower front of the soffit.
Because the crown molding was mounted on the 1×2 pieces, the molding and the 1×3 boards were flush together. We cut the 1×3 boards with straight cuts at the end of each soffit, and beveled cuts in the inner corner.
Step 3: Attach Vertical 1×3″ Boards to Soffit
Once the horizontal 1×3 boards were in place, we measured the distance between the 1×3’s at every corner, and we cut 1×3″ pieces to attach in the corners. It was interesting how different the measurements were! The soffits were definitely not the same size in all spots.
As in Step 2, we cut the outer corners with straight cuts, and did bevel cuts for the inner corner. We attached the vertical blocks at every corner.
The soffits were already looking better at this point!
Step 4: Attach 1×4″ Boards to Connect Cabinets and Soffit
Finally, we removed the small piece of trim or molding that was at the top of our cabinets and the base of the soffit. You can see it hanging down in this photo.
We then used the brad nailer to attach 1×4″ boards to the base of the soffit (at the top of the cabinets), so that approximately 1″ of wood extended beyond the base of the soffit.
By having this piece stick out farther than the soffit, it actually made the soffit and the cabinet boxes look like they are the same (or similar) depth, as opposed to the soffit sticking out farther than the cabinets. It’s a crazy visual trick!
Step 5: Caulk!
So . . . my husband did an incredible job on this soffit makeover, but he is not a carpenter by trade. Because of that, we had a lot of caulking to do before priming!
I used Alex Flex caulk because it said it’s the best for molding and trim, but I’m not a caulk expert (bummer!), so I don’t know if this more expensive caulk was truly necessary.
After caulking and priming, I’ve now started painting the cabinets and soffit, and it’s looking SO GOOD! Here is a little sneak peek of how this is all coming together! (UPDATE: TO SEE THE TOTALLY FINISHED PAINTED CABINETS, CHECK OUT THIS POST and see the TOTALLY UPDATED KITCHEN WITH NEW COUNTERTOPS HERE.)
I really think our attempt to disguise our kitchen soffit is working and making our kitchen look much nicer than it did before!
I hope this post is helpful to you, too! As always, let me know if you have any questions or comments!
-Bre
- DIY Painted Tile Backsplash
- How to Convert a Kitchen Desk to Pull-Out Trash
- DIY Painted Oak Cabinets
- How to Hide the Side of a Refrigerator with Magnetic Panels
- DIY Kitchen Makeover Reveal