The right cabinet painting supplies are a large part of a successful cabinet painting project! Here’s an overview of supplies needed to paint cabinets to start you on your painting journey.
I’ve painted a lot of cabinets in my day (like these painted oak kitchen cabinets and these painted wood cabinets), and I’ve used many different paints and processes. No matter these differences, the supplies needed to paint cabinets are generally the same.
And with the right cabinet painting tools, you’ll achieve beautifully painted cabinetry that looks professionally done!
Before you start reading through this list of cabinet painting supplies, understand that it may seem like a lot. Don’t be overwhelmed! You may already have some of these cabinet painting supplies and tools, and if you don’t, many of these things are inexpensive and can be used again in the future.
Also, I have broken the supplies into sections of the job to help you prioritize what you might need to prep your cabinets for painting and to actually paint the cabinets.
Now that you know all of those important details, let me answer your question of “what supplies do I need to paint my cabinets?”
This post contains affiliate links. Please read my disclosure policy for more information.
Supplies Needed to Prepare Cabinets for Painting
Prep work is arguably the most important step in the cabinet painting process. It’s the foundation of the whole job, so you want to do it right!
These cabinet painting prep materials will get the job done right, no matter which type of paint you use:
- Screwdriver or drill: you’ll need one of these tools to remove the cabinet doors and drawers, to remove the hinges, and also to remove the hardware from the doors and drawers.
- Ziploc bags: use Ziploc bags to store the hardware and hinges.
- Permanent marker: use a permanent marker or Sharpie to label the Ziploc bags and/or the doors and drawers so you know what hardware goes with what drawer when it’s time to put things back together.
Materials Needed to Clean Cabinets Before Painting
Think about the grease and grime that accumulates in the kitchen, and then you’ll understand why proper cabinet cleaning is essential prior to painting! If you paint over grease, for example, the paint will not stick and your hard work will wipe right off. Don’t make that mistake!
Here are the supplies you need to clean your cabinets prior to painting:
- Dropcloths or plastic sheeting: use these to cover areas surrounding cabinet boxes and to set the doors and drawers that you’re going to clean on top of.
- Rubber gloves: to protect your hands while cleaning cabinets, obviously.
- Krud Kutter Concentrated Cleaner / Degreaser: this cleaning solution is the best! It’s non-toxic and it removes all that nasty grease and grime from cabinets. Also, it works with no issues whether you’re using oil-based primers and paints or latex.
- Scotch Brite Heavy Duty Scour Pads: cut these scour pads into smaller pieces and use them to scrub off the grease and grime. They have a little grit to them so they help loosen stuck-on food, but they’re not so rough as to scratch surfaces.
- Scissors: to cut the Scotch Brite Heavy Duty Scour Pads
- Denatured Alcohol: this is amazing for cutting through really tough grease, and it doesn’t leave any residue. I follow up cleaning with Krud Kutter with a spray of 50% denatured alcohol and 50% water, and then wipe it off.
- Spray Bottle: use a spray bottle to apply the denatured alcohol and water mix.
- Water: mix with denatured alcohol to clean cabinets.
- Towel (clean and soft): use clean towels (like shop towels – not bath towels), to dry off cabinets so that Krud Kutter and/or denatured alcohol doesn’t sit too long and ruin the finish. They don’t have to be bone dry, but they need to be wiped down.
- Mask: you absolutely need to wear a mask when working with denatured alcohol.

Supplies for Repairing Cabinets Before Painting
Because cabinets get used daily, they tend to show signs of wear and tear over time. Those dents and dings and other imperfections will show up if you paint over them without repairing first. Because of that, it’s worth it to spend a little extra time repairing cabinets before painting them.
Here are the repair supplies needed to paint cabinets:
- Painters tape: if you plan to fill holes in cabinet doors or drawers (like to move hardware), place a piece of painters tape on the back side of the hole before filling it.
- Paintable wood filler: acrylic wood filler works on all types of cabinets (wood and laminate), so use it to fill in gouges, dents, and dings on cabinet surfaces. Once dry, lightly sand any excess wood filler.
- Putty knife: use a putty knife to get a smooth application of wood filler.
- Sandpaper: use this in connection with the wood filler just discussed.
- Caulk: use this to fill gaps between molding and the ceiling, the cabinet boxes and the walls, and more!
- Caulk gun
- Aqua Coat Grain Filler or Spackle: optional! Use these products to fill in undesired wood grain.
Save Thousands by Painting Your Cabinets Yourself!
Download DIY Cabinet Painting Pro and get:
- Step-by-step instructions
- Complete supply list & product recommendations
- Workflow checklist
- Confidence to do the job right
Materials Needed to Sand Cabinets Prior to Painting (and During the Painting Process)
OK . . . I don’t care if you bought paint that says you don’t need to sand your cabinets before priming or painting – you should still do it. Sanding really is the best way to scuff up the surface a bit and get the primer or paint to stick better!
A lot of people seem to be intimidated by sanding, but there’s nothing to be scared of. You don’t need to sand down to bare wood or anything – you’re just sanding to remove topcoat and make a better surface for the paint and primer to come!
With that said, here are the materials you need to sand cabinets before painting them:
- Small electric sander: you could get by without one of these, but they’re inexpensive and will make the job much easier and more even. If you don’t already have an electric sander, you should consider getting one.
- Sandpaper: I recommend several different sandpaper grits for the various steps in the cabinet painting process: 100-150 for sanding after cleaning, 220 grit in between primer and paint, and 400 for in between coats of paint (if necessary). If you are using an electric sander, make sure to get sandpaper sheets that work with your particular sander.
- Vacuum with brush attachment: use a vacuum to remove as much of the dust from the surfaces.
- Tack cloth: use tack cloth to get up the fine particles of dust that are left after vacuuming.
Cabinet Painting Workspace Prep Supplies
For the area where you’ll be painting the cabinet doors and drawers, as well as the cabinet boxes, you need certain materials to protect the surfaces and make it easy to paint.
- Dropcloths
- Rosin paper: this is also known as contractor paper. It’s perfect for taping down on floors to protect them from drips or overspray.
- Painters tape: use painters tape to hold down rosin paper or plastic drop cloths.
- Tables or 5 gallon paint buckets: set up folding tables or 5 gallon paint buckets to paint cabinet doors and drawers on. This will be easier than painting them on the ground.
CHECK OUT THESE OTHER KITCHEN MAKEOVER POSTS
Supplies Needed to Prime and Paint Cabinets
And finally, when you’re ready to get started painting cabinets, you’ll have a host of other supplies you need, too!
- Primer: choose the right type of primer for your cabinet surface. Speak with a professional at the paint store to help you decide which primer is right for you, based on cabinet type and paint being used.
- Shellac-based primer: If you’re not using a shellac-based primer to prime all of your cabinets, you may want to purchase some as a backup in case you experience bleed through. Check out my post on how to fix paint bleed through for more information!
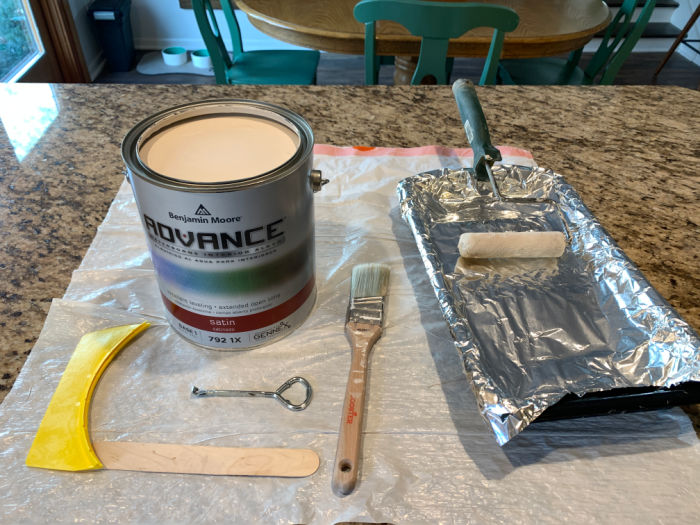
- Paint: there are many paints on the market. Do you research and choose one that’s formulated to withstand the wear and tear of daily kitchen or bathroom use. I like Benjamin Moore Advance for painting cabinets.
- Door risers or Painters Pyramids: these are a must! You do not want cabinet doors and drawers to lie flat on the table or painting surface. Make sure to elevate them on these pyramids to decrease the points of contact with the table or painting surface. Use four pyramids per door.
- Stir sticks: I never remember to ask for paint stir sticks when I buy paint! If you’re like me, maybe a reusable one is a good idea!
- Paint pour spout: take it from me – using one of these pour spouts is so much better than trying to pour paint from a gallon into a smaller working container or spray painter, and then getting it all over the gallon. This keeps the paint can and the rim clean.
- Working paint container: Instead of painting from the can and potentially contaminating the paint inside with dust and debris, transfer some paint to a working container and paint from that.
- Paint can opener: some paint stores will give you one for free. If you don’t have one, you can use a flat head screwdriver instead.
- Face mask: safety first! Wear a mask when working with oil-based paints and/or spray painting!
- Paint roller: A small roller is helpful for cabinet boxes; a larger roller is helpful for sides of cabinets and flat cabinet doors. Check the paint can to see which nap is best to use for your project.
- Roller paint tray
- High-quality paint brushes: Don’t skimp on the brushes you use! Consider using a different brush for the final coat of paint – this may give you an even better finish.
- Paint brush cleaner: I love paint brush cleaner to get a really clean brush. If you’re in a pinch and your paint brush has hardened, check out my post on how to soften hard paint brushes without chemicals.
- Paint sprayer: If you can afford to buy a paint sprayer for your cabinet painting project, DO IT! I would not have survived painting my kitchen cabinets if it weren’t for my paint sprayer. I love my affordable sprayer and recommend it to everyone. Sprayed cabinets generally look much better than those painted with brushes or rollers.
Phew! It takes a lot of materials to paint cabinets! But again, many of these supplies are things you have or that you’ll use again in the future. Comment below and let me know if any of these supplies surprised you, or if you have anything to add to the list!