• Skip to primary navigation
  • Skip to main content
  • Skip to primary sidebar
Average But Inspired logo - DIY and craft

Average But Inspired

Craft a home you love. DIY and craft tutorials.

  • About
    • Contact Me
    • Disclosures
    • Privacy Policy and Copyright Policy
  • DIY
    • Furniture
  • Crafts
    • Dollar Store Crafts
    • Seasonal
      • Patriotic & Summer
      • Valentine’s Day
      • Easter & Spring
      • Fall & Halloween
      • Christmas & Winter
  • Home Decor
    • Organization
  • Shop
    • DIY Swag
    • DIY Guides
  • Home

Crafts

Dollar Store DIY Pumpkin Topiary

September 11, 2023 by Bre 6 Comments

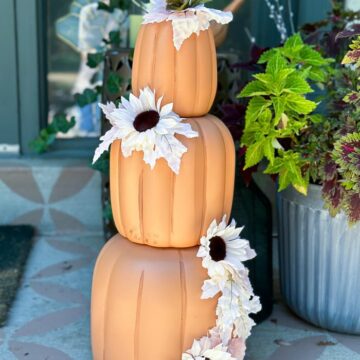
Get ready for the autumn season with a beautiful DIY stacked pumpkin topiary.

A piece of fall decor that I’ve always admired is a pumpkin topiary. I love the way stacked pumpkins look when added to a pretty planter on a front porch, or when displayed on a cozy fireplace hearth.

On a recent trip to Dollar Tree I spotted a set of plastic stacking pumpkins in the “Plus” section, and I knew I had to have them! My dreams of a pretty pumpkin topiary were within reach!
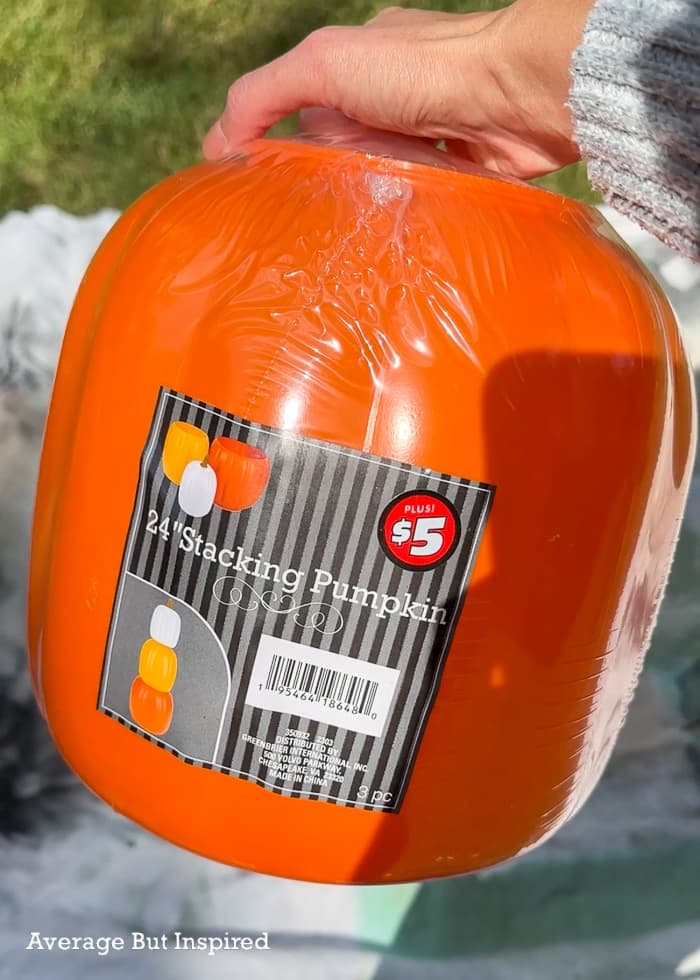
Dollar Tree Plus plastic stacking pumpkins

(Sidenote: do you have Dollar Tree Plus in your store yet? In mine it’s essentially one aisle of higher-priced items (in the $3-$5 range). They seem to have a lot of seasonal decor, home organization, and crafting items in the “Plus” section. It’s also online.)

These faux pumpkins were quite plastic-looking and not realistic at all (hello, candy corn colors!). But, for $5 I decided to see what I could do to make it work. Let me show you!

BEFORE: a stacked pumpkin topiary looked very fake.

Supplies Used to Make a DIY Pumpkin Topiary

This post contains affiliate links. Please read my disclosure policy for more information.

Here are the materials I used to create the DIY stacked pumpkin topiary as shown in this post. Feel free to substitute items to make this project your own!

  • Stacking pumpkins (from Dollar Tree)
  • Terracotta spray paint
  • Brown acrylic paint and paint brush
  • Faux leaves
  • Faux sunflowers
  • High-temperature hot glue gun and hot glue

How to Make Stacked Pumpkin Topiaries for Indoors or Outdoors

This project came together so quickly that I was able to make it in between soccer games one Saturday. How great is that? Practically instant fall decor!

Step One: Spray Paint the Pumpkins

As I mentioned, these Dollar Tree Plus plastic pumpkins are quite fake-looking. To combat that and give them a more natural look, I spray painted them in a traditional fall color: orange.

I used flat spray paint in a terracotta shade, that was suitable for indoor or outdoor use. Make sure to choose a spray paint that works outdoors if you plan to display your topiary outside!

Terracotta spray paint on plastic pumpkins

Two coats of paint later and the candy corn color scheme was gone. Yay!

Step Two: Add Detail with Brown Paint

As with anything spray painted a solid color, the pumpkins looked a little flat in their solid terracotta color.

To help fix that, I decided to add some detailing using brown craft paint. I used a pared down version of the technique I shared for how to make fake pumpkins look real, and this went a long way to improving the appearance of these plastic pumpkins.

I also painted the stem brown, as it had gotten a heavy coat of terracotta spray paint in step one.

Add detail to plastic pumpkins with brown craft paint

Step Three: Embellish the Pumpkins with Fall Decorations Like Fall Leaves and Faux Flowers

These particular pumpkins fit together nicely and did not require any modifications for stacking. So, the only thing left to do was dress them up a bit and make them even more cute.

I cut apart stems of fake fall leaves (in cream shades) and fake flowers (cream sunflowers), and used extraordinarily hot hot glue to fasten them to the stacked pumpkin topiary.

Glue fall leaves and fall flowers to plastic pumpkins to create a pretty pumpkin topiary

If you don’t have a hot glue gun that gets to a VERY high temperature, I recommend using a glue like E6000 to fasten your fall embellishments, because regular hot glue will not work well for attaching anything to the plastic pumpkins.

Step Four (Optional): Add Weight Inside the Bottom Pumpkin

This pumpkin topiary is pretty lightweight, so if you plan to display it outside, you should add rocks or something heavy inside the bottom pumpkin. This will keep it from blowing away.

***

That’s where I finished my DIY pumpkin topiary project, and I love how it turned out! Some other things I’d like to add to it eventually are grapevine and perhaps some twinkling fairy lights. Wouldn’t those look beautiful on it, too?

I plan to put this on my front porch once I get my fall decorating underway out there. Where would you display a stacked pumpkin topiary?

Make a beautiful fall decoration with this DIY pumpkin topiary project. Stacked pumpkins from Dollar Tree look beautiful on a fall front porch or on a fall fireplace.

Filed Under: Dollar Tree, Fall and Halloween

DIY Wood Block Craft: Create Your Own Picture Holder

June 7, 2023 by Bre 2 Comments

blank

Unfinished wood blocks are full of craft potential! Learn how to make a picture holder or picture frame with this wood block craft project.

Whether you buy unfinished wooden blocks at the craft store, Dollar Tree, or make your own cubes with scrap wood, you can create this simple project!

Turning wood blocks into personalized photo holders or printable holders is not only fun, but it’s also so easy to do.

In this tutorial I will show you how to make your own version of this simple wood block craft, which is a great project to do with the kids or to use as a handmade gift idea.

Grab a craft wood cube or unfinished wood block at Dollar Tree (or make your own!), and create a custom wood block photo holder! This is an easy wood block craft idea that can be customized any way you like!

DIY Wood Block Photo Holder Supplies List

These are the basic supplies I used to create the wood block picture holder shown in this post. Some of the links are affiliate links, and you can read my disclosure policy for more information on that.

  • Unfinished wood block (I purchased this craft wood cube at Dollar Tree. Craft stores also sell wooden blocks, and you can make your own with scrap wood, too.)
  • Hand saw and miter box (you could also use power tools, like a miter saw, if you’re so inclined)
  • Ruler and pencil
  • Acrylic craft paint, water, and a paintbrush
  • Scrapbook paper
  • Mod Podge and a paintbrush

There are so many ways to personalize this project to suit your style! Other supplies you could use include rubber stamps, stickers, rub on transfers, vinyl, ribbon, napkins or tissue paper (for decoupage), 3D embellishments, and more.

How to Make a Wood Cube Picture Holder

Although this is one of the easiest projects you’ll ever do, step by step instructions may help! So, here we go!

First, draw a straight line across the top of the wood block. This is where you’ll create the slot for the picture or printable to go. I drew the line about 2/3 of the way back, but you could really place it wherever you like.

To make a wood block photo holder, draw a line at the top of the block before sawing into the cube.

Next, fasten the block into a miter box and saw along the line you drew. Don’t saw too deep – you need just enough of a slit that the picture can stand upright in the block, but you don’t want it so deep that the picture rests too far into the block (obstructing the picture’s visibility).

Use a hand saw and miter box to cut a slit in a wood cube to make it a photo holder.

With that slit in place, it’s time to customize the photo holder! As I mentioned before, you can do this part however you like!

A shallow slit cut into a craft wood cube will serve as a picture holder.

I created a faux stain by watering down craft paint and brushing that over the entire cube.

Once the whole thing was painted, I cut scraps of floral paper into little pieces. I then put a thin layer of Mod Podge on the back of that paper and pressed it onto the wood block.

Use Mod Podge to attach scrapbook paper to the wood block.

Looking for Other DIY Picture Frame Ideas?

  • $1 Picture Frame Upgrade
  • DIY Wood Plaque Photo Frames
  • DIY Boutique-Style Frame

After about twenty minutes, I covered the top of the paper with another thin layer of Mod Podge. This seals that paper in place and helps make sure it won’t come off!

Decoupage scrap paper onto a wood cube to make this pretty picture holder.

And with that, my adorable wood block photo holder was complete.

It looks great with a regular photo in it . . .

Learn how to make a DIY wood cube picture holder in this post.

and even holding a free printable for my Fourth of July decor! (It’s a vintage sheet music cover printable. I have a set of six available in that linked blog post if you want them!)

A DIY picture holder or printable holder made from a craft wood block is an easy craft project idea!

Now, after I made this, I realized these would also be great for wedding table numbers, place card holders, and they would even make great centerpieces with a dinner menu propped inside. So, you’re not limited to photo holder wood block crafts by any stretch of the imagination!

I hope you enjoyed this creative wood block craft idea. Please let me know in the comments what you think and if you have any questions!

Filed Under: Crafts, Dollar Tree

DIY Ribbon Holder Tutorial: a Simple Ribbon Rack

April 3, 2023 by Bre 4 Comments

blank

Looking for an effective way to organize ribbon? Make this DIY Ribbon Holder and get your ribbon stash in order!

Confession: my ribbon storage used to consist of a box where I’d throw ribbon spools and ribbon scraps alike.

It was a jumbled mess and almost impossible to find what I needed for any given project. I was like an animal burrowing in the dirt in that ribbon box! Imagine wild tails of ribbon flying everywhere in my craft room. What a disaster!

When I was given a large quantity of beautiful craft ribbon recently, I knew this had to change! I needed an effective ribbon storage organizer: something more sophisticated than my janky box.

But to my surprise, the ribbon organizers available at craft stores were too small, and the ribbon storage racks available online were too expensive. No thank you!

Since nothing pre-made seemed to meet my needs, I knew I needed to take matters into my own hands. As a result, I came up with this DIY Ribbon Storage Rack, which has given me an amazing way to store ribbon and keep my craft area tidy!

A DIY Ribbon Holder is an amazing way to organize your ribbon stash! This wall mounted ribbon organizer costs hardly anything to make and goes together easily.

Let me show you how you can keep your ribbon organized, too!

DIY Ribbon Organizer Supplies

This post contains affiliate links. Please read my disclosure policy for more information.

These are the exact supplies I used to make the ribbon holder as shown in this post. Feel free to modify to make this project your own!

  • Wooden dowels (I used two 3/16″ dowel rods and one 5/16″ dowel. Note that these are the long dowels purchased from home improvement stores; not the short dowels you purchase at a craft store. Also, before purchasing dowels, it will be helpful if you look at your ribbon collection to find the spools with the largest center holes and the smallest center holes. Purchase dowels that fit both sizes to accommodate your collection.)
  • 1″ x 2″ common board (I cut one board into six pieces that are each approximately 3″ long)
  • Circular saw or hand saw (or have the boards and dowels cut at the home improvement store)
  • #6 Zinc screw eye hooks (I used 8 total: 6 with the 3/16″ wooden dowels and 2 with the 5/16″ dowel)
  • Command Picture Hanging Strips (12 pound rating or more)
  • Recommended: Electric drill
  • Optional: paint

How to Make a DIY Ribbon Holder or Ribbon Rack

This wall mounted ribbon storage goes together so quickly and easily that I know you’re going to wish you made one for your ribbon collection sooner!

Step One: Measure and Cut

The first step is to determine how much space you have for your ribbon organizer. Measure the wall space, and then cut the dowels to fit within the width of that space.

It’s very easy to cut the dowels with a hand saw, so you don’t need to use power tools for this part!

Next, cut the common board into 3″ pieces. I needed eight three-inch pieces (“blocks”) to make the ribbon storage shown in this post (three rows of ribbon storage).

Cut a 1x2 board into 3" pieces to make the DIY ribbon holder and ribbon organizer.

The thinner 3/16″ dowels required three blocks each, while the 5/16″ dowel only needed two.

I used my circular saw to cut the board, and I wasn’t overly precise in my cuts. If you want the blocks to be perfectly straight, it may be better to use a hand saw in a miter box (tedious) or a miter saw.

Cut the common 1x2 board into 3" pieces. These blocks serve as the backer for your ribbon rack.

Note: if you want to paint your DIY ribbon organizer, do it now – before you hang it on the wall! That might sound obvious, but I didn’t paint at first, and only after I had it on the wall did I decide to paint the wooden blocks. That was dumb.

Step Two: Attach Screw Eye Hooks to the Wooden Blocks

Next, I drilled a small pilot hole in the middle of each wooden block, and was careful not to drill all the way through.

Then I screwed a screw eye hook into each of the blocks, making sure the screw hooks were straight up and down on each block.

Put screw eye hooks into the wooden blocks. The screw eyes are what the dowel will rest in.

Note that I did not screw them all the way into the blocks – it is actually good to have them sticking off the block as much as possible. The more space you have between the dowel and the wall, the easier it will be for the ribbon spools to spin when needed.

Step Three: Fasten the Wooden Blocks to the Wall

Instead of anchoring the blocks to the wall, I decided to use Command Picture Hanging Strips, which are one of my favorite inventions of all time. Not only do I love them because they don’t damage the wall, but they also make it really easy to get things like this level! You can readjust them easily until you get it just right, which is wonderful for a (sometimes) inaccurate person like me!

Anyway, I used the 12 pound Command Picture Hanging Strips, and mounted two on the wall; putting them at a distance that the 5/16″ dowel could rest in the screw hooks with a little bit of overhang on each side.

The wooden blocks with screw eyes inserted into them are attached to the wall.

I put some of the largest ribbon spools onto the dowel, and then used that sizing to determine how far down to hang the next set of wooden blocks and corresponding dowel.

The second wall-mounted ribbon rack is hung.

The next two rows were for the skinner dowels, which cannot accommodate as much weight without sagging, so I placed an additional block with hook in the center for each of the 3/16″ dowels (not pictured above!).

Step Four: Place the Ribbon Spools Onto the Ribbon Rack

Finally, slide one end of the dowel out of the screw hook, and place the spools of ribbon onto the new ribbon rack!

Ribbon spools with large center holes fit best on the wider dowel, whereas ribbon rolls with smaller center holes fit best on the skinnier dowels.

This inexpensive DIY ribbon holder organizer makes ribbon storage a breeze.

This inexpensive but effective method for storing ribbon has made my craft table work area so much neater! And, it’s so much easier to find what I need! (I even found ribbon that I know is from 2103! I used it to make this DIY Ribbon Chandelier!)

How to Organize Ribbon Scraps

While the DIY ribbon storage organizer has solved the problem of what to do with all those spools of ribbon, you might be wondering what I did with the previously mentioned ribbon scraps.

Obviously they can’t hang on the rods like the spools!

Well, my “janky” old ribbon box is still being used, but in a much more effective way now!

I’ve grouped types of ribbon or string and put them into Ziploc bags within the box. But another creative idea for DIY ribbon storage of scraps is to wrap them around cardboard scraps. Store them in old shoe boxes or plastic storage containers.

More Ribbon Storage Organizers

Okay, if my DIY ribbon storage ideas aren’t for you, maybe you’d benefit from a premade or store-bought ribbon organizer! Just because those didn’t work for me doesn’t mean they won’t be a perfect solution for you.

Here are some of the best ribbon storage options I’ve found for your craft room! Click any picture to shop.

blank

**

Comment below with any questions about my DIY Ribbon Storage Rack! I’m always happy to help.

Make this and get your ribbon storage in shape! This DIY ribbon organizer is an easy way to store ribbon on the wall with no damage!

Filed Under: Crafts, DIY, Organization

10 Reasons Crafters Will Love the xTool M1 Laser and Blade Cutter

January 12, 2023 by Bre 6 Comments

blank

As a lifelong crafter and DIY’er, I’ve been amazed at the proliferation of craft technology products in recent years.

And to be honest, I’ve been slow to embrace such machines. I took a strange pride in using craft tech only when absolutely necessary.

However, I was given the chance to review the xTool M1 Laser Engraver and Cutter, and I couldn’t pass it up. It looked way too cool not to!

The xTool M1 is a hybrid laser cutter and blade cutter machine: the first of its kind! It can laser cut, engrave, and score, and also blade cut. This allows it to work with over 300 materials! Find out why I think it's a great laser cutter for crafters, hobbyists, and small businesses.

Thank you to xTool for giving me the products featured in this post. The projects and opinions expressed herein are all my own. Also, this post contains affiliate links. Please read my disclosure policy for more information.

This all-in-one machine is a PERFECT size and scope for crafters, hobbyists, and small business owners, and it has so many amazing features. I can’t wait to show you my favorites!

What is the xTool M1?

The xTool M1 is an enclosed hybrid laser and blade cutting machine that cuts, engraves, etches, and scores a multitude of materials. (And by multitude, I mean like over 300 materials!)

Think of it as a Cricut machine x100.

I’ve been testing and experimenting with the machine over the past several weeks, and I can’t say enough about its capabilities.

How User-Friendly is this Laser Cutter and Engraver?

To me, this laser cutter and engraver was simple to set up and is intuitive to use.

I’m not sure if I missed something, but I didn’t locate any type of comprehensive beginner guide on how to use all of the features though. That was surprising to me.

In order to learn best practices for cutting and engraving specific materials, I turned to YouTube and Google. Creators with project tutorials have been the best way of learning – for me at least!

Expect there to be trial and error. You will make mistakes. That is the best way of learning though!

What are the Benefits of the xTool M1?

There are so many benefits of the xTool M1, and I’m going to tell you about my favorites.

As I continue to work with the machine and make more difficult projects, I will update this review.

1. Setup is Easy

When the M1 arrived on my doorstep, I was a little intimidated. The box was huge!

The hardest part of setup was getting the machine out of the box. Let’s just say that xTool has the efficient packing down to a science.

The xTool M1 laser cutter and blade cutter arrives nicely packaged.

Once I actually got to the product, within ten minutes I had the whole thing set up. All you have to do is attach the ventilation tube, plug in the outlet, and plug in the USB cable to the back of the M1.

The xTool M1 laser cutter must be vented out a window when being used on the laser cut function.

2. The xTool M1 Works With Over 300 Materials

Okay, as I mentioned above, this laser machine is able to cut and engrave just about any material you could want or need!

I won’t list the 300+ items here, but instead, I’ll give you the highlights (you’re welcome):

  • Wood (basswood and more): cut and engrave
  • Metal: engrave (very thin stainless steel may be cut)
  • Leather: cut and engrave
  • Colored Acrylic (clear requires modifications): cut and engrave
  • Vinyl: cut
  • Paper: cut
  • Rubber: cut and engrave
  • Rock: engrave
  • Cardboard: cut
  • Fabric: cut

Because it works on so many materials, and because it can cut, engrave, and score, the M1 could replace any other craft technology you have or want. Let that sink in.

Plus, you can purchase materials and materials bundles right from xTool, which ensures they’ll work perfectly with the laser and blade cutter.

The xTool M1 has a premium materials package. This laser cutter can be used with over 300 different materials.

3. The List of Materials You Can’t Use with xTool M1 is Small

And, the list of materials you cannot laser cut with the xTool M1 is small. I don’t even know what half of these items are, so I don’t think it’s hard to avoid using them!

According to xTool, some of the materials you should not laser cut or laser engrave with the xTool M1 include:

  • PVC
  • Polycarbonate
  • ABS
  • Polystyrene and Polypropylene Foam
  • HDPE
  • Coated Carbon Fiber

Again, these aren’t your everyday craft store items, so these materials don’t limit your ability to use the laser cutter in any way of import. (NOTE: this list is for the laser cutter; not the blade cutting feature.)

4. The Project Possibilities are Endless with xTool M1

I can’t adequately express how there is no limit to what you can make with the M1 laser cutter and engraver. Seriously, and as cliche as this sounds, you’re only limited by the extent of your imagination!

For my first project, I engraved a slate coaster with the logo of my husband’s favorite team and his name. He doesn’t usually get excited about my projects, but he loved this!

This slate coaster was engraved with the xTool M1. It is a wonderful laser cutter for crafters, hobbyists, and small businesses.

After that, I upped the ante and moved on to cutting and engraving wood. I made an adorable wood gift card holder. I colored it in with paint markers and couldn’t believe how cute it was.

This wood cupcake gift card holder was cut and engraved with the xTool M1. It is a wonderful laser cutter for crafters, hobbyists, and small businesses.

Then I used the blade cutting feature to cut a glossy red acrylic sheet and translucent acrylic sheet into hearts to make super cute Valentine’s Day Lights.

This Valentine light garland was made with the xTool M1. It is a wonderful laser cutter for crafters, hobbyists, and small businesses.

But there’s so much more that I want to make!

I’m especially excited to engrave photos onto objects (YES, you can do that!), and engrave my own handwriting (or loved ones’ handwriting) onto things. That is so cool!

I will continue to update this list as I make more projects with my hybrid laser cutter engraver.

5. The Rotary Attachment Lets You Engrave Curved Surfaces

One amazing feature of the xTool M1 is that you aren’t limited to cutting and engraving flat surfaces.

With the Rotary Attachment, RA2 Pro, you can also engrave curved surfaces like tumblers, coffee cups, wine glasses, and more!

I haven’t used the rotary engraver yet, but I will update this post when I do.

Learn more and shop all xTool products in their online store! Save 10% with code ABI10!

6. You Can Use the M1 Indoors or Outdoors

As with all laser cutters and engravers, you must properly vent the machine when using the laser feature (not the blade cut feature). Laser cutters give off fumes that need to be released outside – not trapped indoors!

The xTool M1 can be vented right out of a window, which means that it can be used indoors or outside.

When I use the machine, I open the window and point the attached ventilation tube to the outside. If it’s very cold (I live in Wisconsin, so it’s usually very cold!), I stuff a blanket around the tube to keep as much of the cold air out of my house as possible.

Vent the xTool M1 out the window when using it on the laser cut function.

I also run my air purifier for extra odor and fume removal, but having an air purifier isn’t necessary.

I have seen more permanent solutions where people use plywood to fill in the window area around the ventilation tube. This is similar to when people put window unit air conditioners in their homes.

And, if this sounds like too much trouble, xTool has introduced the Smoke Purifier product, which lets you attach the M1 ventilation tube to the Smoke Purifier for proper ventilation! That means you don’t have to vent it out a window!

The fact that you aren’t limited to using the M1 outside is really wonderful. I know that I, for one, would not like working in my garage in the winter!

7. You Can Easily Store the xTool M1

My craft area is in a corner of my basement where I don’t have a window nearby.

Because of that, I purchased this rolling cart to hold my laser cutting machine. It’s amazing because the xTool M1 sits on the top of the cart, and then the laser cutting accessories (like the RA2 Pro rotary attachment, the triangular prisms used to elevate items being cut, and the XTool M1 Premium Materials Box), fit in the drawers beneath.

I keep the machine in my home office, and roll it out of the closet up to the window when I’m ready to use it.

The xTool M1 is a perfect size for crafters, hobbyists, and small businesses. It can fit in a closet.

It stays out of sight when I don’t need it, and is easily accessible when I do. That is absolutely wonderful for a hobby laser cutter you’re not using every day; you don’t need it to be out on display all the time.

8. The Included Laser Engraver Software, Creative Space, is Easy to Use

A wonderful thing about the xTool laser products is that they work with xTool’s free laser engraver software, Creative Space. You don’t have to purchase any additional software if you don’t want to!

If you’ve ever used a Cricut or Silhouette machine, you’ll find Creative Space similar to those vinyl cutter’s design software.

Also, I was surprised that Creative Space uses the same types of files for cutting and engraving as is used for cutting vinyl; namely .svg files. There are tons of options for free cut files online, and for more advanced project files on places like Etsy.

My favorite thing in working with the Creative Space software is that the M1’s built-in camera allows the exact material you’re working with to show up on screen. This makes it foolproof to line up your design exactly right on the object (especially if it’s scrap material!).

xTool Creative Space software is free and easy to use.

The one drawback I’ve identified so far is that the software’s estimated time for projects is totally off. It always takes much longer for the machine to complete a project than it says it will.

9. The M1 is a Wonderful Glowforge Alternative

Being in the craft and DIY space, I’ve heard a lot about Glowforge over the years. (Glowforge is a very popular laser cutter and engraving machine. They invest a lot in marketing.)

At one point I considered buying one, but the steep price was a barrier. At the time of writing this article, Glowforge machines range in price from $3,995 for the basic model to $6,995 for the pro model.

Since publication, Glowforge has introduced the Glowforge Aura, which is most comparable in price and function to the xTool M1. You can read my complete comparison of Glowforge Aura and xTool M1 for more information on these two machines.

Note that none of the Glowforge machines features a blade cutter like the xTool M1. That means that the Glowforge cannot cut as many materials as easily as the M1 can.

10. The xTool Maker Community is Incredible

And finally, one unexpected (for me, at least) reason to love the M1 is the maker community involved with it.

Facebook groups aren’t usually my thing, but the M1 Facebook group is so helpful! It is filled with machine owners who are excited to share their successes, and who turn to the group for help with their failures.

People share their knowledge of things like cut settings and the best materials to buy on Amazon, for example. And I’ve never seen one rude comment (which is crazy for Facebook)!

****

In just a few short weeks of owning this amazing laser cutter, I have learned so much and gotten so many incredible project ideas. I am even wondering if I should sell items I make in my shop (the xTool M1 is great for small business owners)!

Please ask me any questions you have about this hybrid laser and blade cutting and engraving machine. I will do my best to answer or to steer you to where you will be able to find the answer!

And, stay tuned for more posts on projects I create with the xTool M1!

Filed Under: Crafts

3 Clever Window Cling Crafts

November 1, 2022 by Bre Leave a Comment

Three window cling crafts ideas that anyone can make!

Did you ever think to use decorative window clings on things OTHER than windows?

With their cute artwork, they shouldn’t be limited to just one use (in my opinion)! So, I came up with three easy window cling crafts that even the most novice crafter than make.

(Actually I’m wondering if only one of these can be considered a craft??? They’re that easy!)

Get a sheet of window clings at the dollar store and make these cute window cling crafts! They're super easy for all skill levels.

Anyway, I am using Dollar Tree Thanksgiving window clings in this post, but these projects are not limited to Thanksgiving. :-). Use window clings in any pattern or for any holiday to make these DIY projects fit the season you’re in!

This post contains affiliate links. For more information, please read my disclosure policy.

DIY Window Cling Place Cards

This is an example of an awesome Dollar Tree Thanksgiving craft. But again, swap out the window cling pattern to make this project for a different occasion or season.

Supplies Used

  • Dollar Tree ceramic tabletop signs
  • Dollar Tree window clings
  • Vis-a-vis wet erase marker

How to Make Window Cling Place Cards

This project is pretty self-explanatory, but I will walk you through it anyway!

Start with clean ceramic standing tabletop signs. Press a window cling onto the surface. Try to choose a cling that fits on the front of the piece, but if it doesn’t, you can trim it to size with regular scissors.

Once the window cling is in place, write your guest’s name on it with a wet erase marker. Using a wet erase marker (as opposed to dry erase marker), will ensure that the name doesn’t wipe off or get smudged during the course of the meal!

Use dollar store window clings to make adorable place cards for any occasion! These place cards are reusable, and the look can be changed easily.

Check out these adorable Thanksgiving Turkey Place Cards, too!

Once the event is over, wash off the guest’s name and place the window cling back onto the sheet on which it came – you can save it for next year!

DIY Window Cling Signs

Another great, but slightly more difficult, window cling craft is to make window cling signs!

You can make these in any size. Here I made one on a hanging wood round so that I could use this as a front door hanger/wreath.

Supplies Used

  • Wood round
  • Window clings
  • Mod Podge (matte finish)
  • Paint brush
  • Ribbon
  • Hot glue

How to Make Window Cling Signs

Start by figuring out the placement of the window clings on the sign base. Then, paint a very thin layer of Mod Podge onto the sign.

Press the window cling on top of it, and let it sit for about 20 minutes.

Then, paint a thin layer of Mod Podge on top of the window cling, and all over the entire sign. You will paint the entire face of the sign so that the finish, once dry, looks the same all over!

Let the Mod Podge dry, and repeat this process at least one more time. Three times is best!

Add a decorative ribbon to the top of the sign by attaching it with hot glue.

Use window clings to make DIY decorative signs! This is such an easy window cling craft idea.

It is that easy to make a decorative sign or door hanger with window clings!

You may also like this Dollar Tree Tin Tile Wall Art!

Dress Up a Centerpiece with Window Clings

Finally, add some interest to a table centerpiece or table decor with window clings!

Supplies Used

  • Metal bucket
  • Flowers

How to Use Window Clings on a Centerpiece

Basically, stick cute window clings on anything you’d use to hold flowers! I like the rustic look of the metal pail I used here, but glass or wood works well, too!

Window clings can be used on vases, buckets, and other centerpieces to add a cute and decorative touch.

And, just like the place cards above, simply remove the cling to change up the look whenever you want.

So, be honest – did you ever think to use window clings this way? Give me other ideas for using these, too! I love to hear from you in the comments!

Filed Under: Crafts

Dollar Tree Candy Cane Wreath: DIY Christmas Wreath

October 26, 2022 by Bre 7 Comments

Dollar Tree wreath forms and socks are turned into an adorable candy cane wreath!

If you’re looking for a simple, cute, and easy Christmas wreath or Christmas door hanger project, look no further! This DIY Dollar Tree Candy Cane Wreath holiday decor checks all the boxes.

Learn how to make a Dollar Tree candy cane wreath to dress up your front door this Christmas!

This post contains affiliate links. For more information, please read my full disclosure policy.

My favorite part about this project is that it uses a totally unexpected supply: socks! Yes, socks. Can you believe it?

This is not your typical wreath made out of candy canes!

The minute I spotted these red and white striped cozy socks at Dollar Tree, I knew exactly what to make with them.

And I’m excited to show you just how to use them, too! (Unless you want to wear them as socks. No tutorial here for that. Wink wink.)

DIY Candy Cane Wreath Supplies

Here are the supplies I used to make this candy cane wreath as shown in this post. Feel free to substitute anything to make this project your own!

Note that most of the linked Dollar Tree items are available to order online in bulk quantities only. That’s wonderful if you’re making this project with a group or for a craft night, for example. If not, it’s probably best to purchase these items in-store.

  • Two Dollar Tree metal candy cane wreath forms. (Yep, Dollar Tree sells more than just circle wreath forms! If you can’t find the wreath form, you can buy their tinsel candy cane decor, remove the tinsel, and use the base as your wreath form)
  • One pair of Snugadoo red and white stripe cozy socks
  • One stem of frosted greenery
  • Two Christmas greenery picks with pinecones (linked are similar)
  • Wide burlap ribbon
  • Floral wire
  • Hot glue sticks and hot glue gun
  • Ornament (I used an old ornament. Linked ornaments are just cute.)
  • Twine or ribbon
  • Scissors
  • Optional: needle with large opening

DIY Dollar Tree Candy Cane Wreath Instructions

This Christmas craft comes together so effortlessly that I know you’re going to love it!

Step One: Cover the Wreath Forms with Socks

Start by sliding one sock over one of the candy cane wreath forms. I started at the curved tip of the candy cane so that the toe of the sock was at that end, and the open part of the sock was at the bottom of the candy cane.

Take the next candy cane wreath form and flip it over. Then, repeat the process of putting the wreath form in the sock.

Use Dollar Tree's candy cane wreath forms and plush socks to make an adorable DIY candy cane wreath.

The socks are a little bit wider than the wreath forms – especially at the top curved part (where the foot would go in the socks).

To deal with that, flip over each of the candy canes and use hot glue to fold over and press down the extra fabric.

Then, hot glue the bottoms of the socks together. (Well, actually, it would be the top of the socks if you were putting them on your feet!)

Check Out These Other Dollar Tree Christmas Crafts!

DIY Snow Globe Candle

DIY Stacked Presents Decor

DIY Fake Snowballs

Step Two: Add the Embellishments

Next, place hot glue in the middle front of one of the candy canes, and press them together so they’re criss-crossed.

Wrap burlap ribbon around the candy canes OR cinch a piece of ribbon with floral wire and attach it to the candy canes.

Then attach greenery stems to the ribbon – also with floral wire.

Dollar Tree supplies like the candy cane wreath form and striped socks come together to make an adorable DIY Christmas wreath.

Attach a cute ornament with twine or floral wire. Bonus points if you find one that’s candy cane-related!

Add embellishments like faux greenery and a Christmas ornament to make this candy cane wreath special.

Step Three: Add a Wreath Hanger

Finally, thread a needle with twine or embroidery floss, and create a loop at the top of the candy canes so that you can hang this festive candy cane wreath on your door!

Learn how to make a DIY candy cane wreath with Dollar Tree supplies! This blog post teaches you everything you need to know.

I swear, these striped socks were just screaming to be saved from being on someone’s stinky feet!

Pretty greenery and an ornament dress up a dollar store DIY wreath.

Let me know what you think of this project! Is this one of the cutest DIY candy cane wreaths you’ve seen? If not, fill me in on those other candy cane decorations ideas you’ve spotted!

I love to hear from you in the comments and on my social media!

Filed Under: Christmas, Dollar Tree

  • « Go to Previous Page
  • Page 1
  • Page 2
  • Page 3
  • Page 4
  • Interim pages omitted …
  • Page 21
  • Go to Next Page »

Primary Sidebar

Let’s Connect!

Hi, I’m Bre! Thanks for visiting Average But Inspired, where I show you how to work with what you’ve got to create a home you love.

Bre of Average But Inspired - a DIY and craft blog

Love DIY? Subscribe to Get Posts E-mailed!

How Can I Help You?

blank

How to Paint a Countertop to Look Like Marble!

blank

How to Paint a Door to Look Like Wood (It’s Easier Than You Think!)

blank

How to Create a Faux Antique Brass Finish with Paint

blank

My DIY Kitchen Makeover Reveal!

Looking for Something?

Copyright © 2013-2022, Bre Eggert (Average But Inspired). All rights reserved.
  • Home
  • DIY
  • Crafts
  • Home Decor
  • Privacy Policy and Copyright Policy
  • Disclosures
  • Contact Me