• Skip to primary navigation
  • Skip to main content
  • Skip to primary sidebar
Average But Inspired logo - DIY and craft

Average But Inspired

Craft a home you love. DIY and craft tutorials.

  • About
    • Contact Me
    • Disclosures
    • Privacy Policy and Copyright Policy
  • DIY
    • Furniture
  • Crafts
    • Dollar Store Crafts
    • Seasonal
      • Patriotic & Summer
      • Valentine’s Day
      • Easter & Spring
      • Fall & Halloween
      • Christmas & Winter
  • Home Decor
    • Organization
  • Shop
    • DIY Swag
    • DIY Guides
  • Home

Dollar Tree

How to Make a Modern Metal Wreath

January 21, 2019 by Bre 2 Comments

Admittedly my decor style is not modern (I gravitate more toward vintage looks), but something about the simplicity of modern decor elements appeals to me – especially after the excess of the holidays!  So this DIY Modern Metal Wreath is a perfect decor craft for this time of year, and one that can easily be modified for any other time of year, too!  You won't believe how easy it is to make a modern metal wreath! You only need a few inexpensive supplies to create this pretty wreath for your home decor. #valentinewreathdiy #wreathdiy #dollarstorediy #dollarstoredecor #dollarstorecrafts

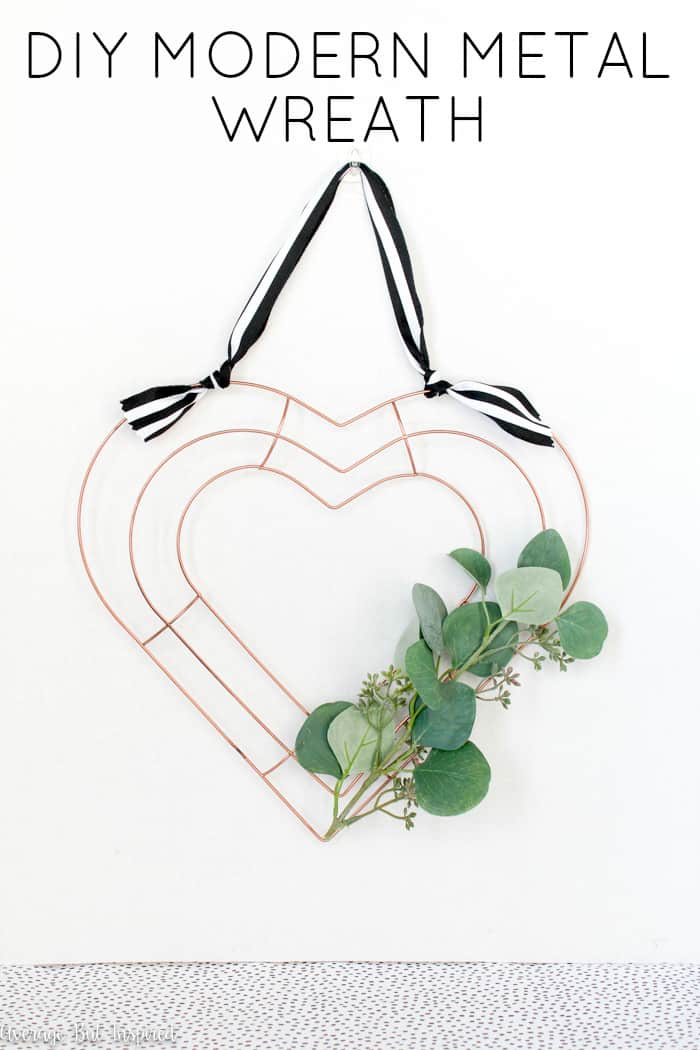
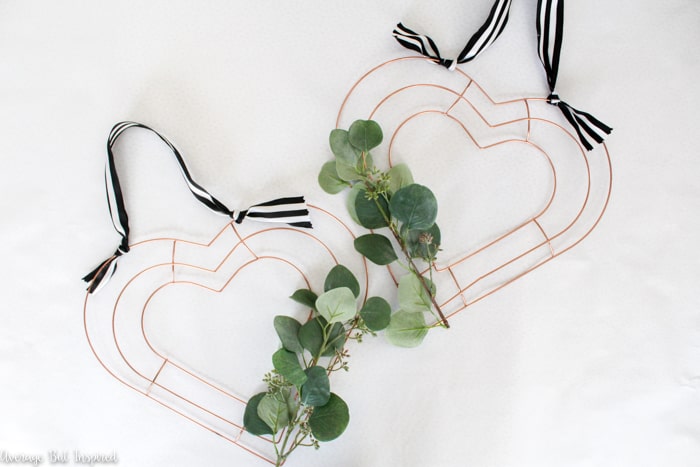
In this post I created modern metal Valentine’s Day wreaths, but round wreath forms can be used if you don’t want a heart-shaped wreath!

Supplies Needed to Make a Modern Metal Wreath

This post contains affiliate links.  To read my full disclosure policy, please click here.

  • Metal wreath form (I bought my heart shaped wreath forms at Dollar Tree, but they are also available here.)
  • Metallic spray paint
  • Faux greenery (I used faux eucalyptus)
  • Floral wire
  • Hot glue and glue gun
  • Ribbon

You won't believe how easy it is to make a modern metal wreath! You only need a few inexpensive supplies to create this pretty wreath for your home decor. #valentinewreathdiy #wreathdiy #dollarstorediy #dollarstoredecor #dollarstorecrafts

How to Make a Modern Metal Wreath

Begin by spray painting the metal wreath form in the color of your choice.  If you’re going for a modern look, I think gold, rose gold, or copper (like I used), will look great!  I spray painted my wreath forms in the middle of winter by putting them on a piece of cardboard, spraying them outside, and then running back inside with them super fast so they could dry inside!  Desperate times call for desperate measures!You won't believe how easy it is to make a modern metal wreath! You only need a few inexpensive supplies to create this pretty wreath for your home decor. #valentinewreathdiy #wreathdiy #dollarstorediy #dollarstoredecor #dollarstorecrafts

After the spray paint dried, I attached faux eucalyptus to the wreath forms with floral wire. You won't believe how easy it is to make a modern metal wreath! You only need a few inexpensive supplies to create this pretty wreath for your home decor. #valentinewreathdiy #wreathdiy #dollarstorediy #dollarstoredecor #dollarstorecrafts

Because there isn’t a lot for the wire to attach to, I reinforced the eucalyptus attachments with hot glue.  You won't believe how easy it is to make a modern metal wreath! You only need a few inexpensive supplies to create this pretty wreath for your home decor. #valentinewreathdiy #wreathdiy #dollarstorediy #dollarstoredecor #dollarstorecrafts

Finally, I tied modern black and white stripe ribbon at the top so that the wreaths could hang easily (and look cute)!  You won't believe how easy it is to make a modern metal wreath! You only need a few inexpensive supplies to create this pretty wreath for your home decor. #valentinewreathdiy #wreathdiy #dollarstorediy #dollarstoredecor #dollarstorecrafts

That is it!!  So super easy to turn a cheap wreath form into a modern wreath for your home!  You won't believe how easy it is to make a modern metal wreath! You only need a few inexpensive supplies to create this pretty wreath for your home decor. #valentinewreathdiy #wreathdiy #dollarstorediy #dollarstoredecor #dollarstorecrafts

You won't believe how easy it is to make a modern metal wreath! You only need a few inexpensive supplies to create this pretty wreath for your home decor. #valentinewreathdiy #wreathdiy #dollarstorediy #dollarstoredecor #dollarstorecrafts

Wouldn’t these heart-shaped wreaths be cute as wedding decor, too?  (I totally have weddings on the brain since we’re knee deep in my sister’s wedding planning!)

You won't believe how easy it is to make a modern metal wreath! You only need a few inexpensive supplies to create this pretty wreath for your home decor. #valentinewreathdiy #wreathdiy #dollarstorediy #dollarstoredecor #dollarstorecrafts

Let me know what you think of this easy way to use a wreath form in the comments below.  I love hearing from you!

-Bre


Filed Under: Crafts, Dollar Tree

Dollar Store Halloween Porch Decor

October 4, 2018 by Bre 7 Comments

blank

While I absolutely love Halloween, I’m not typically a big decorator for the holiday.  I’m not really sure why – it is what it is.  But this year is different because my kids (ages 6 and 8) insisted that we “go all out” and make our house the spookiest on the block.  They wanted to spend my entire life’s savings on Halloween decorations, so I had to rein them in and take them to Dollar Tree to get their fix.

We put up their decorations over the weekend and I’m happy to share their vision** with you!  (**Everything you see is what they picked out.  My version of a Halloween porch would have looked a lot different!  It was hard to let them drive this bus, but I’m glad they got a chance to express their creativity and vision for a Halloween porch.)

This Halloween porch is filled with dollar store items! Check out the post to see how to use dollar store Halloween decorations to deck out your home for Halloween.

The caution tape was a big hit with my kids.  I think we bought four different types.  Currently only two are displayed on our porch (wrapped around the mum planters and along one of the sidelights), but I’ve been told that the others will definitely be going up for Halloween night.

Planters wrapped in caution tape are a great Halloween decorating idea!

This “creepy” skeleton dude is the splurge item on the porch.  Press his hand and his eyes glow red and he says all kinds of weird stuff to you (REALLY LOUDLY).  The kids were lucky they caught me in a generous moment during one of our Home Depot trips.  🙂

This post is filled with ideas for decorating your porch for Halloween with dollar store items!

The planters are my favorite part of the porch.  They’re filled with lots of random Dollar Tree finds, but it kind of works!

Fill an outdoor planter with dollar store Halloween decorations for a spooky look on your front porch! This Halloween front porch has lots of budget-friendly ideas!

I mean, when doesn’t a skull look good next to your front door?Fill an outdoor planter with dollar store Halloween decorations for a spooky outdoor Halloween display! This post has lots of good dollar store Halloween decor ideas!Glittered skulls in an outdoor lantern are a fabulous way to decorate for Halloween! These dollar store Halloween porch decor ideas are not to be missed!

Now this doormat combo is a huge point of contention with my kids.  My mom gave me this personalized pumpkin doormat earlier this fall and I love it.  The kids say it’s too cute.  They want it gone.  What do you think?  Should it stay or should it go?Layered doormats make a beautiful statement at the front door.

Well, that’s the end of my Halloween front porch tour.  My porch is so tiny that there’s not much to see!  I hope you enjoyed seeing my kids’ handiwork.  Stop by on Halloween night for some candy!

This Halloween front porch is filled with dollar store Halloween decorations. See how to decorate your Halloween porch on a budget!

Filed Under: Dollar Tree, Fall and Halloween, Holiday

DIY Dollar Tree Pumpkin Picture Frames

September 19, 2018 by Bre 2 Comments

blank

Fall is my favorite season for Dollar Tree crafts and makeovers, so when I saw their fresh crop of fall arrivals, I suddenly felt inspired to get dollar store crafty. (You might like my Dollar Tree Pumpkin Sign Project or Candy Corn Topiary, too!) 

I purchased a couple of their fall pumpkin chipboard decorations (NOTE: even though this post was written in 2018, Dollar Tree currently has these same decorations in the 2021 season and I linked them in the supply list!), and knew I could turn them into something cuter and more personal – DIY pumpkin picture frames, to be precise! 

So cute! Transform Dollar Tree pumpkin decorations into adorable pumpkin picture frames that are perfect for displaying fall photos! #dollartree #dollartreecrafts #dollartreedecor #fallcrafts

Supplies Needed to Create Dollar Tree Fall Pumpkin Picture Frames

  • Chipboard pumpkin decorations from Dollar Tree
  • Acrylic paints in colors of your choice (I used cream, beige, and orange)
  • Paint brushes
  • Dollar Tree fall ribbon
  • Scissors
  • Twine
  • Raffia
  • Hot glue gun and hot glue

How to Create Dollar Tree Fall Pumpkin Picture Frames

Begin by ripping off the decorative accent portions of the chipboard pumpkins (for example, the raffia and the chipboard flower and/or pumpkin).  Once those are off, rip off the printed layer of the chipboard.  This came off easily!  

So cute! Transform Dollar Tree pumpkin decorations into adorable pumpkin picture frames that are perfect for displaying fall photos! #dollartree #dollartreecrafts #dollartreedecor #fallcrafts

Next, paint the pumpkins whatever color you like.  I went for a white pumpkin look, so I used a cream acrylic paint and then added some beige lines to give the pumpkins a bit of dimension.  I then painted the stand portion of the project orange.  

So cute! Transform Dollar Tree pumpkin decorations into adorable pumpkin picture frames that are perfect for displaying fall photos! #dollartree #dollartreecrafts #dollartreedecor #fallcrafts

After the paint dried, I tied ribbon and raffia around the top of each pumpkin for some cute detail and color.  

So cute! Transform Dollar Tree pumpkin decorations into adorable pumpkin picture frames that are perfect for displaying fall photos! #dollartree #dollartreecrafts #dollartreedecor #fallcrafts

Then I wrapped twine around the top and bottom portions of each pumpkin and hot glued it to the back of each pumpkin.  

So cute! Transform Dollar Tree pumpkin decorations into adorable pumpkin picture frames that are perfect for displaying fall photos! #dollartree #dollartreecrafts #dollartreedecor #fallcrafts

When the hot glue dried, the pumpkin frames looked like this.  

So cute! Transform Dollar Tree pumpkin decorations into adorable pumpkin picture frames that are perfect for displaying fall photos! #dollartree #dollartreecrafts #dollartreedecor #fallcrafts

Super cute, but even cuter once I added pictures of my kids at the pumpkin patch, and my dog posing with a pumpkin.  

So cute! Transform Dollar Tree pumpkin decorations into adorable pumpkin picture frames that are perfect for displaying fall photos! #dollartree #dollartreecrafts #dollartreedecor #fallcrafts

The twine holds the photos in place, and these little Dollar Tree pumpkin frames are the perfect spot to display fall themed photos!  

So cute! Transform Dollar Tree pumpkin decorations into adorable pumpkin picture frames that are perfect for displaying fall photos! #dollartree #dollartreecrafts #dollartreedecor #fallcrafts

It doesn’t get much easier than this, so I’d appreciate it if you would pin this project on Pinterest to help others find it!  So cute! Transform Dollar Tree pumpkin decorations into adorable pumpkin picture frames that are perfect for displaying fall photos! #dollartree #dollartreecrafts #dollartreedecor #fallcrafts

Will you be heading to Dollar Tree to find some of these chipboard pumpkins to transform into pumpkin picture frames?

Filed Under: Crafts, Dollar Tree, Fall and Halloween, Holiday

The Easiest DIY Trinket Dish Ever

March 28, 2018 by Bre 27 Comments

blank

Trinket dishes are one of my favorite additions to my home decor because they’re SO useful (hello, great place to keep rings and jewelry, and catch-all for random tiny things!), and because they can be so darn cute! 

I have them near every sink that I use regularly and in other spots like on my dresser.  I decided to try my hand at a DIY Trinket Dish recently and had so much fun making this quick and easy but oh-so-darling craft, that I couldn’t wait to share it with you!  

This has to be the easiest DIY trinket dish ever! With a few simple and inexpensive supplies, you can make an adorable trinket dish to store your jewelry and other treasures. A perfect ladies' craft night project or quick weekend craft - this is a project everyone can do!

Not only is this DIY Trinket Dish cute, but it is so useful!  The best part is that it was very quick to make and required only a few inexpensive supplies.

Supplies Needed for a DIY Trinket Dish

Some of these links are affiliate links.  To read my full disclosure policy, please click here.

    • Porcelain soap dish or small bowl
    • Pretty paper napkins 
    • Mod Podge
    • Scissors
    • Paintbrush  

This has to be the easiest DIY trinket dish ever! With a few simple and inexpensive supplies, you can make an adorable trinket dish to store your jewelry and other treasures. A perfect ladies' craft night project or quick weekend craft - this is a project everyone can do!

How to Make a DIY Trinket Dish

You’ll love making this project!

DIY Trinket Dish Step One: Cut Up the Napkin

Begin by cutting apart a paper napkin with whatever elements of the design you want to use on the trinket dish.  You can see I tried to cut as close to the printed design as I could – leaving off as much white space around the design as possible.

This has to be the easiest DIY trinket dish ever! With a few simple and inexpensive supplies, you can make an adorable trinket dish to store your jewelry and other treasures. A perfect ladies' craft night project or quick weekend craft - this is a project everyone can do!

Next, make sure to remove the second layer of the paper napkin.  All you want for this project is the top, printed layer of the design!

Step Two: Mod Podge the Dish

Once you’ve done that, spread a thin layer of Mod Podge onto the part of the soap dish or bowl where you’ll be placing your napkin pieces.  You should probably only do a little part of the dish at a time to prevent the Mod Podge from drying before you’ve placed anything there.

This has to be the easiest DIY trinket dish ever! With a few simple and inexpensive supplies, you can make an adorable trinket dish to store your jewelry and other treasures. A perfect ladies' craft night project or quick weekend craft - this is a project everyone can do!

Step Three: Lay Down the Napkins

Gently place the napkin pieces where you want them and make sure to gently smooth the pieces down to remove any ripples.  Be careful not to rip the napkin!  

This has to be the easiest DIY trinket dish ever! With a few simple and inexpensive supplies, you can make an adorable trinket dish to store your jewelry and other treasures. A perfect ladies' craft night project or quick weekend craft - this is a project everyone can do!

Once you have the soap dish or bowl decorated just how you like it, let the pieces dry. 

Step Four: Topcoat with Mod Podge

After about twenty minutes/when everything is dry, cover the entire dish with another coat of Mod Podge.  It will look funky for a little bit, but it will dry clear!

This has to be the easiest DIY trinket dish ever! With a few simple and inexpensive supplies, you can make an adorable trinket dish to store your jewelry and other treasures. A perfect ladies' craft night project or quick weekend craft - this is a project everyone can do!

Once the Mod Podge is completely dry, the white parts of the napkin blend in with the dish, and the printed design looks like it’s printed or painted right on there!  

This has to be the easiest DIY trinket dish ever! With a few simple and inexpensive supplies, you can make an adorable trinket dish to store your jewelry and other treasures. A perfect ladies' craft night project or quick weekend craft - this is a project everyone can do!

If you’re not careful to remove the second layer of the napkin though, it won’t look as good!  I accidentally left the second layer on that green leaf on the side of the trinket dish (pictured below), and you can absolutely see the white around the leaf.  Bummer!  Oh well, the name of this blog is Average But Inspired – not Perfect But Inspired.  😉

This has to be the easiest DIY trinket dish ever! With a few simple and inexpensive supplies, you can make an adorable trinket dish to store your jewelry and other treasures. A perfect ladies' craft night project or quick weekend craft - this is a project everyone can do!

Wouldn’t this make a fun ladies’ craft night project with your friends?  Anybody can do this and it’s so inexpensive!  Get that on the calendar!  You’ll be glad to spend time with your friends and walk away with a cute place to put your jewelry and trinkets.

This has to be the easiest DIY trinket dish ever! With a few simple and inexpensive supplies, you can make an adorable trinket dish to store your jewelry and other treasures. A perfect ladies' craft night project or quick weekend craft - this is a project everyone can do!

-Bre

Filed Under: Crafts, Dollar Tree, Homepage Crafts

Dollar Store DIY Salt and Pepper Shaker Bud Vases

February 13, 2018 by Bre 2 Comments

blank

Two of my favorite things are using things in unintended ways and making budget-friendly projects that look great despite being cheap!  These Salt and Pepper Bud Vases check both of those boxes, and this is probably one of the easiest projects you’ll ever find!

{Video Tutorial!} Transform dollar store salt and pepper shakers into adorable bud vases! This tutorial shows you how to make this dollar store craft in no time! Plus, it's very affordable. Great for cheap baby shower or wedding shower decor, or home decor! #dollarstorecrafts #upcycle

Now listen, I’ve been working really hard on improving my video-making skills, so I made a video to show you how to make this project instead of doing the typical step-by-step photos!  Since it’s the easiest thing ever, I’ve giving you the supply list here and then you can watch the video to see how to put this together.

Brilliant! Learn how easy it is to transform dollar store salt & pepper shakers into adorable bud vases that are perfect for home decor, party decor, and more! So inexpensive and pretty.

Supplies Needed for Salt and Pepper Shaker Bud Vases

  • Salt and pepper shakers (I got these at Dollar Tree)
  • Faux florals (or real) – I got my stem at Dollar Tree
  • Chalky finish paint
  • Raffia (I got it at Dollar Tree)
  • Paint brush
  • Cutter for floral stem

Video Tutorial – How to Make Salt and Pepper Shaker Bud Vases

OK, so watch this video and you’ll see just how easy this project is!


These would be super cute as table decor at a baby shower or Easter brunch, don’t you think?  Or maybe to brighten up a bathroom window sill or a nightstand?  There are so many ways you can use these and customize them!

I’ll be bringing one to my next door neighbor.  She’s 101 years old and could probably use a little bit of spring right about now!

If you liked this project, would you please pin this post so others can find it?  {Video Tutorial!} Transform dollar store salt and pepper shakers into adorable bud vases! This tutorial shows you how to make this dollar store craft in no time! Plus, it's very affordable. Great for cheap baby shower or wedding shower decor, or home decor! #dollarstorecrafts #upcycle

-Bre

You Might Like This Project, Too!

blank

Filed Under: Crafts, Dollar Tree

The Best Dollar Tree Party Supplies (and which ones to skip!)

February 7, 2018 by Bre 9 Comments

blank

While I’m not a party animal, I like to host a nice gathering every once in a while.  Because I believe you can throw an awesome party on a small budget (see my tips for hosting a party on a budget), I thought I should share my thoughts on the best Dollar Tree party supplies and what to avoid!  If you're planning a party, you need to see this list of the best Dollar Tree party supplies! Not only does it tell you what to buy to save money, it tells you what to skip! It's a must have for any party planning! #dollartree #partydecor

Budget-friendly party supplies are an important part of any party, because the more you save on these items, the more money you’ll have for really important things like food and beverages!

Best Dollar Tree Party Supply No 1: Serving Trays and Serving Utensils

If you need disposable serving items for the party you’re hosting, definitely get them at Dollar Tree.  They have high-quality and sturdy trays in clear plastic, colors, and silver finish.

They also have large serving utensils, both disposable and not, which I learned at Thanksgiving you can never have enough of! (My grandma reminded me of that about 100 times!)

If you're planning a party, you need to see this list of the best party supplies to buy at Dollar Tree! Not only does it tell you what to buy to save money, it tells you what to skip! It's a must have for any party planning! #dollartree #partydecor

Sidenote: those silver trays are great for craft projects, too, like the Chalkboard Wreath I created last fall!

I’ll warn you that I do not love Dollar Tree’s plastic utensils, however!  They’re very flimsy (ESPECIALLY the colored utensils), and don’t work well.  I do not recommend those for your party.

If you're planning a party, you need to see this list of the best party supplies to buy at Dollar Tree! Not only does it tell you what to buy to save money, it tells you what to skip! It's a must have for any party planning! #dollartree #partydecor

Best Party Supply No. 2: Candles

If you plan to add a little ambiance to your party and need candles, get your tealights, votives, and tapers at Dollar Tree!  They come in multi-packs, making them very affordable.

Dollar Tree also has a wide selection of battery-operated flameless candles, but those aren’t my favorite.  They’ll do in a pinch, but I find that the batteries don’t last long and they sometimes have a strange color “flame.”

If you're planning a party, you need to see this list of the best party supplies to buy at Dollar Tree! Not only does it tell you what to buy to save money, it tells you what to skip! It's a must have for any party planning! #dollartree #partydecor

Dollar Tree also has candles in the shapes of numbers if you need that for a birthday cake!

Party Planner Pro is a digital party planning tool that will help you stay on track and organized while planning any party!

Best Dollar Tree Party Supply No. 3: Favor Bags and Gift Bags

Ever since I discovered Dollar Tree’s gift bags, I rarely purchase them elsewhere.  They have SO many colors and designs that you’ll definitely find something you like.

I love to use their solid color bags as party favor bags for kids parties, and embellish them with stickers or ribbon that fits the theme of the party.  Because the solid bags come in multi-packs, they’re very kind to your party budget!

If you're planning a party, you need to see this list of the best party supplies to buy at Dollar Tree! Not only does it tell you what to buy to save money, it tells you what to skip! It's a must have for any party planning! #dollartree #partydecor

Best Party Supply No. 4: Balloons

If you need helium balloons for your celebration, this is the place to get them.  Typically, helium balloons cost around $4 at party stores, but they’re just $1.25 at Dollar Tree!

If you're planning a party, you need to see this list of the best party supplies to buy at Dollar Tree! Not only does it tell you what to buy to save money, it tells you what to skip! It's a must have for any party planning! #dollartree #partydecor

I even like to buy the plain mylar balloons and decorate with stickers or washi tape.  That way you can really personalize the look to fit your theme or decor, like I did for my mom’s Kate Spade-themed birthday party!

If you're planning a party, you need to see this list of the best party supplies to buy at Dollar Tree! Not only does it tell you what to buy to save money, it tells you what to skip! It's a must have for any party planning! #dollartree #partydecor

Best Dollar Tree Party Supply No. 5: Vases

If vases for centerpieces or party decor are on your list, Dollar Tree is the place to get them!  They have so many shapes and sizes of plain glass vases that you’re bound to find what you need.

If you're planning a party, you need to see this list of the best party supplies to buy at Dollar Tree! Not only does it tell you what to buy to save money, it tells you what to skip! It's a must have for any party planning! #dollartree #partydecor

Best Supply No. 6: Streamers or Crepe Paper

Streamers are such a fun party supply because you can do so many things with them, in addition to hanging them from the walls!  Search for crepe paper streamer ideas on Pinterest and you’ll be blown away!

Streamers come in 2-packs at Dollar Tree, making them very affordable.

If you're planning a party, you need to see this list of the best party supplies to buy at Dollar Tree! Not only does it tell you what to buy to save money, it tells you what to skip! It's a must have for any party planning! #dollartree #partydecor

Any party I host would not be properly planned without a trip to Dollar Tree.  I can always get a lot crossed off my shopping list and at a great price!

If you have any items you think should be added to my list, please let me know in the comments below!  I’d love to hear from you.

-Bre

Filed Under: Dollar Tree, Entertaining, Holiday

  • « Go to Previous Page
  • Page 1
  • Interim pages omitted …
  • Page 3
  • Page 4
  • Page 5
  • Page 6
  • Page 7
  • Page 8
  • Go to Next Page »

Primary Sidebar

Let’s Connect!

Hi, I’m Bre! Thanks for visiting Average But Inspired, where I show you how to work with what you’ve got to create a home you love.

Bre of Average But Inspired - a DIY and craft blog

Love DIY? Subscribe to Get Posts E-mailed!

How Can I Help You?

blank

How to Create a Faux Antique Brass Finish with Paint

blank

How to Paint Over Tile

blank

How to Paint a Door to Look Like Wood (It’s Easier Than You Think!)

blank

How to Paint a Countertop to Look Like Marble!

Looking for Something?

Copyright © 2013-2022, Bre Eggert (Average But Inspired). All rights reserved.
  • Home
  • DIY
  • Crafts
  • Home Decor
  • Privacy Policy and Copyright Policy
  • Disclosures
  • Contact Me