• Skip to primary navigation
  • Skip to main content
  • Skip to primary sidebar
Average But Inspired logo - DIY and craft

Average But Inspired

Craft a home you love. DIY and craft tutorials.

  • About
    • Contact Me
    • Disclosures
    • Privacy Policy and Copyright Policy
  • DIY
    • Furniture
  • Crafts
    • Dollar Store Crafts
    • Seasonal
      • Patriotic & Summer
      • Valentine’s Day
      • Easter & Spring
      • Fall & Halloween
      • Christmas & Winter
  • Home Decor
    • Organization
  • Shop
    • DIY Swag
    • DIY Guides
  • Home

Crafts

Sponge Painting Terracotta Pots

March 3, 2021 by Bre 2 Comments

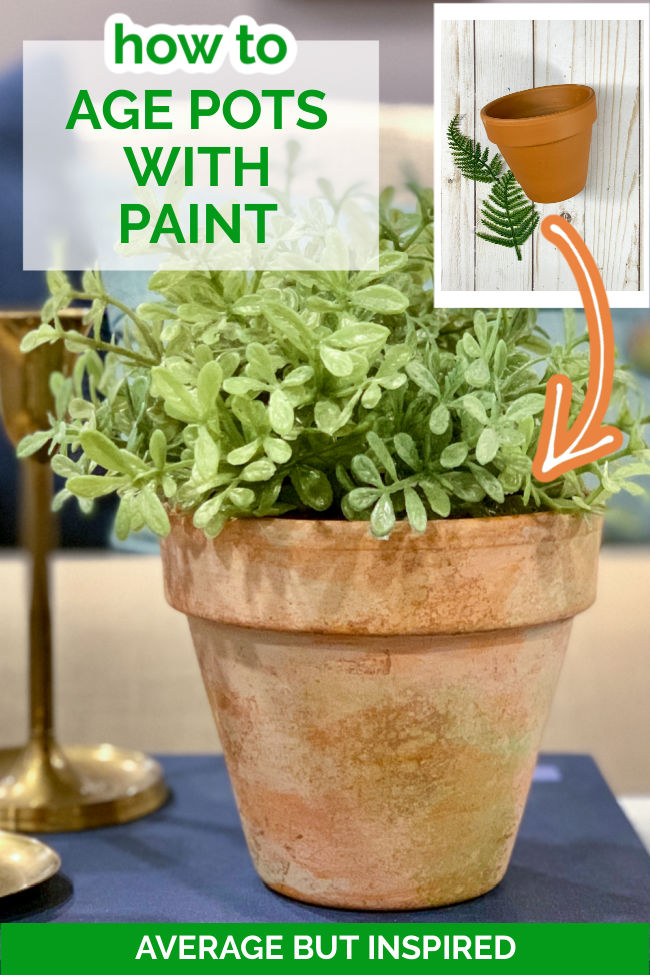
There’s something charming about aged terracotta flower pots.  Layers of color and hairline cracks evoke memories of seasons past spent digging in the dirt and watching the fruits of your labor bloom.  When you don’t have old pots lying around, sponge painting terracotta pots is a really easy way to get that authentically vintage look.

This is great! Learn how to age new terracotta pots with paint. You can make them look old with a simple sponge painting technique.

The good news about this method of making new terracotta pots look old is that the imperfections are part of the beauty.  Because of this, even a novice painter or crafter can paint these pots and get a convincingly aged finish!

This post contains affiliate links.  To read my full disclosure policy, please click here.

What kind of paint do you use on terracotta pots?

To paint a terracotta pot to look old, you should use matte paint.

Glossy paint or satin paint will be too shiny and will not give an authentically-aged look.  Think about the old pots that you have seen before: is the dirt shiny?  Is the moss shiny?  No way!

It's easy to sponge paint terracotta pots and make them look old. Learn this easy aging technique and give new pots that vintage charm.

Because a matte finish is best, chalk paint works great when painting terracotta pots to look old.  Matte acrylic craft paints also work well.

Do you need to seal painted terracotta pots?

The answer to whether you need to seal painted terracotta pots is “it depends.”  Helpful, huh?

Because I’m teaching you how to sponge paint terracotta pots to look old, I do not think you need to seal the painted pots.  Any changes to the painted finish will add to the aged look and character of the flower pots.  

Should you decide to seal the painted aged pot, use a matte sealer like a spray polycrylic to keep that matte look going strong!

If you’re painting flower pots in a different style and want to maintain the precise look you’ve achieved, then you should probably seal the painted pots.  

How do you sponge paint terracotta pots to make them look old?

I know you’re going to love this faux finish technique for painting terracotta pots to make them look old.  It’s so incredibly easy, and it’s similar to the technique I used to antique a mirror from the front side. 

Read or print the project steps below, and watch my video on how to age terracotta pots with paint for even more help!

How to Sponge Paint Terracotta Pots

How to Sponge Paint Terracotta Pots

Yield: 1
Active Time: 10 minutes
Additional Time: 10 minutes
Total Time: 20 minutes
Difficulty: Easy

Sponge painting terracotta pots to look old is the easiest way to age new pots. This is an easy faux finish technique that any level of crafter or DIY'er can do.

Materials

  • Terracotta pot
  • Brown paint (matte)
  • Cream paint (matte)
  • Green paint (matte)
  • Sponge
  • Paint brush
  • Water
  • Paper towel

Instructions

  1. Make sure that the new flower pot doesn't have any stickers or residue on it. Once it's clean, it's ready for painting.
  2. Apply brown paint to a sponge (or part of a sponge like I used). Press the paint-covered sponge onto a surface (like a paper plate), to remove extra paint.
  3. Dab the sponge all over the terracotta flower pot. Use a sponge to dab brown paint on a new terracotta pot. This is a way to make terracotta pots look old with paint.
  4. Once the paint has dried, load a paintbrush with watered-down cream-colored paint. Brush the paint all over the flower pot. Use a paint brush to add cream paint all over the terracotta pot.
  5. Working quickly so the paint doesn't dry, use a paper towel or paper napkin to dab off much of the paint. This will allow the brown paint to show through and create a layered effect. Use a paper towel to remove much of the wet cream-colored paint.
  6. When that layer of paint has dried, use a sponge to apply bits of green paint on random spots of the terracotta pot. Do not put green paint all over. The point of this green paint application is to look like mossy spots on portions of the flower pot. Add bits of green sponge paint detailing to the terracotta pot to look like moss.
  7. After the paint has dried, you may choose to seal it, if desired.

Notes

To speed up the drying process in between coats of paint, use a hairdryer on a low heat setting.

© Bre
Project Type: Home Decor / Category: Crafts
blank
 

-Bre

Filed Under: Crafts

Dollar Tree House Valentine’s Day DIY

January 19, 2021 by Bre Leave a Comment

blank

If you follow any Dollar Tree crafters on Instagram or YouTube, you know that the Dollar Tree house is one of the most popular crafting items around!

blank

Only available in-store and online once in awhile, these cute wooden houses are the perfect craft blanks to update for any style of decor or season!  I gave my Dollar Tree house an adorable new look for Valentine’s Day and turned it into a Love Shack!

I’ve had the Love Shack song stuck in my head for weeks now – ha!

Dollar Tree House “Love Shack” Supplies

This post contains affiliate links.  To read my full disclosure policy, please click here.

These are the supplies I used to create this project.  Feel free to modify anything you like to create a custom look of your own!

  • Dollar Tree wooden house
  • Scrapbook paper in patterns and colors of your choice
  • Hot glue gun (and glue)
  • Letter stickers
  • Colored baker’s twine

How to Make a Dollar Tree Wood House Into a Valentine’s Day Love Shack

This process is so easy, and I’ve also put together a video to show you the basic process!

Step One: Line the House 

First things first, upgrade the Dollar Tree house’s printed backing!  While it is cute, adding scrapbook paper in a pattern of your choice makes it even cuter and more personal!

Simply trace the outline of the house onto scrapbook paper, and then cut and trim to fit inside the wooden house.  This will likely take you several times of trimming to get it just right – don’t get discouraged!

Once cut, press it into the house.  You can secure it with double-sided tape if necessary.

Line a Dollar Tree house with scrapbook paper.

Step Two: Wrap the House with Bakers Twine

Next, place a small dot of hot glue on the back of the house, and press the end of a long piece of baker’s twine onto that hot glue.

Wrap the twine around the base of the house multiple times – criss-crossing the twine as you go.

Wrap baker's twine around the Dollar Tree house.

Glue the end of the baker’s twine down with another dot of hot glue.  Careful not to burn your fingers!

Step Three: Cut out Paper Hearts

Now, transport yourself back to preschool when you learned to cut symmetrical paper hearts by folding a piece of paper in half and cutting one side of the heart so that the fold is in the center.

Cut paper hearts from scrapbook paper in different shapes, sizes, and colors.

Cut many hearts in varying shapes, sizes, colors, and patterns.  This will give you a more interesting Love Shack when finished!

Step Four: Glue the Hearts to the Twine

Lay out the paper hearts in an interesting arrangement, and then hot glue them to the baker’s twine on the wooden house.

Hot glue paper hearts to the baker's twine to create the Love Shack Valentine's Day decoration.

Step Five:  Make a Placard with Stickers and Scrapbook Paper

Now, cut and layer scrapbook paper rectangles, and write a word or phrase with letter stickers.  

Fasten letter stickers to scrapbook paper to create a little sign for the Valentine's Day decor.

If you have a Cricut machine, you could cut vinyl letters instead!  (I LOVE my Cricut Joy, which is the smallest electronic cutting machine.)

Then, hot glue that placard to the Dollar Tree house.

Hot glue scrapbook paper with letter stickers onto the Dollar Tree house.

The Finished Dollar Tree House Valentine’s Day Love Shack

In just about fifteen minutes you have created the cutest little DIY Valentine’s Day decor!

Transform a Dollar Tree wooden house into a cute Valentine's Day decoration.

This little Love Shack makes me happy every time I look at it.  What does not make me happy is that I cannot stop hearing the B-52’s in my head all day!

If you like this project, too, I’d be grateful if you would “pin” this post to help others find it!

This is so cute! Turn a Dollar Tree house into the cutest little Love Shack for Valentine's Day! This Dollar Tree DIY for Valentine's Day is great for tiered trays, shelf styling, and more!

-Bre


Filed Under: Dollar Tree, Valentine's Day

How to Make Fake Snowballs for Decor

January 2, 2021 by Bre 8 Comments

blank

Learn to make your own fake snowballs for adorable winter decor!

With Christmas decorations packed away the house can feel stark!  Because of that, it’s fun to add some winter-themed decor to the mix. 

One great way to do that is to make fake snowballs for decor.  They’re easy to make, inexpensive, and look great in vases, jars, bowls – anywhere really!  They’re a beautiful winter vase filler.

This is so cute for winter decor! Learn to make fake snowballs - they look great as winter vase fillers, popped in a bowl, or displayed with some greenery for a seasonal touch.

Supplies Needed to Make Fake Snowballs

This post contains affiliate links.  To read my full disclosure policy, please click here.

To make DIY fake snowballs, you really only need three main supplies!  Many of the items can be purchased at the dollar store, or you can get them through the links I’m sharing here.

  • White floral foam balls in various sizes (I used three sizes)
  • Epsom salt
  • Mod Podge (any finish will work)
  • Mixing container and stir stick
  • Optional: latex gloves or rubber gloves
White floral foam balls form the base of DIY snowballs.

How to Make Fake Snowballs for Decor

Before you get started crafting up some beautiful snowballs, I highly recommend that you put on a pair of gloves!  This project is really messy, and I think you will not be happy if you’re not wearing gloves. 

I keep a large package of latex gloves on hand all the time (get it – ha!), because they’re invaluable when it comes to crafts & DIY!

Now that my warning is complete, let me show you how to do this!

Begin by mixing epsom salt and Mod Podge in some type of mixing container.  You can eyeball the amount – I probably did a little less epsom salt than Mod Podge.

Learn how to make fake snowballs for decor and crafts! With simple supplies you can make many of them very quickly!

Once those ingredients are mixed together, you need to work quickly because the epsom salt will start to absorb the Mod Podge!

Start rolling a foam ball into the epsom salt and Mod Podge mixture, coating the ball with the mixture.

As the mixture thickens, you will start pressing it onto the foam ball more so than rolling the ball in the mixture.  This will create lumps and texture, and that’s perfect!  

It's easy and fun to make fake snowballs. These snow balls can be used for winter decorations and more!

A snowball is not perfectly round, so you want this variation in texture and coverage.

When you have a good amount of mixture distributed around the foam ball, set it aside to dry, and repeat with the other foam balls.  

These should be dry and ready to display in a few hours, depending on the amount of Mod Podge you used and the humidity in the room.

Need some winter decor inspiration? Check out my Simple Winter Decor Ideas post!

Something important to note is that it is unlikely your entire foam ball will be covered with the epsom salt / Mod Podge mixture. There will be parts of foam ball still visible.  That is OK! 

Learn how to make fake snowballs for decor or crafts. It's very easy and makes for a wonderful winter decor accessory for any space!

Because the floral foam is white, it still gives the appearance of snow – especially when combined with the other parts that have the epsom salt / Mod Podge mixture.

blank

So what do you think?  Will you try making some fake snowballs for your winter decor this year?


Filed Under: Christmas, Crafts

Easy Dollar Store Hostess Gifts Customized with Cricut

October 15, 2020 by Bre Leave a Comment

blank

This is a sponsored post written by me on behalf of Cricut. All opinions are 100% mine.

Entertaining season will be here soon!  Though our celebrations are sure to be different this year, chances are we’ll all still have a need for a hostess gift or two (or maybe a neighbor gift, teacher gift, or co-worker gift!).  That’s why I’m excited to partner with Cricut to share two FAB-U-LESS dollar store hostess gifts that you can make with the new Cricut Joy machine and/or the Cricut EasyPress 2!

This is awesome! These dollar store hostess gifts are so special when customized with Cricut Joy electronic cutting and writing machine! Learn how to put together these budget-friendly hostess gifts, which also work as teacher gifts, holiday gifts, and more!

Before we jump into the step-by-step for making these dollar store hostess gifts, I need to tell you that if you do not own a Cricut electronic cutting and writing machine, you are missing out! 

Full disclosure: I was scared to jump on board with using a Cricut because I wrongly assumed it would be confusing, time-consuming, and too big for my small craft table.  I could not have been more wrong!  I regret not incorporating Cricut into my crafts sooner.  I know you’ll see why as you learn how to make these adorable gifts!  (If you already own a Cricut, can you believe how foolish I was?)

Dollar Store Hostess Gift #1: Customized Soap Set

For this first project, you will create a luxe-looking soap set that’s practical and pretty! 

This is a great dollar store hostess gift idea! Customize or personalize dollar store blanks with Cricut Joy to make a pretty soap set gift basket.

Supplies Used to Make The Dollar Store Customized Soap Set

This post contains affiliate links.  To read my full disclosure policy, please click here.

  • Plain soap tray (purchased at Dollar Tree)
  • Plain terrycloth hand towel (purchased at Dollar Tree)
  • Luxury hand soap (I chose Oatmeal & Lemon Verbena – purchased at Dollar Tree)
  • Cricut Joy electronic cutting and writing machine
  • Cricut Joy Smart Vinyl Matte Metallic Sampler, Elegance – Permanent
  • Cricut Joy Smart Iron-On Patterned Sampler, Nature Walk Basic
  • Cardstock
  • Cricut Joy LightGrip Mat
  • Cricut Starter Tool Set
  • Cricut Transfer Tape

Customize a dollar store soap tray, dollar store hand towel, and dollar store soap to make an awesome dollar store hostess gift!

How to Make the Dollar Store Customized Soap Set with Cricut

This dollar store hostess gift could not be easier to put together! I will walk you through each of the elements so you can see how quickly and inexpensively you can transform plain dollar store items to custom pieces!

Customize the Dollar Store Soap Tray

Begin by opening Cricut Design Space, which is the software or app on your computer or smart phone (yes – you can connect Cricut Joy to your phone and design from there!), and searching for “soap” in the projects tab on the left of the screen.  From there, select whichever soap image you like.  

One of the great things about Cricut Design Space is that you can purchase designs individually for a reasonable price, or you can get unlimited designs with a Cricut Access membership (which you can pay for monthly and cancel at any time!).  Once you see how versatile the Cricut products are (the Cricut Joy alone cuts over 50 materials!), you’ll be hooked and probably want the membership to save money on your projects and always have fresh designs!

Use designs in Cricut Design Space to customize dollar store items to create unique hostess gifts.

I chose an adorable image that reads “Fresh Soap & Water  Hand Towels Free” since this hostess gift also incorporates a hand towel.  #clever  

I clicked the image to add it to my design canvas, changed the dimensions of the design so that it would fit perfectly on the soap tray, and then sent it to my Cricut Joy (which connects to my computer (or phone) wirelessly via Bluetooth).  I did not have to think about ANYTHING – the program immediately told me what to do!  First, I loaded the Cricut Joy Smart Vinyl in gold into the machine.  Since this is a Cricut Joy Smart Vinyl product, I didn’t even need to use a mat underneath the vinyl!

Cricut Joy lets you easily customize dollar store items to create beautiful gifts!

The machine then ran a self-test to make sure I had the right blade loaded and to make sure I had enough vinyl to cut this design.  Foolproof!  Then it cut the design in a matter of seconds.

Weed the design cut by Cricut Joy prior to placing it on the soap tray.

Once I unloaded the vinyl with the cut design, I removed the parts that I didn’t want on the soap tray (the professional Cricut crafters call this “weeding.”).  I gently pulled off those parts with my fingers and with the helpful Cricut weeding tools that come in the Starter Tool Set.

Add a "fresh soap & water" vinyl design cut on Cricut Joy to a dollar store soap tray to create a wonderful hostess gift.

Then I transferred the vinyl design to the Cricut Transfer Tape and applied it to the plain dollar store soap tray, again using one of the tools in the Starter Tool Set.

Use Cricut tools and materials to create unique hostess gifts.

Look how cute it is!

This plain Dollar Tree soap tray got an upgrade with a cute design from Cricut!

Customize the Dollar Store Hand Towel

The next part of this adorable hostess gift is a monogrammed hand towel.  Monograms send a message that you were truly thinking of the gift recipient, and Cricut Joy makes it incredibly easy to monogram anything!

Just like the soap tray, I picked a monogram in Cricut Design Space, added it to my design canvas, and sized it to fit the dollar store hand towel.

Use Cricut Design Space to properly size a monogram to add to a dollar store hand towel.

I chose a black and white herringbone vinyl from my Cricut Joy Smart Iron-On Patterned Sampler, Nature Walk Basic, and then clicked to start the cutting process, and was reminded that I needed to mirror image my monogram because I was cutting iron-on vinyl, which is cut upside down.  Cricut Design Space is SO SMART!  I would have ruined the vinyl had the smart software not reminded me to fix my design for my project.  It also told me how to load the iron-on vinyl properly – upside down in this case.  This makes it practically impossible to mess up.  I love it!

Cut Cricut Joy Smart Iron-On Vinyl to customize a dollar store hand towel.

Once it finished cutting, I weeded (see, I’m already becoming a professional!), and then plugged in the most fantastic tool, the Cricut EasyPress 2, so that I could get this monogram onto the towel!

Use the Cricut EasyPress 2 to add vinyl text and artwork to almost any fabric surface!

The EasyPress 2 is essentially a combination of a heat press and an iron, and it ensures that iron-on projects go off without a hitch!  I consulted the Cricut EasyPress online guide, which told me exactly which heat settings and timing to use to affix the monogram to the towel.  No guessing!

Cricut EasyPress 2 makes is easy to use iron-on vinyl! It is a cross between a heat press and an iron, and eliminates the guesswork on timing and temperature.

In less than a minute from start to finish, I monogrammed this hand towel, and it is so cute!  And I know that because I used the right temperature and time, this monogram will not come off of the towel – even with repeated washing.

This dollar store hand towel got a custom monogram with Cricut Joy! It is part of an awesome dollar store hostess gift set.

Customize the Hand Soap

Finally, to take this dollar store hostess gift to the next level of cuteness, I embellished the dollar store soap!  I found a cute border element in Design Space and popped it onto my canvas.

Use Cricut Design Space to create a cardstock wrap for a luxury soap.

I narrowed the width to about 2″ and the shortened it to about 9″ long, and then added black cardstock (that I cut into a smaller strip) to the CricutJoy LightGrip Mat.  Unlike Cricut Joy Smart-materials, cardstock requires use of a mat underneath.

The Cricut Joy LightGrip Mat is perfect for cutting cardstock.

Once again the program told me everything I needed to know about how to cut this cardstock, so I set it up and got to cutting!

Cut CricutJoy cardstock on the LightGrip mat.

In just a few seconds my paper border was ready! I got it off the mat and then wrapped it around the soap, which I removed from the box.  I put adhesive on one end of the cardstock and pressed the other end on top.

Wrap the cut cardstock around the soap.

It could not be easier to upgrade a nice soap even more!

Customize dollar store soap with a cute cardstock band to create a pretty hostess gift.

Put it All Together

To make these dollar store items into a cohesive and lovely hostess gift, I put all of them into a pretty gold wire basket (also from Dollar Tree)!  When I present them to the hostess, I will wrap them in clear cellophane and tie with a beautiful ribbon.  Oh, and I might even get crazy and make a pretty gift tag or thank you card with my Cricut Joy to tie on there, too.  (The Cricut is SO versatile that you can make practically anything with just about any material!)

Create a beautiful dollar store hostess gift with dollar store blanks and Cricut Joy! This soap set hostess gift is just lovely.

Dollar Store Hostess Gift #2: Customized Bath Spa Set

For the second dollar store hostess gift, you will customize dollar store bath spa blanks with Cricut to create a luxe gift that will help the hostess relax during the stressful holiday season!

Create a bath spa hostess gift set with dollar store items and Cricut Joy!

Supplies Used to Create the Dollar Store Bath Spa Set

  • Decorative storage jar (purchased at Dollar Tree)
  • Bath salts (purchased at Dollar Tree)
  • Bath scrub brush (purchased at Dollar Tree)
  • Microfiber hair wrap (purchased at Dollar Tree)
  • Cricut Joy
  • Cricut EasyPress 2
  • Cricut Joy Smart Vinyl Sampler, Beachside – Permanent 
  • Cricut Joy Smart Iron-On- Holographic
  • Cricut Transfer Tape
  • Cricut Starter Tool Set

Use dollar store items to create a customized bath spa hostess gift! Learn how to customize them with Cricut Joy and Cricut EasyPress 2.

How to Make the Dollar Store Bath Spa Set with Cricut

Just like the dollar store hand soap set, this bath spa set is so easy to create, and perfect for any level Cricut user – even beginners like me!  I will walk you through each of the steps.

Customize the Bath Salts Jar

For this portion of the gift set, you need bath salts and a pretty decorative jar – both from the dollar store!  I started by searching in Cricut Design Space for spa-type designs, and I found this text art that was perfect for soaking in the tub with some luxurious bath salts: “Soak Your Troubles Away.”

Cricut Design Space is filled with images that you can use on any dollar store project.

I measured the lid of decorative jar, placed the design on my Cricut canvas, resized it to fit the jar lid, and sent it to Cricut Joy to cut!

Cricut Joy cuts Smart Vinyl without any cutting mat!

Because I used the Cricut Joy Smart Vinyl- Permanent, I didn’t need a cutting mat.  The Cricut Joy double checked that everything was aligned and that I had enough material, and it cut flawlessly!

I followed the same steps as the soap dish above: putting the cut vinyl design on Cricut Transfer Tape, and then applying the text art to the jar lid.

Customize a dollar store trinket jar to create a holder for bath salts.

I filled the jar with the bath salts and had the first component of the dollar store bath spa set finished in under five minutes!

Customize the Bath Brush

For the next part of this relaxing hostess gift, I used Cricut Joy to customize a dollar store bath brush!  I followed the same steps as the bath salts jar lid (finding the design in Cricut Design Space, resizing it on my canvas, and cutting it on Cricut Smart Vinyl- Permanent).

Cut Cricut Joy Smart Vinyl to embellish a dollar store bath brush as part of a bath spa gift set.

After I applied it to the bath brush with the Cricut Transfer Tape, I rewrapped it in the clear packaging it came in.

Customize a dollar store bath brush with a vinyl embellishment.

Customize the Microfiber Hair Towel

For the last part of the bath spa basket, I decided to add a similar floral flourish to the microfiber hair towel.  This was extra fun because I tried out the Cricut Smart Iron-On Vinyl in a Holographic material.  I love all of the iridescence and beautiful colors in this vinyl!

After I found my design and cut it per the instructions that Cricut Joy gave me, I fired up my Cricut EasyPress 2 and consulted the online guide for the exact way to add this holographic design to the microfiber hair wrap.

Cricut EasyPress 2 makes applying iron on vinyl effortless! It tells you exactly what settings to use.

Because this hair wrap is 100% polyester, I was so glad that the online directions told me exactly how to apply the vinyl for a lasting hold!  No guess work AT ALL!

Cricut EasyPress 2 lets you quickly and correctly apply iron-on vinyl to fabric and wood.

Once the heat press part was finished, I was able to see the flower embellishment shimmer and shine!

Customize a dollar store bath hair wrap with Cricut Joy Smart Iron-On holographic vinyl!

Put It All Together

As I did with the soap tray gift set, I put these lovely bath spa products all together in a gold wire basket – also from the dollar store!  When it’s time to present this gift to the hostess, I will wrap it up in clear cellophane wrap and tie with a beautiful bow.

Create a thoughtful dollar store hostess gift by customizing items with Cricut Joy! It's so easy and makes for a wonderful gift.

These lovely DIY hostess gifts are made extra-special with the customization elements I was able to create with my Cricut Joy and Cricut EasyPress 2.  With the amount of use I will get out of my Cricut products (and the ability to make even simple dollar store products look so good!), these machines will pay for themselves in no time!

This is awesome! These dollar store hostess gifts are so special when customized with Cricut Joy electronic cutting and writing machine! Learn how to put together these budget-friendly hostess gifts, which also work as teacher gifts, holiday gifts, and more!

Seriously, if you don’t have a Cricut yet – what are you waiting for?  Treat yourself (hey, it’s 2020 – we ALL deserve a treat!), or maybe ask Santa for one. 

-Bre

blank

Filed Under: Dollar Tree

DIY Boho Tapestry Wall Art: A Dollar Tree DIY Decor Project

August 5, 2020 by Bre 2 Comments

blank
 

You know those moments when inspiration strikes and you just HAVE to get to work before the idea flies away?  That is what happened with this Dollar Tree rug turned DIY Boho Tapestry Wall Art project!  I stopped doing laundry (ha!) and immediately got to work!

Get a cotton rug from Dollar Tree and create a fun boho wall tapestry! This Dollar Tree DIY could not be easier! It's great wall decor for a spot that needs a little something special, or even great DIY dorm decor!

I knew I could turn a $1 rug into something . . . different!  This easy DIY is the perfect thing for a little spot in your home that needs something trendy, or for your favorite college student’s dorm room!  (Are college students even living in dorms this fall?  Hmmmm….)

Supplies Needed to Make Dollar Store DIY Boho Tapestry

This post contains affiliate links.  To read my full disclosure policy, please click here.

  • Dollar Tree rag rug
  • Dollar Tree toilet plunger
  • Felt
  • Dollar Tree twine
  • Aileen’s Tacky Glue or hot glue
  • Fabric scissors
  • Round objects in three sizes (used to trace to create semi-circles)
  • Pencil

Use a Dollar Tree cotton rug and a toilet plunger to create awesome boho wall decor!

How to Make a Dollar Store DIY Boho Tapestry Wall Decor

For this project I have this written tutorial, and I also made a video that helps clarify some of the steps.  

Start by cutting one of the fringed ends off of the rug.  Use a Dollar Tree rug to create unique wall art.

On the cut-off piece, fold the cut edge over and glue it down, so that you create a nice, straight seam at the top of the cut-off piece.  Then, glue that piece onto the rug, a few inches above the fringed end that remained on the rug.  Cut the end off a Dollar Tree rug to create unique boho wall decor.

Next, remove the rubber part of the plunger.  Fold the fringeless end of the rug over the wooden part of the plunger and glue down the rug.  Use a Dollar Tree rug and toilet plunger to create tapestry art.

Next, use round objects in three different sizes to trace semi-circles onto the felt.  I used Dollar Tree burner covers for this!

Use a Dollar Tree rug to create unique DIY home decor.

Cut out the semi-circles and glue them to the face of the rug – one on top of the other.  

Glue felt pieces to a Dollar Tree rug to create a boho wall tapestry.

If you don’t like this look, cut an entirely different shape out of felt and glue it to the rug!  You can do this however you want.  It is OK, I promise. đŸ™‚

Finally, tie twine around both ends of the wooden plunger to create a hanger for the tapestry art. Create a boho wall tapestry with a dollar store rug!

With that, your dollar store boho wall decor is complete!

Create a boho wall tapestry with a Dollar Tree rug and other dollar store supplies! This is awesome dorm room decor or boho decor for a unique look.

Filed Under: Dollar Tree

Pressed Flower Craft: Air Dry Clay Flower Plaque

July 7, 2020 by Bre 4 Comments

blank

With two months left of the kids’ summer vacation and every activity canceled, I’m wracking my brain trying to find things to keep them busy! Last week we got crafty with some leaves and flowers we found in our yard, and we made a pretty pressed flower craft – lovely air dry clay flower plaques!  I’m excited to show you how to make them, too!

Learn to make pretty pressed flower plaques in this post! This is an easy air dry clay craft that's fun for kids and adults alike.

Surprisingly, my son enjoyed this activity the most!  He loved foraging around the forest (not really a forest – just some junk trees in a shady spot in the yard – but forest sounds more magical), to find pretty flowers and leaves to use on his plaques.

What types of flowers are best to press into air dry clay?

This part of the activity was nice because it got us talking about what was growing outside and what types of blooms and greenery might work best for flower pressing and leaf pressing.

Once we collected enough specimens to make our pressed flower plaques, we headed inside and got down to business.  We quickly realized that the flatter the flowers or leaves were to begin with, the better they were to press into the clay.  Bulky flowers had too much dimension to be pressed flat into clay, and very veiny leaves had the same problem.

What type of air dry clay is best for pressing flowers into?

I had air dry clay leftover from previous projects (like my air dry clay keychains and air dry clay garden markers), and so we didn’t need to buy anything new for this project!  

The air dry clay we used was totally natural clay (not polymer clay), which I think is best when working with flowers as there are no chemicals to discolor the flowers or leaves.

Pressed flower crafts are a wonderful nature craft! Learn to make pressed flower plaques in this post.

This project was really simple but quite fun; rolling the clay, pressing the flowers into it, poking holes so that the plaques could be hung once dry.  We had a nice time together and made so many of these pressed flower plaques, which we plan to hang in our sun room.

If you make it with kids, not only will you end up with a nice piece of decor, but you’ll also have sweet memories of your time together.
This pretty pressed fern plaque is an easy DIY. Learn how to make this pressed flower craft in this blog post.

Pressed Flower Craft: Air Dry Clay Flower Plaque

Pressed Flower Craft: Air Dry Clay Flower Plaque

Yield: 12
Prep Time: 5 minutes
Active Time: 20 minutes
Additional Time: 1 day
Total Time: 1 day 25 minutes
Difficulty: Easy

Create a pretty pressed flower craft with blooms and leaves from your yard! Use air dry clay to create this pretty floral craft.

Materials

  • Terracotta Air Dry Clay
  • Clay Roller Kit
  • Clay Sculpture Tools
  • Twine
  • White Craft Paint
  • Painting Sponge
  • Flowers & Leaves

Tools

  • Paper Towels
  • Drying Rack

Instructions

  1. Roll a piece of terracotta clay into a ball. Roll a chunk of terracotta clay into a ball.
  2. Partially flatten it with the clay roller or a rolling pin. blank
  3. Lay a leaf or flowers onto the partially flattened piece of clay. blank
  4. Using the clay roller or rolling pin, gently press the leaf or flowers into the clay. Take care to press all portions of the leaf or flower into the clay so that nothing is sticking up out of the air dry clay. blank
  5. Using a pointed object (such as the poker in the Clay Tools Set), poke two holes near the top of the air dry clay plaque. blank
  6. Gently set the pressed flower plaque on a cookie cooling rack and let it dry. It will probably take around 24 hours for the air dry clay to dry on both sides. It may take a little longer for the pressed flowers or leaves to fully dry. blank
  7. Once the air dry clay and the pressed flowers or pressed leaves are dry, you may want to add a bit of "age" to the flower plaque with some white craft paint. To do this, dab a little bit of white paint on a painting sponge, and gently press it along the clay plaque. Wipe off or dab off any excess with a paper towel. blank

Notes

The beauty of this project is the imperfections. These enhance the rustic or natural feel of this craft. Don't worry about your plaque being the perfect shape or if your clay starts to crack or wrinkle. Embrace the imperfections!

© Bre Eggert
Project Type: Home Decor / Category: Crafts
blank
I’d appreciate it if you’d share this post with someone who might enjoy it! Send them the link or share it on Pinterest – thank you!

Create beautiful pressed flower plaques with air dry clay. This is a beautiful nature craft that is fun for adults and kids alike!

Filed Under: Crafts, Homepage Crafts

  • « Go to Previous Page
  • Page 1
  • Page 2
  • Page 3
  • Page 4
  • Page 5
  • Page 6
  • Interim pages omitted …
  • Page 21
  • Go to Next Page »

Primary Sidebar

Let’s Connect!

Hi, I’m Bre! Thanks for visiting Average But Inspired, where I show you how to work with what you’ve got to create a home you love.

Bre of Average But Inspired - a DIY and craft blog

Love DIY? Subscribe to Get Posts E-mailed!

How Can I Help You?

blank

How to Paint Over Tile

blank

Limewash Stone Fireplace Makeover: Bye Bye Orange Stone Fireplace, Hello Neutral Stone Beauty!

blank

How to Paint a Door to Look Like Wood (It’s Easier Than You Think!)

blank

How to Create a Faux Antique Brass Finish with Paint

Looking for Something?

Copyright © 2013-2022, Bre Eggert (Average But Inspired). All rights reserved.
  • Home
  • DIY
  • Crafts
  • Home Decor
  • Privacy Policy and Copyright Policy
  • Disclosures
  • Contact Me