• Skip to primary navigation
  • Skip to main content
  • Skip to primary sidebar
Average But Inspired logo - DIY and craft

Average But Inspired

Craft a home you love. DIY and craft tutorials.

  • About
    • Contact Me
    • Disclosures
    • Privacy Policy and Copyright Policy
  • DIY
    • Furniture
  • Crafts
    • Dollar Store Crafts
    • Seasonal
      • Patriotic & Summer
      • Valentine’s Day
      • Easter & Spring
      • Fall & Halloween
      • Christmas & Winter
  • Home Decor
    • Organization
  • Shop
    • DIY Guides
  • Home

Crafts

How to Make Faux French Enamel Number Tags (That Look Like the Real Thing!)

March 1, 2018 by Bre 2 Comments

I know I’ve said it a million times on here before, but I’m gonna say it again – I LOVE making simple updates to my decor with inexpensive items and supplies.  A few years ago I made a set of chalkboard wall hooks for my front entryway (you can see that post with its embarrassing photography here – wait until you see how much my skills have improved!).  I got tired of the chalkboard look, however, and needed to give it a new look.  I wanted to add French enamel house numbers, but at over $20 a piece, that was too pricey.  So I got to work and made my own Faux French Enamel Number Tags that look pretty close to the real thing!  It's so easy to make faux French enamel number tags with inexpensive craft supplies like paint! Learn how to make these French enamel number tags for your home decor and organization projects.

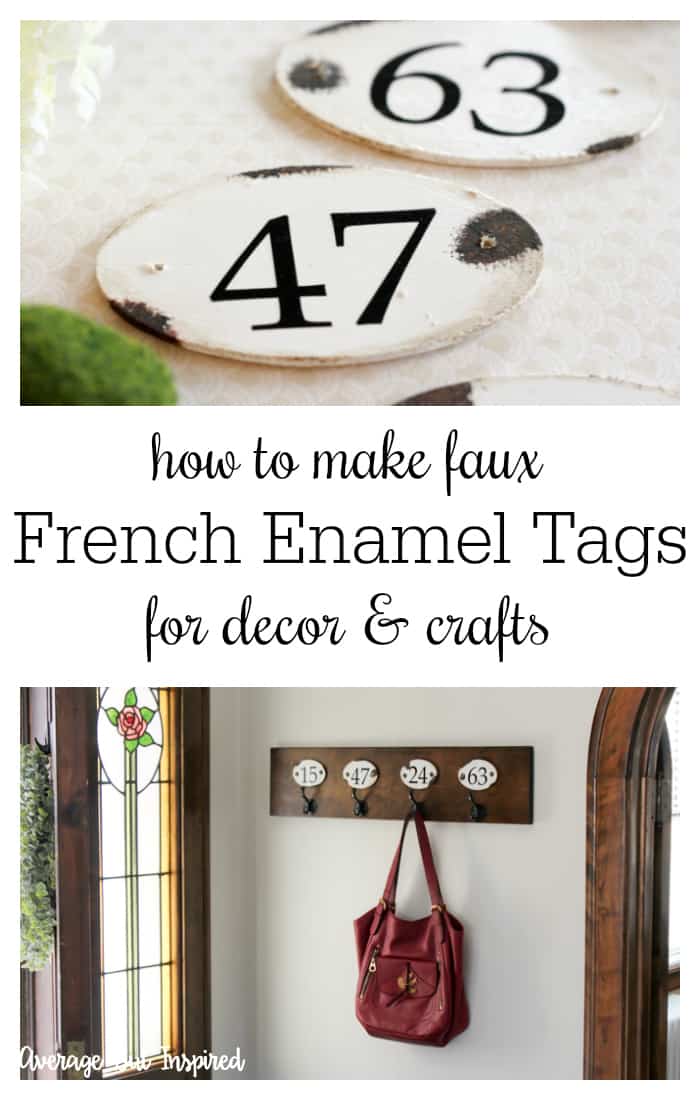
Supplies Needed for Faux French Enamel Number Tags

This post contains affiliate links.  To read my full disclosure policy, please click here.

  • Oval wood cutouts
  • Acrylic paint (white, black, brown, orange)
  • Vinyl number stickers OR number stencils and black paint
  • Mod Podge (glossy finish)
  • Dark brown wax
  • Paintbrushes
  • Stencil brush
  • Drill
  • Material to hang or affix your French enamel number tags (I used decorative furniture nails to fasten mine to the wall hooks)

How to Make Faux French Enamel Number Tags

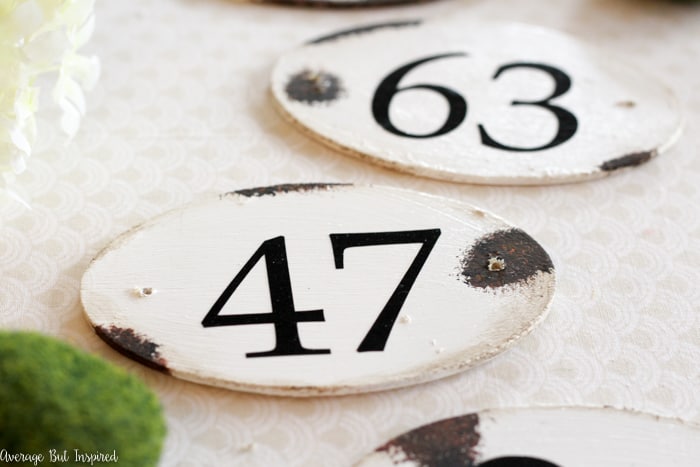
Start by painting the oval wood cutouts white.  Regular acrylic paint does the trick for this step.It's so easy to make faux French enamel number tags with inexpensive craft supplies like paint! Learn how to make these French enamel number tags for your home decor and organization projects.

Once dry, place your number stickers onto the ovals or stencil your numbers onto them.  I cut out numbers with my Silhouette Portrait but you absolutely do not need a vinyl cutting machine for this project!  Regular black number stickers or stencils and paint will work perfectly!  It's so easy to make faux French enamel number tags with inexpensive craft supplies like paint! Learn how to make these French enamel number tags for your home decor and organization projects.

Once all of the numbers are in place and/or dry, cover everything with a coat of Mod Podge in glossy finish.  This is meant to give the ovals a glossy look like enamel.  You don’t want them to be dull or they will look less realistic.  It's so easy to make faux French enamel number tags with inexpensive craft supplies like paint! Learn how to make these French enamel number tags for your home decor and organization projects.

After they’ve dried, apply brown wax in strategic areas (like around the outside edges of the ovals), to help give the faux enamel number tags an aged look (you can see it on No. 47 in the below photo).  I used this type of brown wax, which is what I use on furniture projects and had available. If you don’t use brown wax regularly, buy a less expensive brand of wax like this!  It's so easy to make faux French enamel number tags with inexpensive craft supplies like paint! Learn how to make these French enamel number tags for your home decor and organization projects.

The brown wax will dry quickly, and then you can add some faux rust to the enamel tags with paint!  I got a little carried away with my “rust” and wish I wouldn’t have put so much on.  I’d recommend applying the paint very sparingly and in small areas to see how you like the look.  You can always add more, but you can’t always take it away!  All you do is dab a thick coat of black paint with a stencil brush, then a thick coat of brown paint over that, and then a little (but thick) dab of orange paint to create a bumpy rust look!  It's so easy to make faux French enamel number tags with inexpensive craft supplies like paint! Learn how to make these French enamel number tags for your home decor and organization projects.

After all of that, you’re ready to drill holes in the Faux French Enamel Number Tags and use them!  It's so easy to make faux French enamel number tags with inexpensive craft supplies like paint! Learn how to make these French enamel number tags for your home decor and organization projects.

You can fasten them to wood like I did, tie them to baskets with twine, use them as house numbers – whatever!  It's so easy to make faux French enamel number tags with inexpensive craft supplies like paint! Learn how to make these French enamel number tags for your home decor and organization projects.

It's so easy to make faux French enamel number tags with inexpensive craft supplies like paint! Learn how to make these French enamel number tags for your home decor and organization projects.

There are so many uses for them, but I do love them on my entryway hooks!  And I love that they cost hardly anything to make.  It's so easy to make faux French enamel number tags with inexpensive craft supplies like paint! Learn how to make these French enamel number tags for your home decor and organization projects.

How would you use Faux French Enamel Number Tags in your decor?

-Bre

Filed Under: Crafts

Upcycled Mini Jello Mold Planter Tray

February 15, 2018 by Bre Leave a Comment

blank

A couple of years ago my husband and I magically had a babysitter on a Saturday afternoon and we ended up at Goodwill.  For the life of me, I cannot remember why!  That is such a strange place to find yourself on a “date,” though, so there must have been a reason!  Anyway, on that day I picked up these mini Jello molds because I thought they were cute and a bargain at .50 a piece.  A totally random find on a totally random date.Thrift stores are full of mini Jello molds! Stock up and turn them into an adorable mini Jello mold planter that doubles as a votive holder centerpiece! This is such a versatile thrift store upcycle.

At the time, I didn’t know they were Jello molds – I thought they were mini baking pans.  Fast forward to a couple of weeks ago when I found these little guys in my project stash, and some valuable internet detective work revealed that these are, in fact, Jello molds.  I knew that these Jello molds and some adorable faux succulents I got at Dollar Tree were a match made in Heaven.  And that, my friends, is how I came up with this Upcycled Mini Jello Mold Planter Tray.

This post contains affiliate links.  To read my full disclosure policy, please click here.

I started by staining a scrap wood board with my favorite stain cloths.  I love these because they’re very low odor so I can stain indoors!Thrift stores are full of mini Jello molds! Stock up and turn them into an adorable mini Jello mold planter that doubles as a votive holder centerpiece! This is such a versatile thrift store upcycle.

After the stain dried (really quickly, I might add!), I gave the wood a once-over with my new favorite find, Liming Wax.  This gave the wood a beautiful gray finish!  Thrift stores are full of mini Jello molds! Stock up and turn them into an adorable mini Jello mold planter that doubles as a votive holder centerpiece! This is such a versatile thrift store upcycle.

Thrift stores are full of mini Jello molds! Stock up and turn them into an adorable mini Jello mold planter that doubles as a votive holder centerpiece! This is such a versatile thrift store upcycle.

After that dried, I hot glued my mini Jello molds onto the board.  I used my super hot cordless glue gun, which definitely attached these Jello molds with no problem.  If you don’t have a high-heat glue gun yet – get one!  Life-changing.  Thrift stores are full of mini Jello molds! Stock up and turn them into an adorable mini Jello mold planter that doubles as a votive holder centerpiece! This is such a versatile thrift store upcycle.

At this point (the wrong point), I decided the board was a little too plain.  So I headed downstairs to the basement to stain and cut some “craft wood” (that’s what the tag said on the back of it!), to serve as trim around the edge of the board.  Now if there’s one thing I’m good at, it’s measuring poorly.  So needless to say, my measurements were off and the wood did not meet perfectly at the edges.  Oh well.  I used my nail gun to attach the pieces and pretended like it looked OK.  (You could use wood glue if you don’t have a nail gun.)  Thrift stores are full of mini Jello molds! Stock up and turn them into an adorable mini Jello mold planter that doubles as a votive holder centerpiece! This is such a versatile thrift store upcycle.

Then I attached some corner braces on the outer edges to add some more metal like the the Jello molds.  This was purely decorative!  Because my cuts were so bad on these trim pieces, I couldn’t even put screws in on some of the corner braces!  Yikes.Thrift stores are full of mini Jello molds! Stock up and turn them into an adorable mini Jello mold planter that doubles as a votive holder centerpiece! This is such a versatile thrift store upcycle.

After that, I popped some floral gems and faux succulents from Dollar Tree into the mini Jello molds to finish things off.  Thrift stores are full of mini Jello molds! Stock up and turn them into an adorable mini Jello mold planter that doubles as a votive holder centerpiece! This is such a versatile thrift store upcycle.

Thrift stores are full of mini Jello molds! Stock up and turn them into an adorable mini Jello mold planter that doubles as a votive holder centerpiece! This is such a versatile thrift store upcycle.

Thrift stores are full of mini Jello molds! Stock up and turn them into an adorable mini Jello mold planter that doubles as a votive holder centerpiece! This is such a versatile thrift store upcycle.

I bet the person who used to make Jello in these tiny molds never imagined someone would use them as planters!  Thrift stores are full of mini Jello molds! Stock up and turn them into an adorable mini Jello mold planter that doubles as a votive holder centerpiece! This is such a versatile thrift store upcycle.

In the summer I plan to take the floral gems and succulents out, and replace them with votive candles.  I think this will make a perfect centerpiece for my outdoor coffee table!  Thrift stores are full of mini Jello molds! Stock up and turn them into an adorable mini Jello mold planter that doubles as a votive holder centerpiece! This is such a versatile thrift store upcycle.

For now I think this will work underneath the TV in my basement living room.

If you found mini Jello molds at a thrift store, what would you do with them?  Think about that and pin this post to help others find this idea!  🙂  Thrift stores are full of mini Jello molds! Stock up and turn them into an adorable mini Jello mold planter that doubles as a votive holder centerpiece! This is such a versatile thrift store upcycle.-Bre

You Might Like This Upcycle Project, Too!  {Changing Table Upcycle}

Give an old changing table new life by turning it into a console table!

Filed Under: Crafts

Dollar Store DIY Salt and Pepper Shaker Bud Vases

February 13, 2018 by Bre 2 Comments

blank

Two of my favorite things are using things in unintended ways and making budget-friendly projects that look great despite being cheap!  These Salt and Pepper Bud Vases check both of those boxes, and this is probably one of the easiest projects you’ll ever find!

{Video Tutorial!} Transform dollar store salt and pepper shakers into adorable bud vases! This tutorial shows you how to make this dollar store craft in no time! Plus, it's very affordable. Great for cheap baby shower or wedding shower decor, or home decor! #dollarstorecrafts #upcycle

Now listen, I’ve been working really hard on improving my video-making skills, so I made a video to show you how to make this project instead of doing the typical step-by-step photos!  Since it’s the easiest thing ever, I’ve giving you the supply list here and then you can watch the video to see how to put this together.

Brilliant! Learn how easy it is to transform dollar store salt & pepper shakers into adorable bud vases that are perfect for home decor, party decor, and more! So inexpensive and pretty.

Supplies Needed for Salt and Pepper Shaker Bud Vases

  • Salt and pepper shakers (I got these at Dollar Tree)
  • Faux florals (or real) – I got my stem at Dollar Tree
  • Chalky finish paint
  • Raffia (I got it at Dollar Tree)
  • Paint brush
  • Cutter for floral stem

Video Tutorial – How to Make Salt and Pepper Shaker Bud Vases

OK, so watch this video and you’ll see just how easy this project is!


These would be super cute as table decor at a baby shower or Easter brunch, don’t you think?  Or maybe to brighten up a bathroom window sill or a nightstand?  There are so many ways you can use these and customize them!

I’ll be bringing one to my next door neighbor.  She’s 101 years old and could probably use a little bit of spring right about now!

If you liked this project, would you please pin this post so others can find it?  {Video Tutorial!} Transform dollar store salt and pepper shakers into adorable bud vases! This tutorial shows you how to make this dollar store craft in no time! Plus, it's very affordable. Great for cheap baby shower or wedding shower decor, or home decor! #dollarstorecrafts #upcycle

-Bre

You Might Like This Project, Too!

blank

Filed Under: Crafts, Dollar Tree

The Best Dollar Tree Party Supplies (and which ones to skip!)

February 7, 2018 by Bre 9 Comments

blank

While I’m not a party animal, I like to host a nice gathering every once in a while.  Because I believe you can throw an awesome party on a small budget (see my tips for hosting a party on a budget), I thought I should share my thoughts on the best Dollar Tree party supplies and what to avoid!  If you're planning a party, you need to see this list of the best Dollar Tree party supplies! Not only does it tell you what to buy to save money, it tells you what to skip! It's a must have for any party planning! #dollartree #partydecor

Budget-friendly party supplies are an important part of any party, because the more you save on these items, the more money you’ll have for really important things like food and beverages!

Best Dollar Tree Party Supply No 1: Serving Trays and Serving Utensils

If you need disposable serving items for the party you’re hosting, definitely get them at Dollar Tree.  They have high-quality and sturdy trays in clear plastic, colors, and silver finish.

They also have large serving utensils, both disposable and not, which I learned at Thanksgiving you can never have enough of! (My grandma reminded me of that about 100 times!)

If you're planning a party, you need to see this list of the best party supplies to buy at Dollar Tree! Not only does it tell you what to buy to save money, it tells you what to skip! It's a must have for any party planning! #dollartree #partydecor

Sidenote: those silver trays are great for craft projects, too, like the Chalkboard Wreath I created last fall!

I’ll warn you that I do not love Dollar Tree’s plastic utensils, however!  They’re very flimsy (ESPECIALLY the colored utensils), and don’t work well.  I do not recommend those for your party.

If you're planning a party, you need to see this list of the best party supplies to buy at Dollar Tree! Not only does it tell you what to buy to save money, it tells you what to skip! It's a must have for any party planning! #dollartree #partydecor

Best Party Supply No. 2: Candles

If you plan to add a little ambiance to your party and need candles, get your tealights, votives, and tapers at Dollar Tree!  They come in multi-packs, making them very affordable.

Dollar Tree also has a wide selection of battery-operated flameless candles, but those aren’t my favorite.  They’ll do in a pinch, but I find that the batteries don’t last long and they sometimes have a strange color “flame.”

If you're planning a party, you need to see this list of the best party supplies to buy at Dollar Tree! Not only does it tell you what to buy to save money, it tells you what to skip! It's a must have for any party planning! #dollartree #partydecor

Dollar Tree also has candles in the shapes of numbers if you need that for a birthday cake!

Best Dollar Tree Party Supply No. 3: Favor Bags and Gift Bags

Ever since I discovered Dollar Tree’s gift bags, I rarely purchase them elsewhere.  They have SO many colors and designs that you’ll definitely find something you like.

I love to use their solid color bags as party favor bags for kids parties, and embellish them with stickers or ribbon that fits the theme of the party.  Because the solid bags come in multi-packs, they’re very kind to your party budget!

If you're planning a party, you need to see this list of the best party supplies to buy at Dollar Tree! Not only does it tell you what to buy to save money, it tells you what to skip! It's a must have for any party planning! #dollartree #partydecor

Best Party Supply No. 4: Balloons

If you need helium balloons for your celebration, this is the place to get them.  Typically, helium balloons cost around $4 at party stores, but they’re just $1.25 at Dollar Tree!

If you're planning a party, you need to see this list of the best party supplies to buy at Dollar Tree! Not only does it tell you what to buy to save money, it tells you what to skip! It's a must have for any party planning! #dollartree #partydecor

I even like to buy the plain mylar balloons and decorate with stickers or washi tape.  That way you can really personalize the look to fit your theme or decor, like I did for my mom’s Kate Spade-themed birthday party!

If you're planning a party, you need to see this list of the best party supplies to buy at Dollar Tree! Not only does it tell you what to buy to save money, it tells you what to skip! It's a must have for any party planning! #dollartree #partydecor

Best Dollar Tree Party Supply No. 5: Vases

If vases for centerpieces or party decor are on your list, Dollar Tree is the place to get them!  They have so many shapes and sizes of plain glass vases that you’re bound to find what you need.

If you're planning a party, you need to see this list of the best party supplies to buy at Dollar Tree! Not only does it tell you what to buy to save money, it tells you what to skip! It's a must have for any party planning! #dollartree #partydecor

Best Supply No. 6: Streamers or Crepe Paper

Streamers are such a fun party supply because you can do so many things with them, in addition to hanging them from the walls!  Search for crepe paper streamer ideas on Pinterest and you’ll be blown away!

Streamers come in 2-packs at Dollar Tree, making them very affordable.

If you're planning a party, you need to see this list of the best party supplies to buy at Dollar Tree! Not only does it tell you what to buy to save money, it tells you what to skip! It's a must have for any party planning! #dollartree #partydecor

Any party I host would not be properly planned without a trip to Dollar Tree.  I can always get a lot crossed off my shopping list and at a great price!

If you have any items you think should be added to my list, please let me know in the comments below!  I’d love to hear from you.

-Bre

Filed Under: Dollar Tree, Entertaining, Holiday

Upcycled Sweater Craft: Embroidery Hoop Art

January 10, 2018 by Bre 4 Comments

blank

Repurpose old sweaters to make this adorable upcycled sweater craft! Embroidery hoop art is so charming.

I don’t know about where you live, but here in Chicago we have been FREEZING since, well, it feels like forever!  The temps have been unusually low and I’ve been craving everything cozy. 

Although the cold is annoying, I guess I have it to thank for inspiring this Upcycled Sweater Embroidery Hoop Art, because sweaters, blankets, and hot tea are all I seem to think about these days!  

Upcycled sweater embroidery hoop art is a great way to use less-than-perfect sweaters in home decor! Instead of throwing your sweaters away, turn them into art for your home! #embroideryhoop #upcycle #upcycledsweater

This project is a fantastic way to give new life to any sweaters of yours that have seen better days!  Or, if your sweaters are all in perfect condition, buy some at a thrift store to repurpose and make these cute sweater embroidery hoops!

Supplies Needed for Upcycled Sweater Embroidery Hoop Art

This post contains affiliate links.  Please read my disclosure policy for more information.

  • Old sweaters
  • Embroidery hoops in various sizes
  • Fabric scissors
  • Hot glue gun
  • For the Mitten Hoop:  Acrylic felt in color of your choice, embroidery floss (I used white and pink), needle, pencil & paper
  • For the Plain Hoop:  Faux greenery of your choice, chalkboard tag, snowflake tag
Upcycled sweater embroidery hoop art is a great way to use less-than-perfect sweaters in home decor! Instead of throwing your sweaters away, turn them into art for your home! #embroideryhoop #upcycle #upcycledsweater

How to Make This Upcycled Sweater Craft: Embroidery Hoop Art

I love how simple but cute this project is!  It only took me about 20 minutes per hoop, which isn’t bad at all! 

I began by cutting a sweater to be slightly larger than the embroidery hoop.

Upcycled sweater embroidery hoop art is a great way to use less-than-perfect sweaters in home decor! Instead of throwing your sweaters away, turn them into art for your home! #embroideryhoop #upcycle #upcycledsweater

I pressed the pieces of the embroidery hoop together, with the sweater between them, and then trimmed all along the edge of the hoop to remove excess fabric.  

Upcycled sweater embroidery hoop art is a great way to use less-than-perfect sweaters in home decor! Instead of throwing your sweaters away, turn them into art for your home! #embroideryhoop #upcycle #upcycledsweater

If you do this and the sweater feels a little saggy, just pull gently at the edges and trim additional excess fabric.

Once I had the sweater placed in the embroidery hoop just how I wanted it, I hot glued some greenery, a chalkboard tag, and a snowflake ornament to the top of of it.  

Upcycled sweater embroidery hoop art is a great way to use less-than-perfect sweaters in home decor! Instead of throwing your sweaters away, turn them into art for your home! #embroideryhoop #upcycle #upcycledsweater

Do you see my pretty new cordless hot glue gun in this photo?  I didn’t know it was possible to be in love with a hot glue gun, but you guys, it is!  This cordless hot glue gun is a workhorse!  I think I could hot glue anything I wanted now!  Plus, not having a cord makes working with it so much easier. 

If you use hot glue regularly, you should DEFINITELY get one of these!  (Note: if you don’t have any Ryobi tools already, make sure you also purchase the rechargeable battery to go with it!  You can use the battery on any other Ryobi too, too.  Awesome!)

Upcycled sweater embroidery hoop art is a great way to use less-than-perfect sweaters in home decor! Instead of throwing your sweaters away, turn them into art for your home! #embroideryhoop #upcycle #upcycledsweater

This embroidery hoop art came out looking simple but pretty.  I love it!  

Upcycled sweater embroidery hoop art is a great way to use less-than-perfect sweaters in home decor! Instead of throwing your sweaters away, turn them into art for your home! #embroideryhoop #upcycle #upcycledsweater

Here’s Another Awesome Sweater Craft Idea!

Upcycled Cozy Sweater Jars

Upcycled sweater embroidery hoop art is a great way to use less-than-perfect sweaters in home decor! Instead of throwing your sweaters away, turn them into art for your home! #embroideryhoop #upcycle #upcycledsweater

For my next sweater embroidery hoop, I decided to use a fun, patterned sweater, and Jasper tried to interfere with my work.  (Poor Jasper needs a haircut.)  

Once I moved him out of the way, my sweater hoops looked like this. 

Upcycled sweater embroidery hoop art is a great way to use less-than-perfect sweaters in home decor! Instead of throwing your sweaters away, turn them into art for your home! #embroideryhoop #upcycle #upcycledsweater

To add something extra, I drew a mitten on a piece of printer paper and then used that as a template for cutting out a felt mitten.  (Sorry this photo is kind of blurry.  I was taking photos in my basement and the lighting was awful!)

Upcycled sweater embroidery hoop art is a great way to use less-than-perfect sweaters in home decor! Instead of throwing your sweaters away, turn them into art for your home! #embroideryhoop #upcycle #upcycledsweater

Next, I freehand stitched some details onto the felt mitten – like edging and a heart.  Embroidery floss is all you need for this!

Upcycled sweater embroidery hoop art is a great way to use less-than-perfect sweaters in home decor! Instead of throwing your sweaters away, turn them into art for your home! #embroideryhoop #upcycle #upcycledsweater

I used my big daddy hot glue gun to secure the mitten into place on the embroidery hoop instead of sewing it on.  I was worried that sewing it would deform the sweater in some way and make it look wonky in the hoop.  

Upcycled sweater embroidery hoop art is a great way to use less-than-perfect sweaters in home decor! Instead of throwing your sweaters away, turn them into art for your home! #embroideryhoop #upcycle #upcycledsweater

If you’re not into mittens, you could put any shape you want on your sweater embroidery hoop!  And if you’re not good and free-handing designs, just look for some clip art online that you could trace.

Upcycled sweater embroidery hoop art is a great way to use less-than-perfect sweaters in home decor! Instead of throwing your sweaters away, turn them into art for your home! #embroideryhoop #upcycle #upcycledsweater

Don’t you just love that you can reuse old sweaters in such an adorable way? 

Upcycled sweater embroidery hoop art is a great way to use less-than-perfect sweaters in home decor! Instead of throwing your sweaters away, turn them into art for your home! #embroideryhoop #upcycle #upcycledsweater

These repurposed sweater crafts look so cute on my fireplace mantel decorated for winter! You could display these anywhere though – they’d look great hanging on the wall, too!   

Have you upcycled sweaters before?  What did you do with them?  Leave me a note in the comments to let me know!

Filed Under: Crafts

DIY Labeled Picture Frames

December 13, 2017 by Bre 14 Comments

blank

In life it is inevitable that all good things will come to an end, and while it’s always sad to see the good things go, it’s best when they go out on top.  Thus, while I’m sad to announce that this is the last edition of the Monthly DIY Challenge, I am happy to be ending it on a high note, with my friends and with some beautiful projects that all use metal label holders, including my DIY Labeled Picture Frames.

Before I show you my project, I need to pretend like I’m at the Oscars and give a quick thank you speech.  First, I need to thank the original mastermind of the Monthly DIY Challenge years ago, my friend, Kristi from Making it in the Mountains.  Our first challenge happened in 2014 with the “Great Crate Challenge,” and being a member of this monthly challenge is probably the reason I am still blogging!  I also need to thank Nicole from The Inspired Hive, who put together our link up every single month – even while juggling a full-time nursing job and raising two little ones.  Bre from Brepurposed, who designed our graphics and media kit, also deserves a HUGE shoutout.  I also can’t forget to thank Emily from Table & Hearth who was our lead hustler in terms of making contact with sponsors and connecting us with some of the fabulous brands we’ve worked with.  All of the other ladies in this group who pushed me each month to create something unique (and many times out of my comfort zone) – you all hold a special place in my heart!  And finally, all of YOU who have visited these posts over the past three years – thank you!  Okay, I hear my exit music playing so that’s my cue to get to the project now.

Okay, so my project this month is completely easy and completely customizable depending on your tastes!  In other words, it’s the best kind of project!  You can whip up a bunch of these DIY Labeled Picture Frames in no time – seriously.  This project gives $1 frames a boutique look at a fraction of the price with metal label holders! #crafts #diypictureframe

This post contains affiliate links.  To read my full disclosure policy, please click here.

Supplies Needed for DIY Labeled Picture Frames

  • Wood picture frames (I used these $1 frames from Michaels.  Such a bargain!)
  • Wood stain cloths
  • Acrylic paint or chalky finish paint
  • Chip brush
  • Drill
  • Ribbon
  • Scotch Tape
  • Metal label holders
  • Screwdriver

This project gives $1 frames a boutique look at a fraction of the price with metal label holders! #crafts #diypictureframe

How to Make Labeled Picture Frames

Start by drilling two holes at the top of your frame.  I used a 3/16″ drill bit.  This project gives $1 frames a boutique look at a fraction of the price with metal label holders! #crafts #diypictureframe

Next, stain the picture frame (if that’s the look you’re going for).  If you don’t want a natural finish, you could totally paint your frame instead!  I used my FAVORITE staining option (LOVE these cloths because they don’t smell at all and the color dries really fast) on the front and back of the frame, as well as the little peg that holds up these inexpensive frames.This project gives $1 frames a boutique look at a fraction of the price with metal label holders! #crafts #diypictureframeOnce my frame dried, I dry brushed some dark gray chalky finish paint over the surface of the frame to give it a weathered look. This project gives $1 frames a boutique look at a fraction of the price with metal label holders! #crafts #diypictureframe

Then I attached a cute metal label holder to the bottom of the frame.  This project gives $1 frames a boutique look at a fraction of the price with metal label holders! #crafts #diypictureframe

Finally, I threaded ribbon through the holes in the top of the frame by using Scotch tape on the ends to help me pull the ribbon through.  I tied the ribbon into a little bow and pressed it into place with some more Scotch tape.  This project gives $1 frames a boutique look at a fraction of the price with metal label holders! #crafts #diypictureframeThis project gives $1 frames a boutique look at a fraction of the price with metal label holders! #crafts #diypictureframe

I popped a picture of Jasper, my labradoodle, in the frame and added a “Good Boy” label to the label holder.  This project gives $1 frames a boutique look at a fraction of the price with metal label holders! #crafts #diypictureframe

You might think it’s crazy for me to have a framed photo of my dog, but I am the woman who went to a class about how to paint your dog’s portrait.  So there’s that.  This project gives $1 frames a boutique look at a fraction of the price with metal label holders! #crafts #diypictureframe

Plus, Jasper and I kind of look alike, so it just gets weirder from there.  (Note: yes, I need a new photo printer.  Those lines in his picture are terrible!)This project gives $1 frames a boutique look at a fraction of the price with metal label holders! #crafts #diypictureframe

Shortly after I put this project together, Jasper ate one of my son’s favorite stuffed animals.  The first thing he yelled in his anger was “you need to change that picture frame to ‘bad boy!'”  I think they’ve made up now, so I will be keeping the “good boy” designation in the frame . . . for now.Upgrade a simple wooden picture frame by turning it into a labeled picture frame! This project gives $1 frames a boutique look at a fraction of the price with metal label holders! #crafts #diypictureframe

Clearly you could frame a photo of anything you want and make these frames in whatever color scheme you like.  The possibilities really are endless!  Because of that, I’d love for you to “pin” this project to share the idea with others!  Upgrade a simple wooden picture frame by turning it into a labeled picture frame! This project gives $1 frames a boutique look at a fraction of the price! #crafts #diypictureframe

Now that you’ve seen my last ever Monthly DIY Challenge project, please visit my friends to see their ideas for metal label holders, too!  I know they’d love to have you swing by.
blank
Thank you for your support of the Monthly DIY Challenge over the years!
-Bre

Filed Under: Crafts

  • « Go to Previous Page
  • Page 1
  • Interim pages omitted …
  • Page 7
  • Page 8
  • Page 9
  • Page 10
  • Page 11
  • Interim pages omitted …
  • Page 21
  • Go to Next Page »

Primary Sidebar

Let’s Connect!

Hi, I’m Bre! Thanks for visiting Average But Inspired, where I show you how to work with what you’ve got to create a home you love.

Bre of Average But Inspired - a DIY and craft blog

Love DIY? Subscribe to Get Posts E-mailed!

How Can I Help You?

blank

How to Paint Over Tile

blank

7 Tips for Hosting a Party on a Budget

blank

How to Create a Faux Antique Brass Finish with Paint

blank

How to Paint a Door to Look Like Wood (It’s Easier Than You Think!)

Looking for Something?

Copyright © 2013-2022, Bre Eggert (Average But Inspired). All rights reserved.
  • Home
  • DIY
  • Crafts
  • Home Decor
  • Privacy Policy and Copyright Policy
  • Disclosures
  • Contact Me