• Skip to primary navigation
  • Skip to main content
  • Skip to primary sidebar
Average But Inspired logo - DIY and craft

Average But Inspired

Craft a home you love. DIY and craft tutorials.

  • About
    • Contact Me
    • Disclosures
    • Privacy Policy and Copyright Policy
  • DIY
    • Furniture
  • Crafts
    • Dollar Store Crafts
    • Seasonal
      • Patriotic & Summer
      • Valentine’s Day
      • Easter & Spring
      • Fall & Halloween
      • Christmas & Winter
  • Home Decor
    • Organization
  • Shop
    • DIY Guides
  • Home

Crafts

Dollar Store Halloween Porch Decor

October 4, 2018 by Bre 7 Comments

While I absolutely love Halloween, I’m not typically a big decorator for the holiday.  I’m not really sure why – it is what it is.  But this year is different because my kids (ages 6 and 8) insisted that we “go all out” and make our house the spookiest on the block.  They wanted to spend my entire life’s savings on Halloween decorations, so I had to rein them in and take them to Dollar Tree to get their fix.

We put up their decorations over the weekend and I’m happy to share their vision** with you!  (**Everything you see is what they picked out.  My version of a Halloween porch would have looked a lot different!  It was hard to let them drive this bus, but I’m glad they got a chance to express their creativity and vision for a Halloween porch.)

This Halloween porch is filled with dollar store items! Check out the post to see how to use dollar store Halloween decorations to deck out your home for Halloween.

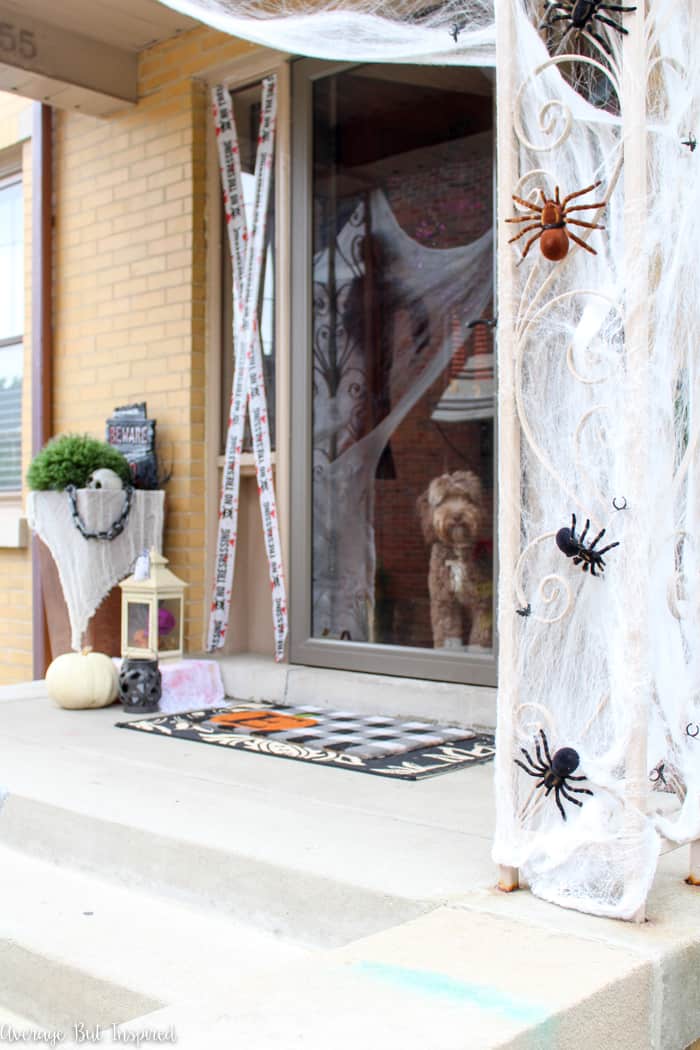
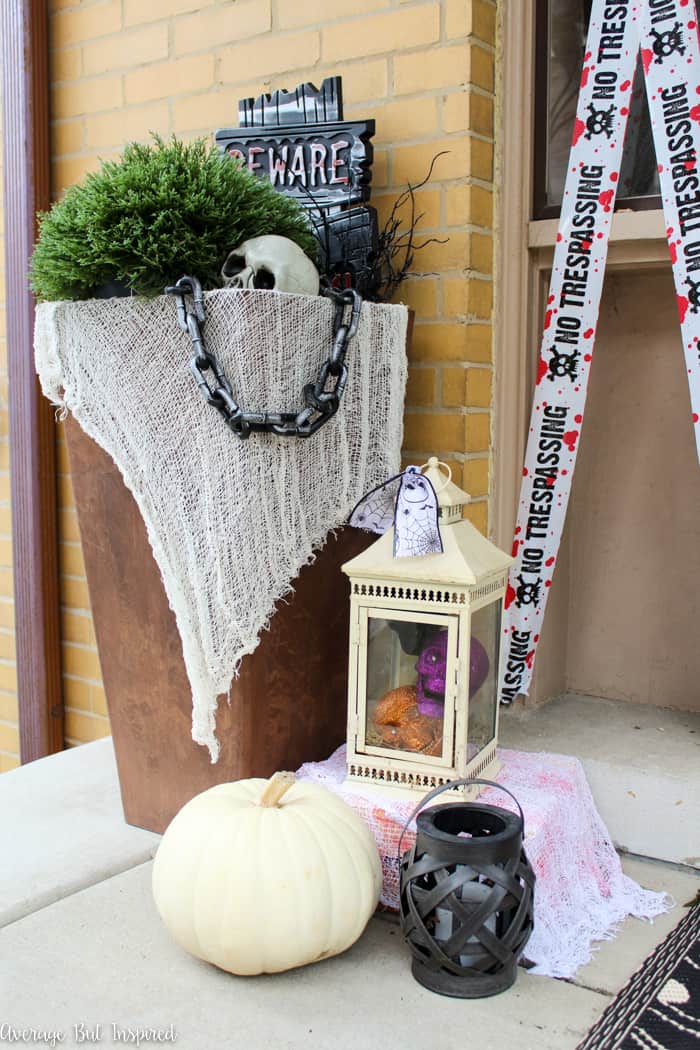
The caution tape was a big hit with my kids.  I think we bought four different types.  Currently only two are displayed on our porch (wrapped around the mum planters and along one of the sidelights), but I’ve been told that the others will definitely be going up for Halloween night.

Planters wrapped in caution tape are a great Halloween decorating idea!

This “creepy” skeleton dude is the splurge item on the porch.  Press his hand and his eyes glow red and he says all kinds of weird stuff to you (REALLY LOUDLY).  The kids were lucky they caught me in a generous moment during one of our Home Depot trips.  🙂

This post is filled with ideas for decorating your porch for Halloween with dollar store items!

The planters are my favorite part of the porch.  They’re filled with lots of random Dollar Tree finds, but it kind of works!

Fill an outdoor planter with dollar store Halloween decorations for a spooky look on your front porch! This Halloween front porch has lots of budget-friendly ideas!

I mean, when doesn’t a skull look good next to your front door?Fill an outdoor planter with dollar store Halloween decorations for a spooky outdoor Halloween display! This post has lots of good dollar store Halloween decor ideas!Glittered skulls in an outdoor lantern are a fabulous way to decorate for Halloween! These dollar store Halloween porch decor ideas are not to be missed!

Now this doormat combo is a huge point of contention with my kids.  My mom gave me this personalized pumpkin doormat earlier this fall and I love it.  The kids say it’s too cute.  They want it gone.  What do you think?  Should it stay or should it go?Layered doormats make a beautiful statement at the front door.

Well, that’s the end of my Halloween front porch tour.  My porch is so tiny that there’s not much to see!  I hope you enjoyed seeing my kids’ handiwork.  Stop by on Halloween night for some candy!

This Halloween front porch is filled with dollar store Halloween decorations. See how to decorate your Halloween porch on a budget!

Filed Under: Dollar Tree, Fall and Halloween, Holiday

DIY Dollar Tree Pumpkin Picture Frames

September 19, 2018 by Bre 2 Comments

blank

Fall is my favorite season for Dollar Tree crafts and makeovers, so when I saw their fresh crop of fall arrivals, I suddenly felt inspired to get dollar store crafty. (You might like my Dollar Tree Pumpkin Sign Project or Candy Corn Topiary, too!) 

I purchased a couple of their fall pumpkin chipboard decorations (NOTE: even though this post was written in 2018, Dollar Tree currently has similar decorations this 2025 season and I linked them in the supply list!), and knew I could turn them into something cuter and more personal – DIY pumpkin picture frames, to be precise! 

So cute! Transform Dollar Tree pumpkin decorations into adorable pumpkin picture frames that are perfect for displaying fall photos! #dollartree #dollartreecrafts #dollartreedecor #fallcrafts

Dollar Tree DIY Pumpkin Picture Frames Supplies

  • Chipboard pumpkin decorations from Dollar Tree (similar)
  • Acrylic paints in colors of your choice (I used cream, beige, and orange)
  • Paint brushes
  • Dollar Tree fall ribbon
  • Scissors
  • Twine
  • Raffia
  • Hot glue gun and hot glue

How to Create Dollar Tree DIY Fall Picture Frames

Begin by ripping off the decorative accent portions of the chipboard pumpkins (for example, the raffia and the chipboard flower and/or pumpkin).  Once those are off, rip off the printed layer of the chipboard.  This came off easily!  

So cute! Transform Dollar Tree pumpkin decorations into adorable pumpkin picture frames that are perfect for displaying fall photos! #dollartree #dollartreecrafts #dollartreedecor #fallcrafts

Next, paint the pumpkins whatever color you like.  I went for a white pumpkin look, so I used a cream acrylic paint and then added some beige lines to give the pumpkins a bit of dimension.  I then painted the stand portion of the project orange.  

So cute! Transform Dollar Tree pumpkin decorations into adorable pumpkin picture frames that are perfect for displaying fall photos! #dollartree #dollartreecrafts #dollartreedecor #fallcrafts

After the paint dried, I tied ribbon and raffia around the top of each pumpkin for some cute detail and color.  

So cute! Transform Dollar Tree pumpkin decorations into adorable pumpkin picture frames that are perfect for displaying fall photos! #dollartree #dollartreecrafts #dollartreedecor #fallcrafts

Then I wrapped twine around the top and bottom portions of each pumpkin and hot glued it to the back of each pumpkin.  

So cute! Transform Dollar Tree pumpkin decorations into adorable pumpkin picture frames that are perfect for displaying fall photos! #dollartree #dollartreecrafts #dollartreedecor #fallcrafts

When the hot glue dried, the pumpkin frames looked like this.  

So cute! Transform Dollar Tree pumpkin decorations into adorable pumpkin picture frames that are perfect for displaying fall photos! #dollartree #dollartreecrafts #dollartreedecor #fallcrafts

Super cute, but even cuter once I added pictures of my kids at the pumpkin patch, and my dog posing with a pumpkin.  

So cute! Transform Dollar Tree pumpkin decorations into adorable pumpkin picture frames that are perfect for displaying fall photos! #dollartree #dollartreecrafts #dollartreedecor #fallcrafts

The twine holds the photos in place, and these little Dollar Tree pumpkin frames are the perfect spot to display fall themed photos!  

So cute! Transform Dollar Tree pumpkin decorations into adorable pumpkin picture frames that are perfect for displaying fall photos! #dollartree #dollartreecrafts #dollartreedecor #fallcrafts

So cute! Transform Dollar Tree pumpkin decorations into adorable pumpkin picture frames that are perfect for displaying fall photos! #dollartree #dollartreecrafts #dollartreedecor #fallcrafts

It doesn’t get much easier than this, so I’d appreciate it if you would pin this project on Pinterest to help others find it!  

Will you be heading to Dollar Tree to find some of these chipboard pumpkins to transform into pumpkin picture frames?

Filed Under: Crafts, Dollar Tree, Fall and Halloween, Holiday

How to Paint a Straw Tote for a Trendy Summer Bag

July 17, 2018 by Bre 4 Comments

blank

Create a custom straw tote bag with this easy straw bag painting tutorial!

If you’ve been in any stores recently or shopped online, then you’ve definitely noticed that straw bags are the must have this summer.  Every store has them and they’re all so cute! 

Although I already have a small straw purse, I wanted a larger one for every day use, but I didn’t want a large price tag. 

That’s why I decided to paint a straw tote and get a cute summer bag at a fraction of the price! 

Grab a plain straw bag and customize it with paint and a DIY fabric tassel! It's so easy to get this trendy straw bag look for summer without spending a fortune. Learn how in this post!

This was a super simple project that left me with a darling straw tote, and I can’t wait to show you just how to make your own!

Supplies Needed to Paint a Straw Purse

This post contains affiliate links.  To read my full disclosure policy, please click here.

  • Straw tote bag (Linked bag is similar to the one used in this post)
  • Multi-surface acrylic paints in colors of your choice
  • Artist paintbrush
  • Letter stencil
  • Masking tape (to hold stencil in place)
  • Scrap fabric (to make tassel)
  • Embroidery floss (to make tassel)
  • Pinking shears (to make tassel)
  • Optional: premade bag tassel

How to Paint a Straw Tote Bag

Before I show you how I customized my plain straw tote, let me show you how boring it was initially. 

Grab a plain straw bag and customize it with paint and a DIY fabric tassel! It's so easy to get this trendy straw bag look for summer without spending a fortune. Learn how in this post!

I knew it could be so much cuter, so I grabbed my acrylic paints and got to work! 

Grab a plain straw bag and customize it with paint and a DIY fabric tassel! It's so easy to get this trendy straw bag look for summer without spending a fortune. Learn how in this post!

I began by painting a band of aqua at the bottom of the bag, simply following the lines in the straw as my guide.  

Then I found a letter stencil I’ve had for YEARS in my craft stash and taped that onto the bag. 

Grab a plain straw bag and customize it with paint and a DIY fabric tassel! It's so easy to get this trendy straw bag look for summer without spending a fortune. Learn how in this post!

I couldn’t get it totally flush with the bag, but I did the best I could.  

I chose a coordinating color of paint for the stencil and I got to work, gently applying the paint to the stencil and trying to prevent any bleed through from happening. 

To do this, I used the stencil as more of a guide than an actual stencil.  

Grab a plain straw bag and customize it with paint and a DIY fabric tassel! It's so easy to get this trendy straw bag look for summer without spending a fortune. Learn how in this post!

Thankfully there was no bleed through or smudges, and the tote looked great!

It was missing a little something, however, so I whipped up a fabric tassel with some scrap fabric. 

I Think You’ll Like These Other Bag and Purse Ideas, Too!

DIY Upcycled Shirt Tote Bag

No-Sew Clutch Purse (From a Placemat!)

To do this, just cut narrow strips of fabric with pinking shears, lay them on top of each other, fold in half and secure near the top with embroidery floss!

Making fabric tassels could not be easier! Get the how to in this post, and see how cute fabric tassels look on purses!

I covered the embroidery floss with another piece of scrap fabric for a more “finished” look.  

Grab a plain straw bag and customize it with paint and a DIY fabric tassel! It's so easy to get this trendy straw bag look for summer without spending a fortune. Learn how in this post!

And I attached that right to the tote bag.

Grab a plain straw bag and customize it with paint and a DIY fabric tassel! It's so easy to get this trendy straw bag look for summer without spending a fortune. Learn how in this post!

And that is all it took to upgrade a plain straw tote to a cute, personalized straw tote bag for summer!  

So what are you waiting for?  Summer will be gone before we know it, so paint a straw tote for yourself ASAP!  How would you customize yours?

Filed Under: Crafts Tagged With: Summer

How to Make a Bold DIY Tissue Paper Mug

May 14, 2018 by Bre 4 Comments

blank

This post is part of a social shopper marketing insight campaign with Pollinate Media Group® and The J.M. Smucker Company, but all my opinions are my own. #pmedia #1850Coffee #1850CoffeeatMeijer  http://my-disclosur.es/OBsstV

Every day I hop on the hamster wheel of life and grind out tasks for my job, my blog, and of course, my family!  Being pulled in so many directions all the time can be draining to say the least.  (I know you know what I’m talking about!)  That’s why I take ten minutes at the beginning of every day (before the kids get up), to drink a cup of coffee, enjoy the quiet, and think about what that day holds.

Folgers coffee has always been in my morning mug, but their new premium coffee, 1850 Brand Coffee, is my now filling my cup.

Learn how to make a bold and dishwasher safe DIY Tissue Paper Mug with this easy project tutorial! With just four supplies you can make these adorable DIY coffee mugs that are perfect for inexpensive gifts or girls night craft parties! Anyone can make tissue paper mugs!

The 1850 Brand Coffee beans are fire-roasted and ground to bring out rich taste and aroma, and their unique blends deliver bold, yet smooth, taste.  I feel like I’m enjoying a coffee from a nice coffee shop every morning (minus any bitter taste)!  Learn how to make a bold and dishwasher safe DIY Tissue Paper Mug with this easy project tutorial! With just four supplies you can make these adorable DIY coffee mugs that are perfect for inexpensive gifts or girls night craft parties! Anyone can make tissue paper mugs!

Starting my day on a positive note is essential to my productivity, and that’s why I value my morning coffee time so much! Drinking my 1850 Brand Coffee from a mug as bold as my drink’s flavor profile is also a favorite way to get excited about the day.  Learn how to make a bold and dishwasher safe DIY Tissue Paper Mug with this easy project tutorial! With just four supplies you can make these adorable DIY coffee mugs that are perfect for inexpensive gifts or girls night craft parties! Anyone can make tissue paper mugs!

And guess what? This bold mug is the easiest thing to make!  Let me show you how. . . .

First, you’ll need to gather the following supplies:

  • Plain mug (you can buy them at the dollar store!)
  • Tissue paper
  • Dishwasher-safe Mod Podge
  • Paintbrush

Learn how to make a bold and dishwasher safe DIY Tissue Paper Mug with this easy project tutorial! With just four supplies you can make these adorable DIY coffee mugs that are perfect for inexpensive gifts or girls night craft parties! Anyone can make tissue paper mugs!

Begin by ripping pieces of tissue paper into sizes that will fit on the mug.  Learn how to make a bold and dishwasher safe DIY Tissue Paper Mug with this easy project tutorial! With just four supplies you can make these adorable DIY coffee mugs that are perfect for inexpensive gifts or girls night craft parties! Anyone can make tissue paper mugs!

Paint a thin, light coat of Mod Podge onto the back of a piece of tissue paper and press the tissue paper onto the mug.  Carefully smooth any wrinkles, taking care not to rip the tissue paper.  Learn how to make a bold and dishwasher safe DIY Tissue Paper Mug with this easy project tutorial! With just four supplies you can make these adorable DIY coffee mugs that are perfect for inexpensive gifts or girls night craft parties! Anyone can make tissue paper mugs!

Learn how to make a bold and dishwasher safe DIY Tissue Paper Mug with this easy project tutorial! With just four supplies you can make these adorable DIY coffee mugs that are perfect for inexpensive gifts or girls night craft parties! Anyone can make tissue paper mugs!

Once the mug is covered in tissue paper, let it dry for at least 20 minutes.  When the Mod Podge feels dry, cover all of the tissue paper with a coat of Mod Podge.  Let it dry and repeat this process at least one more time.  Learn how to make a bold and dishwasher safe DIY Tissue Paper Mug with this easy project tutorial! With just four supplies you can make these adorable DIY coffee mugs that are perfect for inexpensive gifts or girls night craft parties! Anyone can make tissue paper mugs!

Before putting your tissue paper mug through the dishwasher, make sure to read the Mod Podge instructions about curing!  Learn how to make a bold and dishwasher safe DIY Tissue Paper Mug with this easy project tutorial! With just four supplies you can make these adorable DIY coffee mugs that are perfect for inexpensive gifts or girls night craft parties! Anyone can make tissue paper mugs!

Would you believe that you can make such adorable coffee mugs with tissue paper?  Make a bunch and pair them with packages of 1850 Brand Coffee for a darling gift that any coffee drinker would love!  Or make one for yourself and enjoy your daily coffee in a colorful and happy mug!  Learn how to make a bold and dishwasher safe DIY Tissue Paper Mug with this easy project tutorial! With just four supplies you can make these adorable DIY coffee mugs that are perfect for inexpensive gifts or girls night craft parties! Anyone can make tissue paper mugs!

1850 Brand Coffee is available in four signature ground coffee blends or K-Cups, and will also be available in three ready to drink flavors!  And BONUS for those of you with a Meijer in the area: visit Meijer from 5/6 – 6/2 and take $1 off any 1850 Brand Coffee Product with the mPerk digital coupon (while supplies last)!

Remember that to live a bold life, you must first make a bold choice.  Back in 1850, J.A. Folger started something innovative to help the prospectors as they sought their fortunes, and today, there’s still no better way to hustle than by starting your day with a bold-yet-smooth cup of coffee.  Let 1850 Brand Coffee in a DIY Tissue Paper Mug fuel your original ideas, daily commitments, and new endeavors.  Learn how to make a bold and dishwasher safe DIY Tissue Paper Mug with this easy project tutorial! With just four supplies you can make these adorable DIY coffee mugs that are perfect for inexpensive gifts or girls night craft parties! Anyone can make tissue paper mugs!

If you agree, I’d love for you to save this image to Pinterest to help others find it!  Learn how to make a bold and dishwasher safe DIY Tissue Paper Mug with this easy project tutorial! With just four supplies you can make these adorable DIY coffee mugs that are perfect for inexpensive gifts or girls night craft parties! Anyone can make tissue paper mugs! #diycoffeemugs #coffeemugideas #coffeemugcrafts #dishwashersafecoffeemugs

This DIY tissue paper coffee mug makes a great DIY gift for the holidays!  If you’re looking for other great DIY gift ideas, check out this post with 15 DIY Holiday Gifts Under $10!

blank
15 DIY Holiday Gifts Under $10

-Bre

Filed Under: Crafts

How to Make an Outdoor Hula Hoop Wreath

May 2, 2018 by Bre 4 Comments

blank

I hope I’m not jinxing it by saying that spring has finally arrived in Chicago, but with beautiful sunshine and temps in the 70’s, I think it’s safe to say that winter is gone!  I am really looking forward to sprucing up my backyard and patio this season, and I have the first project to share with you – my new outdoor hula hoop wreath! 

Yes – I turned a hula hoop into a large outdoor wreath and I’m going to show you how to make one for your outdoor space, too!  

Add a pop of color to your patio with a pretty DIY Outdoor Hula Hoop Wreath! Click here for the tutorial on how to make a hula hoop wreath, and learn how to protect it for outdoor use.

I wish I had some pretty backyard shots to show you, but my grass is barely growing, I have no flowers, and everything still looks kind of blah.  So you’ll just have to see my wreath for now and check back later in the season to see how it looks with the rest of my backyard setup!

Supplies Needed for a DIY Hula Hoop Wreath

This post contains affiliate links. To read my full disclosure policy, please click here.

These are the supplies I used to make the hula hoop wreath as shown in this post.  You can substitute anything to make the wreath your own style!

  • Hula hoop (I bought mine at the dollar store)
  • Faux greenery (I picked out two types at Michaels)
  • Faux lemons with leaves
  • Gorilla tape
  • Floral wire
  • Scissors
  • UV floral protectant spray
  • Rope
  • Fishing line

How to Make a DIY Outdoor Hula Hoop Wreath

If you’ve read this far, I think it’s safe to assume that you’re into this project.  But in case you’re not, let me tell you why you’d want to use a hula hoop for a wreath.  The answer is that hula hoops make very large wreath bases at a very inexpensive price point!

OK, so let’s get started on crafting a wreath with a hula hoop.

Hula Hoop Wreath Step One: Make the Hoop Plain

When I started, my hula hoop looked like this – it had a bright pattern all over it.  

Add a pop of color to your patio with a pretty DIY Outdoor Hula Hoop Wreath! Click here for the tutorial on how to make a hula hoop wreath, and learn how to protect it for outdoor use.

The pattern was just tape, so I peeled it all off to reveal a plain, brown hula hoop.  Not so good for kids, but perfect for my wreath! 

If your hula hoop is not decorated with tape, you could spray paint it to get a solid color.  

Add a pop of color to your patio with a pretty DIY Outdoor Hula Hoop Wreath! Click here for the tutorial on how to make a hula hoop wreath, and learn how to protect it for outdoor use.

Step Two: Attach Greenery to the Hula Hoop

I started to transform the hula hoop into a wreath by attaching pieces of faux greenery to the it with Gorilla Tape.  This tape worked perfectly because it is the same color as the hula hoop and because it is SO STRONG and waterproof – perfect for outdoors!  

Add a pop of color to your patio with a pretty DIY Outdoor Hula Hoop Wreath! Click here for the tutorial on how to make a hula hoop wreath, and learn how to protect it for outdoor use.

After I had a first layer of greenery on the hula hoop, I attached a different type of greenery to the hula hoop – also with the Gorilla Tape.  The first type of greenery had large leaves; the second had small leaves and tiny white flowers.

Add a pop of color to your patio with a pretty DIY Outdoor Hula Hoop Wreath! Click here for the tutorial on how to make a hula hoop wreath, and learn how to protect it for outdoor use.

Then, I used floral wire to wire in some faux lemons.  I liked the pop of color the lemons added.  Plus, they’re summery and fun.  (If lemons leave a sour taste in your mouth, skip them.  :-))

Add a pop of color to your patio with a pretty DIY Outdoor Hula Hoop Wreath! Click here for the tutorial on how to make a hula hoop wreath, and learn how to protect it for outdoor use.

Hula Hoop Wreath Step Three: Protect the Greenery from Fading

Once I had everything on the hula hoop, I took it outside and sprayed it with UV Floral Protectant. 

Faux flowers and faux greenery can become discolored by the sun when left outside, so spraying them with this UV Floral Protectant helps preserve the color.  The vibrant colors will last so much longer! 

Add a pop of color to your patio with a pretty DIY Outdoor Hula Hoop Wreath! Click here for the tutorial on how to make a hula hoop wreath, and learn how to protect it for outdoor use.

Step Four: Wrap the Hula Hoop with Rope

After that dried, I cut some rope and fastened it to the top part of the hula hoop (where the greenery doesn’t show), with the Gorilla Tape.  

Add a pop of color to your patio with a pretty DIY Outdoor Hula Hoop Wreath! Click here for the tutorial on how to make a hula hoop wreath, and learn how to protect it for outdoor use.

I then hung the hula hoop wreath from the side garage door (I have a detached garage that is next to my patio), with fishing line.  I put the hook on the inside of the side door and strung the fishing line over it so that the wreath hanger is not visible on the door.  

Add a pop of color to your patio with a pretty DIY Outdoor Hula Hoop Wreath! Click here for the tutorial on how to make a hula hoop wreath, and learn how to protect it for outdoor use.

This outdoor hula hoop wreath is super cute and was such an inexpensive way to add a decorative touch to my (currently) bare patio area!

Add a pop of color to your patio with a pretty DIY Outdoor Hula Hoop Wreath! Click here for the tutorial on how to make a hula hoop wreath, and learn how to protect it for outdoor use.

Add a pop of color to your patio with a pretty DIY Outdoor Hula Hoop Wreath! Click here for the tutorial on how to make a hula hoop wreath, and learn how to protect it for outdoor use.

Add a pop of color to your patio with a pretty DIY Outdoor Hula Hoop Wreath! Click here for the tutorial on how to make a hula hoop wreath, and learn how to protect it for outdoor use.

Now I just hope some flowers bloom out there soon so we can really enjoy the patio and its pretty colors!

-Bre


Filed Under: Crafts, home decor

The Easiest DIY Trinket Dish Ever

March 28, 2018 by Bre 27 Comments

blank

Trinket dishes are one of my favorite additions to my home decor because they’re SO useful (hello, great place to keep rings and jewelry, and catch-all for random tiny things!), and because they can be so darn cute! 

I have them near every sink that I use regularly and in other spots like on my dresser.  I decided to try my hand at a DIY Trinket Dish recently and had so much fun making this quick and easy but oh-so-darling craft, that I couldn’t wait to share it with you!  

This has to be the easiest DIY trinket dish ever! With a few simple and inexpensive supplies, you can make an adorable trinket dish to store your jewelry and other treasures. A perfect ladies' craft night project or quick weekend craft - this is a project everyone can do!

Not only is this DIY Trinket Dish cute, but it is so useful!  The best part is that it was very quick to make and required only a few inexpensive supplies.

Supplies Needed for a DIY Trinket Dish

Some of these links are affiliate links.  To read my full disclosure policy, please click here.

    • Porcelain soap dish or small bowl
    • Pretty paper napkins 
    • Mod Podge
    • Scissors
    • Paintbrush  

This has to be the easiest DIY trinket dish ever! With a few simple and inexpensive supplies, you can make an adorable trinket dish to store your jewelry and other treasures. A perfect ladies' craft night project or quick weekend craft - this is a project everyone can do!

How to Make a DIY Trinket Dish

You’ll love making this project!

DIY Trinket Dish Step One: Cut Up the Napkin

Begin by cutting apart a paper napkin with whatever elements of the design you want to use on the trinket dish.  You can see I tried to cut as close to the printed design as I could – leaving off as much white space around the design as possible.

This has to be the easiest DIY trinket dish ever! With a few simple and inexpensive supplies, you can make an adorable trinket dish to store your jewelry and other treasures. A perfect ladies' craft night project or quick weekend craft - this is a project everyone can do!

Next, make sure to remove the second layer of the paper napkin.  All you want for this project is the top, printed layer of the design!

Step Two: Mod Podge the Dish

Once you’ve done that, spread a thin layer of Mod Podge onto the part of the soap dish or bowl where you’ll be placing your napkin pieces.  You should probably only do a little part of the dish at a time to prevent the Mod Podge from drying before you’ve placed anything there.

This has to be the easiest DIY trinket dish ever! With a few simple and inexpensive supplies, you can make an adorable trinket dish to store your jewelry and other treasures. A perfect ladies' craft night project or quick weekend craft - this is a project everyone can do!

Step Three: Lay Down the Napkins

Gently place the napkin pieces where you want them and make sure to gently smooth the pieces down to remove any ripples.  Be careful not to rip the napkin!  

This has to be the easiest DIY trinket dish ever! With a few simple and inexpensive supplies, you can make an adorable trinket dish to store your jewelry and other treasures. A perfect ladies' craft night project or quick weekend craft - this is a project everyone can do!

Once you have the soap dish or bowl decorated just how you like it, let the pieces dry. 

Step Four: Topcoat with Mod Podge

After about twenty minutes/when everything is dry, cover the entire dish with another coat of Mod Podge.  It will look funky for a little bit, but it will dry clear!

This has to be the easiest DIY trinket dish ever! With a few simple and inexpensive supplies, you can make an adorable trinket dish to store your jewelry and other treasures. A perfect ladies' craft night project or quick weekend craft - this is a project everyone can do!

Once the Mod Podge is completely dry, the white parts of the napkin blend in with the dish, and the printed design looks like it’s printed or painted right on there!  

This has to be the easiest DIY trinket dish ever! With a few simple and inexpensive supplies, you can make an adorable trinket dish to store your jewelry and other treasures. A perfect ladies' craft night project or quick weekend craft - this is a project everyone can do!

If you’re not careful to remove the second layer of the napkin though, it won’t look as good!  I accidentally left the second layer on that green leaf on the side of the trinket dish (pictured below), and you can absolutely see the white around the leaf.  Bummer!  Oh well, the name of this blog is Average But Inspired – not Perfect But Inspired.  😉

This has to be the easiest DIY trinket dish ever! With a few simple and inexpensive supplies, you can make an adorable trinket dish to store your jewelry and other treasures. A perfect ladies' craft night project or quick weekend craft - this is a project everyone can do!

Wouldn’t this make a fun ladies’ craft night project with your friends?  Anybody can do this and it’s so inexpensive!  Get that on the calendar!  You’ll be glad to spend time with your friends and walk away with a cute place to put your jewelry and trinkets.

This has to be the easiest DIY trinket dish ever! With a few simple and inexpensive supplies, you can make an adorable trinket dish to store your jewelry and other treasures. A perfect ladies' craft night project or quick weekend craft - this is a project everyone can do!

-Bre

Filed Under: Crafts, Dollar Tree, Homepage Crafts

  • « Go to Previous Page
  • Page 1
  • Interim pages omitted …
  • Page 6
  • Page 7
  • Page 8
  • Page 9
  • Page 10
  • Interim pages omitted …
  • Page 21
  • Go to Next Page »

Primary Sidebar

Let’s Connect!

Hi, I’m Bre! Thanks for visiting Average But Inspired, where I show you how to work with what you’ve got to create a home you love.

Bre of Average But Inspired - a DIY and craft blog

Love DIY? Subscribe to Get Posts E-mailed!

How Can I Help You?

blank

7 Tips for Hosting a Party on a Budget

blank

How to Paint a Door to Look Like Wood (It’s Easier Than You Think!)

blank

How to Paint a Countertop to Look Like Marble!

blank

Limewash Stone Fireplace Makeover: Bye Bye Orange Stone Fireplace, Hello Neutral Stone Beauty!

Looking for Something?

Copyright © 2013-2022, Bre Eggert (Average But Inspired). All rights reserved.
  • Home
  • DIY
  • Crafts
  • Home Decor
  • Privacy Policy and Copyright Policy
  • Disclosures
  • Contact Me