• Skip to primary navigation
  • Skip to main content
  • Skip to primary sidebar
Average But Inspired logo - DIY and craft

Average But Inspired

Craft a home you love. DIY and craft tutorials.

  • About
    • Contact Me
    • Disclosures
    • Privacy Policy and Copyright Policy
  • DIY
    • Furniture
  • Crafts
    • Dollar Store Crafts
    • Seasonal
      • Patriotic & Summer
      • Valentine’s Day
      • Easter & Spring
      • Fall & Halloween
      • Christmas & Winter
  • Home Decor
    • Organization
  • Shop
    • DIY Guides
  • Home

Crafts

Dollar Tree Easter Craft: DIY Bunny Planters

April 1, 2019 by Bre 2 Comments

This adorable Dollar Tree Easter craft is easy to make! Display this DIY bunny planter all spring long.

Sometimes life gets in the way of creative time, and that has definitely been the case for me recently!  I finally made it a priority over the weekend, and just LOVE this Dollar Tree Easter craft I whipped up: these darling DIY Bunny Planters!

These cute DIY Bunny Planters are made with dollar store supplies! Get the project tutorial for this cute Dollar Tree Easter craft in this blog post.

They are a speedy project, which is great when you don’t have a lot of leisure time.  Plus, they add a cute touch to your spring and Easter decor.

Supplies Needed to Make DIY Bunny Planters

This post contains affiliate links.  Please read my disclosure policy for more information.

  • Small white planters (originally purchased at Dollar Tree, but they don’t have them currently. You could also purchase terracotta pots and paint them white.)
  • Hot Pink multi-surface acrylic paint
  • Gray multi-surface acrylic paint
  • Small paint brush
  • Floral moss
  • Faux succulents
  • White felt
  • Pink felt
  • Fabric scissors
  • Multi-surface glue, like E6000 brand
  • Clothespins or craft clamps
  • Optional: bunny ear templates that you draw onto paper or card stock

Dollar Tree Easter Craft How-To: Instructions for Making DIY Bunny Planters

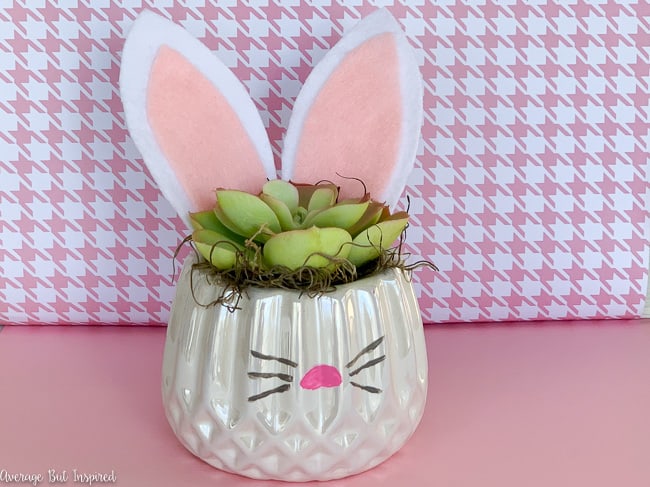
I started with the cutest little white planters that I got at Dollar Tree.  I just love them with their facets and iridescent shimmer!  They came in other colors, too, like pink and turquoise, but I think white is best for this project.  (Update: I don’t think Dollar Tree carries these anymore, but you could paint a flower pot white to make this craft or use a small white planter like this!)

Step One: Paint a Nose and Whiskers

I used a small paint brush to paint a pink nose and gray whiskers onto the planter.  I used multi-surface acrylic paint to make sure it adheres well!

Transform a plain dollar store planter into an adorable bunny planter! It's a great Easter craft. Get the project tutorial in this post.

If you don’t want the mess of paint and a paint brush, you could also use oil-based Sharpie markers. I love those things!

Step Two: Make a Bunny Ears Template

Next, I drew bunny ear templates onto scrap cardstock and cut those out.  I drew a large ear and a smaller ear. 

Love Dollar Tree spring crafts? Check out this adorable Dollar Tree Easter wreath!

Step Three: Create the Bunny Ears

Then, I used the larger ear template to cut out two white felt ears. 

I used the smaller template to cut out two pink felt ears. 

I didn’t draw on the felt – I just held the templates in place and carefully cut around them.

Cut out felt ears to make a cute DIY Dollar Store Bunny Planter that's perfect for Easter or spring.

Then, I glued one pink felt ear onto each white felt ear. 

These felt ears will become bunny ears in this darling DIY Dollar Store Bunny Planter project.

Step Four: Attach the Ears to the Planter

Next, I placed a thin line of multi-surface E6000 glue around the inner rim of the planter. 

I pressed the ears onto the glue, and held them in place temporarily with clothespins.  Once the glue hardened, I removed the clothespins. 

Clothespins hold the bunny ears in place while the glue is drying on these DIY Bunny Planters.

Step Five: Fill the Planter

I filled the planter with craft moss to help hold the faux succulent in place.  This stuff makes a mess, so have your broom or dust buster ready!  😉

Fill the DIY Bunny Planter with craft moss prior to adding the faux succulent.

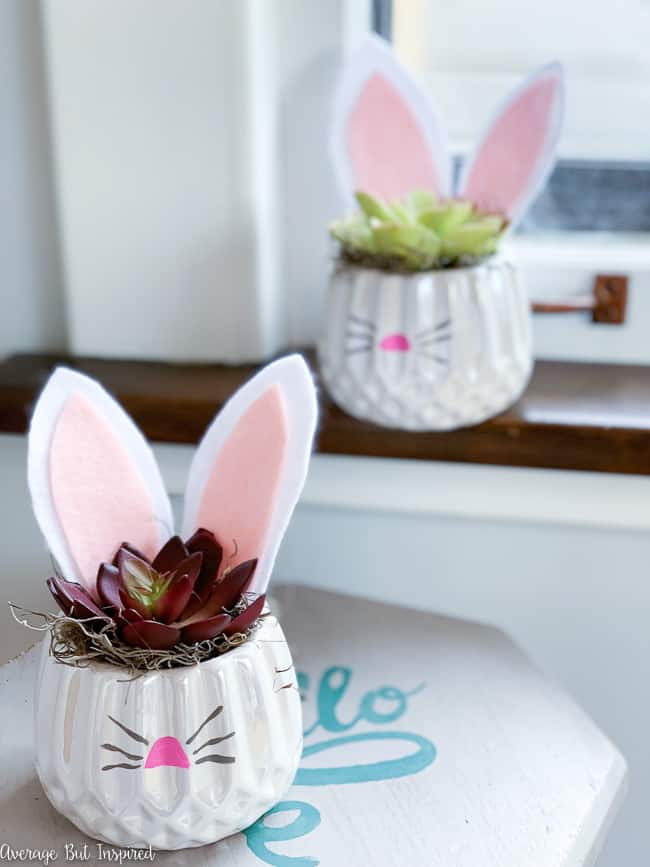
And for the final touch, I placed a faux succulent into the planter. 

Learn how to make a darling DIY Bunny Planter for Easter or Spring in this blog post!

These little bunny planters make me so happy; I think they’re just darling!  They are a great spring or Easter craft project, and make for a sweet Easter hostess gift or addition to your spring decor!  

If you wouldn’t mind, I’d love for you to pin this Dollar Tree Easter craft project to Pinterest and help spread the love! 

So cute! Make these Dollar Store DIY Bunny Planters for Easter or spring! They're easy to make and such a cute spring craft!

Filed Under: Crafts, Dollar Tree, Easter, Holiday

How to Make DIY Glitter Luggage Tags (Without the Mess!)

March 5, 2019 by Bre Leave a Comment

blank

Spring break is coming up soon, and my family really hoped to take a vacation to escape the unusually cold winter weather!  Unfortunately for us that won’t be happening, but it did get me dreaming of jetting off to some place fabulous (or even somewhere lame – basically just going anywhere!).  With wanderlust in my heart, I created some cute DIY Glitter Luggage Tags for my future travels.  These are such a simple project that will add a fun touch to any suitcase, travel bag, or purse! Add a dash of fun to your vacation with these cute DIY Glitter Luggage Tags! Make your own sparkly luggage tags without the mess, and travel in style.

Supplies Needed for DIY Glitter Luggage Tags

This post contains affiliate links.  To read my full disclosure policy, click here.  Also, thank you to DecoArt for giving me the paint used in this post.

  • Unfinished wood tags
  • DecoArt Galaxy Glitter paints in colors of your choice
  • DecoArt Americana Acrylics paint in complimentary colors to the Galaxy Glitter paints used (they have a chart on their site that helps you match up colors)
  • Paint brush
  • Electronic cutting machine and vinyl OR letter stickers or phrases stickers from the scrapbook aisle at the craft store
  • Book rings

How to Make DIY Glitter Luggage Tags

I love a dash of glitter on a project, but sometimes the mess is not worth it.  Because of that, I was excited to see a new line of mega-glittered craft paints from DecoArt that give you the intense glitter look without the mess of actually working with glitter.  I decided to test them out on this project!

First, I painted designs with Americana Acrylics paint onto my unfinished wood tags.  Add a dash of fun to your vacation with these cute DIY Glitter Luggage Tags! Make your own sparkly luggage tags without the mess, and travel in style.

Once the paint dried, I added a topcoat of Galaxy Glitter paint in a shade that coordinated with the base coat color.  This made the glitter in the paint stand out even more!  Add a dash of fun to your vacation with these cute DIY Glitter Luggage Tags! Make your own sparkly luggage tags without the mess, and travel in style.

After the paint dried, I used my ancient (by today’s standards) Silhouette electronic cutting machine to cut out some cute travel-related phrases and the initial of my first name.  Add a dash of fun to your vacation with these cute DIY Glitter Luggage Tags! Make your own sparkly luggage tags without the mess, and travel in style.

If you don’t have a fancy-schmancy cutting machine – no worries!  You can get the same look with letter stickers or travel-related scrapbook stickers from the craft store.  Once your words are ready, stick them onto the front of the luggage tag.  Add a dash of fun to your vacation with these cute DIY Glitter Luggage Tags! Make your own sparkly luggage tags without the mess, and travel in style.Add a dash of fun to your vacation with these cute DIY Glitter Luggage Tags! Make your own sparkly luggage tags without the mess, and travel in style.

Finally, add a book ring through the hole in the top of the tag so that you can attach the tag to your luggage!  Or, if you don’t want to use a book ring, a key ring or key chain will do the trick.  Add a dash of fun to your vacation with these cute DIY Glitter Luggage Tags! Make your own sparkly luggage tags without the mess, and travel in style.

Won’t these make an adorable addition to my luggage?  Add a dash of fun to your vacation with these cute DIY Glitter Luggage Tags! Make your own sparkly luggage tags without the mess, and travel in style.

Now . . . I just need to save up enough cash to actually go somewhere!  Do you have any fun travel plans in the near future?  Let me know in the comments!

-Bre

You May Also Like Making These DIY Air Dry Clay Keychains  blank

Filed Under: Crafts

My Favorite DIY Dollar Store Home Decor Ideas

February 5, 2019 by Bre Leave a Comment

blank

It’s no secret that I harbor a true love for Dollar Tree. It is definitely in my top five favorite stores! Because of that, I’ve shared many DIY Dollar Store Home Decor Ideas on my blog over the years.  Often those projects were seasonal or holiday-themed, but I’ve also created a fair amount of year-round dollar store decor projects, too. 

There are so many great DIY Dollar Store Decor Ideas in this post! It's so easy to make pretty home decor with items from the dollar store or Dollar Tree! #dollarstoredecordiy #dollarstoredecorating #dollartreedecorideas

Today I’m rounding up several of my favorite dollar store decor projects that will work for any time of the year, and I hope they inspire you to get creative at the dollar store!

DIY Dollar Store Home Decor Ideas

Make your home decor shine with these DIY dollar store decorating ideas! They're all affordable decor projects that don't look like they came from the dollar store.

Image for DIY Dollar Store Plates Decor

DIY Dollar Store Plates Decor

Transform plain dollar store plates into adorable wall decor that looks great hanging in your kitchen!

Image for Dollar Store Silver Tray Wreath

Dollar Store Silver Tray Wreath

A plain dollar store silver tray is transformed into a lovely wreath! Accent it with leaves for the fall, or flowers for the spring! The possibilities are endless.

Image for Dollar Store DIY Pizza Pan Magnet Board

Dollar Store DIY Pizza Pan Magnet Board

Make a dollar store pizza pan your new decorative organization piece! This post will show you how!

Image for Dollar Store DIY Salt and Pepper Shaker Bud Vases

Dollar Store DIY Salt and Pepper Shaker Bud Vases

Make dollar store salt and pepper shakers into beautiful bud vases! They'll add a decorative touch to any small space. They also look great as party decor!

Image for Dollar Store DIY Trinket Dish

Dollar Store DIY Trinket Dish

Keep your jewelry safe in a stylish DIY trinket dish made with dollar store supplies! Functional and fabulous!

Image for Dollar Store DIY Modern Metal Wreath

Dollar Store DIY Modern Metal Wreath

Dollar store metal wreath forms become the star of these easy DIY wreaths!

Image for Dollar Store Stained Glass Candles

Dollar Store Stained Glass Candles

Dollar store candles and permanent markers become beautiful stained glass candles in this fun project!

Image for Dollar Store Laundry Hamper to Burlap Basket

Dollar Store Laundry Hamper to Burlap Basket

Turn a dollar store laundry hamper into a pretty decorative basket for your home!

Image for Dollar Store DIY Tissue Paper Mug

Dollar Store DIY Tissue Paper Mug

A plain dollar store mug gets an injection of personality in this easy DIY!

Image for Dollar Store DIY Sea Glass Jars

Dollar Store DIY Sea Glass Jars

Dollar store candy jars become pretty decorative accents with paint and iridescent wax!

Image for Dollar Store DIY Earring Organizer

Dollar Store DIY Earring Organizer

Transform a dollar store splatter screen into a cute earring organizer. It's so easy!

Image for Vintage Tin Tile Wall Art: a Dollar Tree DIY

Vintage Tin Tile Wall Art: a Dollar Tree DIY

Surprising Dollar Tree supplies make for a charming piece of vintage-inspired wall art! Learn how to make a vintage look tin tile in this post!

Create dollar store diy decorative ball vase fillers with surprising items!

Dollar Store DIY Decorative Ball Vase Fillers

It's kind of crazy how expensive decorative ball vase fillers can be! Dollar Tree baseballs and paper napkins come together beautifully to create a lovely vase filler in this project. Customize the look with any napkin pattern or color!

Can you see yourself making any of these projects? Let me know which one is your favorite in the comments!
-Bre

You May Also Like This Post on The Best Craft Supplies to Buy at Dollar Tree!  

blank
10 Craft Supplies You Should Buy at Dollar Tree

Filed Under: Crafts, Dollar Tree, home decor

How to Make a Modern Metal Wreath

January 21, 2019 by Bre 2 Comments

blank

Admittedly my decor style is not modern (I gravitate more toward vintage looks), but something about the simplicity of modern decor elements appeals to me – especially after the excess of the holidays!  So this DIY Modern Metal Wreath is a perfect decor craft for this time of year, and one that can easily be modified for any other time of year, too!  You won't believe how easy it is to make a modern metal wreath! You only need a few inexpensive supplies to create this pretty wreath for your home decor. #valentinewreathdiy #wreathdiy #dollarstorediy #dollarstoredecor #dollarstorecrafts

In this post I created modern metal Valentine’s Day wreaths, but round wreath forms can be used if you don’t want a heart-shaped wreath!

Supplies Needed to Make a Modern Metal Wreath

This post contains affiliate links.  To read my full disclosure policy, please click here.

  • Metal wreath form (I bought my heart shaped wreath forms at Dollar Tree, but they are also available here.)
  • Metallic spray paint
  • Faux greenery (I used faux eucalyptus)
  • Floral wire
  • Hot glue and glue gun
  • Ribbon

You won't believe how easy it is to make a modern metal wreath! You only need a few inexpensive supplies to create this pretty wreath for your home decor. #valentinewreathdiy #wreathdiy #dollarstorediy #dollarstoredecor #dollarstorecrafts

How to Make a Modern Metal Wreath

Begin by spray painting the metal wreath form in the color of your choice.  If you’re going for a modern look, I think gold, rose gold, or copper (like I used), will look great!  I spray painted my wreath forms in the middle of winter by putting them on a piece of cardboard, spraying them outside, and then running back inside with them super fast so they could dry inside!  Desperate times call for desperate measures!You won't believe how easy it is to make a modern metal wreath! You only need a few inexpensive supplies to create this pretty wreath for your home decor. #valentinewreathdiy #wreathdiy #dollarstorediy #dollarstoredecor #dollarstorecrafts

After the spray paint dried, I attached faux eucalyptus to the wreath forms with floral wire. You won't believe how easy it is to make a modern metal wreath! You only need a few inexpensive supplies to create this pretty wreath for your home decor. #valentinewreathdiy #wreathdiy #dollarstorediy #dollarstoredecor #dollarstorecrafts

Because there isn’t a lot for the wire to attach to, I reinforced the eucalyptus attachments with hot glue.  You won't believe how easy it is to make a modern metal wreath! You only need a few inexpensive supplies to create this pretty wreath for your home decor. #valentinewreathdiy #wreathdiy #dollarstorediy #dollarstoredecor #dollarstorecrafts

Finally, I tied modern black and white stripe ribbon at the top so that the wreaths could hang easily (and look cute)!  You won't believe how easy it is to make a modern metal wreath! You only need a few inexpensive supplies to create this pretty wreath for your home decor. #valentinewreathdiy #wreathdiy #dollarstorediy #dollarstoredecor #dollarstorecrafts

That is it!!  So super easy to turn a cheap wreath form into a modern wreath for your home!  You won't believe how easy it is to make a modern metal wreath! You only need a few inexpensive supplies to create this pretty wreath for your home decor. #valentinewreathdiy #wreathdiy #dollarstorediy #dollarstoredecor #dollarstorecrafts

You won't believe how easy it is to make a modern metal wreath! You only need a few inexpensive supplies to create this pretty wreath for your home decor. #valentinewreathdiy #wreathdiy #dollarstorediy #dollarstoredecor #dollarstorecrafts

Wouldn’t these heart-shaped wreaths be cute as wedding decor, too?  (I totally have weddings on the brain since we’re knee deep in my sister’s wedding planning!)

You won't believe how easy it is to make a modern metal wreath! You only need a few inexpensive supplies to create this pretty wreath for your home decor. #valentinewreathdiy #wreathdiy #dollarstorediy #dollarstoredecor #dollarstorecrafts

Let me know what you think of this easy way to use a wreath form in the comments below.  I love hearing from you!

-Bre


Filed Under: Crafts, Dollar Tree

How to Make Scrap Wood Nesting Houses for Decor

January 14, 2019 by Bre 7 Comments

blank

On Saturday I made my weekly pilgrimage to Dollar Tree.  (Don’t laugh – that place is thebomb.com (yes, I’m bringing that expression back)).  While there, I found a NEW and EXCITING product – moss sheets!  I know that sounds funny, but moss sheets for crafting are typically expensive, so I was ecstatic to find them at Dollar Tree!  I got them home and immediately put them to use on an adorable DIY home decor project – Scrap Wood Nesting Houses!  Grab some wood from the scrap pile and learn to make adorable scrap wood nesting houses for decor! They're so easy to make and add a cute touch to your space! #scrapwoodprojects #scrapwoodcrafts #scrapwoodprojectsdiy

These little moss sheets, combined with scrap wood left over from my IKEA Rast Bar Cart Hack, made for one cute project!  Let me show you what you need and how to make them.

Supplies Needed for Scrap Wood Nesting Houses

  • Scrap wood
  • Saw (I used my Ryobi circular saw, which I adore)
  • Sandpaper 
  • Paint (I used brown acrylic, creamy white acrylic, and red chalk paint (but acrylic would totally work))
  • Paint brushes
  • Moss sheets
  • Hot glue gun
  • Twine
  • Scissors

How to Make Scrap Wood Nesting Houses

Not pictured in this post is me cutting my scrap wood into house shapes.  It’s hard to use a saw and photograph yourself, you know?  Just understand that I used a ruler to draw simple house shapes on my board and then cut them out.  

Grab some wood from the scrap pile and learn to make adorable scrap wood nesting houses for decor! They're so easy to make and add a cute touch to your space! #scrapwoodprojects #scrapwoodcrafts #scrapwoodprojectsdiy

I gently sanded around the edges to make sure I didn’t give myself a splinter.  Then I painted the houses with brown acrylic paint so that I could do a distressed finish on top.  The brown is the base layer, intended to give some contrast.  Grab some wood from the scrap pile and learn to make adorable scrap wood nesting houses for decor! They're so easy to make and add a cute touch to your space! #scrapwoodprojects #scrapwoodcrafts #scrapwoodprojectsdiy

After the brown paint dried, I dry brushed some off-white acrylic paint on top, making sure to leave some of the brown showing in parts so that the nesting houses would have a slightly worn finish.  

Grab some wood from the scrap pile and learn to make adorable scrap wood nesting houses for decor! They're so easy to make and add a cute touch to your space! #scrapwoodprojects #scrapwoodcrafts #scrapwoodprojectsdiy

Next, I cut one moss sheet into strips and hot glued them onto the tops of the scrap wood so that the pieces would look like little moss covered roofs. 

Grab some wood from the scrap pile and learn to make adorable scrap wood nesting houses for decor! They're so easy to make and add a cute touch to your space! #scrapwoodprojects #scrapwoodcrafts #scrapwoodprojectsdiy

For a little decorative detail, I tied twine at the roofline of each house.

Grab some wood from the scrap pile and learn to make adorable scrap wood nesting houses for decor! They're so easy to make and add a cute touch to your space! #scrapwoodprojects #scrapwoodcrafts #scrapwoodprojectsdiy

The scrap wood nesting houses were cute like this, but I felt like they were a little plain.  Since Valentine’s Day is around the corner, I decided to paint little hearts on them.  You could skip this part or paint different details!

Grab some wood from the scrap pile and learn to make adorable scrap wood nesting houses for decor! They're so easy to make and add a cute touch to your space! #scrapwoodprojects #scrapwoodcrafts #scrapwoodprojectsdiy

I gently sanded over the hearts, once dry, to give them an equally weathered look as the houses’ paint finish.  Then they were ready for their close ups.  🙂

Grab some wood from the scrap pile and learn to make adorable scrap wood nesting houses for decor! They're so easy to make and add a cute touch to your space! #scrapwoodprojects #scrapwoodcrafts #scrapwoodprojectsdiyGrab some wood from the scrap pile and learn to make adorable scrap wood nesting houses for decor! They're so easy to make and add a cute touch to your space! #scrapwoodprojects #scrapwoodcrafts #scrapwoodprojectsdiy

OK back to the moss sheets from Dollar Tree.  You might be wondering why they’re a big deal, as opposed to bagged craft moss.  The reason is that they make so much less of a mess!  And they let you get straight lines with your moss, which can be tricky when you’re gluing moss on certain projects.  

Grab some wood from the scrap pile and learn to make adorable scrap wood nesting houses for decor! They're so easy to make and add a cute touch to your space! #scrapwoodprojects #scrapwoodcrafts #scrapwoodprojectsdiy

For those reasons, I bought all five packages my Dollar Tree had.  #sorrynotsorry

Grab some wood from the scrap pile and learn to make adorable scrap wood nesting houses for decor! They're so easy to make and add a cute touch to your space! #scrapwoodprojects #scrapwoodcrafts #scrapwoodprojectsdiy

I’ve got another moss project planned for next week.  I can’t wait to share it with you.  In the meantime, I’d love for you to share this project with a friend who might like it!  

Grab some wood from the scrap pile and learn to make adorable scrap wood nesting houses for decor! They're so easy to make and add a cute touch to your space! #scrapwoodprojects #scrapwoodcrafts #scrapwoodprojectsdiy

-Bre

You Might Also Like This Post on How to Make a Ceiling Medallion Mirror

blank
Ceiling Medallion Mirror

Filed Under: Crafts

How to Make Leaf Stamped Tea Towels (With Real Leaves!)

October 24, 2018 by Bre 8 Comments

blank

Use leaves from the yard to make leaf imprint tea towels for gorgeous home decor. Leaf stamped crafts are so easy to make!

Over the weekend I took Jasper (my pup) for a nice walk and couldn’t help but admire all of the beautiful fall leaves on the ground.  I scooped up a few of my favorite maple leaves and brought them home because I knew they’d be perfect for a craft project. 

This fall craft project idea is so fun! Create leaf stamped tea towels with real leaves from your yard! What a pretty fall decor project.

After checking out the craft supplies in my desk, I knew exactly what to make – a leaf stamped tea towel!  It’s an easy project and adds a nice fall touch to my kitchen!  

Supplies Needed to Make Leaf Stamped Tea Towels

This post contains affiliate links.  Please read my disclosure policy for more information.

  • Leaves (pick freshly fallen leaves – not ones that have started to dry out and curl)
  • Plain tea towel
  • Fabric craft paints
  • Brayer
  • Wax paper
  • Decorative trim
  • Permanent fabric glue
  • Scissors

How to Make Leaf Imprint Kitchen Towels

Begin by mixing fabric paints so that they’re mottled and a blend of shades you see in fall leaves. 

This fall craft project idea is so fun! Create leaf stamped tea towels with real leaves from your yard! What a pretty fall decor project.

Then, flip over a leaf and paint the underside with a thin coat of paint.  You want to paint the underside because the leaf’s veins are more prominent and will leave more of an impression on the tea towel.  

Flip the leaf over and place it paint side down onto the tea towel.

You May Also Like These Nature Craft Ideas

Air Dry Clay Pressed Flower Plaques

How to Press Flowers in a Book

Cut a piece of wax paper and lay it on top.  (The wax paper prevents any paint that squishes out from under the leaf from getting on the brayer and making a mess on the tea towel.) 

This fall craft project idea is so fun! Create leaf stamped tea towels with real leaves from your yard! What a pretty fall decor project.

Then gently roll the brayer over the leaf and remove the wax paper.  Repeat this process until the entire tea towel is covered in leaf prints.

Once the paint has dried, attach decorative trim to the bottom edge of the tea towel with permanent fabric glue.  

This fall craft project idea is so fun! Create leaf stamped tea towels with real leaves from your yard! What a pretty fall decor project.

That is just how easy it is to use fall leaves to make a beautiful leaf stamped tea towel for your kitchen! 

This fall craft project idea is so fun! Create leaf stamped tea towels with real leaves from your yard! What a pretty fall decor project.

You could also use this leaf imprint method on pillow covers, tote bags, or anything else that’s fabric!  

This fall craft project idea is so fun! Create leaf stamped tea towels with real leaves from your yard! What a pretty fall decor project.

PRINTABLE TUTORIAL

If you’d like to print or save this tutorial, here you go!  Please let me know if you find this new feature useful!

How to Make Leaf Stamped Tea Towels (With Real Leaves!)

How to Make Leaf Stamped Tea Towels (With Real Leaves!)

Yield: 1
Prep Time: 5 minutes
Active Time: 15 minutes
Additional Time: 15 minutes
Total Time: 35 minutes
Difficulty: Easy
Estimated Cost: $3

Use real leaves to make a beautiful leaf stamped tea towel for your kitchen! Bring the beauty of nature indoors with this pretty leaf craft project.

No Ratings

Materials

  • Leaves
  • Plain Tea Towel
  • Acrylic Paints
  • Brayer
  • Wax Paper
  • Decorative Trim
  • Permanent Fabric Glue
  • Scissors

Instructions

  1. Begin by mixing acrylic paints so that they're mottled and a blend of shades you see in fall leaves.  blank
  2. Flip over a leaf and paint the underside with a thin coat of paint. You want to paint the underside because the leaf's veins are more prominent and will leave more of an impression on the tea towel. Flip the leaf over and place it paint side down onto the tea towel.
  3. Cut a piece of wax paper and lay it on top. (The wax paper prevents any paint that squishes out from under the leaf from getting on the brayer and making a mess on the tea towel.) Then gently roll the brayer over the leaf and remove the wax paper. Repeat this process until the entire tea towel is covered in leaf prints. blank
  4. Once the paint has dried, attach decorative trim to the bottom edge of the tea towel with permanent fabric glue. blank
© Bre
Project Type: Home Decor / Category: Crafts
blank
Have you tried stamping with real leaves before?  It’s pretty amazing how well this process works!

Filed Under: Crafts

  • « Go to Previous Page
  • Page 1
  • Interim pages omitted …
  • Page 5
  • Page 6
  • Page 7
  • Page 8
  • Page 9
  • Interim pages omitted …
  • Page 21
  • Go to Next Page »

Primary Sidebar

Let’s Connect!

Hi, I’m Bre! Thanks for visiting Average But Inspired, where I show you how to work with what you’ve got to create a home you love.

Bre of Average But Inspired - a DIY and craft blog

Love DIY? Subscribe to Get Posts E-mailed!

How Can I Help You?

blank

How to Paint a Countertop to Look Like Marble!

blank

How to Paint Over Tile

blank

Limewash Stone Fireplace Makeover: Bye Bye Orange Stone Fireplace, Hello Neutral Stone Beauty!

blank

How to Create a Faux Antique Brass Finish with Paint

Looking for Something?

Copyright © 2013-2022, Bre Eggert (Average But Inspired). All rights reserved.
  • Home
  • DIY
  • Crafts
  • Home Decor
  • Privacy Policy and Copyright Policy
  • Disclosures
  • Contact Me