• Skip to primary navigation
  • Skip to main content
  • Skip to primary sidebar
Average But Inspired logo - DIY and craft

Average But Inspired

Craft a home you love. DIY and craft tutorials.

  • About
    • Contact Me
    • Disclosures
    • Privacy Policy and Copyright Policy
  • DIY
    • Furniture
  • Crafts
    • Dollar Store Crafts
    • Seasonal
      • Patriotic & Summer
      • Valentine’s Day
      • Easter & Spring
      • Fall & Halloween
      • Christmas & Winter
  • Home Decor
    • Organization
  • Shop
    • DIY Guides
  • Home

Crafts

12 DIY Vacation Souvenir Ideas

July 19, 2017 by Bre 1 Comment

I feel like everyone I talk to is going on vacation in the next few weeks!  And if they’re not going on vacation this summer, they have some amazing adventure planned in the near future.

I like it.  We should all travel more!

While I’m not one to load up on souvenir tchotchkes, I do love to have something special from the trips I’ve been on; whether it’s a rock I found, a photo I took, or a postcard I picked up in a local store.  There are so many creative things to do with items like that, and I feel like those types of souvenirs often outlast the cheap, junky ones you find in a souvenir store!  Because of that (and because this is a DIY and crafts blog), here are twelve DIY vacation souvenir ideas to help you keep those vacation memories alive long after your trip ends!  Click through to visit the original posts and get the full tutorials!

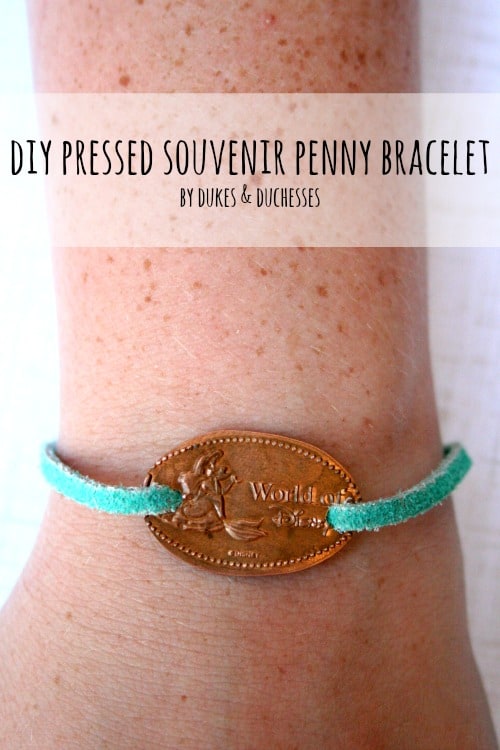
Pressed Penny Souvenir Bracelet– Dukes and Duchesses

Souvenir Wine Cork Ornaments – The Kim Six Fix

blank

DIY Glossy Photo Wood Slice – Hazel + Gold Designs

blank

Clay Vacation Map Photo Ornament – Where the Smiles Have Been

blank

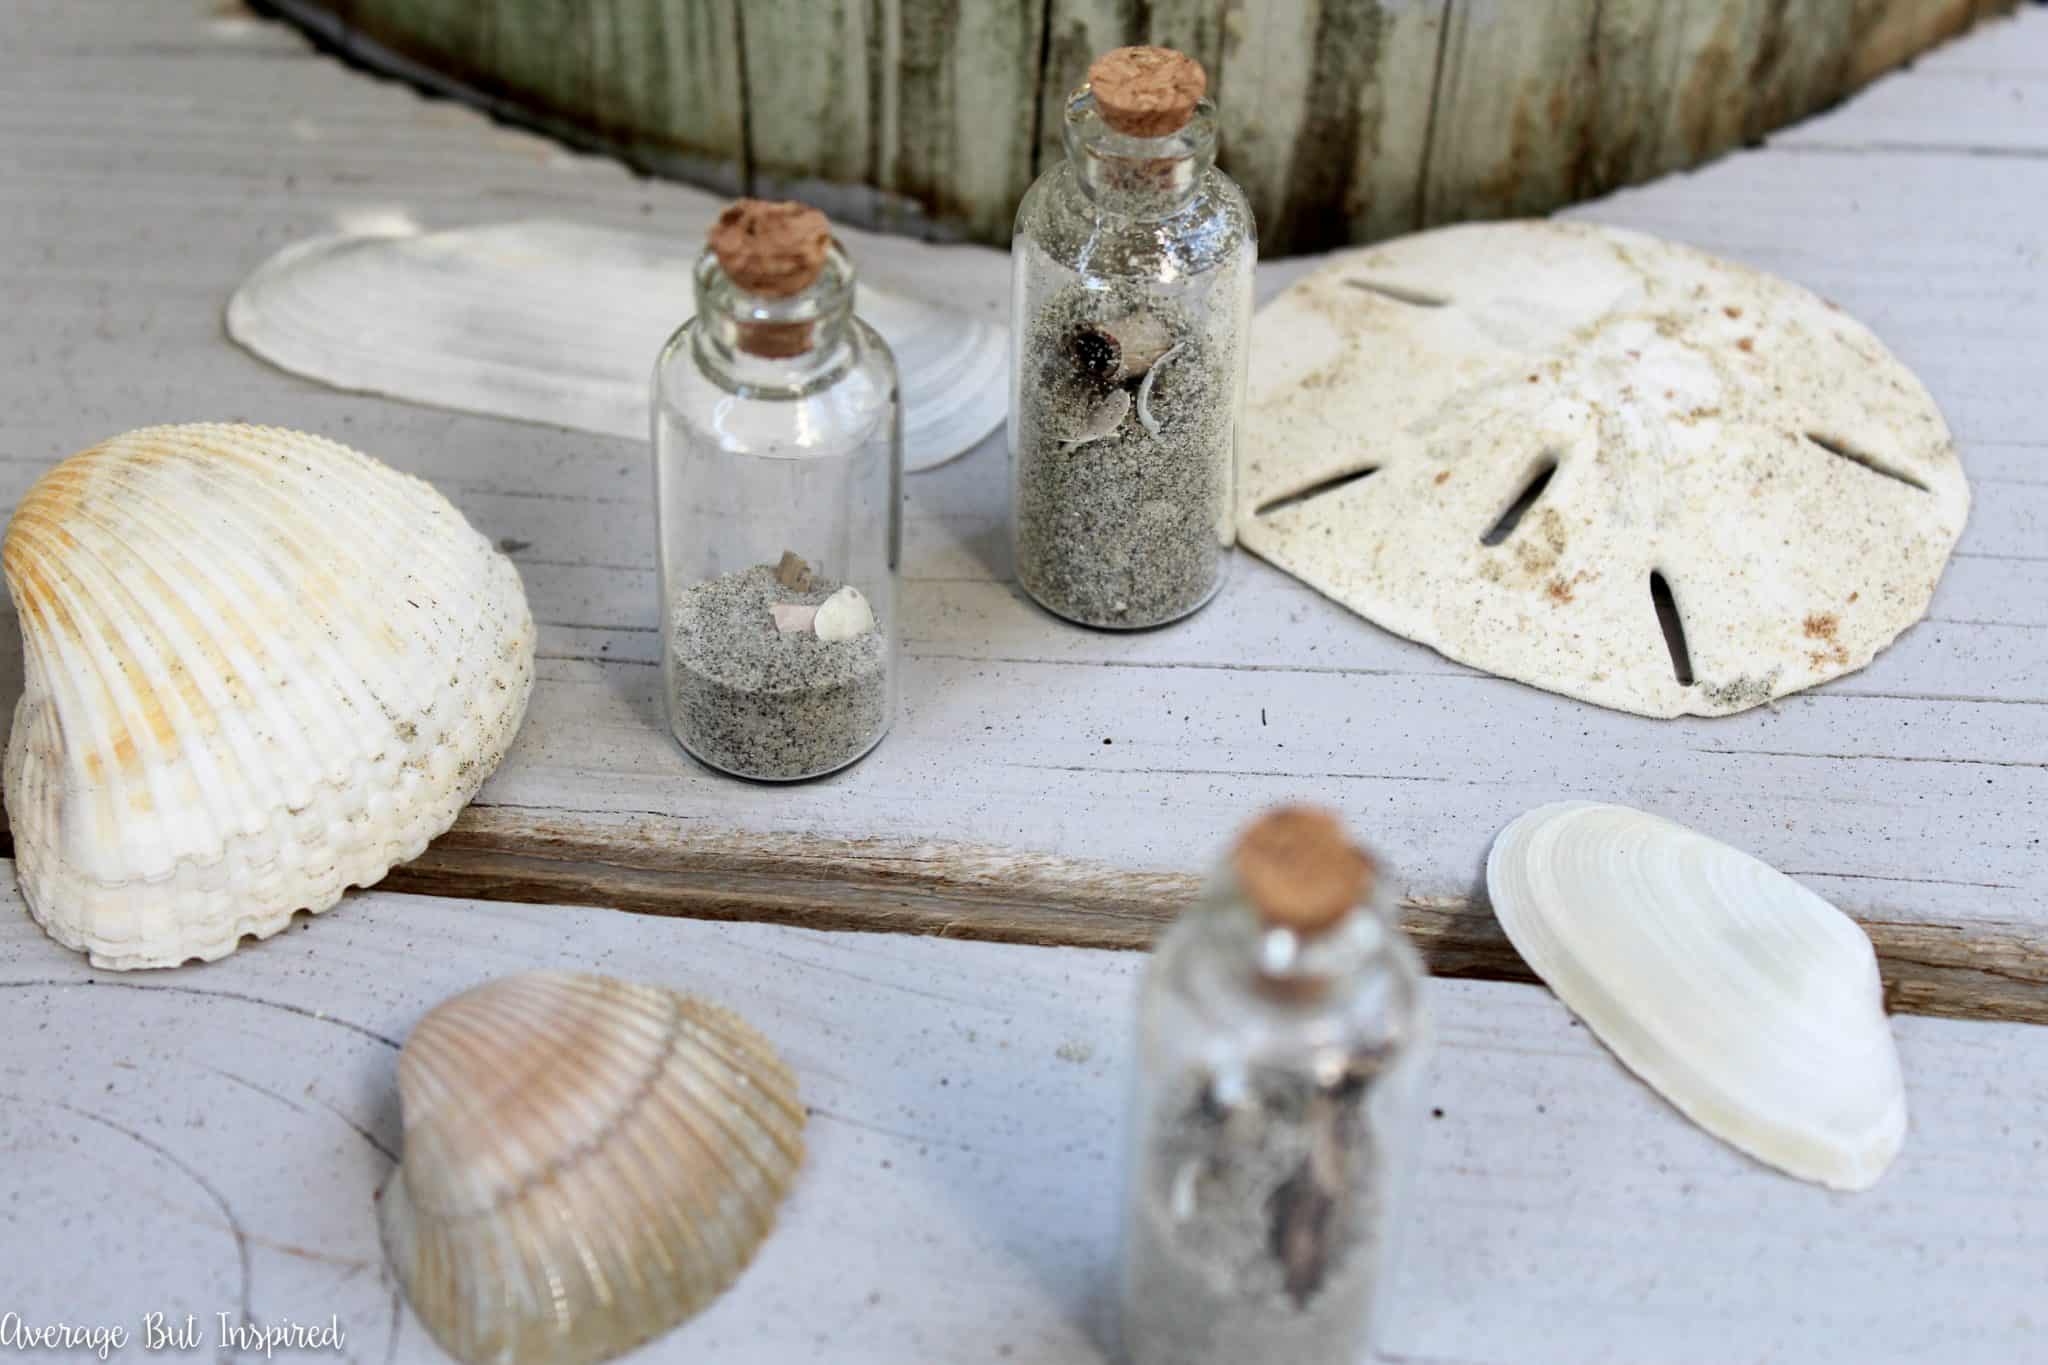
DIY Beach in a Bottle – Average But Inspired

blank

Souvenir T-Shirt Pillow – Happy Hour Projects

blank

Memorabilia Shadow Box – Dwell Beautiful

blank

Vacation Memories Map Box – View From the Fridge

blank

DIY Map Coasters -The Country Chic Cottage

blank

Postcard Gallery Wall – The Weathered Fox

blank

Beach Treasures Shadow Box – Table + Hearth

blank

Travel Photo Display in an Old Window Frame – Green with Decor

blank

Are you going on any fun trips soon?  Tell me where and what kind of souvenir you’re thinking of buying or making!  And please make sure to pin this post to help others think of creative ways to remember their trips!  Don't settle for junk from a souvenir shop as a way to remember your vacation! Check out these creative ways to make DIY Vacation Souvenirs! They're a great way to create travel keepsakes that you'll cherish.

-Bre

Filed Under: Crafts

DIY Burlap Basket from a Laundry Basket

July 12, 2017 by Bre 14 Comments

blank

Looking for a Dollar Tree laundry basket idea? Why not turn one into a pretty basket! This is a great, low-cost makeover for any home!

Baskets are an organization and decor staple; you can never have enough!  They’re a perfect spot to plop your pillows and blankets, stick a potted plant, or hide some junk when you need to do a quick house pick up before guests arrive.

Because there is no such thing as too many baskets, I decided to add another to my collection with this upcycle of a Dollar Tree laundry hamper to a pretty decorative basket for my office space!

It's easy to transform a dollar store laundry basket into a pretty burlap basket! What a great Dollar Tree craft project!

Now, let me show you how to upgrade a plain laundry basket into a stylish burlap basket for your home!

Supplies Needed to Make a DIY Basket from a Laundy Basket

This post contains affiliate links.  Please read my disclosure policy for more information.

  • 5 inches wide x 10 yards roll burlap ribbon
  • Dollar Tree laundry hamper
  • Scissors
  • Plastic spray paint in the color of your choice
  • Small wooden tag
  • Paint pen
  • Yarn pom poms

How to Make a Burlap Basket from a Laundry Hamper

Before I give you instructions, I have to show you the plain old laundry basket that I bought at Dollar Tree.  So simple, right?  

It's easy to transform a dollar store laundry basket into a pretty burlap basket! What a great Dollar Tree craft project!

Step One: Spray Paint the Laundry Basket

I started by spray painting the laundry basket with spray paint that adheres to plastic.  My favorite type of plastic spray paint is Rustoleum 2x, but I had to use a different kind from Target for my project. 

The Target spray paint worked just fine in case you were wondering.  

It's easy to transform a dollar store laundry basket into a pretty burlap basket! What a great Dollar Tree craft project!

After I spray painted, I let the basket dry for a looooong time to make sure it really stuck to the plastic hamper, and I plotted the best way to transform it from a laundry basket to a pretty basket.

It's easy to transform a dollar store laundry basket into a pretty burlap basket! What a great burlap craft project!

Love Dollar Tree DIY? I Think You’ll Like These Projects, Too!

  • DIY Picture Frame Flower Box
  • Sea Glass Jars
  • DIY Vase Fillers

Step Two: Cut Burlap Ribbon Into Strips

Once it dried, I grabbed some soft burlap ribbon that is extra wide at 5″ across, and that has sewn edges to reduce fraying.  This burlap ribbon comes in an 11 yard roll, which is the perfect size for this project!  

To begin, I cut a piece that measured 1.5 times longer than the circumference of the laundry hamper base.  (How do you like me throwing around those math terms from second grade?)

It's easy to transform a dollar store laundry basket into a pretty burlap basket! What a great burlap craft project!

Step Three: Weave the Burlap Ribbon

Then I began weaving the burlap ribbon in and out of the slots in the bottom row of the laundry hamper.  

It's easy to transform a dollar store laundry basket into a pretty burlap basket! What a great Dollar Tree craft project!

Step Four: Cut the Excess Burlap

When I got all the way around the base of the basket, I tied off the ends on the inside of the basket and cut off the excess burlap ribbon.  

It's easy to transform a dollar store laundry basket into a pretty burlap basket! What a great Dollar Tree craft project!

Step Five: Repeat the Process

Next, I cut another piece of burlap ribbon and moved up to the next row of slats on the basket; repeating the steps above and making sure to start my weaving one column of slats to the right in order to offset the weaving pattern.  

It's easy to transform a dollar store laundry basket into a pretty burlap basket! What a great burlap craft.

I did this until all of the basket was woven with burlap ribbon!  

In all, I probably used about 8 yards of the burlap ribbon, so I’m glad this spool came in such a long length!  

To finish off this burlap basket, I added a little hang tag that reads “Cozy Things,” and some pom poms.  Pom poms are my fave.

It's easy to transform a dollar store laundry basket into a pretty burlap basket! What a great Dollar Tree craft project!

Can you believe how easy it was to transform a plain Dollar Tree laundry hamper into a pretty basket?  

It's easy to transform a dollar store laundry basket into a pretty burlap basket! What a great Dollar Tree craft project!

Jasper couldn’t resist posing for this photo shoot.  He’s a big fan of this DIY burlap basket. 🙂  

It's easy to transform a dollar store laundry basket into a pretty burlap basket! What a great burlap craft idea!

Next time you see one of those small laundry baskets at the store, make sure to pick one up and transform it into a cute piece of functional decor for your home!  

It's easy to transform a dollar store laundry basket into a pretty burlap basket! What a great Dollar Tree craft project!

And please make sure to pin this post to share the love!  

Filed Under: Dollar Tree

DIY Birth Stats Monogram {Easy Baby Gift or Nursery Decor}

June 28, 2017 by Bre 2 Comments

blank

For the first time in my life I am officially an AUNT!  You might recall me mentioning my excitement last month when I shared pictures from the Secret Garden Baby Shower that I hosted for my sister-in-law and “Peapod,” my soon-to-arrive niece.  Well, I am so happy to report that “Peapod” is here, she has a real name, and she is perfect in every single way!  To celebrate her arrival, I did lots of online shopping for the cutest baby clothes I could find, and of course I made her a little something for her nursery wall – this cute and colorful DIY Birth Stats Monogram!  blank

I’m so excited to give my niece her personalized baby gift because it was made with love (and I think it will look great in her nursery, which her mom and dad filled with adorable DIY and personal touches)!

If you have any babies in your life, consider making a personalized birth stats monogram for a gift or for nursery decor.  It is such a fun project to make and doesn’t take a lot of time at all.

Supplies Needed for a Birth Stats Monogram

Some of these links are affiliate links.  To read my full disclosure policy, please click here.

  • Unfinished wooden letter
  • Acrylic paint or chalk paint in the color of your choice (I used this paint)
  • Wood craft cut in the shape of a heart (or any other shape you like!)
  • Paint pen marker
  • Scrapbook paper
  • Pencil
  • Scissors
  • Mod Podge (I used matte finish)
  • Paint brush
  • Wood glue or other strong adhesive
  • Ribbon
  • Staple Gun

Making a Birth Stats Monogram – The How To

First up, paint your unfinished wood letter in the color of your choice.  I used chalky finish paint on my letter because it had a black finish on it already, and I wanted to make sure the paint would stick really well.  If you’re using acrylic paint on a letter with some pre-existing finish, get a multi-surface acrylic.

blank

I gave the letter two coats of paint and let it dry completely.  Then, I traced the letter onto a piece of adorable scrapbook paper. blank

I cut out the scrapbook paper letter and applied a thin, even layer of Mod Podge to the front of the wooden letter.  blank

I placed the scrapbook paper letter on top and smoothed it all down.  Once that first coat of Mod Podge dried (about 25 minutes), I put a thin, even layer of Mod Podge on top of the scrapbook paper and let it dry.  blank

While that was drying, I wrote my niece’s birth stats on a wooden heart.  Double checked to make sure I had it all right, and then I went over the pencil with an oil based paint pen.  blank

Once the Mod Podge dried on the letter, I used wood glue to attach the heart to the letter.  blank

After that dried, I repeated the tracing, cutting, and Mod Podging (not a real word) of scrapbook paper onto the back of the letter.  Because it’s the back, you definitely don’t have to do that!  Anyway, when that was dry, I cut some ribbon and stapled it to the back of the letter so that the birth stats monogram can hang in my niece’s room!  blank

It makes such a cute decoration for a baby’s room!

blank

blank

I think the best part is that it’s totally personalized and a really sweet thing to give as a gift!  blank

Make it in any color and with any patterned scrapbook paper you like, and you have a sweet DIY baby gift or DIY nursery decor for any newborn.  I’d love for you to PIN this post so that you remember to make it later or to help others find it!  blank

What’s your favorite gift to give a newborn?

-Bre

Filed Under: Crafts

DIY Fourth of July Wreath Made with Dollar Tree Supplies

June 11, 2017 by Bre Leave a Comment

blank

Make a patriotic Dollar Tree craft to celebrate Memorial Day and the Fourth of July!

I can’t believe it’s that time of year again where patriotic decor is lining the shelves.  The Fourth of July will be here before we know it!  

Last week my daughter begged me to take her to Dollar Tree so she could buy her daddy a Father’s Day present (so sweet), and while we were there I picked up some supplies to make a fun Fourth of July Wreath that took ten minutes TOTAL to make.  I promise!  

Make a DIY Fourth of July Wreath with supplies from Dollar Tree! This wreath cost $5 total to make! The tinsel garland adds a festive and sparkly touch for the Fourth of July.

This patriotic wreath is so sparkly and fun for the Fourth!  It reminds me of fireworks.

I made a tinsel garland wreath for Christmas long before I was blogging, so I was excited to have a new holiday to make one for!  

Anyway, RUN to Dollar Tree and get what you need to make this adorable tinsel garland wreath for the Fourth of July.

DIY Dollar Tree Patriotic Wreath Supplies

This post contains affiliate links. Please read my disclosure policy for more information.

  • Wire wreath form
  • Patriotic tinsel garland (buy two strands to be safe)
  • Patriotic headband with glitter stars
  • Chalkboard Star (no longer sold at Dollar Tree, so I recommend getting a wood star cutout and painting it black for the chalkboard look)
  • Hot glue gun and hot glue
  • Scissors
Make a DIY Fourth of July Wreath with supplies from Dollar Tree! This wreath cost $5 total to make! The tinsel garland adds a festive and sparkly touch for the Fourth of July.

How to Make a Dollar Tree DIY Patriotic Wreath

To learn how to make your own tinsel garland wreath for the Fourth of July, watch this fun video I made showing you just how to do it!  

The only thing to mention is that I cut the sparkly stars off of the headband (not shown in the video) to glue onto the chalkboard star.

If you enjoyed this project, please pin this post to Pinterest or share it on Facebook to share the love!  I’d really appreciate it!

Make a DIY Fourth of July Wreath with supplies from Dollar Tree! This wreath cost $5 total to make! The tinsel garland adds a festive and sparkly touch for the Fourth of July.

Filed Under: Crafts, Dollar Tree, Holiday, Patriotic Tagged With: Dollar Tree, Summer, Wreath

Summer Fun Bubble Paint Tea Towels

June 8, 2017 by Bre 4 Comments

blank

Looking for a fun summer kids craft idea? Here’s a unique one: bubble painting!

Well, it’s been a minute or two since I’ve posted, friends.  What can I say – end of the school year craziness combined with Memorial Day fun and work projects left me a little pressed for time!  You know how it goes.  

Anyway, my kids are off of school now (yay?), and I’m going to have to figure out how to get some projects done while they’re home (short of locking them in their bedrooms for an hour or two each day.  (I kid, I kid.)).

To help with that, this week I got my little guy involved in helping make some fun Bubble Paint Tea Towels for the kitchen!  

Turn your kids' bubble solution into bubble paint and make these adorable bubble paint tea towels for your kitchen! Bubble paint tea towels are easy to make and a great project to have the kids help with!

I needed a new set of tea towels for the summer months (my most recent set said “Hello Spring,” so clearly they had to go), so we decided to make some together.  

And what says summer more than bubbles (OK, probably a lot of things, but bubbles is high up on the list!)?  

This was a perfect project to have kids involved with!

Supplies Needed to Make Bubble Paint Crafts

This post contains affiliate links. Please read my disclosure policy for more information.

For the project shown in this post, we painted with bubbles by using plain white tea towels as our canvas. Other ideas for bubble painting include paper, blank canvases, t-shirts, and more!

  • Plain white tea towels
  • Bubbles
  • Multi-surface acrylic paint in colors of your choice
  • Large piece of cardboard
  • Masking tape
  • Decorative fringe or trim
  • Fabric glue
  • Plastic cups for mixing

How to Make Bubble Paint

Learn from my mistakes and don’t do what I did!  I tried to make my bubble paint by using dish soap, but I couldn’t get the consistency right to actually make bubbles.  

Turn your kids' bubble solution into bubble paint and make these adorable bubble paint tea towels for your kitchen! Bubble paint tea towels are easy to make and a great project to have the kids help with! Learn how to make your own bubble paint in this post.

Skip that and go straight to the good stuff – your kids’ bubble solution.  Pour some into a cup and add multi-surface acrylic paint to it.  

Turn your kids' bubble solution into bubble paint and make these adorable bubble paint tea towels for your kitchen! Bubble paint tea towels are easy to make and a great project to have the kids help with! Learn how to make your own bubble paint in this post.

Stir it all up and you’ll have beautiful bubble paint!  Just mix until you get the color saturation you want.

This project gets a little messy, so I recommend heading outside.  

Turn your kids' bubble solution into bubble paint and make these adorable bubble paint tea towels for your kitchen! Bubble paint tea towels are easy to make and a great project to have the kids help with!

Bring a foam board or piece of cardboard with you and tape a white tea towel to the board so that it lies flat.  

More Summer Fun for the Kids!

Sand Shapes Art

Beach in a Bottle

Then have fun with your kids (or by yourself – no shame!), blowing paint bubbles all over the tea towel!  

Turn your kids' bubble solution into bubble paint and make these adorable bubble paint tea towels for your kitchen! Bubble paint tea towels are easy to make and a great project to have the kids help with!

You’ll probably have to move around a lot, depending on how the breeze is blowing, and you may even run after some good bubbles with your tea towel board.  It’s okay; embrace the crazy.  

Turn your kids' bubble solution into bubble paint and make these adorable bubble paint tea towels for your kitchen! Bubble paint tea towels are easy to make and a great project to have the kids help with!

We figured out that it works best if you get really close to the tea towel and blow the bubble right near it.  Less chance of escaping; better chance of popping.  

Turn your kids' bubble solution into bubble paint and make these adorable bubble paint tea towels for your kitchen! Bubble paint tea towels are easy to make and a great project to have the kids help with!

Let the tea towel dry thoroughly before bringing it inside.  Once it’s dry, embellish with fringe or other trim of your choice.  I just glued it on with fabric glue so it was a super easy addition!  

Turn your kids' bubble solution into bubble paint and make these adorable bubble paint tea towels for your kitchen! Bubble paint tea towels are easy to make and a great project to have the kids help with!

After the trim glue dries, hang up your new tea towels and add a summery touch to your kitchen!  

Turn your kids' bubble solution into bubble paint and make these adorable bubble paint tea towels for your kitchen! Bubble paint tea towels are easy to make and a great project to have the kids help with!

And remember: you don’t have to paint with bubbles on tea towels only. You could try bubble painting on paper, a canvas, a white t-shirt: whatever!

Turn your kids' bubble solution into bubble paint and make these adorable bubble paint tea towels for your kitchen! Bubble paint tea towels are easy to make and a great project to have the kids help with!

I feel like bubble painting on canvas could result in some cool modern art for your home!  

Turn your kids' bubble solution into bubble paint and make these adorable bubble paint tea towels for your kitchen! Bubble paint tea towels are easy to make and a great project to have the kids help with!

-Bre

Filed Under: Crafts Tagged With: Summer

DIY Egg Cup Planters

May 10, 2017 by Bre 4 Comments

blank

Since April showers bring May flowers, let’s talk about a clever flower pot idea: quirky and adorable egg cup planters!

I have been seeing cute face planters all over the place – in magazines, at my hair salon, and in the shops – so I knew I had to try and make some for myself!

Learn how to turn egg cups into adorable mini planters in this post!

Supplies Needed to Make Egg Cup Planters

Some of these links are affiliate links.  To read my full disclosure policy, please click here.

  • White egg cups
  • Sharpies or other permanent markers
  • Rubbing alcohol & cotton ball
  • Colored pebbles or gravel
  • Mini faux succulents (or you could use real ones if you have a green thumb!)

Learn how to turn egg cups into adorable mini planters in this post!

How to Make Egg Cup Planters

Before you get started drawing on your egg cups, make sure to wipe them down with rubbing alcohol!  This step is really important because it removes any fingerprints, smudges, or weird residues from the surface, which could prevent your permanent marker from sticking.  Learn how to turn egg cups into adorable mini planters in this post!

Once the rubbing alcohol has completely dried, make cute little faces on your egg cups!  I drew out some ideas on a piece of paper before drawing directly on my egg cups, and this helped me not mess them up.  Learn how to turn egg cups into adorable mini planters in this post!

Learn how to turn egg cups into adorable mini planters in this post!

Learn how to turn egg cups into adorable mini planters in this post!

Once the drawings have dried, fill the egg cups with colored pebbles.  These pebbles seem like the kind of stuff you might put in a fish tank.

Don’t hold me to that though because I only had one fish for a pet and it didn’t live very long.  My memory of fish tank pebbles may be skewed.  Learn how to turn egg cups into adorable mini planters in this post!

Plop some tiny plants into your egg cup planters and giggle to yourself about how cute these are.  (You may also find yourself giggling because you think your egg cup planters have better “hair” than you do.)Egg cups and mini succulents make adorable planters!

Ten minutes invested and you have an adorable new planter!  Learn how to make mini face planters with egg cups! This tutorial teaches you how to do it.

Mini egg cups make adorable DIY planters for tiny succulents! Get the full tutorial on how to customize them here.

I feel like this guy resembles Harry Potter.  What do you think?

Use egg cups and sharpies to make adorable mini succulent planters. Get the full tutorial here!

Learn how to make cute planters with egg cups and Sharpies!

How adorable would these be as place card holders at a party?  Since they’re small, you could really use them anywhere!  Learn how to make mini succulent planters with egg cups! This tutorial teaches you how to personalize them in no time.

Please help spread the love for these little guys and pin them to Pinterest!  Make your own adorable face planter with an egg cup! This tutorial teaches you how to use egg cups to make darling planters. It's easy!

Filed Under: Crafts

  • « Go to Previous Page
  • Page 1
  • Interim pages omitted …
  • Page 9
  • Page 10
  • Page 11
  • Page 12
  • Page 13
  • Interim pages omitted …
  • Page 21
  • Go to Next Page »

Primary Sidebar

Let’s Connect!

Hi, I’m Bre! Thanks for visiting Average But Inspired, where I show you how to work with what you’ve got to create a home you love.

Bre of Average But Inspired - a DIY and craft blog

Love DIY? Subscribe to Get Posts E-mailed!

How Can I Help You?

blank

7 Tips for Hosting a Party on a Budget

blank

Limewash Stone Fireplace Makeover: Bye Bye Orange Stone Fireplace, Hello Neutral Stone Beauty!

blank

How to Paint a Door to Look Like Wood (It’s Easier Than You Think!)

blank

How to Create a Faux Antique Brass Finish with Paint

Looking for Something?

Copyright © 2013-2022, Bre Eggert (Average But Inspired). All rights reserved.
  • Home
  • DIY
  • Crafts
  • Home Decor
  • Privacy Policy and Copyright Policy
  • Disclosures
  • Contact Me