• Skip to primary navigation
  • Skip to main content
  • Skip to primary sidebar
Average But Inspired logo - DIY and craft

Average But Inspired

Craft a home you love. DIY and craft tutorials.

  • About
    • Contact Me
    • Disclosures
    • Privacy Policy and Copyright Policy
  • DIY
    • Furniture
  • Crafts
    • Dollar Store Crafts
    • Seasonal
      • Patriotic & Summer
      • Valentine’s Day
      • Easter & Spring
      • Fall & Halloween
      • Christmas & Winter
  • Home Decor
    • Organization
  • Shop
    • DIY Guides
  • Home

Crafts

Upcycled Tile Christmas Ornaments

December 6, 2017 by Bre 4 Comments

Use leftover tile or tile samples to make beautiful Christmas ornaments – I’ll show you how!

You know the old saying “when life hands you lemons, make lemonade?”  Well I’ve got a new twist on that for you and it goes like this: “when your neighbor hands you leftover tile samples, make Christmas ornaments.”

Tile samples can be turned into beautiful ornaments with this tutorial! These upcycled tile Christmas ornaments are so easy to make and fun for all ages! #upcycle #ChristmasCrafts #ChristmasOrnaments

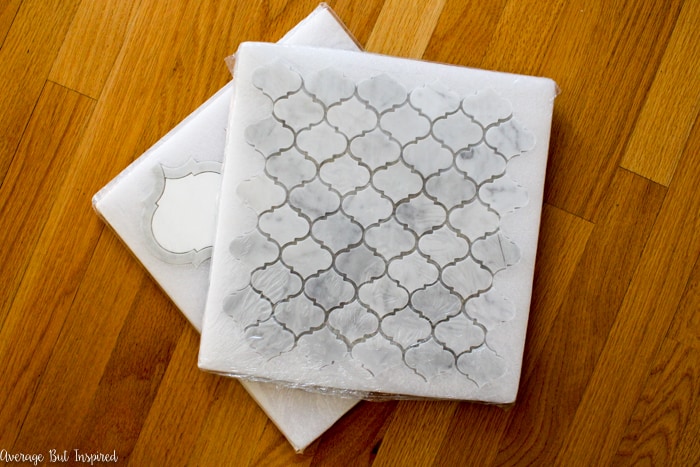
Over the summer, my neighbor brought me many different marble tile samples that he didn’t need anymore, because he and his wife figured I’d find some use for them.  (I think they’ve seen enough of my weekend projects in the garage to know that I never turn down good materials!

(Let’s be honest – I never turn down any materials – good or bad.))  

So anyway, the tile samples sat in various places in my house since that time, just collecting dust, until this past Sunday. 

My seven-year-old daughter was having a tough day and was sulking in her bedroom.  I had had enough of that doom and gloom, so I snatched her out of there and told her we were making a craft project together. 

I had nothing planned, but when I spotted those tile samples on my desk, I knew we needed to turn them into ornaments. And I’m going to show you how we did it.

Supplies Needed for Repurposed Tile Ornaments

This post contains affiliate links. Please read my disclosure policy for more information.

  • Small tiles (sheets of mosaic tiles work great)
  • Rubber stamps – letter rubber stamps and Christmas rubber stamps
  • Multi-surface acrylic paint
  • Small artist paint brushes
  • Ribbon
  • Multi-surface craft glue
  • Scissors
  • Stiffened felt

Instructions for Upcycled Tile Christmas Ornaments

We gathered multi-surface acrylic paints in various colors (primarily metallics, glitters, and pink (yes, pink.  She’s seven, after all.), and Christmas-themed and letter rubber stamps, and we set off to work!

Tile samples can be turned into beautiful ornaments with this tutorial! These upcycled tile Christmas ornaments are so easy to make and fun for all ages! #upcycle #ChristmasCrafts #ChristmasOrnaments

We applied thin layers of paint to the rubber stamps and gently pressed them onto the tiles, fixing mistakes as we went along (trust me, there were lots of those!).  

Tile samples can be turned into beautiful ornaments with this tutorial! These upcycled tile Christmas ornaments are so easy to make and fun for all ages! #upcycle #ChristmasCrafts #ChristmasOrnaments

She worked on making ornaments for her friends, while I played along.

Tile samples can be turned into beautiful ornaments with this tutorial! These upcycled tile Christmas ornaments are so easy to make and fun for all ages! #upcycle #ChristmasCrafts #ChristmasOrnaments

After a while, my five-year-old son also got in on the action and he mass-produced about 29 of these things in an hour (they are all lime green). 

I Think You’ll Also Like This Christmas Craft

DIY Marbled Ornaments

My daughter and I preferred to work more slowly and thoughtfully, and once all of our creations dried, we turned our tiles into actual ornaments. 

We used multi-surface glue to attach pretty ribbon to the backs of the ornaments.

Tile samples can be turned into beautiful ornaments with this tutorial! These upcycled tile Christmas ornaments are so easy to make and fun for all ages! #upcycle #ChristmasCrafts #ChristmasOrnaments

Once that glue had set a bit, we cut pieces of stiffened felt and glued those over the ribbon.  This made the ribbon a little sturdier, which is great for ornaments that are on the heavier side.

Tile samples can be turned into beautiful ornaments with this tutorial! These upcycled tile Christmas ornaments are so easy to make and fun for all ages! #upcycle #ChristmasCrafts #ChristmasOrnaments

We let them dry overnight, just to be sure the glue was really holding everything together, and then our ornaments were finished!  

Tile samples can be turned into beautiful ornaments with this tutorial! These upcycled tile Christmas ornaments are so easy to make and fun for all ages! #upcycle #ChristmasCrafts #ChristmasOrnaments

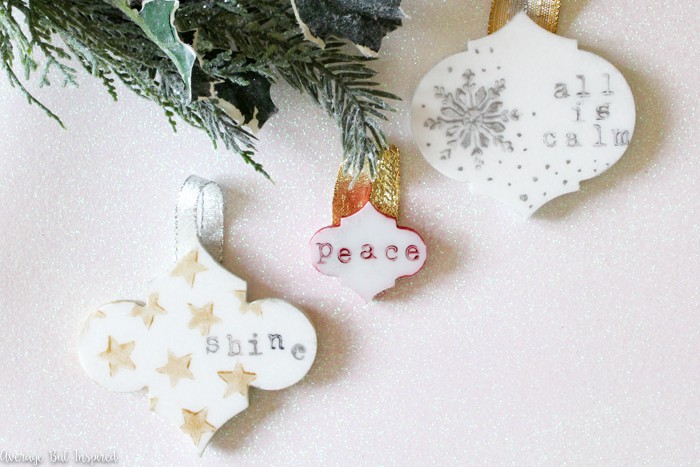
They turned out so much cuter than I expected!  

Tile samples can be turned into beautiful ornaments with this tutorial! These upcycled tile Christmas ornaments are so easy to make and fun for all ages! #upcycle #ChristmasCrafts #ChristmasOrnaments

My daughter’s tile ornaments are so sweet, but I didn’t take pictures of them because she put all of her friends’ names on them and I didn’t think I should put those on the Internet. 

Tile samples can be turned into beautiful ornaments with this tutorial! These upcycled tile Christmas ornaments are so easy to make and fun for all ages! #upcycle #ChristmasCrafts #ChristmasOrnaments

So . . . you’re stuck with my generic Christmas sayings.  

Tile samples can be turned into beautiful ornaments with this tutorial! These upcycled tile Christmas ornaments are so easy to make and fun for all ages! #upcycle #ChristmasCrafts #ChristmasOrnaments

In the end, a day that started out very rough turned out to be a wonderful one that I won’t soon forget. We made more than ornaments on Sunday – we made wonderful memories together. 

Tile samples can be turned into beautiful ornaments with this tutorial! These upcycled tile Christmas ornaments are so easy to make and fun for all ages! #upcycle #ChristmasCrafts #ChristmasOrnaments

That sounds cheesy, but this project helped remind me how important it is to really be there for our kids when they need a little extra attention.  AND it also reminded me how important is to never throw anything away – HA!

Tile samples can be turned into beautiful ornaments with this tutorial! These upcycled tile Christmas ornaments are so easy to make and fun for all ages! #upcycle #ChristmasCrafts #ChristmasOrnaments

If you agree, or if you just think this is a fun project, please make sure to “pin” this project to help others find it!  You can pick up tile samples just like the ones we used, or less expensive ceramic versions, at any home improvement store, so replicating this project is very easy!


Filed Under: Christmas, Crafts, Holiday

How to Make a Dollar Store Christmas Cloche

November 15, 2017 by Bre 2 Comments

blank

Make a charming DIY Christmas Cloche with Dollar Tree supplies!

I hope you all will forgive me for posting about Christmas before Thanksgiving, but listen . . . if you’re going to do any Christmas crafts, now’s the time to get started! 

So here we go – my first Christmas-related post of the season . . . and it’s a cute one!  Run over to Dollar Tree to pick up the essential supplies for this project and get to work making a beautiful Dollar Store Christmas Cloche for your Christmas decor!  

Christmas cloches filled with holiday miniatures have been a Pinterest staple for years, but this simple version is probably the most budget-friendly one around!

Transform a dollar store ornament and other supplies into a pretty Christmas Cloche for your DIY Christmas decor! #dollarstore #dollartree #Christmasdecor

Supplies Needed to Make a Dollar Store Christmas Cloche

Some of these are affiliate links.  Please read my disclosure policy for more information.

  • Dollar Tree cylinder vase
  • Dollar Tree foam discs
  • Dollar Tree miniature church, building, etc.
  • Woodgrain shelf liner
  • Fake snow
  • Spray adhesive
  • Hot glue and hot glue gun
  • Scissors

How to Make a Dollar Tree Christmas Cloche

Guys, this project will take you all of ten minutes to make.  TEN MINUTES!  I promise. 

I whipped this up right before I had to go volunteer at my kids’ school library (I’m getting real friendly with the Dewey Decimal System, friends!) – easiest project ever!

Transform a dollar store ornament and other supplies into a pretty Christmas Cloche for your DIY Christmas decor! #dollarstore #dollartree #Christmasdecor

Begin by spraying one side of the foam disc with spray adhesive.  

Transform a dollar store ornament and other supplies into a pretty Christmas Cloche for your DIY Christmas decor! #dollarstore #dollartree #Christmasdecor

Then press some fake snow onto that disc.  

Transform a dollar store ornament and other supplies into a pretty Christmas Cloche for your DIY Christmas decor! #dollarstore #dollartree #Christmasdecor

Next, cut two strips of 12″ woodgrain scrapbook paper or the woodgrain shelf liner available at Dollar Tree to be a little wider than the edge of your disc. 

(If you happen to have woodgrain paper that is longer than traditional 12″ scrapbook paper, you may only need to cut one strip of paper.)  

Transform a dollar store ornament and other supplies into a pretty Christmas Cloche for your DIY Christmas decor! #dollarstore #dollartree #Christmasdecor

Fire up that hot glue gun and wrap the woodgrain paper around the edge of the foam disc.  Make the top edge of the paper flush with the edge of the foam disc that has the fake snow on it. 

Here Are Other Dollar Tree Christmas DIY Projects You’ll Enjoy!

  • Candy Cane Wreath
  • Large Gift Tag Decor

Then flip the disc over and trim the excess scrapbook paper from around the bottom edge of the foam disc.

(If you used the woodgrain adhesive shelf liner, you won’t need to use the hot glue gun. You could just stick the shelf liner to the foam disc.)

Transform a dollar store ornament and other supplies into a pretty Christmas Cloche for your DIY Christmas decor! #dollarstore #dollartree #Christmasdecor

Hot glue the ornament or miniature building to the foam disc (snowy side), and place the cylinder vase on top. 

That’s all you need to make a cute Christmas Cloche for your holiday decor!  

Transform a dollar store ornament and other supplies into a pretty Christmas Cloche for your DIY Christmas decor! #dollarstore #dollartree #Christmasdecor

I paired my cloche with adorable white ceramic houses.

Transform a dollar store ornament and other supplies into a pretty Christmas Cloche for your DIY Christmas decor! #dollarstore #dollartree #Christmasdecor

I just love the simplicity of these little houses.  (My kids asked me 89348 times if they could paint them.  NO.  No, you may not paint my little white houses!)

Transform a dollar store ornament and other supplies into a pretty Christmas Cloche for your DIY Christmas decor! #dollarstore #dollartree #Christmasdecor

This simple look is perfect for Christmas decor, or to be left out all winter.  Make sure to “pin it” so you’ll remember to make this for your seasonal decor!

Transform a dollar store ornament and other supplies into a pretty Christmas Cloche for your DIY Christmas decor! #dollarstore #dollartree #Christmasdecor

Filed Under: Christmas, Crafts, Dollar Tree, Holiday

How to Make a DIY Dog Treat Jar

September 25, 2017 by Bre 6 Comments

blank

Six months ago when we brought home our labradoodle puppy, Jasper, I never would have imagined that he would become such a treasured member of our family!  Of course I knew we would enjoy having a dog in the house, but the way he has blended into our lives and filled our hearts is remarkable.  

Transform a candle jar into an adorable DIY Dog Treat Container! This easy upcycle is a perfect place to store dog treats and will add a decorative touch to your kitchen!

This post is part of a social shopper marketing insight campaign with Pollinate Media Group® and the J.M. Smucker Company, but all my opinions are my own.  #pmedia #miloskitchen http://my-disclosur.es/OBsstV

Because Jasper is such an important member of our family, it only seemed right to involve him in my blog.  So, Jasper and I got to work on our first mother/dog craft project, creating an adorable DIY Dog Treat Jar filled with delicious Milo’s Kitchen home-style dog treats that he cannot resist!  

Transform a candle jar into an adorable DIY Dog Treat Container! This easy upcycle is a perfect place to store dog treats and will add a decorative touch to your kitchen!

Supplies Needed to Make a DIY Dog Treat Jar

  • Unfinished wood pedestal
  • Unfinshed wood circle cutout
  • Unfinished wood knob
  • Wood stain
  • Black spray paint
  • Glass jar (I used a candle jar that I cleaned and removed all wax from)
  • Glue that binds wood and glass
  • Dog bone sticker OR vinyl cutting machine and vinyl

How to Make a DIY Dog Treat Jar

In order to get your dog pumped up to craft** with you, I highly recommend bribing him or her with Milo’s Kitchen home-style dog treats, because meat is the #1 ingredient and your dog will basically do whatever it takes to get some!  (**By “craft” I mean lie under the table on your feet while you work.) 

Step One: Stain or Paint the Wood Pieces of the Dog Treat Jar

Jasper and I began by using our favorite pre-loaded stain cloths to add some color to an unfinished wood pedestal, a flat wooden circle cutout, and an unfinished wood knob.  

Transform a candle jar into an adorable DIY Dog Treat Container! This easy upcycle is a perfect place to store dog treats and will add a decorative touch to your kitchen!

Transform a candle jar into an adorable DIY Dog Treat Container! This easy upcycle is a perfect place to store dog treats and will add a decorative touch to your kitchen!

Step Two: Decorate the Glass Jar

We set those aside to let them dry, and then we got to work customizing a glass jar that would hold the treats. 

We used a glass candle jar that I cleaned out for this project because I liked the shape, but if you don’t have one of those, you could easily use a mason jar or empty pasta sauce jar!

Transform a candle jar into an adorable DIY Dog Treat Container! This easy upcycle is a perfect place to store dog treats and will add a decorative touch to your kitchen!

To help you with any of those glass jars that you might be using, here are some helpful tips on getting glass jars ready for crafts.

How do you clean out a jar candle for crafts?

I cleaned out this candle jar by melting the rest of the candle and pouring out the wax.  For the remaining wax residue inside the candle, I ran hot water over it until it softened, and then scraped it out.

How do you remove labels from glass jars for crafts?

To get labels off of jars, I soak them in water and remove as much of the label as I can by scraping it off.  If any parts are stubborn, I spray them with GooGone and let it work its magic.  

How do you remove ink stamps from glass jars for crafts?

Swap acetone or acetone nail polish remover over date stamps or other ink stamps on glass jars to remove them.  This gets them nice and clean for crafting!

Once your jar is ready, you’ll want to make it pretty!

I downloaded a dog bone shape and cut it out on my electronic cutting machine.  If you don’t have a cutting machine, just buy cute stickers in the scrapbook section of your favorite craft store.  I promise you’ll find something great!

Transform a candle jar into an adorable DIY Dog Treat Container! This easy upcycle is a perfect place to store dog treats and will add a decorative touch to your kitchen!

Attach your vinyl cutout or sticker to your clean jar for a cute, decorative touch!  

Transform a candle jar into an adorable DIY Dog Treat Container! This easy upcycle is a perfect place to store dog treats and will add a decorative touch to your kitchen!

Step Three: Glue the Glass Jar to the Wood Pedestal

Next, use a highly-adhesive glue that bonds wood and glass to attach the glass jar to the wood pedestal.  Make sure to double check that your glue will work for this type of bonding!  Not all glues do.  

Transform a candle jar into an adorable DIY Dog Treat Container! This easy upcycle is a perfect place to store dog treats and will add a decorative touch to your kitchen!

Step Four: Paint the DIY Dog Treat Jar Lid

While that is drying, spray paint the lid of your candle jar to be the color you want.  I chose black to mimic the black dog bone on the front of the jar.  

Step Five: Glue the Wood Pieces to the Lid

Once the lid dried, I glued the wooden circle and wooden knob to the lid in order to hide some raised text that was on there, and to add a nice finishing touch to the piece!  

Transform a candle jar into an adorable DIY Dog Treat Container! This easy upcycle is a perfect place to store dog treats and will add a decorative touch to your kitchen!

When the glue on both parts of this project dried, this DIY Dog Treat Container was ready to go! 

I got to work filling it with Milo’s Kitchen home-style dog treats and placed it on my kitchen counter so that my family will have easy access to the dog treats that Jasper loves!  

Transform a candle jar into an adorable DIY Dog Treat Container! This easy upcycle is a perfect place to store dog treats and will add a decorative touch to your kitchen!

This DIY Dog Treat Container is such a cute addition to my kitchen!  (Not pictured here: Jasper trying to jump onto the counter to get his treats.  Bad dog!)

Transform a candle jar into an adorable DIY Dog Treat Container! This easy upcycle is a perfect place to store dog treats and will add a decorative touch to your kitchen!

Transform a candle jar into an adorable DIY Dog Treat Container! This easy upcycle is a perfect place to store dog treats and will add a decorative touch to your kitchen!

I truly believe that nothing says “I love you” more than something made with love and care.  That’s why a homemade dog treat container and Milo’s Kitchen home-style dog treats go hand in hand; they’re perfect for any dog who is a cherished member of your family!

Do you believe that dogs are family, too?  How do you show your pet that you love him or her?

-Bre

Filed Under: Crafts

Dollar Tree Silver Tray Wreath

September 19, 2017 by Bre 6 Comments

blank

Over the years I’ve made quite a few pieces of door decor or wreaths from Dollar Tree supplies.  (Take my Fourth of July Tinsel Wreath or my Egg Tray Wreath for Easter, for example.)  I just can’t help myself!  Every time I go to Dollar Tree I find cute new supplies that call out to me, and I am forced to create.  It’s a real problem, friends (the creating and the fact that products at Dollar Tree talk to me.  HA!)!  On a recent trip, I bought supplies to make an atypical fall wreath for my backdoor – and today I’m going to show you how to transform a Dollar Tree silver tray from the party supply section into a beautiful Silver Tray Wreath!  Transform a silver tray into a wreath! Learn how to make a Dollar Tree silver tray sparkle as a beautiful fall wreath in this post.

Supplies Needed to Make a Silver Tray Wreath

Some of these links are affiliate links.  Please read my full disclosure policy here.

  • Silver tray (I purchased a nickel plated metal serving tray at Dollar Tree)
  • Chalkboard paint
  • Paintbrush
  • Light gray and dark gray acrylic paint
  • Sponge
  • Chalk
  • Faux fall leaves (I also purchased them at Dollar Tree, but here’s an alternative)
  • Hot glue gun and hot glue
  • Mini 3M Command Hooks
  • Ribbon

How to Make a Silver Tray Wreath for Fall

I started with this plain silver tray from the party supply section at Dollar Tree.  These are actually really sturdy and they come in three shapes/sizes.  They’re great for crafting and entertaining!  Transform a silver tray into a wreath! Learn how to make a Dollar Tree silver tray sparkle as a beautiful fall wreath in this post.

Next, I turned the center of the silver tray into a chalkboard with my favorite chalkboard paint.  I used two coats of chalkboard paint to make sure there was good coverage!  Transform a silver tray into a wreath! Learn how to make a Dollar Tree silver tray sparkle as a beautiful fall wreath in this post.

Once the chalkboard paint was dry, I worked to take the shine down on the silver tray, and to make it look like it is aged or antique.  I began by lightly sponging on acrylic paint in a light gray color.  I gently dabbed the light gray paint all around the edge of the tray.Transform a silver tray into a wreath! Learn how to make a Dollar Tree silver tray sparkle as a beautiful fall wreath in this post.

When that light gray paint dried, I then used by sponge to rub dark gray acrylic paint along the raised portions of the silver tray.  Unlike with the light gray paint where I dabbed the color on, this time I rubbed the color on in order to accent those raised portions of the tray.  Transform a silver tray into a wreath! Learn how to make a Dollar Tree silver tray sparkle as a beautiful fall wreath in this post.

This painting technique went a long way toward giving my Dollar Tree silver tray an aged look!  Transform a silver tray into a wreath! Learn how to make a Dollar Tree silver tray sparkle as a beautiful fall wreath in this post.

Once that paint dried, I cut leaves off of my Dollar Tree fall leaf garland and began to hot glue them around the bottom 1/3 to 1/2 of the silver tray.  I layered them and angled them in different ways, rather than lying them flat and in a row.Transform a silver tray into a wreath! Learn how to make a Dollar Tree silver tray sparkle as a beautiful fall wreath in this post.

Transform a silver tray into a wreath! Learn how to make a Dollar Tree silver tray sparkle as a beautiful fall wreath in this post.

Next, I flipped the tray over and attached two 3M Mini Command Hooks to the back, upside down.  These things are my go-to for just about everything that needs a hook.  I love them!  I then ran a ribbon through the hooks and tied it at the top.  Transform a silver tray into a wreath! Learn how to make a Dollar Tree silver tray sparkle as a beautiful fall wreath in this post.

Then I flipped the tray over and gently ran a piece of chalk all over the chalkboard portion of the tray to season it.  Next, I tried to write “Hello” in fancy script on the front.  (Note: need to practice chalkboard lettering!)  Transform a silver tray into a wreath! Learn how to make a Dollar Tree silver tray sparkle as a beautiful fall wreath in this post.

Before I hung up my Silver tray wreath, I bent my ribbon streamers and hot glued them to the edges of the tray.  Then my silver tray wreath was ready to be displayed on my backdoor!  Transform a silver tray into a wreath! Learn how to make a Dollar Tree silver tray sparkle as a beautiful fall wreath in this post.

I love the pretty touch it adds to the door, and it was such an affordable way to bring some charm to the back porch!  Transform a silver tray into a wreath! Learn how to make a Dollar Tree silver tray sparkle as a beautiful fall wreath in this post.

Can you see why I love to go to Dollar Tree so much?  What’s your favorite thing to buy there?  Also, if you enjoyed this project, I would appreciate it if you would PIN it to share the love!  Transform a silver tray into a wreath! Learn how to make a Dollar Tree silver tray sparkle as a beautiful fall wreath in this post.

-Bre

You Might Also Like This Dollar Tree Project!

DIY Fork, Spoon, and Knife Kitchen Plates Decor

blank

Filed Under: Crafts, Dollar Tree, Fall and Halloween, Holiday

Dollar Tree Pizza Pan Craft: Pretty Memo Board

August 9, 2017 by Bre 4 Comments

blank

Pizza pans from Dollar Tree are the new “hot” crafting item.  People have so many creative ways to use them, and I’m going to add another Dollar Tree pizza pan craft idea with this pretty memo board project!

It's so easy and fun to make a pizza pan magnet board! This inexpensive project will help you get organized in a stylish way.

This is a great project because it is really fast to make and the supplies used are inexpensive!

Supplies Needed to Make a Dollar Tree Pizza Pan Memo Board

Some of these links are affiliate links, which means I earn a small commission at no added cost to you if you purchase through them. To read my full disclosure policy, please click here.

  • Pizza pan (they’re $1 at Dollar Tree – don’t buy anywhere else!)
  • Scrapbook paper
  • Spray adhesive (permanent)
  • Elmer’s ProBond Adhesive
  • Pencil
  • Scissors
  • Multi-surface acrylic paint or chalky finish paint in the color of your choice (I used this paint)
  • Small paintbrush
  • Natural Rope (1/4″ thick)
  • Ribbon
  • Small 3M Command Hooks

It's so easy and fun to make a pizza pan magnet board! This inexpensive project will help you get organized in a stylish way.

Dollar Tree Pizza Pan Craft Instructions

This pizza pan craft project is fun to make!

Step One: Paint the Pizza Pan

To begin, flip the pizza pan so its upside down, and paint around the outer edge.  This will ensure that if your scrapbook paper circle isn’t perfectly shaped (mine definitely was not!), it will still look nice and not as much like a pizza pan!  

It's so easy and fun to make a pizza pan magnet board! This inexpensive project will help you get organized in a stylish way.

What kind of paint do you use on a pizza pan?

Make sure to use a paint that has good adhesion properties!  I used chalk paint because it sticks to just about anything.  You could also paint a Dollar Tree pizza pan with a multi-surface acrylic paint.  Two coats of acrylic paint will likely be needed, whereas you can probably get away with just one coat of chalk paint.

Step Two: Cut Scrapbook Paper to Fit the Pizza Pan

Once the paint has dried, trace the pizza pan onto the scrapbook paper.  

Then cut about 1/4″ smaller than the circle you traced.  

It's so easy and fun to make a pizza pan magnet board! This inexpensive project will help you get organized in a stylish way.

Step Three: Spray the Pizza Pan and Scrapbook Paper with Spray Adhesive

Next, spray the pizza pan and the scrapbook paper with spray adhesive, and carefully place the scrapbook paper onto the pizza pan.  It will be hard, if not impossible, to move the paper once it’s made contact with the pizza pan, so be very careful in your placement.  

It's so easy and fun to make a pizza pan magnet board! This inexpensive project will help you get organized in a stylish way.

If there is a significant amount of scrapbook paper sticking over one side or the other, you can carefully trim the excess with the scissors.  

Step Four: Add Rope to the Edge

Next, cut a piece of rope long enough to wrap around the pizza pan.  

It's so easy and fun to make a pizza pan magnet board! This inexpensive project will help you get organized in a stylish way.

Glue the rope around the edge of the pizza pan and weigh it down with heavy objects or craft clamps to get it to lie in place and form a strong bond with the pizza pan.  

It's so easy and fun to make a pizza pan magnet board! This inexpensive project will help you get organized in a stylish way.

It's so easy and fun to make a pizza pan magnet board! This inexpensive project will help you get organized in a stylish way.

Step Five: Get the Pizza Pan Memo Board Ready to Hang

When everything has dried, flip the pizza pan over and press two 3M Command hooks to the back of the pizza pan, upside down. 

It's so easy and fun to make a pizza pan magnet board! This inexpensive project will help you get organized in a stylish way.

Run a ribbon through the hooks and tie a bow at the top, and then you’re ready to hang your Dollar Tree pizza pan memo board!  

It's so easy and fun to make a pizza pan magnet board! This inexpensive project will help you get organized in a stylish way.

It is just that easy to upgrade a pizza pan to a stylish and functional magnet board!  

This Dollar Tree pizza pan craft idea is so cute! See how she turned a pizza pan into a cute memo board that's stylish and functional.

Two important things on this to-do list: (1) call mom; (2) buy wine.  (That’s my to-do list; not my daughter’s.)

It's so easy and fun to make a pizza pan magnet board! This inexpensive project will help you get organized in a stylish way.

And I just have to show you these adorable magnets my daughter picked out for her magnet board – they’re animals and pretty glass gems!

It's so easy and fun to make a pizza pan magnet board! This inexpensive project will help you get organized in a stylish way.

I might have to borrow those animal heads for my own workspace!  🙂

If you enjoyed this project, would you please pin it so others can find it, too?  It's so easy and fun to make a pizza pan magnet board! This inexpensive project will help you get organized in a stylish way.

Now that we have a cute magnet board for my daughter’s room, let’s hope that it will help control some of the clutter she manages to keep in there!

-Bre

Filed Under: Crafts, Dollar Tree, Organization

How to do Nail Polish Marbling {A Video Tutorial}

August 2, 2017 by Bre 6 Comments

blank

Two weeks ago my family and I went to Colorado for a vacation and family reunion, and I have not been able to get my you-know-what together to get anything done on this blog!  It’s like my brain is still on vacation!  No creativity happening up there at all.  I think I left it all in the mountains.

That being said, I did have a blast putting together a new video tutorial that shows you just how fun it is to do nail polish marbling!  I made these beautiful marbled Christmas ornaments last year, but it was hard to show just how cool this technique is through photos.

So . . . I snagged a white ceramic bowl and nail polish at Dollar Tree and brought this project to life!  Click to watch the video and be mesmerized!  And then keep reading for three great tips that will make nail polish marbling even better for you!

Now, here are the tips I promised:

Tip One:  get some disposable latex gloves to keep your hands polish free while doing this.  I wish I would have had some on hand!

Tip Two:  wipe off any stray nail polish (like I had on the inside of my bowl), with nail polish remover.  It comes right off!

Tip Three:  if you want to wash your marbled object in the dishwasher, coat the marbling (once dry), with two or three coats of dishwasher safe Mod Podge!

Learn how to make just about any plain object beautiful with nail polish marbling! This post has a video that shows you how to marble with nail polish. It is such a fun technique!

Nail polish marbling is so fun and so easy!  If you enjoyed this video tutorial and my nail polish marbling tips, I’d appreciate it if you would “pin” this post so others can find it, too!

Learn how to make just about any plain object beautiful with nail polish marbling! This post has a video that shows you how to marble with nail polish. It is such a fun technique!

-Bre

Filed Under: Crafts

  • « Go to Previous Page
  • Page 1
  • Interim pages omitted …
  • Page 8
  • Page 9
  • Page 10
  • Page 11
  • Page 12
  • Interim pages omitted …
  • Page 21
  • Go to Next Page »

Primary Sidebar

Let’s Connect!

Hi, I’m Bre! Thanks for visiting Average But Inspired, where I show you how to work with what you’ve got to create a home you love.

Bre of Average But Inspired - a DIY and craft blog

Love DIY? Subscribe to Get Posts E-mailed!

How Can I Help You?

blank

My DIY Kitchen Makeover Reveal!

blank

How to Paint Over Tile

blank

Limewash Stone Fireplace Makeover: Bye Bye Orange Stone Fireplace, Hello Neutral Stone Beauty!

blank

How to Paint a Door to Look Like Wood (It’s Easier Than You Think!)

Looking for Something?

Copyright © 2013-2022, Bre Eggert (Average But Inspired). All rights reserved.
  • Home
  • DIY
  • Crafts
  • Home Decor
  • Privacy Policy and Copyright Policy
  • Disclosures
  • Contact Me