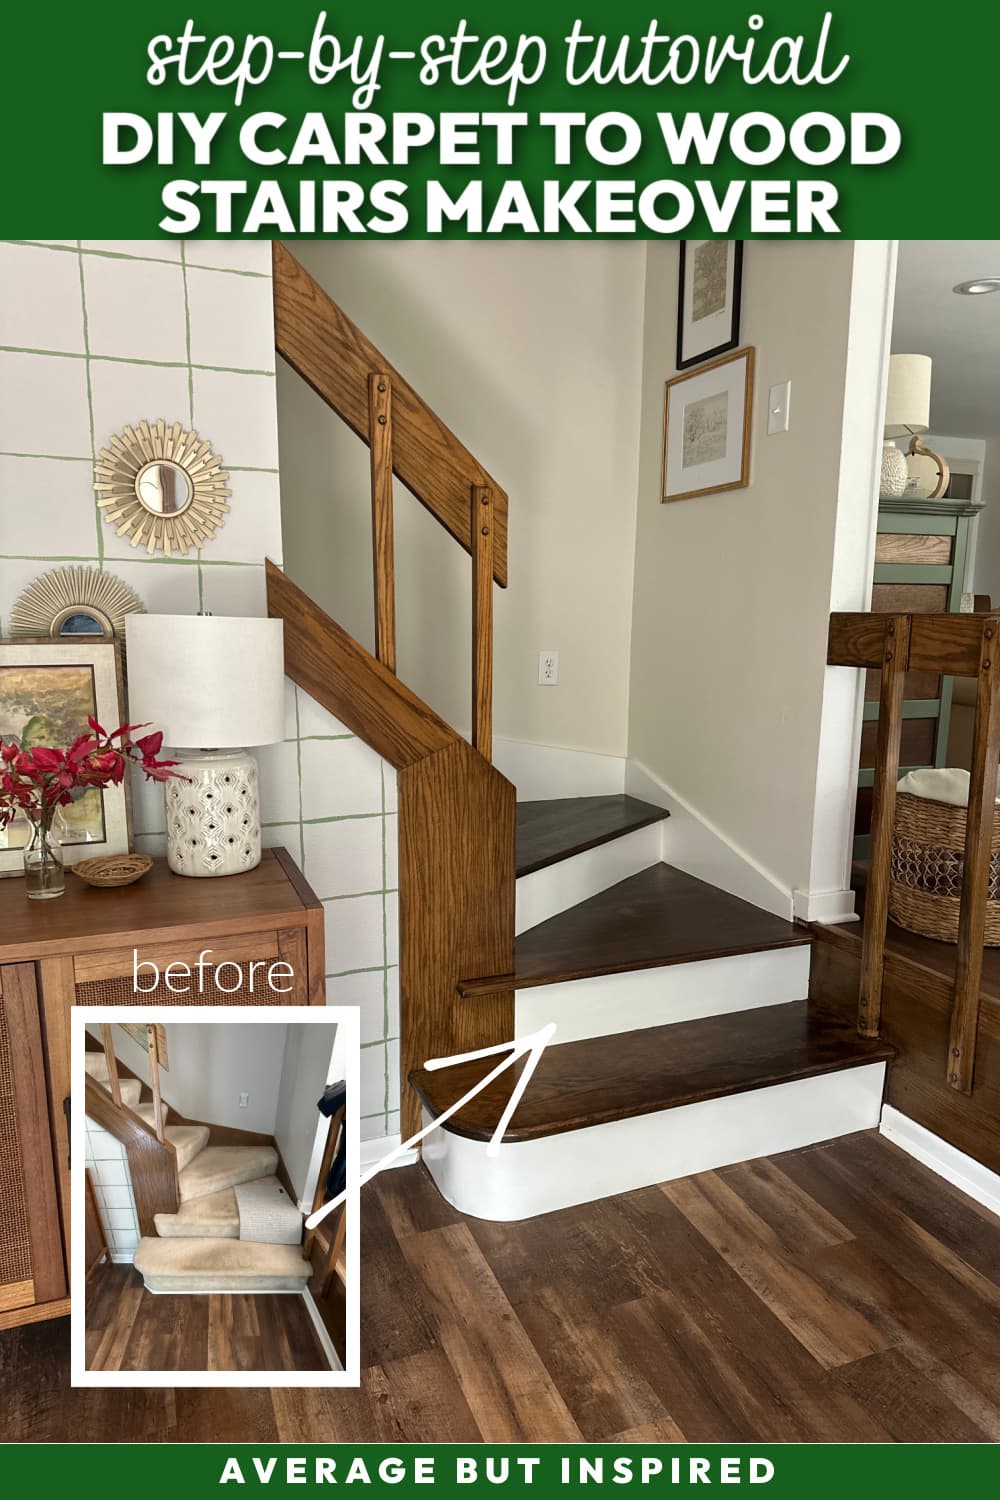
Do you want to update your carpeted stairs with the beautiful look of hardwood stairs? This post will tell you everything you need to know about replacing carpet on stairs with a prettier version of your existing treads.
Buckle up because this project is a doozy. Anyone who tells you otherwise (“it’s so easy!), is misleading you.
That being said, removing old carpet to remodel stairs is definitely a doable DIY. And, it’s 100% worth it. It just takes patience and a lot of time.
And a funny story before we dive in: I did not even intend to do this project! I was pulling up carpet on the stairs so I could paint the skirt board running up the staircase before we had new carpet installed.
But when I found unfinished pine treads underneath the carpet (instead of plywood), I got so excited that I ripped it all out without thinking twice.
And alas, here we are. And I’m so glad because WOW – what a difference this staircase makeover has made in the look and feel of my home!
Supplies Needed to Change Carpeted Stairs to Stained Wood Stairs
Some of these links are affiliate links. For more information, please read my disclosure policy.
Don’t let this supply list intimidate you! You probably have a lot of these tools and materials already. And even if you don’t, they’re not all that expensive.
Not included in this list is wine. But you may want some (or a lot). Wink wink.
Carpet Removal Supplies
- Needle nose pliers
- Trim puller, pry bar, or crowbar
- Hammer or mallet
- Flat head screwdriver
Stair Treads and Risers Materials
- Electric compact sander
- Sandpaper in multiple grits (I suggest 80, 150, and 220)
- Painters tape (delicate surface tape is suggested)
- Paintable latex caulk
- Wood filler (stainable and paintable)
- Putty knife
- Prestain conditioner for oil-based stains
- Gel stain
- Polyurethane (satin finish suggested)
- Stain blocking primer
- Alkyd enamel paint
- Foam brushes
- Stain pad
- Lint-free cloth
- 2″ angled trim brush
- Mini roller and roller tray
- Recommended: tack cloth
General Stair Remodel Supplies
- Safety glasses
- Mask
- Work gloves
- Ear protection / noise protection ear muffs
- Latex gloves
- Utility knife
- Utility shop vacuum
- Paper towels
- Contractor bags (giant trash bags)
- Masking tape
Replacing Carpet on Stairs With Wood: How to Do It
Now that you have a good idea of the materials needed to complete this project, let me walk you through the step-by-step process of this stair makeover.
Step One: Remove Carpet on Stairs
Starting at the top of the staircase, use needle nose pliers to gently pull up the carpet. The carpet should remove from this spot, but if it doesn’t, keep trying in corners until you find an end piece of carpet that pulls up easily.
Once you are able to lift the carpet off the tack strips holding it in place, inspect the treads. You’ll be able to tell if you have:
- A. existing hardwood treads: amazing candidates for refinishing;
- B. pine treads: that’s what I have. They’re not the best because they’re soft, BUT they are workable; or
- C. plywood stairs: you’ll want to paint these (not stain), or skip this project altogether (unless you want to install new hardwood stairs or new treads – a whole other ballgame).

After you’ve assessed the situation, you’ll start pulling the carpet off the stairs by pulling it off the tack strips and down the staircase. You will also remove the carpet padding at this time, too. Hopefully yours isn’t so old that it crumbles all over the place like mine did!
This is really dusty and gross, so make sure you’re wearing a mask, safety glasses, and work gloves. And be careful of the exposed tack strips, which have little nails sticking out all over!
Once the carpet is removed, you can use a utility knife to cut it into smaller sections for disposal. You can also roll it into tubes and fasten them with masking tape. Our garbage collectors took one roll a week for us. 🙂
Step Two: Remove Tack Strips and Staples
With your safety glasses on (trust me: I almost lost an eye during this part of the project!), get started removing all of the tack strips on the unfinished treads.
The easiest way to remove tack strips for me was to place a trim puller under part of the tack strip, and then tap the end of it with a hammer to get it pretty far underneath the strip. (You could also do this with a pry bar or crowbar.)
Then I gently pulled upwards and the tack strip popped up and out of the tread.
Once the tack strips and all their crazy nails were removed, I moved on to removing the staples on the treads that were left over from holding the carpet pad in place.
To remove those staples, I slid a flat head screwdriver underneath the staples and pulled upwards to pop them out of the wood.
Once all of the tack strips and staples were gone, I was left with hundreds of tiny holes all over the stair treads and risers. Fun!
Step Three: Fill the Holes and Gouges
Now it’s time to fill all of those holes left behind from the tack strips and carpet pad staples. Make sure to use stainable and paintable wood filler, and fill in all of those holes.
As I mentioned, my treads are pine. They had some significant gouges in spots, which required a lot of wood filler. While stainable wood filler does accept stain, there is no wood grain there, so large areas of wood filler will not blend in perfectly. I just want you to know that ahead of time – large sections of wood filler will be visible after staining.
Let the wood filler dry, and then decide if you need to add more to sunken spots.
Step Four: Vacuum the Stairs and Sand
What’s left on your staircase at this point is a whole lotta mess. You’ll definitely want to vacuum before you start sanding, because otherwise you’ll be sending debris flying everywhere.
Next, put some heavy duty sandpaper on your electric sander and get to work. It’s time to smooth out those unfinished risers and treads.
I used 80 grit sandpaper on the treads and sanded for what felt like forever. I used 150 grit on the risers because they weren’t in as bad of shape.
This sanding process made a TON of dust, so I had my son help me at times and hold the Shop-Vac nearby as I sanded. It didn’t prevent all the dust from covering my home, but it helped somewhat.
Once all the sanding was done, I vacuumed again and wiped down everything to remove as much dust as possible. If you have a tack cloth, that would be great to use at this point.
Step Five: Stain the Stair Treads and Top Coat Them
FINALLY you’re reaching the part of the project where you see some real progress being made. And, just so we’re all on the same page, I am writing this tutorial from the perspective of the treads being UNFINISHED. (Your staining process may be different if you find finished hardwood stairs under your old carpet.)
Staining Stair Treads
Working on every other stair tread (this is VERY important!!), apply prestain conditioner to the unfinished treads. Prestain conditioner is essential when using gel stain on unfinished wood. If you don’t use it, you’ll have splotchy and ugly stairs. (Don’t say I didn’t warn you!)
Once the prestain conditioner has set and been wiped off per the directions on the can, apply a coat of gel stain to each tread. I suggest using a stain pad to apply it, and wiping off the excess stain almost immediately (as opposed to letting it sit for a few minutes).
I used Minwax Gel Stain in the color Coffee, because it looked the best with my luxury vinyl plank floor at the bottom of the staircase.
For more information on working with gel stain, read my blog post on Helpful Gel Stain Tips and Tricks!
Let the gel stain dry on these treads for the suggested amount of time (typically 8 hours), and then repeat the process on the alternate stair treads that haven’t already been stained.
Apply Topcoat to Treads
When the gel stain is completely dry, it’s time to protect the beautiful stained finish on the treads.
Again, working every other stair, use polyurethane in a satin finish, and follow the directions on the can to apply three coats. Think about how much wear and tear stairs take. They need a lot of protection!
TIP: I put a piece of painters tape on the treads that did not have polyurethane on them. This gave a visual marker of where we could walk, and helped us avoid any missteps!
Once the polyurethane is dry on the wood treads, repeat this process on the other stair treads. (And, move your painters tape to the polyurethaned treads that are now walkable.)
Step Six: Paint the Risers and Skirt Board
Polyurethane can take awhile to cure, so I suggest leaving a few days in between topcoating the treads and painting the risers.
Once you’re ready for this part, put down delicate surface painters tape on the stair treads. If there are gaps between the risers and treads, run a bead of paintable latex caulk in those gaps to make a seamless look.
Once the caulk – if any – has dried, apply a stain blocking primer to the risers. You’ll want a stain blocking primer because chances are some of your new gel stain from the treads got on the risers. You don’t want that seeping through your fresh paint, so pay a little extra to get the good primer.
Then, use an angled trim brush to paint the edges of the risers, and a mini trim roller to paint the rest of the risers. You’ll want at least two coats of paint for a durable finish.
I also painted the skirt board going up the wall and stairs.
I chose a white paint (Dove White by Benjamin Moore), for a clean look and nice contrast against the dark wood treads.
Note: I will be writing a separate post about the curved riser at the bottom of the staircase. That was an entire project that’s too detailed to cover here.
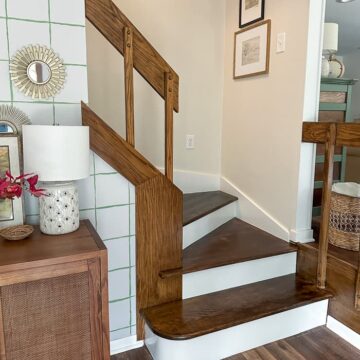
The Completed Stairs Makeover
Goodbye carpeted stairs, hello beautiful staircase!
This project has made all the difference in my house. To be honest, this staircase embarrassed me with its dingy carpet and wonky trim at the base.
Now it makes a beautiful first impression when people come through my front door. (P.S. I painted the walls in the stairwell and upstairs hallways, too.)
The curved staircase with its small landing are now architectural details that are celebrated instead of hidden.
And, while I would feel confident leaving the staircase as it is now, post-makeover, I had a runner installed. It’s a gorgeous, modern stair runner and I’d love for you to check it out in that linked post!
**Not shown here: we are getting new carpet upstairs, so the carpet will wrap over the top tread and be stapled underneath the tread where the top riser meets the tread. You can do that with your old carpet as the transition point.
If you’re thinking of removing your old carpet and remodeling your staircase as I did, my biggest piece of advice is to know that it’s not a fun project, but it will be worth it!
Finally, I tried to be as thorough in this post as possible without getting too far into the weeds. So, please leave me a comment with any questions or compliments! I appreciate you checking out my “new” wood stairs!